Dreamy Room Level 170
Dreamy Room Level 170 guide - Dreamy Room 170 Walkthrough & Solution.
Important Notice Regarding Level Numbering
Due to frequent changes in Dreamy Room's level numbering and differences between platforms (Android/iOS) – for example, level 170 on Android might not be the same as level 170 on iOS – the text guide below may not always match the images and video above. Please prioritize the image and video guides. If you find that the guide content doesn't match your current level, please visit the All Level Walkthroughs page to find the correct guide based on level images. Thank you for your understanding.
Dreamy Room Level 170 Walkthroughs & Guide
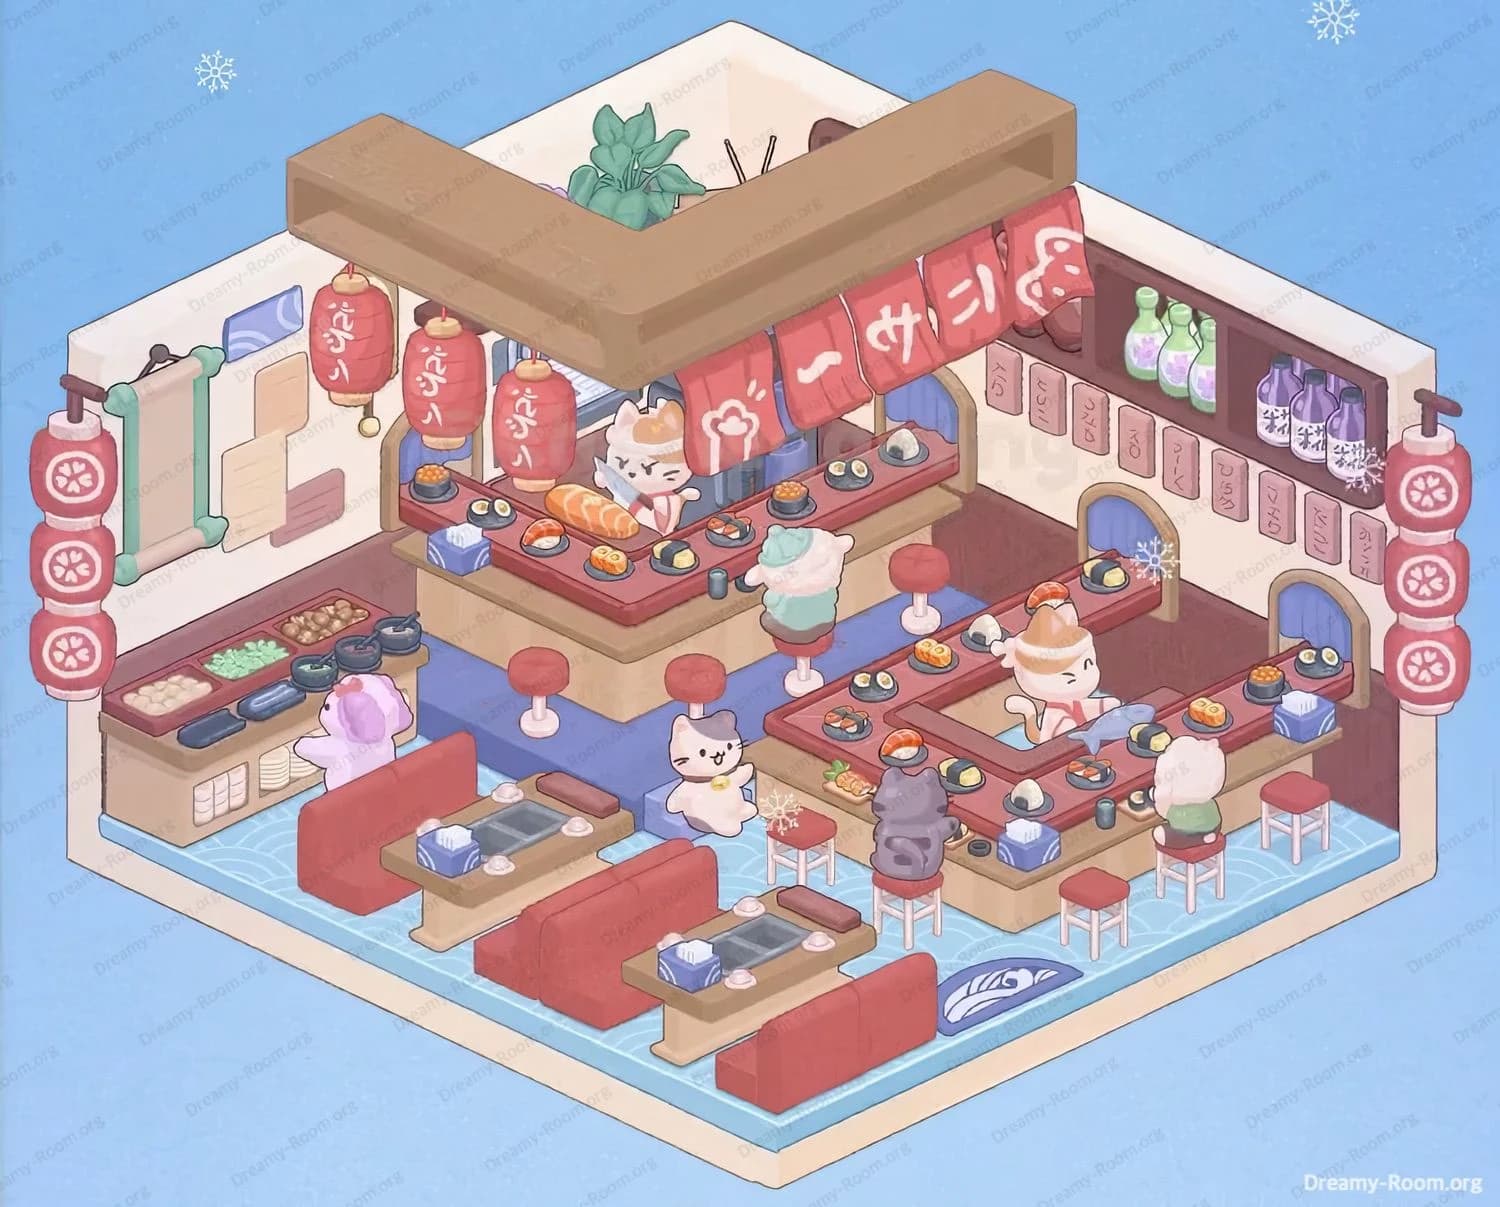
Step 1. Place the wave-patterned floor tile in the center
In Dreamy Room Level 170, the very first task is to lay down the distinctive light-blue wave-patterned floor tile in the empty isometric room. In Dreamy Room Level 170, flooring alignment will determine how objects snap into place later, so you need to position the tile orientation exactly as depicted—curved arcs pointing toward the front edge. When you place that tile flush with both back walls, ensure the pattern extends seamlessly from left to right. Because Dreamy Room Level 170’s main challenge is determining the correct placement for each object, misaligned flooring could throw off every subsequent piece. Take your time to rotate or nudge the floor tile so that each semicircle lines up perfectly. Once the floor is correctly placed, you’ll have a solid foundation to build upon. In this Dreamy Room Level 170 walkthrough, we emphasize the importance of this base layer for creating the cozy sushi bar ambiance that unfolds in later steps.
Step 2. Install the L-shaped sushi bar counter against the back walls
Next in Dreamy Room Level 170, position the main L-shaped sushi bar counter along the back corner junction of the two walls. The lower counter piece is a warm brown wood base; place it snugly against the lower half of both walls. On top of this base, dock the darker reddish-brown countertop so that it forms an inner U shape, leaving space for stools in the center. Above the counter, attach the matching wooden canopy beam flush with the top of the beige walls—this creates the overhang that will hold lanterns later. Remember, Dreamy Room Level 170 demands precise angle alignment: the canopy must mirror the angle of the corner walls exactly. If the beam shifts even a few degrees, lantern hooks and banners won’t align properly. Because Dreamy Room Level 170 tests your spatial reasoning, double-check that every edge of the counter is flush before moving on. This counter assembly anchors the entire sushi bar theme.
Step 3. Add seating elements: bar stools and booth tables
In Dreamy Room Level 170, once the bar structure is secure, it’s time to populate the room with seating. Start by placing the seven small round bar stools with red cushions around the inner and outer edges of the sushi bar counter: three along the right-hand leg, two along the front, and two on the left. Each stool snaps onto the floor grid—be sure each leg touches the floor tile exactly. Next, position the three booth tables in the bottom-left quadrant: each table features a light-wood top with built-in induction cooktop, a matching bench with deep red upholstery, and a neatly placed blue napkin box at one corner. Place one booth flush against the left wall and two more booths parallel to the front edge, equally spaced. Because Dreamy Room Level 170 focuses on finding the correct spot for every piece, take your time with each snap-point. Perfectly placed seating sets the stage for the bustling sushi service.
Step 4. Hang decorative lanterns, banners, and wall accents
Now in Dreamy Room Level 170, it’s time to embellish the scene with atmospheric details. Hang five red cylindrical lanterns under the wooden canopy beam: three along the back leg and two on the right leg, each spaced evenly. Next, drape the red sushi banners with white motifs beneath the canopy overhang, forming a continuous curtain across the front of the counter. On the left wall, attach the vertical scroll and the small rectangular paper notes precisely as shown—these pieces give the room character. On the right wall, mount the sake bottle shelf: arrange three green and three purple bottles neatly on two tiers. Finally, tuck a leafy potted plant behind the back-left section of the counter. Because Dreamy Room Level 170 demands precision, ensure each decorative element “clicks” into place exactly on its hook or shelf. These accents bring the sushi bar to life.
Step 5. Arrange sushi plates, utensils, and character figures
The final step in Dreamy Room Level 170 is to stage the sushi service and populate the scene with charming cat characters. Place a variety of sushi plates—nigiri with salmon, tuna, and shrimp; rice balls (onigiri); and sushi rolls—on the countertop in front of the chefs. Position soy sauce dishes, chopsticks, and tea cups at each seating spot. Add two cat sushi chefs behind the counter: the main chef slicing a large salmon log at center, and the assistant chef working on nigiri at the right-hand side. Finally, place four cat customers on the stools and bench seats: a white cat with a green collar, a gray cat with a red scarf, a black cat on the far-right stool, and a purple cat waiting by the ingredient station. Because Dreamy Room Level 170 revolves around correct placement, take a moment to adjust each figure until they face the counter and interact naturally with the sushi plates.
Notes and Precautions
- Grid Snapping: In Dreamy Room Level 170, every object snaps to an invisible grid. If a piece won’t attach, it’s likely misaligned by a half-tile.
- Rotation Lock: Use the rotate tool sparingly; the game locks orientation once you confirm placement.
- Undo Option: There is no unlimited undo—plan ahead before placing heavy structures like the canopy.
- Item Overlap: Decorative items must not overlap; if one piece blocks another’s snap-point, you may need to remove and re-place in sequence.
Tips and Tricks from Top Player
- Work from Back to Front: In Dreamy Room Level 170, always build the scene starting with flooring, then walls, then counters, and finally décor—to prevent blocking snap-points.
- Use the Preview Tool: Hover over an object before placement to see its footprint; this tip is vital in Dreamy Room Level 170 when space is tight.
- Save Early, Save Often: Make small saves at each major step in Dreamy Room Level 170, so you can revert if later pieces refuse to snap.
- Color-Coding: Memorize each palette (reds for lanterns, browns for wood) to speed up object selection during Dreamy Room Level 170.
Final Scene Description
In the completed Dreamy Room Level 170 scene, you are greeted by a warm sushi bar tucked into a cozy L-shaped corner, its smooth reddish-brown counter crowned by a matching wooden canopy beam. Beneath five glowing red lanterns and a cascade of red sushi-print banners, two cat chefs animate the scene—one expertly slicing a salmon slab, the other carefully crafting nigiri pieces. Along the inner U of the counter, seven red-cushioned stools invite four feline patrons who sample sushi rolls, onigiri, and glossy nigiri with soy sauce dishes and tea cups at their sides. To the left, three booth tables with built-in induction cooktops and plush red benches create an intimate dining area, each topped with crisp blue napkin boxes. A shelf of green and purple sake bottles lines the right wall, while a decorative scroll and paper notes adorn the left. The light-blue wave-patterned floor ties the room together, echoing a gentle sea breeze and completing the tranquil sushi bar ambience of Dreamy Room Level 170.