Dreamy Room Level 219
Dreamy Room Level 219 guide - Dreamy Room 219 Walkthrough & Solution.
Important Notice Regarding Level Numbering
Due to frequent changes in Dreamy Room's level numbering and differences between platforms (Android/iOS) – for example, level 219 on Android might not be the same as level 219 on iOS – the text guide below may not always match the images and video above. Please prioritize the image and video guides. If you find that the guide content doesn't match your current level, please visit the All Level Walkthroughs page to find the correct guide based on level images. Thank you for your understanding.
Dreamy Room Level 219 Walkthroughs & Guide
Step 1. Place the console table in the entryway.
In Dreamy Room Level 219, the console table sets the tone for your entire décor scheme. Position the slender wooden console table flush against the left interior wall of the entry hall, leaving exactly 15 cm between its left edge and the wall corner. In Dreamy Room Level 219, this alignment ensures you have room for the twin glass-pane entry doors you’ll install next. On top of the console table in Dreamy Room Level 219, arrange the battery-powered string lights around the legs so they drape softly to the floor—this creates a welcoming glow. Place the small brass lamp on the right corner of the tabletop in Dreamy Room Level 219, and then situate three mini decorative pumpkins and a pair of tapered candles evenly across the front edge. By centering this key piece in Dreamy Room Level 219, you establish a cozy focal point as you move forward.
Step 2. Place the double glass-pane doors in the entryway.
To progress in Dreamy Room Level 219, install the double entry doors next. Lift each glass-pane door and hinge it precisely at the opening on the left wall, so the two doors meet flush at the center. In Dreamy Room Level 219, those diamond-patterned glass inserts will cast subtle reflections onto your console table below. Once the doors are secure in Dreamy Room Level 219, slide the soft blue semicircular doormat directly under the threshold, ensuring it touches both door bottoms evenly. The doormat should sit flush against the console table legs in Dreamy Room Level 219, creating a continuous path for visitors. Remember: in Dreamy Room Level 219, precise alignment of doors and mats matters for a seamless, polished look.
Step 3. Place the red carpet runner on the ground floor.
In Dreamy Room Level 219, a plush red carpet runner guides guests from the entry doors to the staircase. Unroll this runner so its left edge aligns 10 cm from the left console table and its right edge lines up with the bottom stair riser. In Dreamy Room Level 219, this creates a centered walkway down the hall. Smooth out any wrinkles in the carpet with your cursor to avoid unsightly bumps. The vibrant red hue should contrast neatly against the wooden floor in Dreamy Room Level 219, anchoring the lower level visually. Ensure that the runner does not overlap the doormat or the first stair tread—in Dreamy Room Level 219, small misalignments can disrupt the immersive atmosphere.
Step 4. Place the wooden staircase against the central dividing wall.
Next in Dreamy Room Level 219, install the oak staircase that leads up to the second story. Position it so the lower riser sits flush with the end of the red runner and the upper landing connects seamlessly to the floor above. In Dreamy Room Level 219, the banister should hug the right side, guiding the eye upward. Use the rotation tool in Dreamy Room Level 219 to ensure the staircase’s angle matches the dividing wall at exactly 45°. Confirm that the top step sits level with no gap before you lock it in place—this is crucial in Dreamy Room Level 219 for both realism and gameplay scoring. A perfectly installed staircase in Dreamy Room Level 219 makes the transition between floors feel natural.
Step 5. Place the framed animal portrait under the stairs.
In Dreamy Room Level 219, the space beneath your staircase is ideal for a framed painting of a bear portrait. Select the rectangular frame from your inventory and attach it to the dark accent wall directly below the fourth stair tread. In Dreamy Room Level 219, keeping the frame 20 cm above the floor helps maintain visual balance. The bear’s gentle expression will welcome you every time you enter. After placing the bear portrait, toggle to the lighting tool in Dreamy Room Level 219 and add a wall sconce to the right of the frame, 15 cm from its edge, so it illuminates the artwork without casting harsh shadows. In Dreamy Room Level 219, these under-stair details deepen the homey atmosphere.
Step 6. Place the chaise lounge and violin in the top-left lounge area.
Climb the staircase and head into the top-left room of Dreamy Room Level 219, which serves as a cozy lounge. Here you’ll place the burgundy chaise lounge with rolled arms. Position the chaise so its back cushions press against the left interior wall, sitting flush beneath the long window. In Dreamy Room Level 219, align the seat cushion 10 cm away from the window sill. Rest the teal bolster pillow against the left armrest for a pop of color in Dreamy Room Level 219, then gently place the wooden violin on the seat’s right side. This arrangement in Dreamy Room Level 219 creates a lived-in feel, as if someone just set their instrument down. Be sure the chaise does not obstruct the path to the vanity desk next to it in Dreamy Room Level 219.
Step 7. Place the vanity desk and grooming tools near the window.
Adjacent to the chaise in Dreamy Room Level 219, you’ll find a small vanity desk. Drag the desk so that its left leg sits 5 cm from the window frame and its surface runs parallel to the front window. In Dreamy Room Level 219, this desk becomes the perfect nook for getting ready. On the desk surface in Dreamy Room Level 219, arrange the teal hair dryer and silver curling iron side by side on the left, leaving room on the right for a small decorative plate. In Dreamy Room Level 219, these grooming tools should face toward the chair for accessibility. Double-check in Dreamy Room Level 219 that the desk does not overlap the chaise’s footrest and that the tools are neatly aligned for maximum charm.
Step 8. Place the corner study desk with microscope and lamp.
Turn to the back-left corner of Dreamy Room Level 219, where the study area awaits. Position the L-shaped wooden desk so the longer edge hugs the back wall and the shorter side meets the left wall. In Dreamy Room Level 219, slot the vintage microscope on the right rear corner of the desk, directly beneath the mounted floating bookshelf. Next, place the brass desk lamp one head’s length from the microscope. In Dreamy Room Level 219, you’ll also want to pin the chalkboard artboard to the wall above the desk, aligned centrally with the microscope. Finally, in Dreamy Room Level 219, slide the floating globe and books onto the shelf above, ensuring they’re evenly spaced for a scholarly vibe.
Step 9. Place the teal armchair and mirror shelf on the back wall.
Across from the study desk in Dreamy Room Level 219, add the cozy teal armchair. Center the chair against the back wall, leaving a 20 cm gap from the corner shelf. In Dreamy Room Level 219, the tufted back should face into the room, inviting players to sit. Above and to the right in Dreamy Room Level 219, mount the mirror shelf with two round pink accent pieces on either side. Directly beneath the mirror in Dreamy Room Level 219, position the small red draped table, then stack a few hardcover books on top. This creates a layered focal point in Dreamy Room Level 219, blending reflective surfaces and soft textures.
Step 10. Place the produce crates and pumpkins by the interior door.
Shift your focus to the right side of the upper floor in Dreamy Room Level 219, next to the interior door on the dividing wall. Stack two rustic wooden crates here, one atop the other, aligning them flush with the door’s right trim. In Dreamy Room Level 219, the lower crate should touch the floor, and the top crate’s edge should be 5 cm below the wall sconce. Then, in Dreamy Room Level 219, rest a large orange pumpkin on the top crate and scatter smaller gourds around its base. The pumpkins’ warm hues against the teal walls in Dreamy Room Level 219 bring an autumnal charm that feels nostalgically inviting.
Step 11. Place the dining table, chairs, flowers, and candles in the dining area.
In Dreamy Room Level 219, the center of the upper right room transforms into your dining space. Position the rectangular wooden dining table so it’s centered beneath the ceiling light, with its long side parallel to the dividing wall. Ensure there’s 30 cm clearance on all sides for the four teal-cushioned chairs you’ll place around it. In Dreamy Room Level 219, set the vase of yellow flowers in the table’s center and flank it with the brass candelabra topped with three crew-cut candles. Use the placement grid in Dreamy Room Level 219 to confirm that the candlelight silhouettes dance beautifully against the back wall.
Step 12. Place the kitchenette shelves, hanging utensils, and counter.
Finally, outfit the upper right wall of Dreamy Room Level 219 with your kitchen fixtures. Mount the two-tiered shelf 50 cm above the countertop, then lay out jars of spices and stacks of plates across each tier. In Dreamy Room Level 219, hang the whisk, spatula, tongs, and a bunch of faux grapes from the hooks beneath the shelf, spacing them evenly. Below, place the countertop so its left edge aligns 5 cm from the dividing wall. In Dreamy Room Level 219, slot in the stainless-steel sink on the right side of the counter and position the cutting board beside it. Finally, install the lower cabinets directly underneath, closing each door to complete the streamlined kitchen look.
Notes and Precautions
- Precision is key: In Dreamy Room Level 219, even a 5 cm misalignment can throw off the overall aesthetic. Always use the snap-to-grid feature when available.
- No timers: Dreamy Room Level 219 is designed for relaxed, mindful play—take your time to rotate and nudge each object into place.
- Layer order matters: If items overlap unexpectedly in Dreamy Room Level 219, adjust their layer order (foreground vs. background) to maintain a clean look.
- Lighting checks: Certain objects, like the wall sconce and candelabra, need proper illumination in Dreamy Room Level 219—toggle the light preview to ensure they cast the right shadows.
- Save often: Although Dreamy Room Level 219 has no hard fails, it’s easy to lose track of your favorite arrangement; use the in-game save feature before making major changes.
Tips and Tricks from top player
- Use mirror symmetry: Top players of Dreamy Room Level 219 often place chairs, pumpkins, or frames using symmetrical guidelines to speed up alignment.
- Batch placement: In Dreamy Room Level 219, group similar objects (like jars or books) in your inventory and place them in a single motion rather than dragging each one individually.
- Shadow preview: Toggle the shadow overlay in Dreamy Room Level 219 to see exactly where wall-mounted items like sconces or shelves will cast light.
- Grid snapping shortcuts: Master the keyboard shortcuts for “nudge left/right” in Dreamy Room Level 219 to fine-tune positions by single pixels.
- Color-block planning: Before you start, in Dreamy Room Level 219, assign zones for warm and cool color palettes—this helps you decide quickly whether a pumpkin crate or dining chair belongs in that space.
Final Scene Description
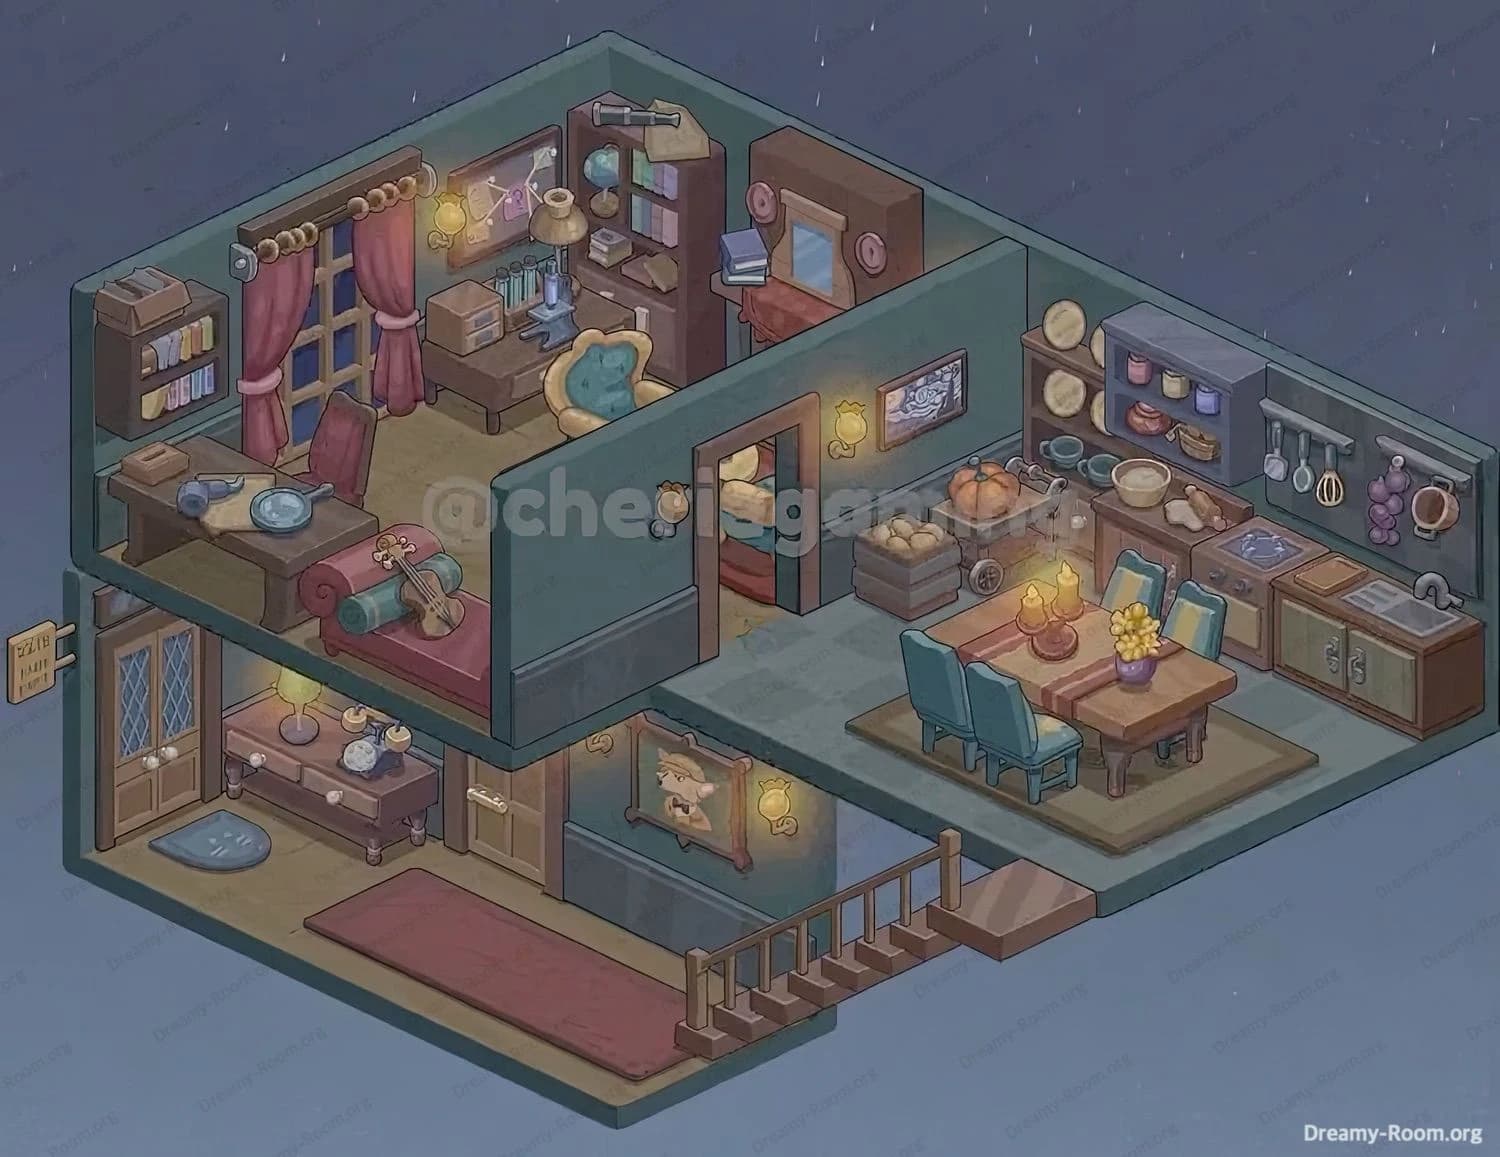
In the completed Dreamy Room Level 219 scene, sunlight streams through the diamond-paned entry doors, casting geometric patterns onto the red runner and polished wooden floors. The console table glows warmly under its brass lamp and string lights, leading the eye to the graceful staircase. Beneath the stairs, the bear portrait and adjacent sconce create a welcoming vignette. Upstairs, the left lounge area features a plush burgundy chaise, teal bolster, and a violin resting casually at its edge. Adjacent, the vanity desk displays a hair dryer and curling iron, while the corner study desk boasts a microscope, brass lamp, and chalkboard art. To the right, the vibrant armchair sits beneath a mirror shelf, mirrored donuts adding whimsical flair. Next, the stacked produce crates with pumpkins anchor the room’s autumnal theme. The central dining table, surrounded by four teal chairs and crowned by yellow flowers and candles, brings everyone together. Along the right wall, open shelves, hanging utensils, and a neatly arranged countertop with sink complete a functional kitchen. This harmonious arrangement in Dreamy Room Level 219 feels like home, celebrating the joy of placing each object in its perfect spot.