Dreamy Room Level 433
Dreamy Room Level 433 guide - Dreamy Room 433 Walkthrough & Solution.
Important Notice Regarding Level Numbering
Due to frequent changes in Dreamy Room's level numbering and differences between platforms (Android/iOS) – for example, level 433 on Android might not be the same as level 433 on iOS – the text guide below may not always match the images and video above. Please prioritize the image and video guides. If you find that the guide content doesn't match your current level, please visit the All Level Walkthroughs page to find the correct guide based on level images. Thank you for your understanding.
Dreamy Room Level 433 Walkthroughs & Guide
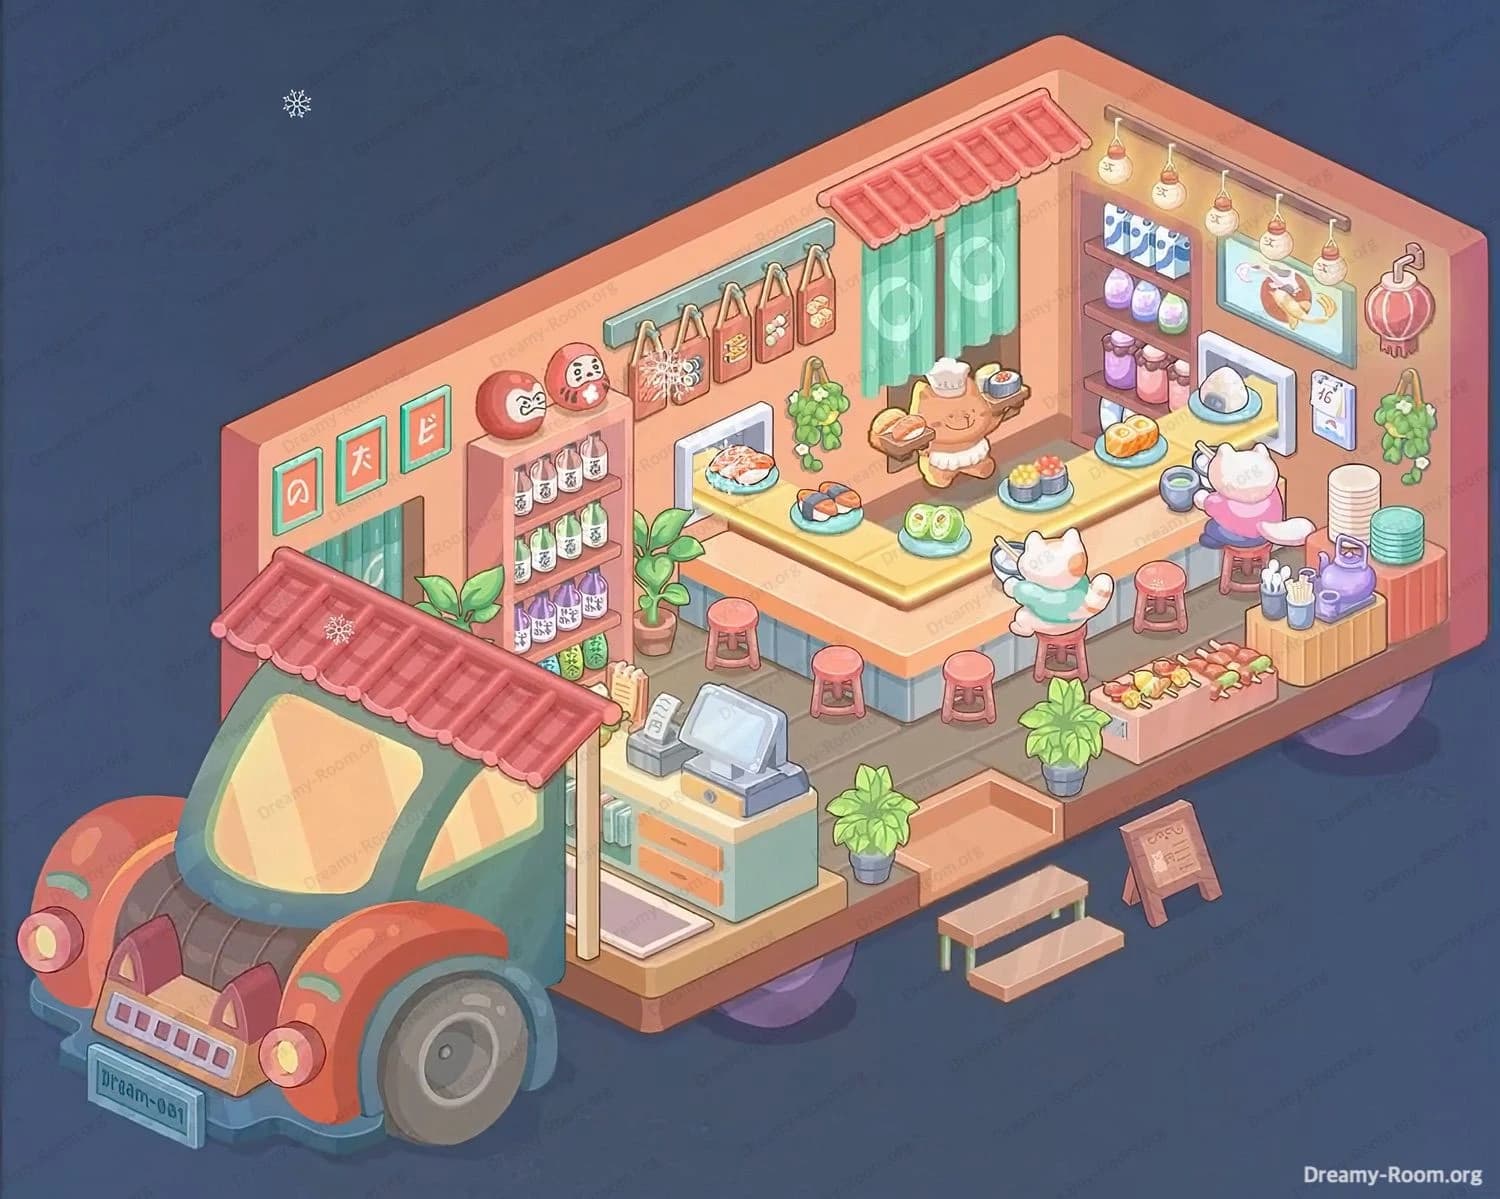
Step 1. Place the food-truck cab at the left exterior.
Begin Dreamy Room Level 433 by docking the vintage, cat-themed truck cab to the outside of the left wall so the windshield faces out and the wheels sit just below the platform edge. Fit the red tiled awning above the cab’s roofline so its eaves align with the wall’s top trim. This establishes the mobile-shop silhouette that defines Dreamy Room Level 433 and anchors every later placement. Add the narrow entrance curtain (green noren) inside the left doorway opening, then sit the stair block at the front right of the platform with the small A-frame chalkboard sign just to its right. Tuck the purple trailer wheels beneath the floor so one is visible near the front and one near the rear. This step sets the footprint and ensures the later counters and seating won’t clip the entrances—the main challenge in Dreamy Room Level 433 is placement.
Step 2. Place the U-shaped service counter in the center-right.
In Dreamy Room Level 433, drag the U-shaped counter onto the middle of the room, letting its open side face the front edge so customers can sit from the outside rim. Push the back straight segment tight against the rear wall, directly under the green curtains with round porthole windows. Line the base panels—blue with gray kickplates—so their corners meet cleanly at both bends. Arrange the red round stools evenly along the front and left arms of the counter; leave a clear gap at the front-right corner to keep the stairs unobstructed. Place two seated cat customers on adjacent stools along the right arm, angled toward the chef. Drop trays of sushi, pastries, and buns on the counter top, spacing them along the inner ledge. This precise loop creates the circulation path that Dreamy Room Level 433 expects and prevents item overlap.
Step 3. Place the chef and prep displays at the rear center.
Now, in Dreamy Room Level 433, position the chef (a cuddly brown cook) behind the center of the back counter segment so they face the seated customers. Put two platters of sushi in front of the chef—one with green-topped rolls, another with nigiri—then a wooden board with baked goods to the right. Snap the small pass-through niche with a plated fish into the rear wall, centered below the curtains; it should read like a warm serving hatch. Add bunches of hanging herbs on both sides of that niche—one pair to the left, one to the right—to suggest freshness. Above the curtains, mount the short red awning inside the room; it must sit just under the ceiling trim. With these anchored, Dreamy Room Level 433 recognizes the cooking zone and unlocks the vibe of a tiny street sushi bar.
Step 4. Place left-wall storage, mascots, and signage near the entrance.
Against the left wall, directly inside the doorway, place the tall shelving unit filled with neatly stacked white packets. Set two round red-and-white Daruma mascots on the top of the shelf—big one left, smaller one right—so they’re visible from the entrance. Slide a small leafy plant to the shelf’s right foot, bridging to the counter corner. Above the doorway, hang the three green square signage panels with cream characters, spaced evenly in a horizontal row. This is essential in Dreamy Room Level 433 because it visually guides players from the exterior cab to the retail interior. Hang a rail of tote bags with cute prints along the upper left of the rear wall so they align just under the red indoor awning and stop before the curtains. The arrangement ensures Dreamy Room Level 433 reads as a retail-plus-dining hybrid.
Step 5. Place right-wall lighting, menu screen, and beverage station.
For Dreamy Room Level 433 to look alive, stretch the string of warm bulbs across the right ceiling edge, running from the rear corner toward the front, evenly spaced. Below the bulbs, mount the large menu screen showing sushi on the right wall, slightly forward of center. To its right, pin a small date card and a vertical red lantern near the back corner. Beneath the screen, install the shelving rack with pastel jars, mugs, and tumblers. At the front-right, build the beverage and plate station: stack mint-colored bowls high, set the kettle and teapot, and line a few cups along the rim. Drop a crate of skewers and snacks at the very front-right corner, facing the customers. Add a trailing plant on the rear right wall hook. This tidy right side prevents clutter flags in Dreamy Room Level 433.
Step 6. Place the cashier, produce, and greenery at the front.
Finish the layout logic that Dreamy Room Level 433 rewards by placing the cashier counter immediately inside the left entrance, facing forward. Seat the register on top, a small scanner to the side, and slide a floor mat just in front. Tuck a potted plant to the right of this counter to soften the transition into the dining zone. Place another leafy plant near the front step cut-out, centered between the stairs and the snacks crate, so the entrance feels welcoming. If you picked up a shallow produce tray, angle it along the front edge of the platform beside the plant to hint at daily specials. Confirm the final micro-alignments: stools parallel to the platform edge, counter corners perfectly mitered, and hanging decor centered. When these snap, Dreamy Room Level 433 recognizes every object is in its correct place—the core challenge of the game.
Notes and Precautions — Dreamy Room Level 433
Mind the pathing grid that Dreamy Room Level 433 enforces along the platform edge; the stairs and chalkboard must not overlap the nearest stool, or customers will appear to “clip.” Keep vertical clearances: bulbs should never intersect the red indoor awning, and the lantern must hang to the right of the menu screen, not over it. Place the chef only after the counter locks; otherwise, they may snap to the wrong tile. Shelving on the left wall must sit flush with the doorway trim; scooting it forward breaks the sightline to the Daruma pair. On the right, the bowl stack belongs on the wood-slat counter, not the wall shelf with mugs. Finally, Dreamy Room Level 433 is lenient with plants, but each pot should touch the floor edge shadow to register as grounded.
Tips and Tricks from top player — Dreamy Room Level 433
Start with big anchors: the cab, U-counter, and stairs. Dreamy Room Level 433 rewards macro → micro sequencing, so you’ll save time by locking those first. Use symmetry cues: the chef aligns with the center of the back curtains, and the fish niche sits exactly under the curtain’s midpoint circles. Duplicate spacing: match the gap between two front stools and reuse that gap near the stair opening to keep flow clean. If a piece won’t snap, rotate the camera subtly (tap-drag) and re-hover; Dreamy Room Level 433 often reveals a valid tile from a slightly different angle. Place decor in “triangles”—for example, Darumas (two) plus the plant (one) form a stable visual group. When in doubt, check shadows; correct placements in Dreamy Room Level 433 always produce consistent soft shadows that kiss the floor edge.
Final Scene Description — Dreamy Room Level 433
The finished scene of Dreamy Room Level 433 is a cozy, rolling sushi-and-snack bar glowing with warm lights. A red-tiled cab snugs the left exterior, while stairs and a chalkboard invite guests at the front right. Inside, a U-shaped counter wraps a cheerful chef at the rear center, framed by green curtains and a tiny pass-through displaying a plated fish. Red stools line the front and left arms where two cat patrons dine. The left wall stacks goods below two smiling Darumas and neat signage, while the right wall glitters with bulb lights, a sushi screen, a red lantern, and shelves of cups. A beverage station with bowls, kettle, and jars sits ahead of a crate of skewers. Soft plants dot corners, the register greets by the entrance, and everything feels perfectly placed—the true triumph of Dreamy Room Level 433.