Dreamy Room Dracula's Chamber Level 11
Dreamy Room Dracula's Chamber Level 11 guide walkthrough.

Share this Guide with your friends:
Dreamy Room Dracula's Chamber Level 11 Walkthroughs & Guide
Step 1. Place the lounge sofas and coffee table in the curved lower-left alcove.
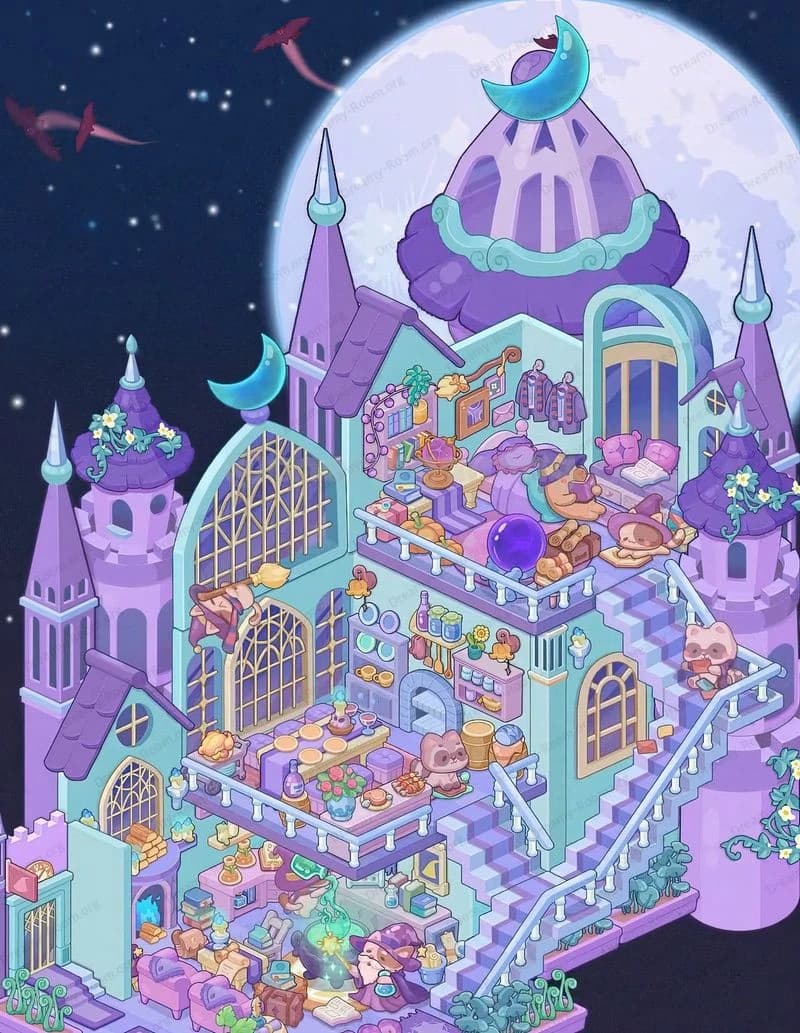
Begin by turning the rounded floor on the lower-left into a welcoming lounge. In Dreamy Room Dracula's Chamber Level 11, slide the longer red-velvet sofa along the inner arc with its back to the curtain wall, then place the matching loveseat opposite so both face inward. Center the oval coffee table between them, with the wine bottle, goblets, and blue glasses on top. Add the heart cushion and pastel pillows to the seating for contrast. Tuck the side end table against the sofa’s right arm and set the candelabra and small trinkets there. This anchoring cluster defines the social area early, a critical placement task in Dreamy Room Dracula's Chamber Level 11. Finish by nestling flower vases at the outer curve to keep the alcove balanced in Dreamy Room Dracula's Chamber Level 11.
Step 2. Place the arched stage window, red drapery, and grand piano behind the lounge.
Now dress the back wall of the alcove with the big arched window and scalloped red theater drapes. In Dreamy Room Dracula's Chamber Level 11, the arc sits perfectly over the piano corner: drop the white grand piano slightly left of center beneath the arch so its open lid mirrors the curve. Add the piano stool in front, plus the pink rose planters to the left and right to soften the instrument. Thread a small blue lantern just to the right edge so moonlight and cool glow mingle. This musical vignette must sit snugly behind the seating so the player can view concerts from the lounge—precise alignment is key in Dreamy Room Dracula's Chamber Level 11. Place a tiny metronome-like ornament on the piano to complete the set for Dreamy Room Dracula's Chamber Level 11.
Step 3. Place the fireplace, gramophone, clock, and wall art along the lower-left inner wall.
Shift focus to the straight inner wall bordering the stairs. In Dreamy Room Dracula's Chamber Level 11, mount the gilt-framed fireplace with twin candleholders directly to the left of the stair opening. Place the elegant gramophone on the cabinet immediately in front of it so the horn points toward the lounge. Drop the grandfather clock just left of that wall cluster, and hang the small framed picture above the mantel to tie the gold accents together. Parade a few blue spirit-flame lamps on low stands along the walkway; their spectral light is a hallmark of Dreamy Room Dracula's Chamber Level 11. Finally, place a small cabinet with drawers near the bottom edge and scatter a pink lamp and crystal to echo the palette and keep everything cohesive in Dreamy Room Dracula's Chamber Level 11.
Step 4. Place the entry arch, wall sconces, haunted tree, coffin, and stair decorations on the lower-right.
On the right ground floor, set the rounded door arch with the small clock centered above it. In Dreamy Room Dracula's Chamber Level 11, hang three blue potion-lantern sconces evenly across the right wall—two flanking the door, one farther left—to create a rhythm of glow. At the base of the stairs, stand the upright coffin with a gold cross and rose garland; then trail skull clusters and teal flames along the first steps. Outside the stair wall, plant the gnarled haunted tree in the slimey green mat and hang skull ornaments and red drapery over its branches. This macabre garden balances the warm lounge. Proper spacing keeps the path readable for the eye, a constant placement puzzle in Dreamy Room Dracula's Chamber Level 11. Confirm the tree does not overlap with the door in Dreamy Room Dracula's Chamber Level 11.
Step 5. Place the alchemy lab on the upper-left balcony.
Climb the stair in your mind to the upper balcony’s left study. In Dreamy Room Dracula's Chamber Level 11, push the dark, obelisk-shaped cabinet loaded with potions to the near-left corner beside the railing. Center the star-carved rug and drop the square alchemy table on it with an open book, skull candle, and assorted vials. On the back wall, mount the wide shelf that features a globe, books, and beakers; set the golden chalice-like vase at its right end. Add the column-like distiller to the corner and a pink-flower bouquet on the floor to soften the lab. The key challenge is aligning shelves so the globe sits under the fence line without clipping, a common precision test in Dreamy Room Dracula's Chamber Level 11. Keep a clear walkway to the stairs in Dreamy Room Dracula's Chamber Level 11.
Step 6. Place the stained-glass windows, vanity, and standing mirror along the upper-right interior wall.
Move to the right side upstairs, in front of the three-pointed stained-glass windows. In Dreamy Room Dracula's Chamber Level 11, position the wooden vanity with drawers beneath the center window and place a pink-flower vase and potion bottle on its top. Angle the gold-trimmed standing mirror to the right of the vanity so it faces the bed area. Drape a small plant on the left to mirror the greenery outside the fence. The placement keeps the light from the stained glass “bathing” the grooming station, a storytelling detail that only lands when objects are centered correctly in Dreamy Room Dracula's Chamber Level 11. Double-check that the vanity edge kisses, but does not cross, the balustrade line in Dreamy Room Dracula's Chamber Level 11.
Step 7. Place the canopied bed, bedside table, cat, cradle, and gold chest in the upper-right suite.
Construct the boudoir. In Dreamy Room Dracula's Chamber Level 11, drop the red-curtained canopy rail so it frames the right bedroom corner; the drapery should hang in front of the glass but stop at the railing. Place the dark chaise-like bed along the railing, the white cat lounging on its pillows. Set the small round side table with a red goblet at the bed’s left. In the far-right nook, install the gilt cradle with pink bedding and the gold-lidded chest or hamper beside it. Ensure the pieces don’t protrude through the fence. This area is a micro-puzzle where every inch matters in Dreamy Room Dracula's Chamber Level 11; the cat on the bed confirms you’ve nailed the spacing in Dreamy Room Dracula's Chamber Level 11.
Step 8. Place the balcony railing, rooftop roses, turret, and hanging lights as finishing touches.
Trace the upper perimeter with the wrought-iron railing pattern, then crown the roofline with the white picket fence and thick rose hedges. In Dreamy Room Dracula's Chamber Level 11, anchor the tiny turret with the pink roof at the back-left crest; weave rose vines so they climb the fence. Add blue hanging lights under the right-hand eaves and along the balcony corners to unify glow across floors. Sprinkle small snowflake particles if your build allows effects—these float against the moon and stars. This is the last alignment test: railings must clip perfectly or the scene looks jagged. Finishing lighting symmetry is often what separates a pass from a near-miss in Dreamy Room Dracula's Chamber Level 11. Keep a visual rhythm in Dreamy Room Dracula's Chamber Level 11.
Notes and Precautions
Dreamy Room Dracula's Chamber Level 11 stresses object adjacency: sofas must face the coffee table, the piano must sit under the arch, and sconces must be evenly spaced. Watch the stairwell edge—wide items like the coffin or skull clusters can overlap the step hitbox if nudged too far. Keep the vanity and mirror clear of the railing to preserve balcony sightlines. The rose fence and turret snap best after the railing is in. If something won’t settle, rotate once and re-place; micro-rotations frequently solve collisions in Dreamy Room Dracula's Chamber Level 11. Finally, remember this series emphasizes calm decorating, not timers, so reposition until the geometry looks natural in Dreamy Room Dracula's Chamber Level 11.
Tips and Tricks from top player
Veterans of Dreamy Room Dracula's Chamber Level 11 block out zones first: lounge, music, entry, lab, and boudoir. Place anchors—the fireplace, piano, canopy rail, and fence—before fillers. Use mirrored pairs (vases, sconces) to check symmetry without rulers. When items feel “off,” turn off grid snap, nudge by a hair, then turn snap back on. Save the spectral blue lamps for last to unify color temperature across floors. If you get stuck, align by story logic: music under the arch, grooming in stained light, experiments near shelves. That narrative approach consistently reveals the intended positions in Dreamy Room Dracula's Chamber Level 11.
Final Scene Description
When complete, Dreamy Room Dracula's Chamber Level 11 glows like a romantic gothic postcard. The curved lounge brims with velvet sofas, a heart cushion, and a laden coffee table. Behind, the arched curtain frames a crisp white piano and roses. To the left, a gold-trimmed fireplace, picture, gramophone, and clock glitter in candlelight. Blue spirit-flames lead to the stairs, where an upright coffin keeps watch and a haunted tree dangles skull charms. Above, a tidy alchemy lab displays globes, books, and potions. Across the balcony, stained glass bathes a vanity and mirror in jewel tones, while a red-canopied bed—with a cozy cat—faces a gilt cradle and chest. Roses crown the fence, a turret peeks over the hedge, and potion lanterns sparkle against the giant moon, completing Dreamy Room Dracula's Chamber Level 11.