Dreamy Room Snowy Day Level 6
Dreamy Room Snowy Day Level 6 guide walkthrough.

Share this Guide with your friends:
Dreamy Room Snowy Day Level 6 Walkthroughs & Guide
Dreamy Room Snowy Day Level 6 — Complete Walkthrough
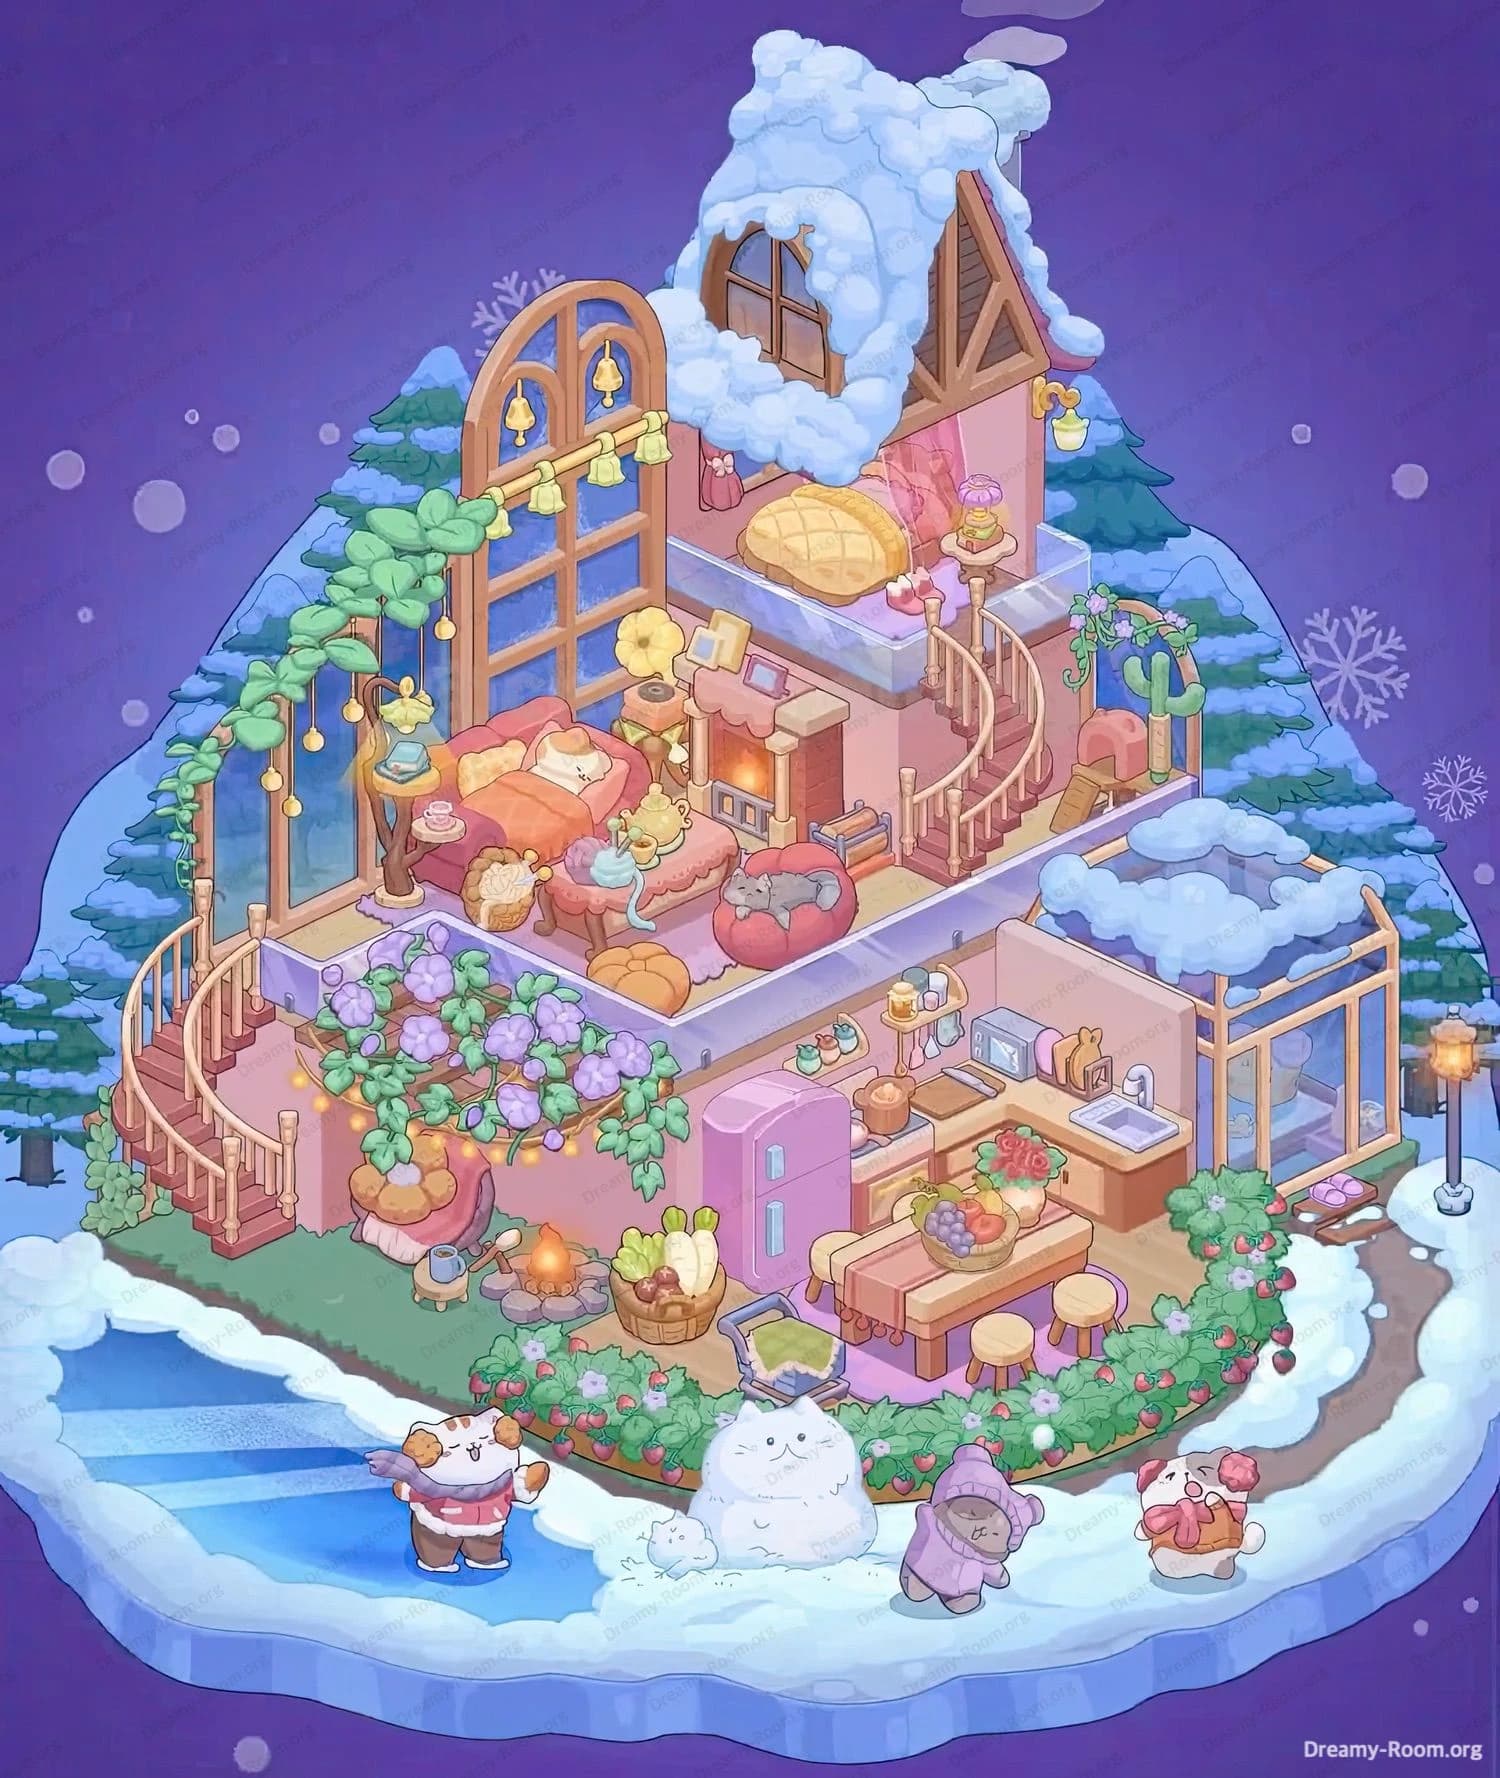
Welcome to this cozy, two-floor winter build! In Dreamy Room Snowy Day Level 6, the challenge is to read the subtle angles of the L-shaped shell and place every piece so pathways, sightlines, and snowy accents click into a single storybook scene. Take your time; the game rewards calm, intentional placement over speed. That gentle, mindful pace is the soul of Dreamy Room, and it shines in Dreamy Room Snowy Day Level 6. :
Step 1. Place the snow roof, gable, and chimney on the upper right loft
Begin Dreamy Room Snowy Day Level 6 by crowning the pink L-shaped house with the heavy snow roof. Seat the tall triangular gable on the upper right, aligning its ridgeline with the short back wall so the iced eaves overhang both the front and right sides. Drop the round dormer window inside the gable and angle a puff of chimney smoke behind it; the smoke should drift slightly left to echo the wind direction. This anchors the upstairs loft and frames the entire composition. Make sure the roof’s deepest snow cap sits above the right spiral staircase landing; that visual weight balances the large arched window you’ll add later on the left. Without this exact placement, later pieces in Dreamy Room Snowy Day Level 6 won’t nest cleanly.
Step 2. Install both spiral staircases and the left veranda
Now, in Dreamy Room Snowy Day Level 6, add the twin spiral staircases that stitch the floors together. The left spiral goes outside the big glass façade, opening from the grassy front into the midfloor balcony; its rail should curve inward, kissing the arched window frame you’ll place next. The right spiral sits indoors at the back-right, climbing to the loft landing under the gable; align its first step just behind the kitchen divider you’ll set later. Extend a slim veranda along the left façade so it wraps the corner, and ensure the left spiral touches its edge. These precise arcs are critical in Dreamy Room Snowy Day Level 6 because they determine walkway clearance for plants, sofas, and the hydrangea ledge lights to come.
Step 3. Raise the arched window wall, bell garland, and vine line on the left
The showcase of Dreamy Room Snowy Day Level 6 is the cathedral-like arched window. Snap it to the midfloor’s front-left edge so its base aligns with the veranda and its curve rises above the sitting area. Hang the triple bell sconce within the upper arch and drape the warm fairy-light string across the outer rail. Behind the rail, plant the tall leafed succulents/cacti in a staggered row that climbs toward the gable; keep their pots inside the veranda line, not on the grass. Tuck a small hanging planter near the loft’s right wall for symmetry. When this glass wall and greenery are square, reflections won’t clash with the sofa colors later, which is a common alignment pitfall in Dreamy Room Snowy Day Level 6.
Step 4. Furnish the midfloor lounge: sofa set, gramophone, tables, and cats
Time to build the warm heart of Dreamy Room Snowy Day Level 6. Place the big orange-coral sofa under the arched window, angled slightly so its right arm points toward the stairs. Add the pumpkin-shaped cushion and a yellow throw. In front, drop the oval coffee table with a tea service; at left, a tiny side table with a kettle and pastry. Push the vintage gramophone and low cabinet against the back wall; the gramophone’s horn should face the sofa. Lay a curved bookshelf under the window ledge for storybook vibes. Set two sleepy cats: one curled atop a round pouf at center, another napping on a plush cushion to the right. This dense cluster is correct for Dreamy Room Snowy Day Level 6 and leaves a walkway to the right kitchen.
Step 5. Arrange the hydrangea ledge, veggie basket, and campfire on the front lawn
Before building the kitchen, step outside in Dreamy Room Snowy Day Level 6. On the midfront ledge beneath the lounge, mount the lavender hydrangea box and weave a string of twinkle lights along its base; the flowers must sit directly under the left balcony so petals peek between the rails. On the grass below, center a large woven basket overflowing with vegetables—corn, cabbage, and carrots—and flank it with a shallow crate. Slightly left of that basket, place a tiny campfire with a kettle tripod; the flame should point toward the ice to illuminate the skating area. Border the lawn with a round bed of red berries and white blooms along the right curve. This outdoor tiering sells depth in Dreamy Room Snowy Day Level 6.
Step 6. Build the kitchen: pink fridge, counter run, appliances, island, and stools
Return inside to the right half of Dreamy Room Snowy Day Level 6. Anchor the tall pink refrigerator at the inner corner where the L-shaped wall turns. Run a wooden counter from the fridge to the back, placing a microwave and toaster on the mid section, and seat the sink beneath the small interior window that looks toward the sunroom. Add spice jars and mugs along the backsplash shelf. Center the chunky island a tile forward of the counter; crown it with a fruit basket (grapes, apples, and a pineapple) and push three round stools along the outside so they face left toward the lounge. This spacing keeps a straight corridor from the front door area to the right spiral. Proper appliance order is critical in Dreamy Room Snowy Day Level 6 for pathing and visuals.
Step 7. Attach the right glasshouse/sunroom and snow-capped awning
Next, in Dreamy Room Snowy Day Level 6, snap the narrow glasshouse to the rightmost edge behind the kitchen, with its roof panes slanting outward and a fresh snow cap resting on top. Place a door mat just inside the threshold and line the sill with small seed trays and potted winter succulents. A slim wooden divider should separate the sink from the glasshouse door; this makes the faucet visually centered. Outside the sunroom, drop a lone warm streetlamp near the snowy path at the lower right—its glow frames the rightmost playing character you’ll add. The glasshouse’s translucence lets you see the snowy landscape through it, a signature look that tells you you’ve matched Dreamy Room Snowy Day Level 6 correctly.
Step 8. Dress the loft: pastry bed, plush shelf, and tiny décor
Climb the right spiral in Dreamy Room Snowy Day Level 6 to stage the loft. Place the whimsical pastry bed—golden bun duvet with lattice texture—so its headboard is against the back wall under the dormer window. Put a small nightstand with a pink lamp at the foot near the railing curve, and a dessert display or plush stack along the short side wall. Add a mini console shelf facing the balcony drop so a little TV or frame can sit midway between the rails and wall. Keep clear space on the landing where the staircase meets the loft to preserve animation paths. The snowy roof above and the hanging planter at the rail should frame this cozy nook perfectly in Dreamy Room Snowy Day Level 6.
Step 9. Populate the lakeside with snow play: characters, snow-cat, and skating
Head to the icy foreground of Dreamy Room Snowy Day Level 6. Center the big round snow-cat sculpture on the snowbank, then perch a tiny baby snowball kitty beside it. To the left on the glassy ice, place the sweatered cat who’s skating with arms wide; angle it toward the house so the eye returns to the build. To the right, add the bundled bear-cub shaping snow, and further right another red-scarfed critter cheering. Keep the lamp post just behind this rightmost friend so light falls over the path edge. This trio of characters and the snow-cat tableau make the front feel alive, which is essential storytelling in Dreamy Room Snowy Day Level 6.
Step 10. Final detailing: wreath of berries, bells, and balance checks
Finish Dreamy Room Snowy Day Level 6 with polish. Double-check the bell trio on the arched window is centered; if off, the reflections look wrong. Ensure the vine line steps upward toward the loft to echo the right gable triangle. Tuck a hanging pot on the loft rail near the right curve and confirm the hydrangea lights are visible from the lawn. Verify the fruit bowl sits on the island’s front-left corner and that three stools face outward in a neat row. Outside, nudge the veggie basket so it’s not blocking the campfire. Finally, make sure the snow roof’s deepest drift overlaps the loft wall; that snowy weight bookends the tall window mass, completing Dreamy Room Snowy Day Level 6.
Notes and Precautions
• In Dreamy Room Snowy Day Level 6, leave clear walk lanes: from front lawn → left spiral → lounge → kitchen → right spiral → loft. Overlapping props will cause visual clipping, especially around the island and right spiral. • The arched window must sit flush with the balcony edge; a one-tile misalignment breaks the bell chain and vine symmetry. • Place the hydrangea planter exactly beneath the balcony rail; lights should read as a single garland when viewed from the lawn in Dreamy Room Snowy Day Level 6. • Keep the campfire a half-tile from the berries to avoid glow overlap. • Don’t rotate the fridge toward the island—door must face left to maintain the L-run silhouette. • Confirm the snow-cat centerpiece does not cover the shoreline ripple on the ice; that reflection sells depth in Dreamy Room Snowy Day Level 6.
Tips and Tricks from top player
• Block out the build for Dreamy Room Snowy Day Level 6 in three tiers (loft, midfloor, lawn) before micro-placing décor; this prevents later shuffling. • Mirror shapes: the gable triangle on the right should visually rhyme with the arch on the left. If one looks heavier, add a hanging planter or lamp to the lighter side—classic balance fix in Dreamy Room Snowy Day Level 6. • Color cadence: warm cores (sofa, island fruit, campfire) sit between cool frames (snow, glasshouse, ice). Keep warm items toward the center to guide the eye. • Use the island as an alignment anchor; if the fruit bowl is centered, you likely slid the counter too far. • When stuck, toggle focus to the characters; their poses hint at sightlines and help you nudge scenery into the right story beats for Dreamy Room Snowy Day Level 6.
Final Scene Description
When everything clicks in Dreamy Room Snowy Day Level 6, the island transforms into a glowing winter postcard. A snow-laden gable crowns a tiny loft where a pastry-soft bed nestles under a round dormer. Below, an arched window showers the lounge in amber light; bells chime above vines while a gramophone hums beside pumpkin cushions and two sleeping cats. To the right, a tidy pink-fridge kitchen and wooden island invite late-night cocoa, with a glasshouse glittering behind the sink. Outside, lavender hydrangeas and berry hedges frame a lawn stacked with vegetables and a cheerful campfire. On the ice, friends skate and sculpt a plump snow-cat as a lamp glows warmly at dusk. The whole composition feels alive, balanced, and irresistibly cozy in Dreamy Room Snowy Day Level 6.


