Dreamy Room Level 469
Dreamy Room Level 469 guide - Dreamy Room 469 Walkthrough & Solution.
Important Notice Regarding Level Numbering
Due to frequent changes in Dreamy Room's level numbering and differences between platforms (Android/iOS) – for example, level 469 on Android might not be the same as level 469 on iOS – the text guide below may not always match the images and video above. Please prioritize the image and video guides. If you find that the guide content doesn't match your current level, please visit the All Level Walkthroughs page to find the correct guide based on level images. Thank you for your understanding.
Dreamy Room Level 469 Walkthroughs & Guide
Step 1. Place the glass balcony railings around the rooftop edge
Start Dreamy Room Level 469 by framing the lower rooftop. Along the front and right edges of the roof, place the tall, iridescent glass railings so they form a U-shape balcony that hugs the corner. Leave the back left corner open where the inner glass room will sit. The railings in Dreamy Room Level 469 must align perfectly with the rooftop edge so the reflections line up with the moonlit sky. This transparent fence is essential: every later object, from the TV to the art corner, visually “locks” to these boundaries. If your rail pieces float inward or hang off the roof, you’ll struggle to line up furniture later, so make sure the glass border exactly follows the outer edge of the building.
Step 2. Place the lounge set in the lower-right interior
Next, in Dreamy Room Level 469, build the cozy lounge area just inside the front glass railing, slightly to the left of the staircase zone. Drop the soft beige rug first, centered inside the glass room’s front wall. On the rug’s left side, place the long brown chaise lounge so it faces diagonally toward the front-right corner. Add the big white flower-shaped cushion with a yellow center on the chaise, then tuck the mustard-yellow pillow behind it. Behind the chaise, against the inner corner of the glass walls, position the large leafy green plant. In front of the chaise, towards the railing, place the low blue coffee table, then set the purple pot with white flowers neatly on top. Finally, put the grey flat-screen TV just in front of the table, aligned with the railing. This composition is crucial in Dreamy Room Level 469 because it defines the whole lower living zone.
Step 3. Place the kitchen island and counter in the back interior
Move deeper into the glass room of Dreamy Room Level 469 to assemble the kitchen. Against the back wall on the right side, place the kitchen counter with built-in sink and cupboards. Make sure the faucet and round dishes face forward so they’re visible through the glass. Slightly in front of this counter, centered in the back-right quadrant, place the rectangular kitchen island. On this island, arrange the food: a bowl of green fruit on one end and a plate with bread or dessert on the other. Now add the pink round stools—one on the left side of the island, another closer to the right, as if two people could sit and snack. When everything is aligned, the counters, stools, and food in Dreamy Room Level 469 create a believable mini-kitchen that can be clearly seen from outside through the windows, reinforcing the lived-in feeling of the rooftop home.
Step 4. Place the art studio corner on the lower-left balcony
Now decorate the lower-left outdoor corner of Dreamy Room Level 469 with an art studio. First, under the open sky just inside the glass railing, place the large leafy bush in the very front-left corner. A bit behind and to the right, install the wooden pergola/trellis so its beams run horizontally above the floor. On top of this pergola, let the small potted vines sit near the left side, their leaves spilling slightly over the edge. Below the pergola, against the back glass wall, arrange the narrow wooden shelf, then place two potted plants and a watering can or pot on it. In front of the shelf, closer to the railing, set the round wooden table with the paint palette and brushes. To the left of that table, place the easel with the cute raccoon painting facing the interior. Finally, drop the tiny drinking cup on the railing edge. In Dreamy Room Level 469 this area reads as a tiny rooftop atelier.
Step 5. Place the staircase and connect the lower level to the upper terrace
On the right side of the scene in Dreamy Room Level 469, it’s time to place the staircase. Starting from the lower balcony’s right edge, build the brown steps upward so they hug the outer wall and climb to the small upper terrace. Each step should align cleanly; no floating steps or overlaps with the glass railing. At the top, the staircase should end exactly level with the upper balcony floor, just beside the glass walls of the upper room. Leave a clear landing space so the character could logically step out toward the bar stools. The glow along the stair edges in Dreamy Room Level 469 comes from their correct alignment with the wall lights, so avoid pushing them too far outward. This stair structure is vital, because it visually and logically links the cozy lower floor to the playful toy lounge above.
Step 6. Place the balloons, mannequin, and fence on the upper-left balcony
Move up to the front-left upper balcony of Dreamy Room Level 469, the one directly in front of the double doors. On the inner edge of the balcony, centered below the vine-covered roof, place the golden picket fence decoration. Just to its right, set the mannequin or dress form wearing the wide-brim hat so it faces toward the railing. To the left of the fence, drop the two fluffy pink and lavender gift-like figures that look like cotton candy piles, arranging them right against the railing. Now, behind these objects but slightly left, anchor the big bundle of balloons—pink, red, gold, white, and brown balloons rising in a cluster. They should lean slightly toward the glowing moon. This front row in Dreamy Room Level 469 must be carefully spaced so nothing blocks the doorways, yet every decoration is visible from the street level view.
Step 7. Place the toy trio and bar stools on the upper central balcony
On the central upper balcony of Dreamy Room Level 469, begin with the railing side. Along the inside of the glass fence, position the three tall bar stools evenly spaced from left to right. Each stool in Dreamy Room Level 469 has a golden base, a purple circular seat, and an orange heart-shaped back; make sure all three face outward as if guests are watching the sky. Just behind these stools, on the inner floor line, arrange the three plush friends: on the left, the tall white bunny with polka dots; in the middle, the tan dog plush; and on the right, the big brown teddy bear holding the golden harp. Their placement should form a soft curve that mirrors the railing. This trio reads like an audience enjoying rooftop music, so precise positioning is what sells the whimsical story in this level.
Step 8. Place the sofa, guitar, dresser, and presents in the upper lounge
Now complete the cozy heart of Dreamy Room Level 469 inside the upper room. Centered along the back wall, slightly left of the middle, place the long brown sofa or daybed. Add the golden blanket and pillows so they lean toward the right side. On top of the sofa’s middle, position the big cluster of green clover-shaped balloons or pillows, and resting diagonally across the front, lean the yellow guitar with purple accents. To the right of the sofa, against the curved console table, stack the colorful present boxes—pink, teal, and orange—then add the small pom-pom topiary tree with a bow on its pot. On the left side of the room, right against the wall, place the vanity dresser with the scalloped mirror. On the dresser, add the cake or dessert platter, the pink vase with flowers, and a couple of boxes. Two round grey poufs sit on the floor below. Together these placements turn Dreamy Room Level 469 into a gift-filled celebration nook.
Step 9. Place the hanging stars, greenhouse roof, and vine flowers
For the final structural touches of Dreamy Room Level 469, focus upward. Along the top of the back wall between the right-hand windows, hang the two golden star decorations so they dangle over the sofa area. Now place the glass greenhouse roofs: one larger segment over the left double doors, one over the center lounge, and a smaller roof over the right extension. Each roof panel should align with the walls beneath so the diagonal frames match the perspective. On top of these roofs, add the lush green vines that curl along the beams. Attach the clusters of big yellow flowers at the vine bends—two clusters over the left roof and one over the right. In Dreamy Room Level 469 the vines should drape just far enough to frame the moon and clouds without hiding them, creating the iconic glowing rooftop greenhouse silhouette.
Notes and Precautions
In Dreamy Room Level 469, the main difficulty is that many objects share similar colors and shapes, so it’s easy to misplace an item by just one tile. Always check how an item lines up with the glass railings and walls; misalignment is the most common issue in this stage. When placing stools and plush toys on the upper balcony, avoid overlapping them with the railing, or the game may not confirm the arrangement for Dreamy Room Level 469. Another precaution: the staircase must connect exactly from lower to upper floors; if the first step is moved even one tile away from the wall, the upper landing will not line up. Finally, be careful with the pergola and vines—they belong only above the lower-left art corner, not near the kitchen or upper balcony, otherwise the rooftop composition in Dreamy Room Level 469 will look wrong and the level will remain incomplete.
Tips and Tricks from top player
Top players treat Dreamy Room Level 469 as a vertical puzzle: always decorate from bottom to top and from inside to outside. First lock in the lounge and kitchen so the interior grid is clear, then move to the art corner and finally tackle the upper balconies. Another smart trick in Dreamy Room Level 469 is to group items by theme: art-related items all stay in the lower-left corner, food items on the kitchen island, toys and gifts only upstairs. If you’re unsure where something goes, match its color palette—pastel balloons and presents belong to the celebratory upper deck, while earthy tones fit the lounge. Remember that every plush toy in Dreamy Room Level 469 faces toward the railing or room center; if a toy faces a wall, you probably placed it incorrectly. Slow, deliberate placement will beat random trial-and-error every time.
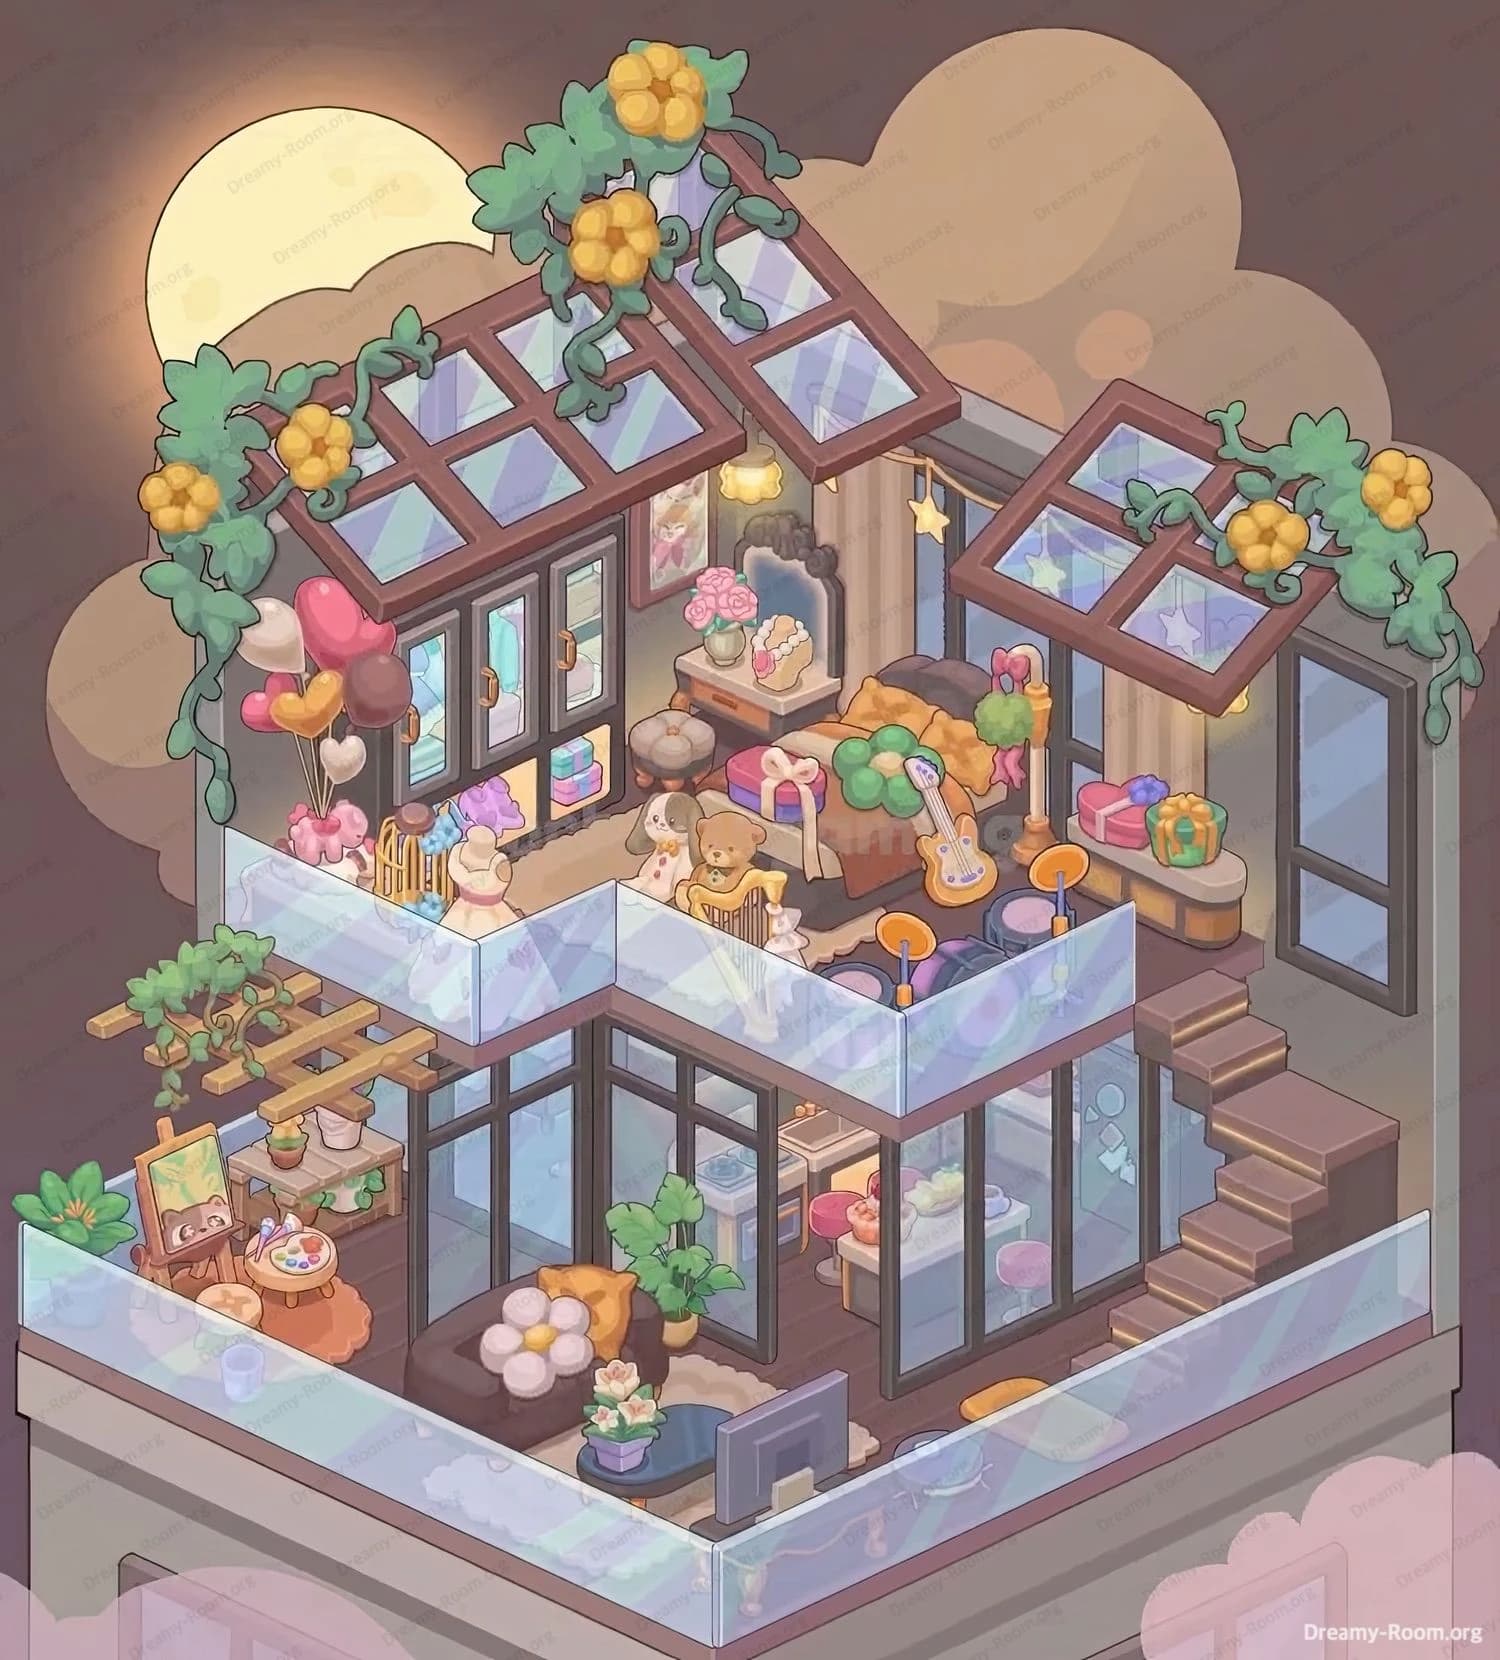
Final Scene Description of Dreamy Room Level 469
When Dreamy Room Level 469 is complete, the once-empty rooftop becomes a glowing glass sanctuary above the clouds. A huge golden moon rises behind the building, its light shimmering across the iridescent railings and greenhouse panes. On the lower level, a soft chaise, flower cushions, and potted plants form a calm movie corner facing the TV, while the open kitchen behind promises midnight snacks. To the left, the pergola-covered art studio overflows with greenery and paints, hinting that someone spends quiet nights sketching under the sky. Upstairs, balloons, mannequins, plush toys, and a harp-playing teddy gather around a gift-loaded sofa and guitar, celebrating some secret occasion. Vines laden with yellow flowers trail over the glass roofs, framing the stars and clouds. The whole of Dreamy Room Level 469 feels like a private sky garden where art, music, and memories share the same peaceful, moonlit terrace.