Dreamy Room Level 148
Dreamy Room Level 148 guide - Dreamy Room 148 Walkthrough & Solution.
Important Notice Regarding Level Numbering
Due to frequent changes in Dreamy Room's level numbering and differences between platforms (Android/iOS) – for example, level 148 on Android might not be the same as level 148 on iOS – the text guide below may not always match the images and video above. Please prioritize the image and video guides. If you find that the guide content doesn't match your current level, please visit the All Level Walkthroughs page to find the correct guide based on level images. Thank you for your understanding.
Dreamy Room Level 148 Walkthroughs & Guide
Step 1. Place the stone foundation and add the stairs.
In Dreamy Room Level 148, the initial stage involves placing the stone base platform, setting the stage for your dream room. Begin by selecting the light beige stone block from your inventory and carefully place it in the lower center of the room. This foundation will create a stable base for all other elements in Dreamy Room Level 148. After the foundation is in place, you’ll need to add the stairs. Locate the matching stone stairs and position them on the lower left side of the foundation, aligning the steps so they flow seamlessly from the bottom to the next level. In Dreamy Room Level 148, ensure the stairs are properly placed without overlapping the walls or the floor, as this will cause placement errors. Once aligned, a confirmation glow will appear, signaling a successful placement. This step is crucial in Dreamy Room Level 148, as it sets up the structure for all subsequent design elements.
Step 2. Add the small palm trees on the right.
In Dreamy Room Level 148, palm trees bring a relaxing and tropical vibe to the space. Select the small palm tree assets and position them on the right side of the platform, slightly apart from the stone foundation. Arrange them symmetrically, ensuring their trunks don’t overlap with other objects like the stairs or walls. In Dreamy Room Level 148, the game checks for overlapping with other assets, so it's essential to adjust them until they rest firmly on the platform. These palms will serve as the focal point for the outside environment, so take your time to place them in a way that enhances the visual harmony. Once positioned correctly, the palm trees will glow subtly, indicating they've been successfully placed. The placement of these trees in Dreamy Room Level 148 marks the beginning of filling the room with nature and life.
Step 3. Set the blue domed roof and place the golden spire.
Next, in Dreamy Room Level 148, it’s time to add the iconic blue domed roof, which defines the character of this space. From the assets menu, select the large blue dome and position it directly on the stone base structure. Make sure the dome is centered perfectly, aligning it with the edges of the walls to avoid any awkward gaps. Once the roof is aligned, place the golden spire atop the dome. This spire will add a touch of elegance and complete the rooftop design in Dreamy Room Level 148. Ensure the spire is properly centered on top of the dome. A slight misalignment will break the visual cohesion of the structure. After placing the spire, the room will light up with a confirmation effect, signaling the successful completion of this step. The dome and spire add architectural grandeur to your design in Dreamy Room Level 148.
Step 4. Add the window arches and the door frame.
To enhance the open feel of the room, add the window arches to the walls. In Dreamy Room Level 148, select the ornate window frame and position it on the left wall, directly above the stairs. These window arches should be aligned symmetrically to maintain a balanced aesthetic. Once the windows are set, place the door frame on the lower right corner of the base platform. Ensure the door frame doesn’t interfere with the stone foundation or other elements. The door should be placed at a slight angle to the right to maintain visual flow in Dreamy Room Level 148. After the window arches and door frame are positioned, a subtle animation will confirm that they are properly aligned. These elements will serve to open the room up to the outside environment and tie the space together.
Step 5. Furnish the upper level with cushions and plants.
In Dreamy Room Level 148, the upper level is perfect for cozy seating arrangements. Start by placing several large cushions in various colors—preferably blue, orange, and green—on the floor of the upper platform. Arrange them in a casual, inviting manner, ensuring they are neatly spaced without touching the walls. After the cushions are placed, select a few potted plants and position them near the base of the dome. Choose plants that complement the warm colors of the cushions while adding a touch of greenery. In Dreamy Room Level 148, make sure the plants are placed far enough from the window arches to avoid visual clutter. These elements will create a cozy and comfortable atmosphere. Once these items are placed, the upper level will feel complete and ready for more decorative accents in Dreamy Room Level 148.
Step 6. Decorate the lower level with baskets and pottery.
In Dreamy Room Level 148, the lower level will soon be filled with various decorative items to enhance the room’s theme. Start by placing the large woven baskets on either side of the well. Make sure the baskets are aligned symmetrically for a balanced look. Next, select the clay pottery and position them around the stone platform. Arrange the pottery to fill empty spaces while ensuring they don’t crowd the door or stairs. In Dreamy Room Level 148, the pottery should be spread out to create a harmonious, well-decorated environment. Place the larger pots near the palms, and the smaller ones closer to the stairs. After positioning the baskets and pottery, check that none of the objects overlap or obstruct the path. The lower level will now feel more grounded and culturally rich, enhancing the charm of Dreamy Room Level 148.
Step 7. Place the well and add the surrounding rocks.
In Dreamy Room Level 148, the well is a centerpiece that adds both functionality and charm to your space. Place the well in the lower center of the platform, making sure it doesn’t overlap with the stairs or baskets. Position the well so it is fully visible and accessible within the room’s layout. After placing the well, select the surrounding rocks and scatter them around the base of the well to create a natural, rustic look. Ensure the rocks are placed in a circle, surrounding the well without obstructing any other objects. In Dreamy Room Level 148, the well and surrounding rocks should feel as though they are part of the natural landscape. Once these elements are aligned, a gentle sparkle will confirm the completion of this step, adding a touch of magic to the space.
Step 8. Place the character figurines and complete the scene.
In Dreamy Room Level 148, your final step involves adding character figurines to bring life to the space. Start by placing the first character, the musician, near the well. Align them carefully so that the figurine faces the well, creating a dynamic, interactive scene. Next, place the second character, the cat with a red scarf, on the upper platform, seated comfortably next to the plants. Ensure that the character is positioned naturally in the space, facing the plants and cushions. In Dreamy Room Level 148, these character figurines will give the room a sense of life and personality. Once the figurines are placed, take a moment to admire the entire space. The scene will now feel fully realized, with a perfect balance of décor, nature, and character interactions.
Notes and Precautions for Dreamy Room Level 148
- Be mindful of spacing when placing objects like baskets, plants, and figurines. Overlapping items can cause placement errors.
- Pay close attention to the symmetry of your items, especially with the palm trees, window arches, and door frame, as Dreamy Room Level 148 heavily rewards balance.
- If an item doesn't fit, try rotating it or moving it slightly to see if it fits better in the available space.
- Make sure to check the alignment of the stairs and the placement of the roof, as these elements are key to the overall layout of Dreamy Room Level 148.
- Always ensure that characters are facing outward or interacting with other elements of the scene, as this enhances the room’s dynamism.
Tips and Tricks from top player for Dreamy Room Level 148
- Start with the big items first: Place the palm trees, the dome roof, and the foundation before adding smaller objects like cushions and baskets. This helps you better visualize the space.
- Use the rotate tool frequently: Sometimes a slight turn is all it takes to get an object to fit perfectly.
- Don’t rush the decorative elements: Placing the smaller items like pottery, plants, and baskets takes time. Focus on making sure everything is placed with care.
- Check the camera view from different angles: This will help you spot any issues with alignment that you may not see from the front.
- Lock placements early: When the game confirms an object placement with a glow, lock it in place before proceeding to avoid accidental misplacements later.
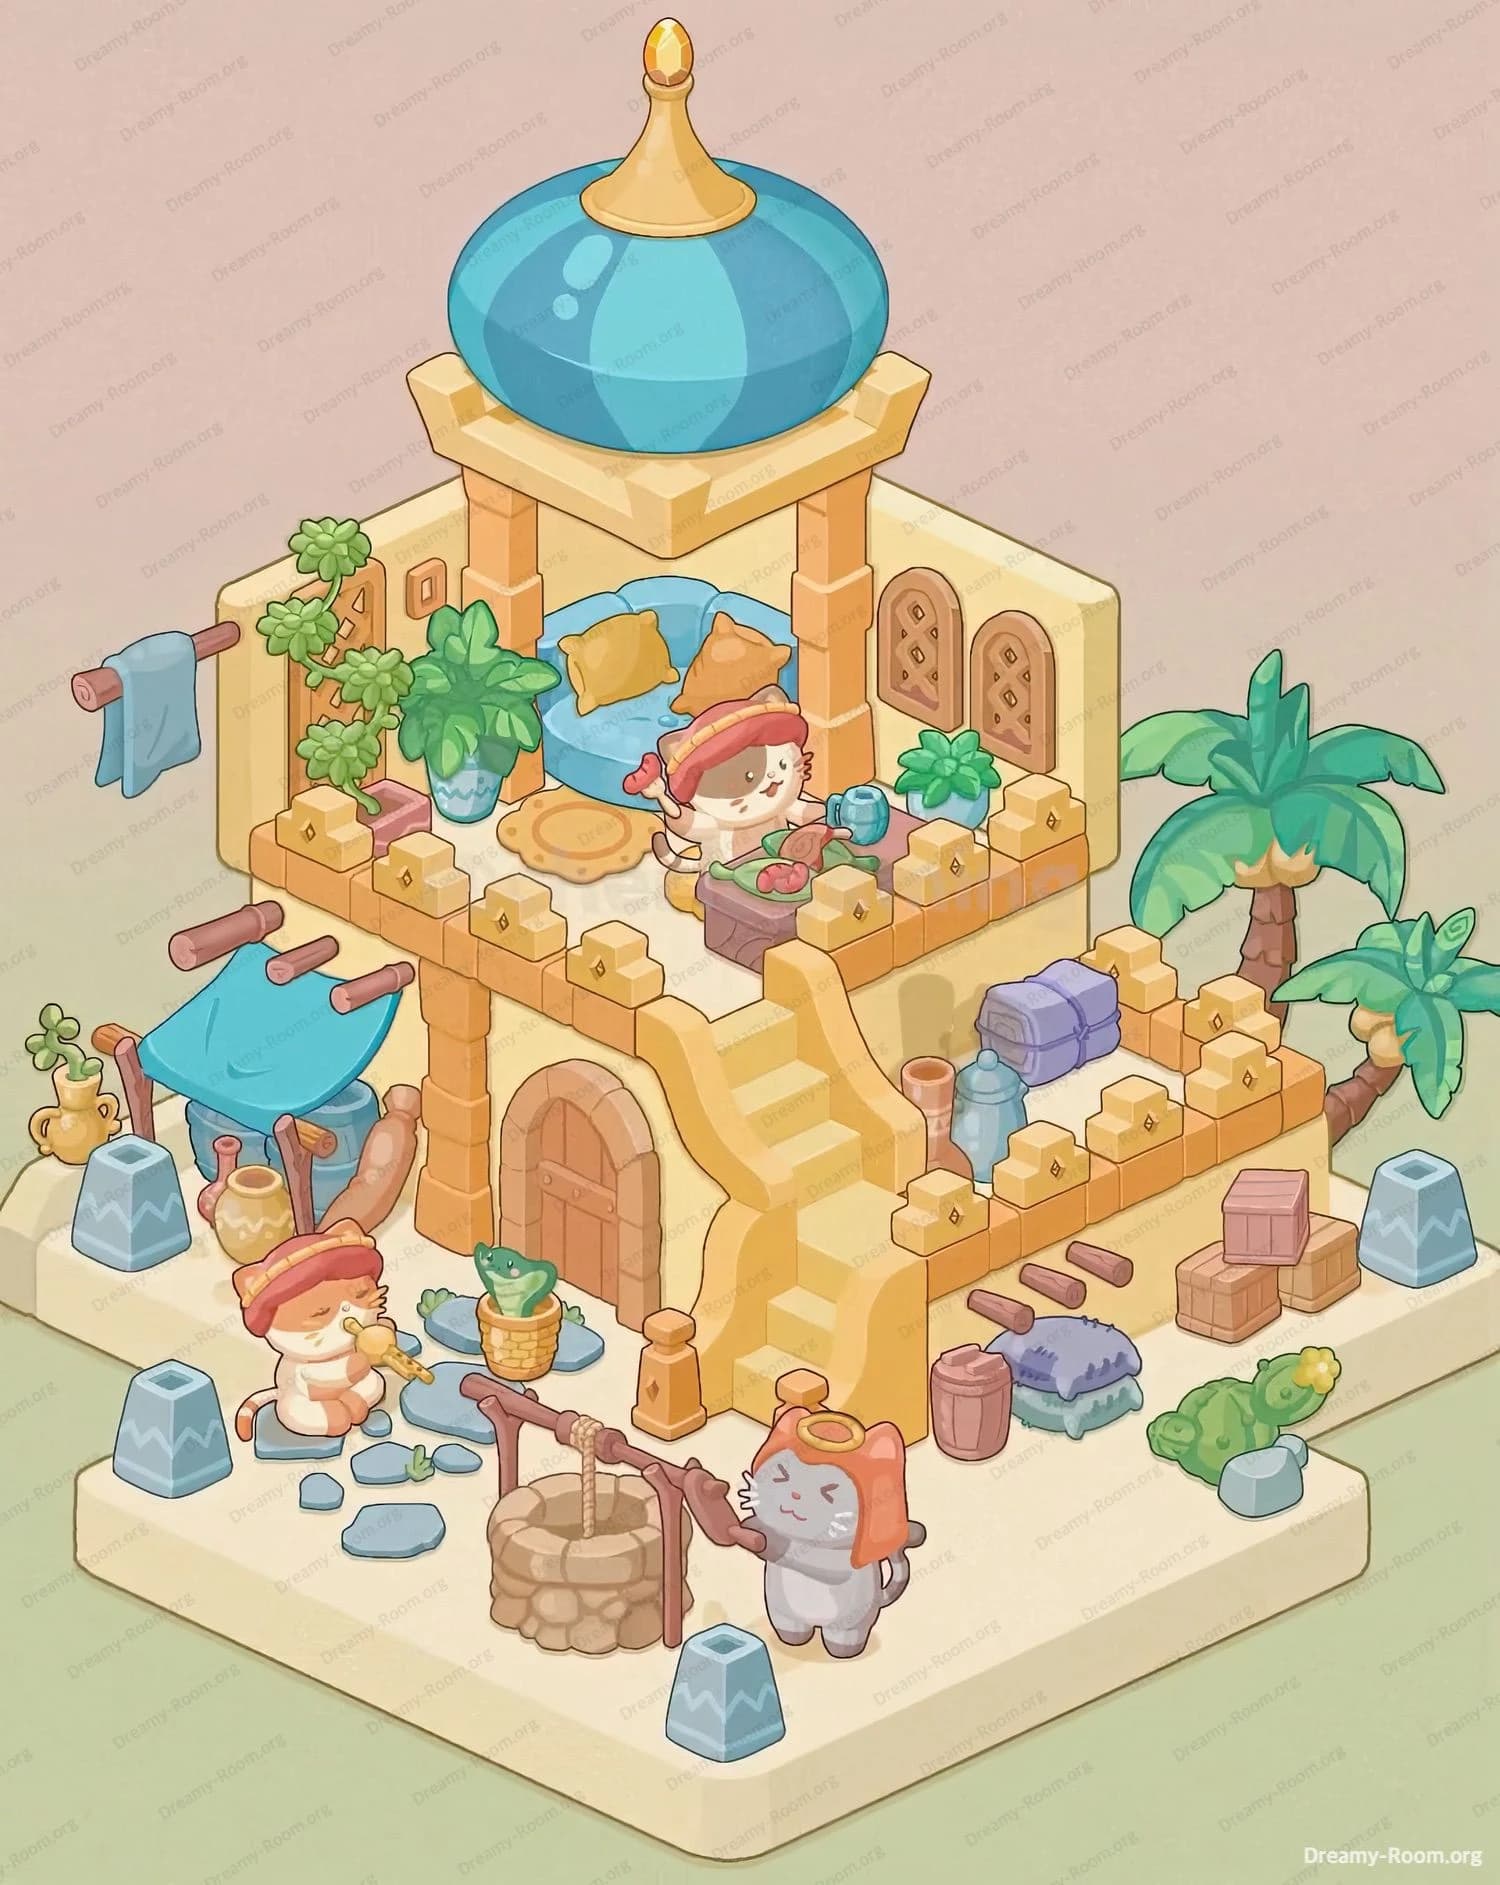
Final Scene Description for Dreamy Room Level 148
The completed scene in Dreamy Room Level 148 is a delightful, cozy space that exudes both comfort and elegance. The stone foundation supports a grand blue-domed roof, topped with a golden spire that catches the light. Palm trees flank the structure, adding a tropical touch to the desert-inspired theme. The upper platform, filled with colorful cushions and plants, offers a serene retreat. The lower level features a well surrounded by rocks, with large woven baskets and pottery scattered around, evoking a sense of cultural richness. Two character figurines—one playing a flute near the well and another seated with a cup on the upper level—bring the scene to life. The warm desert hues, combined with the charming furniture and lively characters, make Dreamy Room Level 148 feel like a welcoming oasis.