Dreamy Room Level 503
Dreamy Room Level 503 guide - Dreamy Room 503 Walkthrough & Solution.

Important Notice Regarding Level Numbering
Due to frequent changes in Dreamy Room's level numbering and differences between platforms (Android/iOS) – for example, level 503 on Android might not be the same as level 503 on iOS – the text guide below may not always match the images and video above. Please prioritize the image and video guides. If you find that the guide content doesn't match your current level, please visit the All Level Walkthroughs page to find the correct guide based on level images. Thank you for your understanding.
Dreamy Room Level 503 Walkthroughs & Guide
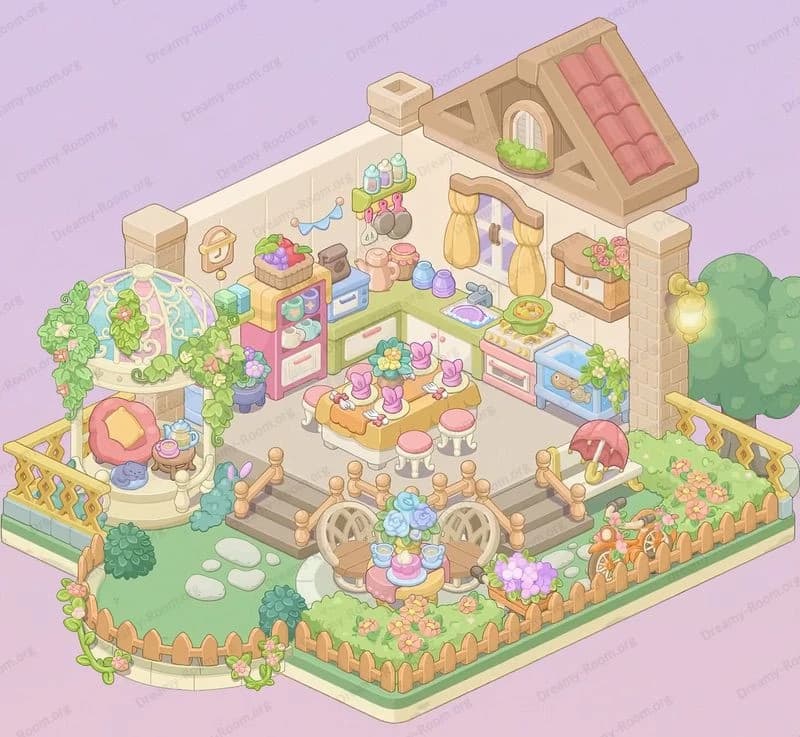
In Dreamy Room Level 503 you turn a bare outdoor corner into a cozy little produce shop and home. The key challenge in Dreamy Room Level 503 is working out the precise placement and layering of every roof tile, hedge, crate and tiny decoration so that they lock into the correct grid positions. There’s no rush in Dreamy Room Level 503 – you can take your time and enjoy the calm decorating vibe.
Step 1. Place the main house body in the centre of the platform.
Start Dreamy Room Level 503 by turning the two plain cream walls into the body of the house. Select the main house piece – the peach-coloured building with the brick archway on the right side. Drop it so that its back corner sits exactly where the original corner of the empty walls was. The left wall of the house should run straight up beside the large yellow tree, so the trunk looks like it is growing right behind the wall. The right wall should line up just in front of the smaller tree on the back-right edge. Make sure the arched doorway faces toward the front-right corner of the grass so that the interior floor is visible. If the house is too far forward or back, later pieces in Dreamy Room Level 503 (like the path and scooter) won’t align correctly.
Step 2. Place the tiled roof on the top of the house.
Next in Dreamy Room Level 503, attach the red tiled roof. Choose the curved terracotta roof section and snap it onto the top of the house so it slopes down toward the front. The left edge of the roof should almost touch the big yellow tree canopy, with a few branches peeking over the tiles. The back edge of the roof should sit just inside the rear border of the platform so you still see the grass behind the house. Now add the small beige chimney block near the middle-left of the roof, slightly forward, so it rises from a single tile row rather than the ridge. Take a moment to rotate the camera if needed and confirm that the roof is centred; in Dreamy Room Level 503 any tiny misalignment here will make the vines and bird’s nest look off later.
Step 3. Place the side window and hedge along the left edge.
On the left wall of the house in Dreamy Room Level 503, you now create the cozy side view. First, drag the long, boxy green hedge piece and lay it along the front-left edge of the grass. Its right end should stop just before the front corner of the house wall, and its back edge should sit tight against the base of the wall, forming a neat garden strip. Above this hedge, place the wide window with purple blinds in the middle of the left wall. The bottom of the window frame should rest just above the hedge top, leaving a thin strip of wall visible. Inside this window, position the cat character so its head peeks out on the right side of the frame, looking toward the doorway. In Dreamy Room Level 503, the cat and hedge create an obvious alignment reference: if the hedge isn’t directly below the window, you know you need to nudge them.
Step 4. Place the interior counter and storage shelves under the arch.
Now focus on the open doorway of Dreamy Room Level 503. Select the interior floor counter – the pale rectangular table or cutting board with bread or pastries on top – and place it just inside the arch, centred left-to-right. Its long side should run parallel to the arch, leaving a slim strip of floor between the table and the threshold. At the back of the room, snap in the shelving unit. Position it so that the shelves sit a little to the right of the doorway’s centre, with purple boxes on the upper shelves and green produce, jars and a small crate on the lower ones. A trailing green plant should stand in the back-right corner of the room, its leaves curling up against the inner wall. In Dreamy Room Level 503 it’s important that this furniture sits fully inside the doorway opening; if anything clips into the arch, the scene will look cramped and other objects may refuse to snap.
Step 5. Place the stone path and vegetable stand at the front-right.
The outdoor shop vibe of Dreamy Room Level 503 comes from the right side of the platform. Start by placing the pale doormat or cloth with scattered rounded stepping stones directly in front of the arch. The centre stone should line up with the middle of the doorway, and the back edge of the mat should tuck just under the door threshold. To the right of this path, build the vegetable stand. First, place the low stone or wooden platform that hugs the right edge of the grass. Then add the large rounded tub of green cabbages on the inner side closest to the door. Next, position the basket of red apples and carrots slightly behind and to the right, near the back-right tree. Finally, put the crate of yellow-orange fruits in front of the apples, angled so its corner points toward the viewer. In Dreamy Room Level 503, all three containers should form a gentle diagonal from back-right to front-centre.
Step 6. Place the scooter with pumpkins at the front-left.
To balance the busy produce stand, Dreamy Room Level 503 gives you a charming scooter on the left. Select the blue and red scooter object with the pumpkin crate on the back. Place it on the grass directly in front of the house wall, slightly left of the doorway but right of the hedge. The front wheel should rest almost on the front edge of the platform, while the rear wheel sits just ahead of the hedge’s right corner. Rotate it so the scooter points roughly toward the front-right corner, angled toward the door. Make sure the wooden crate packed with round orange pumpkins is clearly visible behind the seat and does not overlap the stone path. This angled placement in Dreamy Room Level 503 makes the scooter feel parked casually in front of the little shop, and its bright colours draw the eye toward the entrance.
Step 7. Place the balcony, shutters, vines, and rose bush on the house.
Now decorate the upper part of the facade in Dreamy Room Level 503. Begin with the curved balcony piece with turquoise shutters. Snap it into the wall directly above the arch so the balcony floor touches the top edge of the arch bricks. The shutters should swing open to the left and right, framing the empty opening. Next, add the leafy rose bush on the left wall just under the roof. This bush should sit above the purple-blinded window, with its green foliage spreading across the plaster and a few pink roses facing forward. Then place the long vine canopy that stretches from the roof over the balcony. Position it so its thickest part sits near the top-right of the roof, with curling tendrils hanging down in front of the balcony opening and a few pink flowers dotting the leaves. In Dreamy Room Level 503, these green pieces soften the rigid outlines of the house and visually connect it to the surrounding trees.
Step 8. Place the bird’s nest, wall lamps, and final lighting accents.
The last major decorations in Dreamy Room Level 503 add personality and light. Take the bird’s nest object with two yellow chicks and eggs and place it on top of the right end of the roof-vine canopy. It should sit at the very top-right of the scene, perched just above the roof tiles and slightly overhanging the edge so the nest is clearly visible against the sky. Next, add the pair of blue wall lamps. One lamp should be placed on the left side of the arch, halfway up the wall, with its glow overlapping the brick border. The second lamp mirrors it on the right side of the arch at the same height. Both should appear to cast a warm halo against the wall. Check that the light circles do not overlap the hedge or vegetable stand. Once these are snapped in correctly, Dreamy Room Level 503’s layout is complete; only minor nudges may be needed so every object clicks into its intended grid slot.
Notes and Precautions
Because Dreamy Room Level 503 packs so many objects into a small outdoor plot, it’s easy to misplace items by a single grid step. Always zoom in when placing the house, roof, and arch so you can see whether edges align cleanly with the platform borders. In Dreamy Room Level 503, try not to drag objects across the trees; some decorations may try to snap behind tree trunks, which can obscure them. Place the large structural pieces (house, roof, hedge, vegetable stand base) before smaller ones, or the game might auto-reorder layers in ways that hide details like the cat or the pumpkin crate. If you notice the scooter or path clipping into the platform edge, pick them up and re-drop from directly above instead of sideways dragging. Finally, remember that Dreamy Room Level 503 is about careful observation—compare frequently to the preview of the finished scene so you don’t overlook any tiny item.
Tips and Tricks from top player
Top players treat Dreamy Room Level 503 like a spatial puzzle rather than a simple decoration task. Start by mentally dividing the platform into three vertical bands: hedge and scooter on the left, doorway in the centre, and produce stand on the right. This mental grid makes it easier to decide where each object belongs. In Dreamy Room Level 503, always anchor objects to something fixed: align the hedge with the platform edge, the path with the arch centre, and the scooter with the hedge’s corner. Place foliage last; vines and rose bushes are flexible and hide small misalignments elsewhere. Another efficient trick in Dreamy Room Level 503 is to check silhouettes: if you zoom out and the bird’s nest, chimney, and tree crowns form a smooth rising arc from right to left, you know your roof and vine placement is correct. Use these visual patterns as quick checks instead of dragging each object repeatedly.
Final Scene Description for Dreamy Room Level 503
When everything is correctly arranged, Dreamy Room Level 503 shows a tiny sunlit farmhouse nestled between two golden trees. The peach-coloured house sits snugly in the centre, capped with a warm red tiled roof and a small chimney. A lush rose bush and trailing vines spill across the walls and roof, crowned by a bird’s nest where two yellow chicks cuddle above their eggs. On the left, a long hedge borders the grass while a curious cat peeks out from a window with purple blinds. At the front, a turquoise scooter loaded with pumpkins rests casually beside the arched doorway, where a glowing pair of wall lamps frame the entrance to a tidy kitchen with a bread-topped counter and stacked supplies. On the right, a neat stone path leads past mounds of cabbages, apples, carrots and bright fruits, turning Dreamy Room Level 503 into a charming, storybook open-air shop.