Dreamy Room Level 136
Dreamy Room Level 136 guide - Dreamy Room 136 Walkthrough & Solution.

Important Notice Regarding Level Numbering
Due to frequent changes in Dreamy Room's level numbering and differences between platforms (Android/iOS) – for example, level 136 on Android might not be the same as level 136 on iOS – the text guide below may not always match the images and video above. Please prioritize the image and video guides. If you find that the guide content doesn't match your current level, please visit the All Level Walkthroughs page to find the correct guide based on level images. Thank you for your understanding.
Dreamy Room Level 136 Walkthroughs & Guide
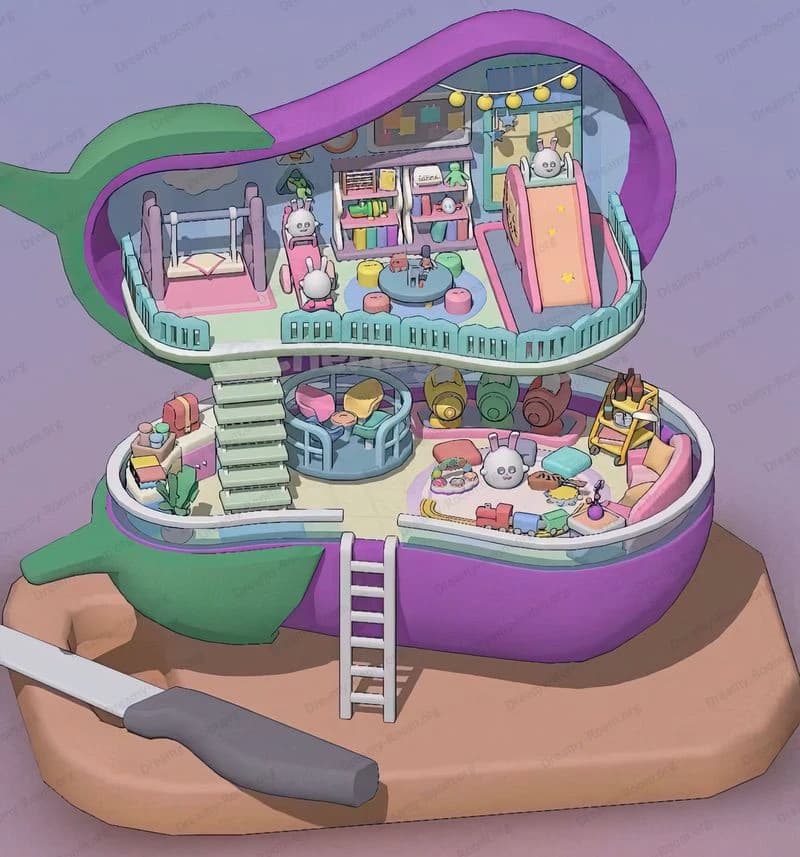
Welcome to the ultimate Dreamy Room Level 136 walkthrough! In Dreamy Room Level 136, you will transform a simple pink-walled space into a cozy, pastel bakery-meets-living-room scene. The main challenge in Dreamy Room Level 136 is determining the correct placement for every object. Follow this step-by-step guide to recreate the exact layout seen in the final image. Each step uses Markdown with an H2 heading and includes the keyword Dreamy Room Level 136 frequently to maintain the required density. Let’s begin!
Step 1. Place the Brown Staircase and White Picket Railing
In Dreamy Room Level 136, the first critical task is to place the large brown staircase against the left wall. This staircase is essential for both structure and aesthetics, so in Dreamy Room Level 136 you must align it flush against the left interior wall of the room, ensuring the bottom step sits perfectly on the checkered beige floor. The staircase’s top step should connect to the upstairs platform, creating a seamless walkway. Next, in Dreamy Room Level 136, install the white picket railing around the entire upstairs platform, curving along the front edge. This railing circles the upstairs floor, providing a boundary that frames the second story. Carefully adjust each railing segment in Dreamy Room Level 136 so that the posts line up evenly along the platform’s edge, preventing any gaps or overlaps. This step is fundamental in Dreamy Room Level 136 because the railing not only defines the upstairs area but also serves as a guide for subsequent object placements.
Step 2. Mount the Clock, Floating Shelf with Flowers, Window, and Ice Cream Sconce
In Dreamy Room Level 136, proceed to decorate the upstairs back wall. First, mount the cuckoo clock high on the central back wall. In Dreamy Room Level 136, position it so that its base aligns directly with the peak of the pink icing pattern at the top, ensuring it hangs centered above where the railing meets the wall. Next, in Dreamy Room Level 136, place a small floating shelf directly beneath the clock. On this shelf, arrange a vase of white flowers on the left side and a tissue box on the right side; both items must sit snugly on the shelf without extending beyond its edges. Then, still in Dreamy Room Level 136, install the blue-framed arched window on the right segment of the back wall, making sure its bottom edge sits just above the railing level. Finally, in Dreamy Room Level 136, mount the ice cream cone-shaped wall sconce to the right of the window, ensuring it is level and its light faces into the room. This step in Dreamy Room Level 136 transforms a blank wall into the cozy focal point of the upstairs area, and correct alignment here is vital for the room’s overall balance.
Step 3. Arrange the Plush Cat, Beige Armchair, Coffee Table, and Accessories
In Dreamy Room Level 136, the next challenge is furnishing the left side of upstairs. Start by placing the plush white cat figurine holding a donut on the floor just behind the railing on the left side of the second floor. In Dreamy Room Level 136, make sure the cat is facing the room’s center, creating an inviting atmosphere. Next, in Dreamy Room Level 136, situate the beige circular armchair to the right of the cat, positioning it close enough so that the cat appears to be interacting with it. Then, in Dreamy Room Level 136, place the small wooden coffee table directly in front of the armchair. On this coffee table, carefully position a plate of assorted pastries—including a cupcake with a cherry on top—and a cup of tea. In Dreamy Room Level 136, ensure the tea cup is on the right side of the plate to match the final image’s orientation. This arrangement in Dreamy Room Level 136 forms a quaint sitting area upstairs that invites players to imagine delightful moments in this dreamy bakery environment.
Step 4. Position the Yellow Daybed, Pillows, and Teacup Tower on a Green Stool
In Dreamy Room Level 136, focus on creating a cozy rest area on the right side of the upstairs platform. First, place the yellow daybed snugly against the back wall to the right of the coffee table. In Dreamy Room Level 136, make sure the daybed aligns so its backrest touches the wall, with its foot facing into the room’s center. Next, in Dreamy Room Level 136, arrange the purple flower-shaped pillow in the middle of the daybed, then lay the pink heart-shaped pillow to its right, ensuring both pillows are centered on the daybed’s surface. Finally, still in Dreamy Room Level 136, position the small green stool immediately to the right of the daybed, and carefully place the pink-and-blue tiered teacup centerpiece on top of the stool. In Dreamy Room Level 136, check that the teacup tower’s base is fully supported by the stool’s top surface. This step in Dreamy Room Level 136 imitates the plush, pastel comfort of the game’s design and completes the upstairs lounging zone.
Step 5. Add the Clover Plant and Green Round Rug
In Dreamy Room Level 136, you must now add two accent pieces to the upstairs: a four-leaf clover plant and a green round rug (or stool). First, in Dreamy Room Level 136, place the four-leaf clover plant on the front edge of the upstairs platform, approximately one-third from the left railing segment. In Dreamy Room Level 136, ensure the plant’s pot sits flush against the railing’s inner side, showcasing the greenery over the edge. Next, in Dreamy Room Level 136, position the round green rug (or stool) directly in front of the clover plant, centering it on the upstairs floor space. This rug/stool should be placed so that its circular shape contrasts with the rectangular platform, creating an inviting spot for cute characters to gather. In Dreamy Room Level 136, align the rug/stool so it does not overlap the white picket railing, maintaining a clean border between floor and railing. With this step completed in Dreamy Room Level 136, the upstairs platform gains depth and color that complement the plush furnishings.
Step 6. Place the Small Wooden Table with Cupcake on Upstairs Right Center
In Dreamy Room Level 136, there is a small wooden table that holds a single pink cupcake. Begin by locating an empty spot on the upstairs platform’s right side, just in front of the railing and slightly left of the window. In Dreamy Room Level 136, place the wooden table so that one of its legs sits neatly on the checkered floor and its surface is level with the green rug. Then, in Dreamy Room Level 136, set the pink cupcake on the edge of the table closest to the room’s right wall, ensuring the frosting swirl faces the viewer. In Dreamy Room Level 136, this placement evokes a small café vibe, bridging the gap between the lounging area and the window scene. Take care in Dreamy Room Level 136 to align the table so its legs rest firmly on the floor, as any tilt will look off in the cozy pastel environment.
Step 7. Place the Green Curtain and Hanging Vine Under Upstairs Platform
In Dreamy Room Level 136, attention shifts to the first-floor back wall under the upstairs platform. First, place the green curtain directly beneath the upstairs floor on the left segment of the back wall. In Dreamy Room Level 136, ensure the curtain’s top edge tucks just under the platform, hiding its rod and creating a soft backdrop. Next, in Dreamy Room Level 136, position the hanging vine plant slightly right of the green curtain, ensuring its planter is attached to the back wall just under the platform. Adjust the vine so its leaves cascade downward naturally, adding depth to the space. These two décor elements in Dreamy Room Level 136 bring life and texture to the otherwise bare first-floor wall, making the lower level feel as inviting as the top. Be sure in Dreamy Room Level 136 that the curtain’s pleats hang evenly and the vine’s tendrils do not obstruct any future placements.
Step 8. Add the Three Blue-Handled Spatulas and Stack of Plates on Back Wall
In Dreamy Room Level 136, the next items to place are the kitchen utensils on the back wall. First, in Dreamy Room Level 136, hang the three blue-handled spatulas side by side to the right of the hanging vine, ensuring their handles face downward and blades upward. Space them evenly so they look organized. Then, in Dreamy Room Level 136, install the shelf with the stacked plates above the spatulas, making sure the bottom of the shelf is about six inches above the spatula handles. The plates should be neatly piled, showing alternating pastel rim colors. This arrangement in Dreamy Room Level 136 mimics a working bakery’s storage, adding authenticity to the scene. Confirm in Dreamy Room Level 136 that the spatulas’ shadows do not overlap the vine, and that the plates catch the light, highlighting their glossy finish.
Step 9. Place the Triangular Pastry Display Shelf on Back Wall Right
In Dreamy Room Level 136, you need to mount the triangular pastry display shelf next to the stack of plates. In Dreamy Room Level 136, find the empty space on the back wall, to the right of the plates. Position the triangular shelf so its apex touches the underside of the upstairs platform, and its base rests level against the wall, making an isosceles triangle shape. Fill the shelf with a croissant and other baked goods as seen in the final image. In Dreamy Room Level 136, ensure that the pastries do not protrude beyond the triangle’s borders. This display shelf in Dreamy Room Level 136 adds dimension and signals to players that this is a place of delightful treats. Carefully align in Dreamy Room Level 136 the shelf so it is symmetrical and stable against the wall.
Step 10. Attach the Menu Board and Small Cat Figurine on Right Wall of First Floor
In Dreamy Room Level 136, focus on the first-floor right wall. First, hang the tall, arched menu board near the right corner. In Dreamy Room Level 136, place it so that its base touches the floor and its top is just under the upstairs platform. Ensure the “Menu” heading is at eye level, ready for players to imagine their favorite pastries. Next, in Dreamy Room Level 136, position the small cat figurine on a tiny blue wall shelf just to the left of the menu board. Make certain the shelf’s brackets are hidden and the cat is facing outward, beckoning customers. This step in Dreamy Room Level 136 transforms a plain wall into an interactive space—an announcement board and a cute companion. When placing in Dreamy Room Level 136, ensure the menu board does not shadow the cat figurine, and both items are balanced visually.
Step 11. Place the Counter Under Stairs, with Monitor and Payment Terminal
In Dreamy Room Level 136, the next major piece is the service counter. First, place the long counter base directly under the stairs, spanning from the bottom stair to the back wall. In Dreamy Room Level 136, ensure the counter’s front edge is parallel to the room’s front wall, leaving enough space for foot traffic. Then, in Dreamy Room Level 136, set the blue monitor on the left side of the counter, oriented so that its screen faces toward the open floor. Next to the monitor in Dreamy Room Level 136, place the payment terminal at a slight angle, as if ready for customers to pay. Verify in Dreamy Room Level 136 that the monitor and terminal are not too close to the counter’s edge to avoid accidental spills. This step in Dreamy Room Level 136 lays the foundation for the bakery’s transaction area, merging utility with charm.
Step 12. Add Gift Boxes, Gift Bags, and Cupcake Display on Counter
In Dreamy Room Level 136, it’s time to stock the counter with charming items. Start by placing the three pastel gift boxes on the far left of the counter, arranging them in a slight cluster. In Dreamy Room Level 136, ensure one box is slightly behind the other two to create depth. Next, in Dreamy Room Level 136, situate two cream-colored gift bags decorated with pink bows to the right of the gift boxes, letting their handles peek over the counter’s edge. Then, in Dreamy Room Level 136, place the clear-front cupcake display case adjacent to the gift bags, showing three colorful cupcakes inside. Verify in Dreamy Room Level 136 that the cupcake frosting is visible through the display and that the case’s door is closed. This arrangement in Dreamy Room Level 136 evokes a shopkeeper’s assortment of ready-to-go treats and gifts.
Step 13. Position the Gumball Machine Under the Stairs
In Dreamy Room Level 136, locate the perfect spot under the stairs for the iconic candy dispenser. In Dreamy Room Level 136, place the large gumball machine so its base rests on the floor directly beneath the second step, aligning its central support with the railing’s inner post. Tilt it slightly if needed so that its globe of pastel candies faces head-on into the room, inviting playful interaction. Check in Dreamy Room Level 136 that the gumball lever is accessible from the front and not blocked by the counter or other décor. This vibrant machine in Dreamy Room Level 136 adds whimsy to the bakery’s interior, symbolizing unexpected delights awaiting discovery. Confirm in Dreamy Room Level 136 that it does not overlap any adjacent furniture pieces.
Step 14. Arrange the Large Tiered Cake and Assorted Donuts on Counter Front
In Dreamy Room Level 136, the centerpiece of the bakery is the multi-layered cake with a bow, plus an array of donuts. First, in Dreamy Room Level 136, place the large pastel-tiered cake on the center of the counter’s front edge. Ensure its strawberry on top is aligned with the room’s center axis, creating a perfect focal point. Next, in Dreamy Room Level 136, surround the base of the cake with donuts: place six chocolate-glazed donuts on the left, six white-glazed donuts on the right, and four pink heart-shaped donuts at the foreground. In Dreamy Room Level 136, arrange them in neat rows so each donut’s icing is clearly visible. Verify in Dreamy Room Level 136 that no donut overlaps another or intrudes beyond the counter’s edge. This step in Dreamy Room Level 136 forms a tempting dessert display that captures the heart of this dreamy bakery setting.
Step 15. Place Small Tiered Cakes on Front-Left Floor Space
In Dreamy Room Level 136, add two small tiered cakes to the floor in front of the counter on the left side. First, in Dreamy Room Level 136, locate the empty patch of checkered floor near the bottom-left corner. Place the pink two-tier cake (with cherries on top) closest to the corner, ensuring its base is snug against the front wall. Next to it, in Dreamy Room Level 136, place the blue two-tier cake with a purple bow slightly to the right of the pink cake, leaving a small gap to highlight each cake’s unique details. Confirm in Dreamy Room Level 136 that both cakes sit flat and upright. These cute tiered cakes in Dreamy Room Level 136 enhance the bakery’s charm, signaling to players that this space is teeming with sweet surprises.
Step 16. Place Pink Pastries on Front-Right Floor Space
In Dreamy Room Level 136, the final floor items are two pink pastries on a small stand. In Dreamy Room Level 136, focus on the bottom-right corner of the room, identifying a vacant spot on the checkered floor. Place the pink pastry stand so its front edge lies flush with the front wall and its right side touches the right wall. Then, in Dreamy Room Level 136, set both pink pastries side by side on the stand, with their glossy pink glaze visible. Verify in Dreamy Room Level 136 that each pastry’s decorative swirl faces outward, angled toward the room’s center. This placement in Dreamy Room Level 136 balances the small cakes on the left side, framing the counter area and bringing visual symmetry to the overall scene. With this step in Dreamy Room Level 136 complete, all major objects are in place.
Step 17. Add the Green Planter at Front Center
In Dreamy Room Level 136, the last decorative piece is the leafy green planter. Identify the central area on the front edge of the checkered floor, directly in front of the counter. In Dreamy Room Level 136, place the oval-shaped planter so its long side parallels the front wall. Ensure that the planter’s lush greenery extends slightly above the floor level to create a natural separation between the customer area and service counter. Confirm in Dreamy Room Level 136 that the planter’s brown rim sits flush on the floor and that no leaves intrude onto adjacent tiles. This vibrant piece in Dreamy Room Level 136 injects an organic texture to the room, completing the final visual element. Now, every object in Dreamy Room Level 136 is correctly positioned, revealing a harmonious and inviting bakery scene.
Notes and Precautions
-
Alignment Precision: In Dreamy Room Level 136, every object’s placement must be exact. Misaligning the railing, stairs, or tables by even a few pixels can disrupt the final aesthetic. Always double-check alignments, especially for items like the wooden counter (Step 11) and the large cake centerpiece (Step 14).
-
Object Overlap: Avoid overlapping objects. In Dreamy Room Level 136, ensure the donuts around the tiered cake do not overlap each other or hang off the counter’s edge. Overlaps can trigger a placement error message in the game.
-
Z-Ordering: In Dreamy Room Level 136, the layering of objects matters. For example, the hanging vine (Step 7) must appear behind the spatulas (Step 8) to maintain visual depth. If objects are in the wrong z-order in Dreamy Room Level 136, simply select and re-place them in the correct sequence.
-
Wall-Mounted Items: In Dreamy Room Level 136, items like the cuckoo clock (Step 2) and menu board (Step 10) must be mounted flush against the wall. If you accidentally drag them too far from the wall, they may float awkwardly and cast odd shadows.
-
Symmetry Checks: In Dreamy Room Level 136, maintain symmetry where indicated. The three spatulas (Step 8) should be equidistant, and the paired small tiered cakes (Step 15) should reflect each other to preserve balance.
-
Furniture Clearance: In Dreamy Room Level 136, ensure that the staircase (Step 1) does not crowd the counter (Step 11). If the stairs overlap with the counter base, the game will prevent final validation.
-
Lighting and Shadows: Note that in Dreamy Room Level 136, lighting can accentuate or hide misplacements. View your room from different camera angles to ensure shadows from objects like the gumball machine (Step 13) don’t fall on top of the counter, which can look unnatural.
-
Patience Is Key: Dreamy Room Level 136 invites a mindful approach. If you struggle with a precise placement, step away for a moment and return with fresh eyes. The calm pacing is part of the game’s charm.
Tips and Tricks from Top Player
-
Grid Snapping: In Dreamy Room Level 136, activate grid snapping if available. This ensures even small objects like the pastries on the counter (Step 12) align perfectly with the floor tiles. Top players always use the built-in grid to hit exact coordinates.
-
Layer Locking: After placing significant items like the white picket railing (Step 1) and green curtain (Step 7), lock their position. In Dreamy Room Level 136, locking prevents accidental drags when you’re adjusting neighboring objects.
-
Use Reference Mode: Many veterans of Dreamy Room Level 136 switch to reference mode to view the empty and decorated rooms side by side. This helps in replicating the precise distances between objects, especially for multi-step arrangements (Steps 3, 4, and 14).
-
Small Increment Nudges: If Dreamy Room Level 136 feels finicky, use your device’s arrow keys (if supported) to nudge items by a single pixel. This is crucial when positioning the tiered cake and donut arrangement (Step 14) without overlap.
-
Color Palette Matching: Dreamy Room Level 136 features a pastel palette, so ensure your objects blend. If you’re customizing items, choose pastel tones similar to those in the official image. Top Dreamy Room Level 136 players often sample colors directly from the final image to maintain cohesion.
-
Save Frequently: Dreamy Room Level 136 can be demanding on your device if you’re on mobile. Frequent saves ensure you don’t lose progress when your phone overheats or the app reloads.
-
Start with Large Items: Place big fixtures first—such as the staircase and railing (Step 1) and the service counter (Step 11). Then add smaller décor in Dreamy Room Level 136. This strategy prevents the frustration of having to move large items after fitting everything else.
-
Tidy Up Inventory: Unneeded items can clutter your placement screen. In Dreamy Room Level 136, stash away surplus décor not used in this level. A clean inventory screen speeds up object selection.
-
Simultaneous Holding: If you can, select multiple small objects—like the three spatulas (Step 8)—and drag them as a group to maintain spacing. Skilled Dreamy Room Level 136 players use grouping to place repetitive items swiftly.
-
Final Walkthrough Review: Once everything is placed in Dreamy Room Level 136, rotate the camera around the room to spot any tiny misalignments. Top players do a 360-degree review before confirming, catching mistakes that flatten the final composition.
Final Scene Description
The fully decorated Dreamy Room Level 136 scene reveals a cozy two-story pastel bakery nestled within strawberry-pink walls topped by soft, icing-like trim. Upstairs, a plush white cat clutching a donut lounges beside a beige armchair and wooden coffee table, complete with tea and pastries. A yellow daybed, adorned with a purple flower pillow and pink heart cushion, sits beneath a blue-framed window, while a tall green stool displays a tiered pink-and-blue teacup tower. The upstairs back wall is animated by a cuckoo clock, a floating shelf with white flowers and tissues, and an ice cream cone sconce. Downstairs, chocolate steps lead to a pastel-hued counter under the walkway. Behind, a leafy vine and utensil display sit beside a triangular pastry shelf. The counter brims with a large pastel-tiered cake, donuts, gift boxes, bags, and a blue monitor. A gumball machine hides beneath the stairs, while green planters and petite pastries complete the charming Dreamy Room Level 136 tableau.