Dreamy Room Level 641
Dreamy Room Level 641 guide - Dreamy Room 641 Walkthrough & Solution.
Important Notice Regarding Level Numbering
Due to frequent changes in Dreamy Room's level numbering and differences between platforms (Android/iOS) – for example, level 641 on Android might not be the same as level 641 on iOS – the text guide below may not always match the images and video above. Please prioritize the image and video guides. If you find that the guide content doesn't match your current level, please visit the All Level Walkthroughs page to find the correct guide based on level images. Thank you for your understanding.
Dreamy Room Level 641 Walkthroughs & Guide
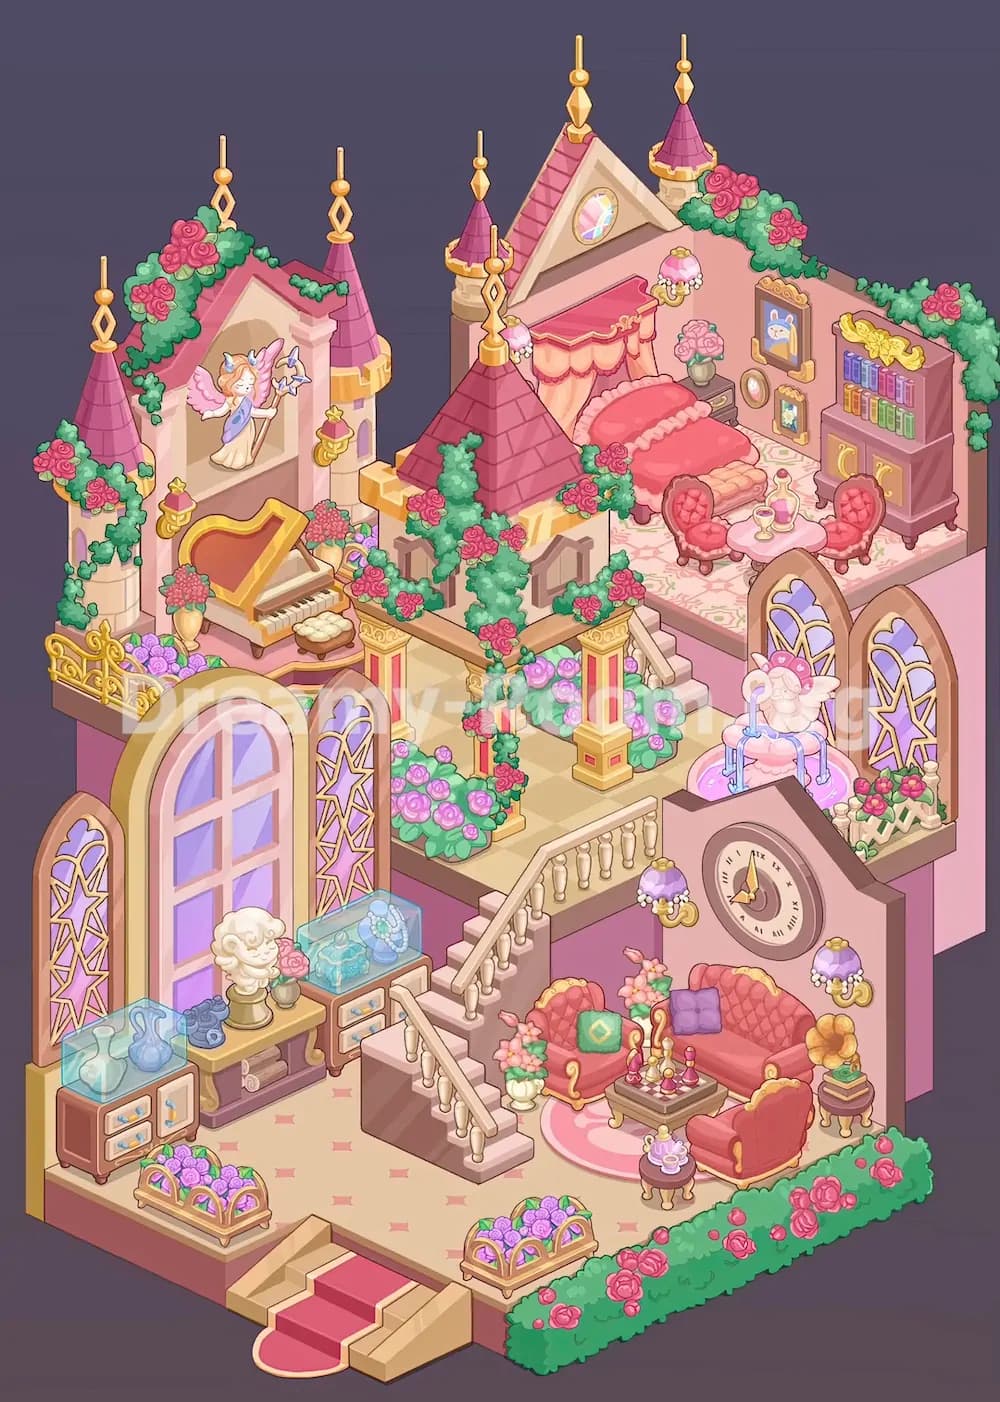
Dreamy Room Level 641 turns a simple three-tier shell into a romantic castle interior filled with music, flowers, and elegant furniture. The real challenge in Dreamy Room Level 641 is not spotting the items, but understanding their exact positions, layers, and symmetry. Many decorations look similar, and several objects only fit correctly when the surrounding structure is already in place. This Dreamy Room Level 641 guide walks through the room in a practical order so you can build the scene from the bottom upward without getting stuck.
Step 1. Place the entrance steps, lower floor frame, and tall windows in Dreamy Room Level 641
Start Dreamy Room Level 641 from the ground floor because this level depends heavily on structure before decoration. At the front center edge, place the short staircase with the pink carpet runner leading into the room. Once the entry is set, install the large arched central window on the left wall of the lower floor. Then add the two narrow stained-glass style windows, one to the far left of the big arch and one just to its right. These three window elements define the whole lower-left side of Dreamy Room Level 641. After that, set the lower floor walls and the open living area boundary on the right. Make sure the giant clock wall remains on the right half of the room, not in the center. If your windows or staircase look slightly off, later furniture will seem misaligned. Dreamy Room Level 641 rewards careful foundation placement before any small decorative item is touched.
Step 2. Place the cabinets, console table, bust, and display cases on the lower-left side
Now furnish the lower-left gallery area of Dreamy Room Level 641. Put one small cabinet beneath the far-left narrow window and another beneath the right narrow window near the stairs. On top of each cabinet, place the transparent glass display cover. The left case holds pale blue vases, while the right case displays delicate blue accessories or jewelry pieces. Between these cabinets, position the long console table directly under the large arched window. On the console, place the white classical bust in the center, a dark blue rotary-style telephone to its left, and a pink rose in a small vase to its right. Below the console shelf, add the rolled fabric or scroll-like items. This section of Dreamy Room Level 641 can look crowded, so keep the objects tight and tidy against the wall. The puzzle logic of Dreamy Room Level 641 is all about matching scale and purpose, and this area should feel like a curated palace display corner.
Step 3. Place the flower baskets, lower stairs, and the main sitting room furniture
Next, build the social space on the lower-right side of Dreamy Room Level 641. Put the flower baskets near the front edge of the floor, one closer to the left side of the entry and one closer to the right side. Then set the staircase that rises from the lower floor toward the center terrace. After that, create the sitting area under the clock wall. Lay down the round pink rug first so the furniture has a clear anchor. Place the long sofa against the clock wall, the loveseat on the left side of the rug, and the single chair at the front right corner of the arrangement. Add the square coffee table in the middle with the small perfume or bottle set on top. Then place the small round side table with the tea set near the chair, and the gramophone on the small stand to the right of the sofa. Dreamy Room Level 641 becomes much easier once this lower lounge is balanced, because it teaches you how the game wants conversation zones arranged.
Step 4. Place the clock wall lamps, floral vases, and polish the lower lounge in Dreamy Room Level 641
With the major seating in place, finish the wall and side details for Dreamy Room Level 641. Center the large round clock high on the pink wall above the sofa. On each side of the clock, attach the purple-and-gold wall lamps at matching heights. Then add the floral vases beside the loveseat and near the sofa so the sitting room feels elegant rather than empty. Put the green throw pillow on the loveseat and the purple cushion on the sofa. Check that the coffee table remains centered and that the armchair faces inward toward the table, not outward toward the hedge. This is one of the easiest places to make a layering error in Dreamy Room Level 641, because the furniture has curved shapes and can appear correct even when slightly misplaced. The lower lounge in Dreamy Room Level 641 should read as a refined reception area beneath the grand staircase, with every object pointing toward conversation and comfort.
Step 5. Place the central terrace, columns, railings, and rose-covered garden sections
Move to the middle level and assemble the heart of Dreamy Room Level 641. Install the two stairways that connect the lower floor to the central terrace and the upper-right bedroom platform. Then place the cream railings along the stairs and the edge of the terrace. In the center, add the covered pavilion structure with its pink roof and vine-covered walls. Beneath it, position the gold-and-pink columns that support the terrace roofline. Around the terrace edges, plant the dense clusters of pink and lavender roses so they wrap around the columns and pathways. This middle section is crucial in Dreamy Room Level 641 because it visually links the music balcony, bedroom, fountain, and lounge into one castle-like composition. If the columns are crooked or the terrace shrubs are missing, the whole level loses its symmetry. Dreamy Room Level 641 hides much of its beauty in the transitions between spaces, so take time to align every stair and floral border.
Step 6. Place the fountain, right-side windows, fence, and exterior hedge decorations
Now complete the right exterior section of Dreamy Room Level 641. Place the pair of tall arched windows on the right side behind the fountain area. In front of them, build the pink circular fountain basin and set the angelic figure in the center so the water streams flow downward into the pool. Near the right wall, add the short white fence lined with flowers. At the very front-right outer edge, place the long green hedge topped with pink roses. This hedge frames the lower-right corner and balances the floral border seen elsewhere in Dreamy Room Level 641. The fountain should sit slightly above the clock wall area, bridging the living room and the upper terrace. This part of Dreamy Room Level 641 often tricks players because the fountain feels like a centerpiece, but it actually belongs off to the right, tucked between the windows and the terrace edge. Correct placement creates a soft palace courtyard effect.
Step 7. Place the music balcony, angel alcove, piano, and golden railing on the upper-left side
The upper-left balcony is one of the most memorable spaces in Dreamy Room Level 641. First, add the castle walls and pink spires around the left platform. Then place the angel figure inside the tall wall alcove above the piano area. Attach the two wall sconces on either side beneath the alcove. Below them, position the gold-trimmed grand piano so it faces inward toward the room, not toward the outer edge. In front of the piano, place the tufted bench. On both sides of the piano, add the tall vases filled with pink hydrangea-like flowers. Finish the balcony with the decorative golden railing and the flower bed packed with purple blooms. Dreamy Room Level 641 uses this balcony as a story detail, suggesting music and ceremony. If the piano or alcove statue is even slightly off, the whole left side loses its regal feeling. In Dreamy Room Level 641, the placement puzzle is always about matching the mood of the space as much as the shape.
Step 8. Place the bedroom structure, canopy bed, lamps, and bedside table on the top-right platform
Now build the sleeping area of Dreamy Room Level 641 on the upper-right platform. Start with the roofline, the triangular gable, and the small oval stained-glass window high above the bed. Add the pink spires and rose-covered greenery along the outer roof edge. Then position the canopy bed against the back wall, centered beneath the draped curtain canopy. Place the ruffled pink bedding and the cushioned bench at the foot of the bed. To the right of the bed, set the bedside table and top it with the vase of pink roses. Mount the hanging lamps on both sides near the canopy to frame the bed with warm symmetry. This bedroom is the softest and most delicate zone in Dreamy Room Level 641, so spacing matters a lot. Dreamy Room Level 641 becomes easier when you think of the bed as the anchor; once it is centered correctly, the lamps, flowers, and wall details naturally fall into place.
Step 9. Place the tea table, chairs, wall portraits, and bookcase in the bedroom of Dreamy Room Level 641
After the bed is set, furnish the rest of the top-right room in Dreamy Room Level 641. In front of the bed, place the small round tea table. Add the glass bottle or decanter on the tabletop along with the cup or goblet. Put one red tufted chair on the left side of the table and the matching chair on the right. On the wall above and beside the table, hang the framed portraits: the larger bunny portrait higher up, then the small oval frame, then the smaller rectangular portrait beneath it. Finally, put the tall bookcase on the far-right wall. Arrange the colorful books on the shelves and make sure the gold ornament sits at the top, with the cabinet doors at the bottom. This upper room in Dreamy Room Level 641 should feel like a private royal suite where reading, resting, and quiet tea all happen in one place. The main challenge in Dreamy Room Level 641 is recognizing that these pieces belong in a tight salon arrangement rather than being spread out.
Step 10. Place the final roses, vines, rooftop details, and check every exact position
Finish Dreamy Room Level 641 by adding all remaining decorative greenery and rose clusters across the tops of walls, around the pavilion roof, and along the exterior edges. Make sure each pink spire has its gold finial, and check the floral vines creeping over the left balcony façade, the central pavilion, and the bedroom roofline. Fill the terrace edges with the last rose bushes so there are no empty patches around the columns or stairs. Recheck the relationship between the fountain, right windows, bedroom floor, and clock wall, because these stacked layers define the vertical flow of Dreamy Room Level 641. Also confirm the lower-left displays, the piano balcony, and the sitting room are all facing inward in a natural way. Dreamy Room Level 641 looks dense, but it becomes manageable when you do a final scan from top to bottom. At this stage, success in Dreamy Room Level 641 comes from correcting tiny offsets rather than moving large furniture.
Notes and Precautions
Dreamy Room Level 641 is full of similar pink, gold, and floral pieces, so the biggest risk is placing a correct-looking object in the wrong zone. The fountain belongs on the right middle section, not the center. The piano belongs on the upper-left balcony, and the tea setup belongs in the upper-right bedroom suite. Another important point in Dreamy Room Level 641 is layering: large structural pieces such as windows, stairs, walls, and roof sections should be placed before decorative items. If you try to force flowers or furniture in too early, you may misread where a later object belongs. Watch symmetry closely. The wall lamps around the clock, the bed lamps, and the paired chairs all rely on mirrored placement. Finally, keep checking direction. In Dreamy Room Level 641, furniture usually faces inward toward the room’s activity, and that clue often tells you the correct final position.
Tips and Tricks from top player
A strong method for Dreamy Room Level 641 is to solve it by function instead of by color. Group all music-related pieces to the upper-left balcony, all rest-and-reading pieces to the upper-right bedroom, all conversation furniture to the lower-right lounge, and all display furniture to the lower-left gallery. That mental sorting instantly reduces confusion. Another top-player trick for Dreamy Room Level 641 is to place anchors first: giant window, clock wall, bed, piano, fountain, and staircase. Once those are locked in, the smaller objects almost explain themselves. Also, use the floral pieces as finishers, not starters. Roses and vines fill gaps after the architecture is correct. When stuck in Dreamy Room Level 641, zoom out mentally and look for empty visual balance rather than hunting one item randomly. The game is testing whether each object completes a story scene, not whether it simply fits in an empty square.
Final scene description
When fully completed, Dreamy Room Level 641 becomes a dreamy pink castle home spread across three elegant levels. The ground floor combines a refined display gallery on the left with a warm sitting room on the right, complete with a clock wall, plush seating, and decorative tables. Above that, the center terrace blooms with rose bushes, golden columns, staircases, and a vine-wrapped pavilion roof. The upper-left side features a graceful music balcony with a grand piano beneath an angel alcove, while the upper-right side transforms into a royal bedroom with a canopy bed, tea corner, portraits, and a bookcase. On the right, a cherub fountain sparkles before tall arched windows, and roses frame nearly every edge. Dreamy Room Level 641 feels luxurious yet cozy, and the final beauty comes from how perfectly every item sits in its intended place.