Dreamy Room Level 174
Dreamy Room Level 174 guide - Dreamy Room 174 Walkthrough & Solution.
Important Notice Regarding Level Numbering
Due to frequent changes in Dreamy Room's level numbering and differences between platforms (Android/iOS) – for example, level 174 on Android might not be the same as level 174 on iOS – the text guide below may not always match the images and video above. Please prioritize the image and video guides. If you find that the guide content doesn't match your current level, please visit the All Level Walkthroughs page to find the correct guide based on level images. Thank you for your understanding.
Dreamy Room Level 174 Walkthroughs & Guide
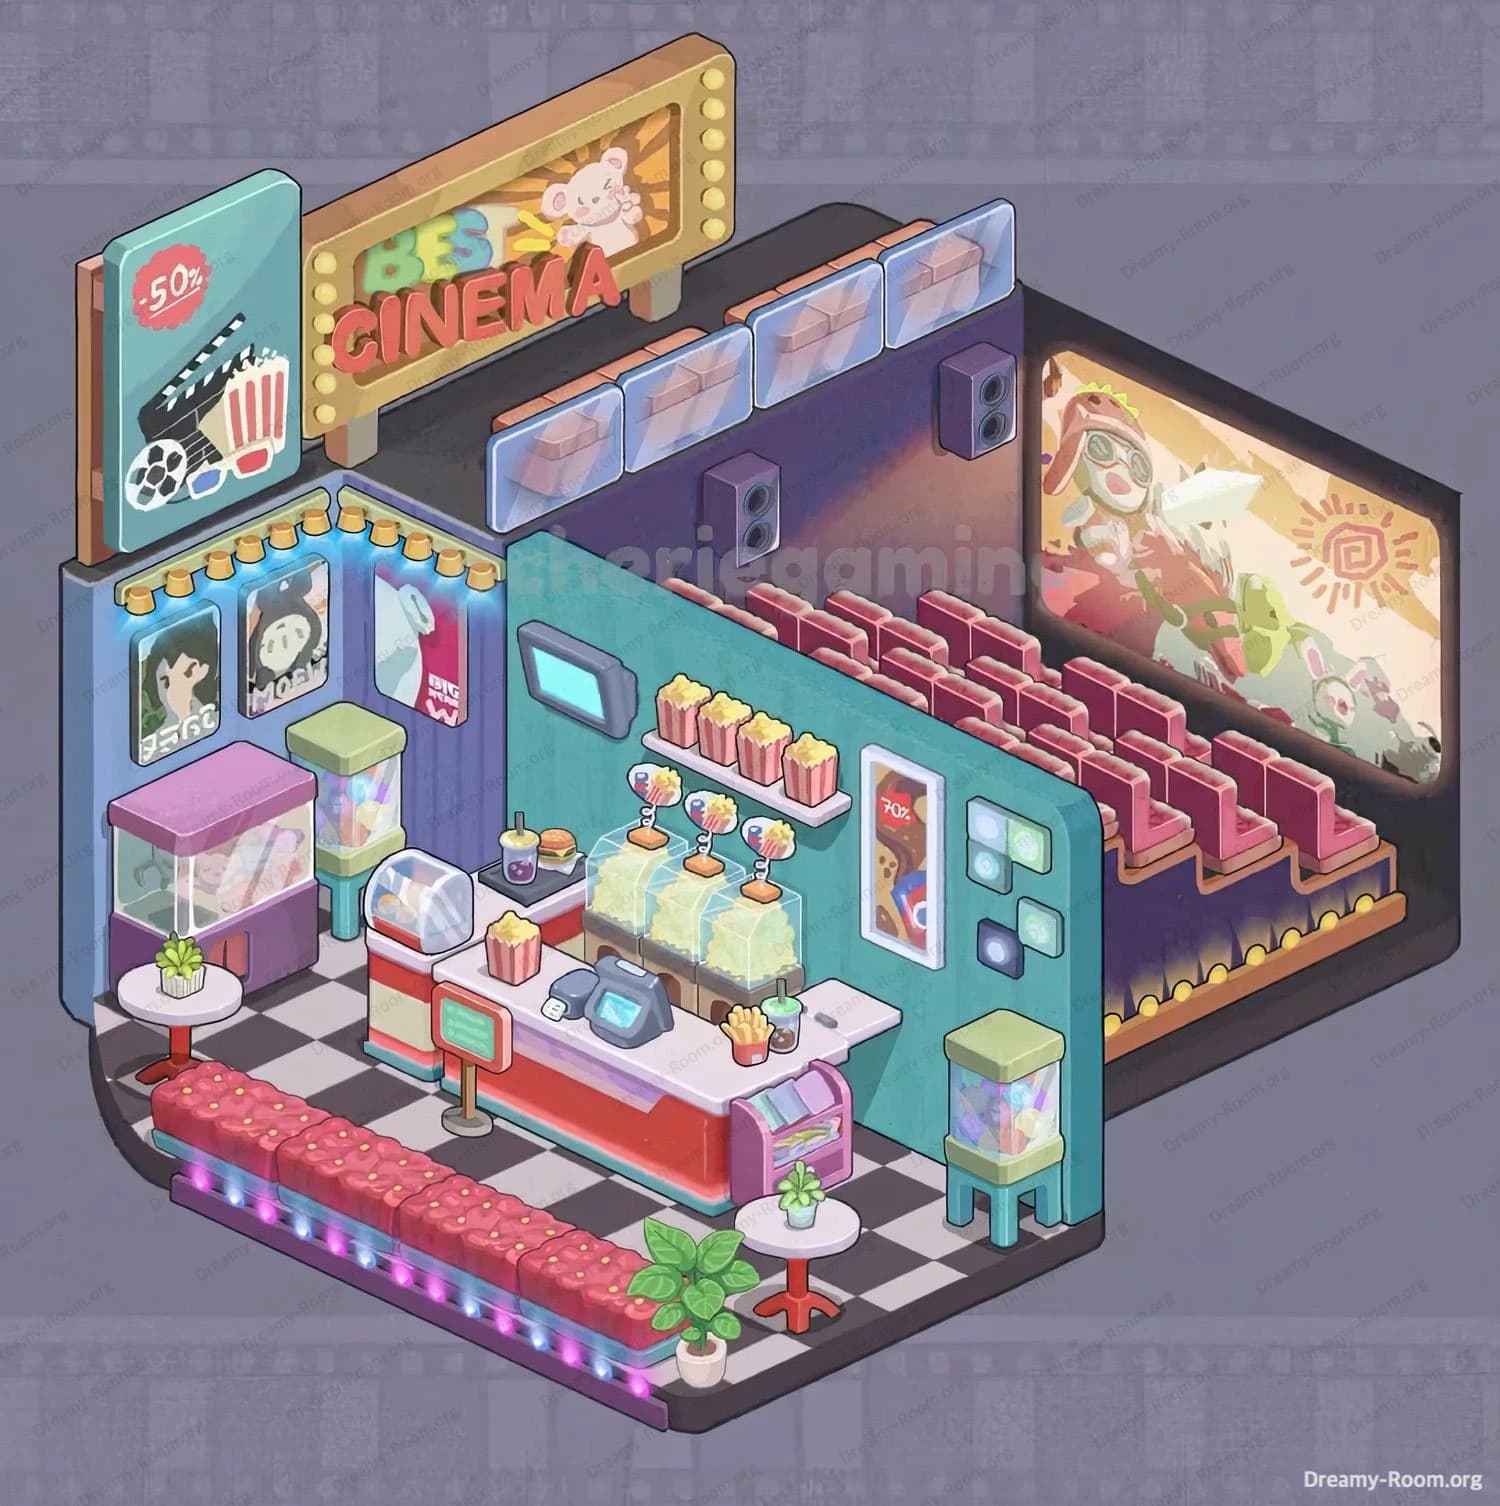
Step 1. Place the black-and-white checkered floor tile in the lower-left quadrant.
Begin Dreamy Room Level 174 by opening your inventory and selecting the large checkered floor tile. In Dreamy Room Level 174, this tile anchors the entire layout and must sit flush against the left wall edge and the bottom boundary. Drag it carefully so that the alternating black-and-white squares face upward, then rotate if needed to align the tile’s curved outer edge with the room’s corner. Because Dreamy Room Level 174 emphasizes precision, zoom in and nudge the tile until there are no visible gaps. Double-check that the tile does not overlap the future concession stand area—mistakes here can cascade and make later steps much harder in Dreamy Room Level 174.
Step 2. Place the teal partition wall behind the concession area.
Next, tackle the partition wall in Dreamy Room Level 174. Select the tall teal panel from the “Walls” tab and position it immediately along the back edge of the checkered floor. In Dreamy Room Level 174, this wall divides the concession stand on the left from the screening area on the right. Rotate the panel so its hinge aligns with the left corner, then click “snap” to lock it in place. Make sure the teal wall stands perpendicular to the floor tile—any slight misalignment in Dreamy Room Level 174 will throw off poster placements and signage. Once locked, you’ll see a crisp vertical boundary for all upcoming decorations in Dreamy Room Level 174.
Step 3. Install the dark purple back wall and mount speakers and the big screen.
For Dreamy Room Level 174, pick the dark purple wall panel and attach it to the right side of the teal partition. In Dreamy Room Level 174, this creates the cinema’s viewing area. After you snap the panel into place, select the widescreen movie display asset and drag it onto the purple wall’s right face. Rotate until it sits flush and centered—this is the main attraction in Dreamy Room Level 174. Finally, add two black speaker boxes: one on each side of the screen, slightly above head height. In Dreamy Room Level 174, proper placement of these speakers is crucial for the authentic cinema vibe, so ensure they’re symmetrically aligned and don’t overlap the floor.
Step 4. Place the raised seating platform and attach the red theater seats.
Now for seating in Dreamy Room Level 174: grab the modular raised platform piece and snap it into the right-center area, flush against the purple back wall and parallel to the teal partition. In Dreamy Room Level 174, the platform elevates your seats for optimal viewing. Once anchored, select the row of red cushioned theater seats and position three seats in a straight line on the platform’s front edge. Next, add a second row directly behind the first, offset by half a seat’s width for a staggered look. Be meticulous in Dreamy Room Level 174—tiny misalignments can ruin the realistic tiered effect, so use the grid overlay to perfect your work.
Step 5. Position the concession stand counter and the small signboard.
In Dreamy Room Level 174, the concession stand is the heart of the left area. Choose the red-and-white counter piece and drag it onto the checkered floor, directly in front of the teal partition. Rotate so the cashier’s register faces the center of the room. In Dreamy Room Level 174, make sure there’s enough clearance behind the counter for staff to “walk.” Once aligned, pick up the little menu signboard on a post and place it just to the left of the counter’s front corner. In Dreamy Room Level 174, this signboard advertises special deals, so angle it slightly toward the room’s entry point to catch a visitor’s eye.
Step 6. Install wall decorations: posters, vending signage, and marquee board.
For Dreamy Room Level 174, embellish the teal partition with three framed movie posters. Click each poster in your décor tab—two character art prints and one abstract film reel image—and place them evenly spaced along the upper left wall, beneath a row of yellow marquee lights. In Dreamy Room Level 174, spacing must be equal: use the “distribute” tool if necessary. Next, add the tall “-70%” vending machine poster on the partition’s right side, then mount the giant gold marquee sign reading “BEST CINEMA” above the teal wall, straddling the join to the purple panel. In Dreamy Room Level 174, this sign is a showstopper, so nudge it until the bulbs line up perfectly.
Step 7. Place machines and snack accessories: candy crane, gumball machines, mini-fridge, popcorn dispensers, snack trays.
To complete the left side in Dreamy Room Level 174, select the purple candy crane game and snap it into the corner nearest the teal wall. In Dreamy Room Level 174, ensure its base aligns with the floor tiles. Then add two pastel gumball machines on either side of the crane. Next, choose the mini-fridge and tuck it just behind the right end of the concession counter. In Dreamy Room Level 174, place three transparent popcorn dispensers atop the counter behind the register. Finally, drag the burger-and-soda tray and a small fries container onto the counter’s surface. In Dreamy Room Level 174, these final snack details bring the concession stand to life—adjust until nothing overlaps.
Step 8. Add seating accessories: LED-lit bench, small tables, and potted plants.
The finishing touches in Dreamy Room Level 174 go along the front bench area. Select the long upholstered bench piece with built-in LED lights and snap it to the front edge of the checkered floor. In Dreamy Room Level 174, make sure the LEDs face outward. Then pick up two small round tables and place one at each end of the bench, on top of the floor tile. Lastly, choose two potted plants—one succulent, one leafy—and position them on each table. In Dreamy Room Level 174, these greenery accents soften the hard lines and complete the cozy cinema atmosphere. Rotate each pot so the leaves face the center for balance.
Notes and Precautions
- Object Overlap: In Dreamy Room Level 174, overlapping any two objects (e.g., a seat and the platform) can prevent future snapping. Always use the “nudge” tool to fine-tune placement.
- Rotation Accuracy: Walls and signs in Dreamy Room Level 174 require precise 90° rotations. A 1° error can cause misalignment issues later.
- Snap Grid: Rely on the grid snap in Dreamy Room Level 174 to align small decorative items like plants and snack trays.
- Undo Limit: There is an undo cap of 10 actions in Dreamy Room Level 174. Plan your moves and save often.
Tips and Tricks from top player
- Layering Order: In Dreamy Room Level 174, always place large backdrops (walls, floor) first, then mid-sized structures (platforms, counters), and lastly small décor (plants, trays).
- Use Angle Lock: Engage the angle lock feature when rotating signs and posters in Dreamy Room Level 174 to guarantee perfect alignment every time.
- Duplicate Quickly: After placing one gumball machine in Dreamy Room Level 174, use the duplicate shortcut (Ctrl+D) to create a second—then just reposition.
- Color Consistency: Refer to the on-screen swatch tool in Dreamy Room Level 174 to match wall and seat colors precisely for a cohesive look.
Final Scene Description
The completed Dreamy Room Level 174 presents a charming isometric mini-cinema bathed in soft pastel hues and punctuated by striking reds and teals. On the left, polished black-and-white checkered tiles lead to a bustling concession stand crowned by three popcorn dispensers, a burger-and-soda tray, and a vibrant mini-fridge. Framed posters and a “-70%” vending sign adorn the teal wall, while a gold-bulbed “BEST CINEMA” marquee straddles the partition to the deep purple back wall. To the right, a tiered platform holds two rows of plush red seats facing an animated movie screen, flanked by black speakers. A cozy LED-lit bench with potted plants and round tables hugs the front. Every detail in Dreamy Room Level 174 has been meticulously arranged to evoke the warm nostalgia of a classic neighborhood theater.