Dreamy Room Level 496
Dreamy Room Level 496 guide - Dreamy Room 496 Walkthrough & Solution.

Important Notice Regarding Level Numbering
Due to frequent changes in Dreamy Room's level numbering and differences between platforms (Android/iOS) – for example, level 496 on Android might not be the same as level 496 on iOS – the text guide below may not always match the images and video above. Please prioritize the image and video guides. If you find that the guide content doesn't match your current level, please visit the All Level Walkthroughs page to find the correct guide based on level images. Thank you for your understanding.
Dreamy Room Level 496 Walkthroughs & Guide
Step 1. Place the bed in the upper-right corner of the top floor
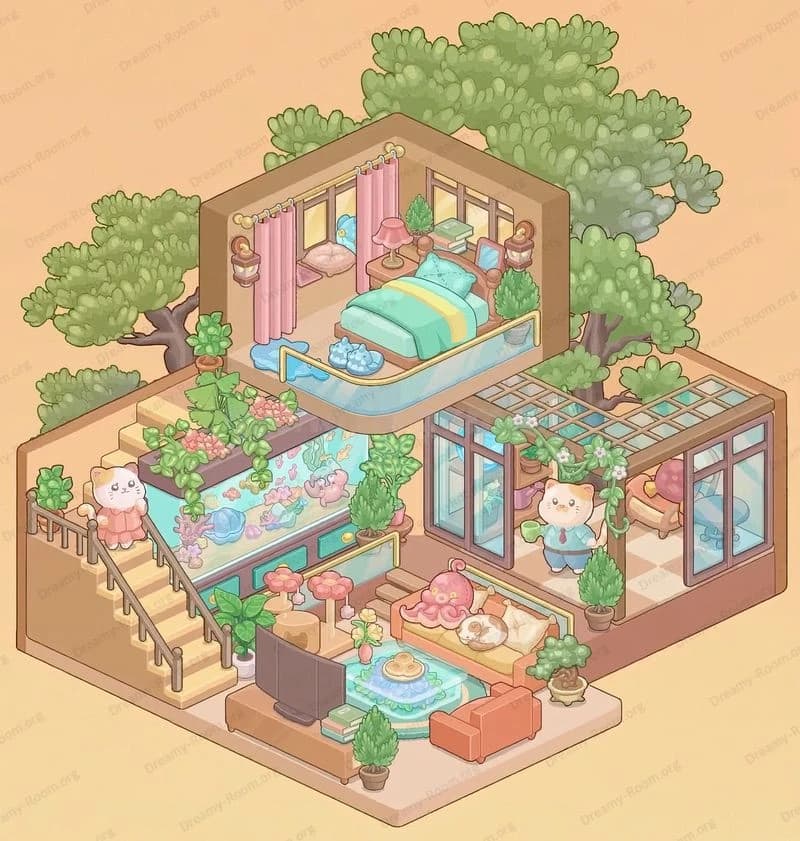
Start Dreamy Room Level 496 by finishing the bedroom zone on the highest platform. Drag the pink checkered bed to the upper-right corner, aligning its long side with the windowed wall and its headboard against the floral wallpaper. Make sure the bed edge follows the isometric grid so the blanket stripes line up with the floor tiles. Next, drop the small side platform or nightstand beside the bed’s foot and stack the pastel books on it, with the blue book at the bottom and the pink one on top. Place the bunny plush leaning on the books, facing slightly toward the center of the room so it’s visible from below. Finally, slide the oval floral rug onto the floor beside the bed, centered under the opening, to anchor this sleeping nook in Dreamy Room Level 496.
Step 2. Place the glass roof in the top-floor ceiling position
Now transform the upper floor of Dreamy Room Level 496 into a greenhouse loft. Drag the long curved glass roof so it covers the entire top level, following the angle of the back wall. The left edge should start just above the blue tree and pink flowers, while the right edge stops before the back tree on the far side. Make sure the pale beams of the roof sit directly above the window frames, and the row of blue decorative orbs appears inside the roof, not floating. Position the large hanging clock beneath the front left arch of the glass roof so the clock face tilts toward the viewer. This placement makes the roof feel like a cozy conservatory ceiling in Dreamy Room Level 496 instead of a random glass arch.
Step 3. Place the wall décor in the center of the back wall
For the next arrangement in Dreamy Room Level 496, focus on the pink floral wall behind the bed. First, position the green house-shaped wall clock above the arched yellow door on the left side so its little roof points upward and its pendulum hangs just below. Place the arched door directly on the mid-level back wall with its golden frame exactly touching the floor edge; the small window in the door should glow softly toward the interior. To the right of the door, hang the two framed pictures—small rectangle on the left, taller rectangle on the right—so they form a neat vertical pair. Slightly farther right, above the bed area, attach the golden circular mirror or sun plaque, centered between the top of the bed and the roof frame. When these frames and clocks sit in this exact order, Dreamy Room Level 496 immediately looks balanced and story-rich.
Step 4. Place the plants, candles, and bird by the windows
Dreamy Room Level 496 uses plants and lighting to emphasize the greenhouse feeling. Along the right side of the top floor, align the tall white-framed windows so they sit directly on the wall edge, matching the floor’s back line. On the inner window ledge, put the potted bouquet of pink flowers to the left and the fuller green plant closer to the right corner, both facing forward. Next, move the tall golden candle stand with three lamps to the bedside, just between the rug and the window, so its base sits on the upper platform and its lamps rise above the bed. At the far right window, place the blue-and-yellow bird on its little perch or cage stand, so it appears inside the glass wall near the hanging vine that curves down the right side. These exact placements make the upper zone of Dreamy Room Level 496 feel lively and botanical.
Step 5. Place the kitchen counter on the mid-left platform
Shift attention to the middle level of Dreamy Room Level 496, which becomes a tiny kitchen and snack bar. Drag the long pink counter so it runs along the back edge of the mid-left platform, straight under the wallpaper. On the counter’s far left, set the small photo frame with chalkboard and the sunflower detail leaning against the wall. Next to it, place the sunflower pot, then the lush green plant so the leaves spill forward. Toward the right side of the counter, arrange the glass jars of sweets and preserves, then the plate of cakes, and finally the small crate or box of bread or pastries. At the extreme left of this level, position the tiny stand with the round fishbowl so it sits against the wall and looks like it almost touches the blue tree outside. When ordered like this, the kitchen in Dreamy Room Level 496 feels both full and tidy.
Step 6. Place the sofa and snack table in the mid-center
The middle platform of Dreamy Room Level 496 also holds a sitting corner. Drag the pink bench or sofa onto the front edge of the mid-center level, facing outward toward the viewer and slightly right. It should sit just above the main staircase, leaving a narrow walking strip behind the back of the sofa. In front of it, place the low rectangular coffee table with the blue checkered tablecloth so the long side parallels the sofa. On this table, arrange the cakes or pastries and the small dish so they are clearly visible from the bottom level. Ensure the sofa does not overlap the stair edge; the stairs must remain visually clear to guide the bears upward. This careful alignment keeps navigation intuitive in Dreamy Room Level 496 and ensures that snacks, not collision, greet players at the mid-floor.
Step 7. Place the dining set in the lower-right terrace
Now decorate the lower terrace of Dreamy Room Level 496 as a garden café. Move the round lavender table to the front-right corner of the main floor, on the checkered tiles. Place it so its back edge nearly touches the glass railing that separates the drop to the level below. Then slide the two pink chairs with checkered seats on opposite sides of the table—one facing left, one facing slightly forward. On the tabletop, set the clear vase filled with white and yellow flowers exactly in the center. Right behind this dining area, position the transparent glass cylinder with the green dress, mannequin, and vine inside so it stands against the right-side trees but still on the tiled floor. This alignment makes the dining corner of Dreamy Room Level 496 feel like a magical greenhouse café overlooking the garden.
Step 8. Place the glass railing and stair details in front
To complete the structural details of Dreamy Room Level 496, drag the long glass railing so it runs along the front edge of the raised mid-right floor, just above the lower terrace. The railing should align with the stair opening, creating a clear safety barrier while leaving the staircase itself uncovered. Ensure the steps from the main floor to the mid-level are centered and clearly visible between the sofa and café area. On the far left, near the waterfall, tuck the leafy green bush at the cliff edge and the bright pink flowering plant just above the rocks, emphasizing the transition from indoor zone to exterior cliff. These transparent and natural elements help players read depth and height quickly in Dreamy Room Level 496, which is crucial for placing smaller objects without confusion.
Step 9. Place the vegetable garden, mushrooms, and fence in the front-right soil
The grassy front-right edge of Dreamy Room Level 496 hosts a miniature farm. On the bare soil patch, plant the two leafy green vegetable clumps at the left of the patch, one slightly behind the other. To their right, place the pink root vegetables that look like turnips or beetroots, staggering them diagonally so both tops are visible. At the back of the patch, seat the small teddy or hamster doll nestled among leaves, facing the center of the island as if watching the bears. Along the back edge of the soil, add the low wooden fence pieces in a gentle curve, dividing the garden from the terrace. Finally, position the two large red-capped mushrooms with white spots just outside the patch on the grass, leaning slightly outward. Correct alignment of this tiny farm is key to the charm of Dreamy Room Level 496.
Step 10. Place the path, animals, and bear characters on the front lawn
The final placements of Dreamy Room Level 496 bring the scene to life. Lay the four pale stepping stones in a smooth curve from the waterfall side toward the center front, making sure they sit on the grass, not overlapping the tile border. Position the small brown dog on the second stone from the right, lying playfully with its head toward the garden. On the far left end of the path, place the bear cub in a red outfit and boots, running toward the center with arms slightly out. On the grass between the garden and path, place the second bear in blue overalls with a star badge, facing left and mid-stride as if greeting the other cub. Check that both bears’ feet sit firmly on the ground and don’t float over tiles. These expressive characters are the heart of Dreamy Room Level 496 and must be placed precisely.
Notes and Precautions
In Dreamy Room Level 496, most mistakes come from height confusion and overlapping objects. Always zoom in before locking the position of tiny items like pastries, jars, and the bunny plush; if they snap to the wrong layer, they may appear behind walls or float above steps. Pay attention to how furniture aligns with the isometric tiles—beds, tables, and counters must follow the diagonal lines of the floor pattern. When placing objects near the waterfall or cliff edges, make sure nothing clips past the island boundary, or the game will reject the placement. Likewise, characters in Dreamy Room Level 496 must stand on grass or stone, never on the void. Finally, remember that decorative pieces such as clocks, pictures, and the bird perch are strictly wall-bound; forcing them onto glass or free space often fails, so always drag them directly over the wallpaper zones.
Tips and Tricks from top player
Top players treat Dreamy Room Level 496 like a layered puzzle rather than random decoration. Start from the highest level and work downward so nothing hides behind later pieces. Use the wallpaper and tile seams as invisible grid guides to judge where bed corners, counters, and railings should sit. When unsure where a small item belongs, think about function: food items group near the kitchen or coffee table, plants gather by windows or garden, and toys cluster close to the bears. In Dreamy Room Level 496, symmetry helps—notice how wall decor balances around the door and bed, and mirror that balance when adjusting frames. If an object keeps snapping to an odd place, slightly adjust the camera angle before dragging; this often reveals the correct anchor tile. Above all, place similar items together first, then fine-tune spacing so the room feels intentional, not scattered.
Final Scene Overview for Dreamy Room Level 496
When every object is correctly positioned, Dreamy Room Level 496 becomes a tiny floating homestead bursting with life. The pastel island hovers above the clouds, its grassy front dotted with vegetables, mushrooms, and a playful puppy while two bear children run along the stone path. Above them, a cozy terrace café with a round flower-topped table leads into a pink-walled home, its kitchen counter overflowing with plants and sweets. A sofa and snack table invite resting halfway up the stairs. On the highest level, under a gleaming glass greenhouse roof, the pink bed, candle stand, potted flowers, and perched bird form a sunny loft bedroom. Clocks, frames, and mirrors line the floral wallpaper, and the waterfall sparkles at the cliff edge. Altogether, Dreamy Room Level 496 feels like a peaceful, storybook sanctuary in the sky.