Dreamy Room Level 738
Dreamy Room Level 738 guide - Dreamy Room 738 Walkthrough & Solution.
Important Notice Regarding Level Numbering
Due to frequent changes in Dreamy Room's level numbering and differences between platforms (Android/iOS) – for example, level 738 on Android might not be the same as level 738 on iOS – the text guide below may not always match the images and video above. Please prioritize the image and video guides. If you find that the guide content doesn't match your current level, please visit the All Level Walkthroughs page to find the correct guide based on level images. Thank you for your understanding.
Dreamy Room Level 738 Walkthroughs & Guide
Step 1. Place the main tall harbor shop on the upper-left deck.
Begin Dreamy Room Level 738 by placing the largest building on the raised left side of the pier. This is the tall purple harbor shop with a rounded red roof, yellow-trimmed windows, and a striped red-and-white awning at the front. It should sit toward the back-left area, directly against the purple wall, with its front facing diagonally toward the lower-right side of the screen. In Dreamy Room Level 738, this building acts as the main anchor for the whole design, so align it carefully before placing smaller items. The roof should rise above the left deck, the small upper window should face forward, and the long awning should extend over the front entrance. Once this shop is placed correctly, the empty pier begins to look like a real seaside entertainment pier rather than a simple platform.
Step 2. Add the small lower-right cabin and balcony structure.
Next in Dreamy Room Level 738, place the smaller purple cabin on the right side of the main tiled pier. This cabin has a red rounded roof, yellow-trimmed windows, a front door, and a fenced balcony area. It belongs on the right-middle section of the platform, slightly below and to the right of the tall shop. Make sure the front balcony faces the viewer and the door sits near the left side of the small cabin’s front wall. The fence should run along the front edge of the balcony, creating a small lookout area above the lower market zone. In Dreamy Room Level 738, this cabin balances the tall left building and creates the feeling of a stacked harbor village. Place the small animal character on the balcony near the front fence, standing like a pirate lookout watching the entertainment pier below.
Step 3. Install the pirate mast, sails, ropes, and flag behind the buildings.
The pirate theme of Dreamy Room Level 738 becomes clear once you place the mast and sail system behind the right-side cabin. Position the two horizontal blue-gray poles behind the small cabin and to the right of the tall shop. The tan patched sails with red markings should hang from the upper pole, while the rope netting should stretch diagonally below them. At the top, place the small round mast base with the purple pirate flag waving to the right. This section must sit at the back-right corner, rising above the roofline without covering the main shop’s upper window. Dreamy Room Level 738 depends on layering here: the sails should appear behind the cabin, the rope net should appear between the buildings, and the flag should sit at the highest point. Correct placement gives the room its pirate harbor identity.
Step 4. Decorate the upper-left café deck with tables, chairs, and octopus dolls.
Now focus on the rounded upper-left deck in Dreamy Room Level 738. Place the two round café tables on the left side of the upper platform, each surrounded by small wooden stools. On top of the tables, add the blue vases with pink flowers. Along the back edge of this deck, arrange the row of cute pink octopus plush figures or sea-creature mascots. They should stand beneath the left-side banner line, close to the wall and behind the seating area. Add the small wooden blocks or crates around this café section, making the deck look like a casual outdoor harbor lounge. In Dreamy Room Level 738, the upper café area should feel busy but not crowded. The octopus decorations belong at the back, the tables belong in the center, and the stools should circle the tables evenly.
Step 5. Place the bunting banners and the open sign around the upper buildings.
Dreamy Room Level 738 uses colorful triangular banners to connect the buildings and make the pier feel festive. Place the red, purple, blue, and cream bunting across the front of the main tall shop, stretching from the left posts to the right side near the small hanging sign. Add another banner line along the edge of the upper-left deck, following the curved railing area. The wooden “OPEN” sign should hang near the center-right side of the tall shop, just below the balcony level and near the stairs. Place the small triangular flags so they do not cover the shop door or the awning. In Dreamy Room Level 738, banners are easy to misplace because they overlap with roofs, stairs, and railings. The correct placement makes the scene look like a cheerful harbor fair rather than random decoration.
Step 6. Build the central stairway and connect the upper and lower areas.
The stairway is one of the most important alignment objects in Dreamy Room Level 738. Place the gray stairs in the center-left area, slanting downward from the upper café deck to the lower wooden pier. The top of the stairs should meet the upper platform just below the tall shop, while the bottom should land near the lower market area. Place the animal character with a light-colored head and pink shirt on or near the stairway, facing upward toward the café. Below the stairs, add the hanging rope net with small blue and yellow floats or bags along the left side. In Dreamy Room Level 738, this stair placement explains how the two levels connect. The stairs should not block the tables above or the lower food stalls below; they act as the visual bridge between both entertainment zones.
Step 7. Arrange the lower market stalls with striped awnings.
Move to the lower center of Dreamy Room Level 738 and place the red-and-white striped market awnings. One awning belongs under the upper deck edge, forming a stall front beneath the main shop. Another awning sits toward the right side under the small cabin balcony, creating a second service counter. Keep the awnings parallel to the pier edges so they look attached to the buildings rather than floating. Add the barrel between the stalls near the center, and place small bottles or containers on and around the stall area. In Dreamy Room Level 738, these striped awnings echo the large shop awning above, tying the whole harbor together visually. Their correct positions also create a clear lower dining area where the animal guests can gather, eat, and enjoy the seaside scene.
Step 8. Place the lower dining tables, stools, snacks, and animal guests.
The lower-right pier is the busiest social area in Dreamy Room Level 738. Place the square red table near the front-center lower area and add the snack bowls or popcorn-like treats on top. Around it, place the pig-like animal guest in a dark outfit facing the table, the curly-haired animal guest nearby, and the light-colored animal seated at the small round table to the right. Add extra stools around the tables, especially near the right stall and beneath the small cabin balcony. The animals should face inward toward the food and tables, making the scene feel active. In Dreamy Room Level 738, correct character orientation matters because the room tells a story through placement. Guests should not face away from the action unless they are positioned as lookouts or passersby.
Step 9. Add plants, candles, crates, and small dockside details.
After the major structures are placed, Dreamy Room Level 738 requires careful small-object placement. Add green shrubs behind the stairs and beside the lower stalls, especially near the base of the small cabin and around the central wall area. Place the cluster of candles near the upper-right edge of the café deck, close to the open sign and stair entrance. Add small crates near the upper tables, near the tall shop entrance, and around the lower market. A few tiny bottles and containers should sit on counters or beside stools. These objects are small, but they make Dreamy Room Level 738 feel complete. The main challenge is recognizing that many of these details belong in corners or beside larger objects, not in the open walking paths. Use them to fill gaps without covering key furniture.
Step 10. Complete the front dock with rope posts, plank extension, seagull, anchor, and life rings.
The front edge of Dreamy Room Level 738 turns into a working harbor dock. Place the short wooden pier extension on the lower-left side, projecting outward over the water. Add rope posts around the front edge of the platform, with ropes connecting them in a gentle curve. Place the seagull on the front-left dock railing area, facing toward the main pier. Hang or position the gray anchor beneath the front dock area, slightly left of center, with a rope leading upward. On the front-right side, attach the two red-and-white life rings to the side of the pier. In Dreamy Room Level 738, these nautical safety objects are not random decorations; they define the setting as a floating harbor venue. Keep the life rings on the right rail and the anchor near the lower-left dock to match the completed image.
Step 11. Place the palm tree, hammock corner, barrels, and tropical seating.
On the lower-right edge of Dreamy Room Level 738, place the palm tree so it leans slightly over the right seating area. Its trunk should stand near the edge of the pier, with green leaves spreading above the small purple hammock or lounge cushion behind it. Add the barrel near the center-right, close to the striped awning and below the balcony. Place a few small round stools around the right-side table, keeping the animal guest seated comfortably near the stall. This section gives Dreamy Room Level 738 a tropical entertainment-pier feeling, mixing pirate details with a vacation café mood. The palm tree should not cover the cabin door or the balcony character. Its correct position is at the outer right edge, where it frames the scene and softens the busy architecture.
Step 12. Check all layers, edges, and object relationships.
The final step in Dreamy Room Level 738 is a full placement check. Look from back to front: the wall supports the tall shop, the small cabin, and the pirate sail mast; the upper-left deck holds café tables, octopus mascots, bunting, and candles; the central stairway leads down into the market; and the lower pier contains food stalls, guests, stools, ropes, life rings, the seagull, and the anchor. In Dreamy Room Level 738, objects often appear wrong when they are only a few pixels away from their intended spot. Make sure nothing overlaps awkwardly: banners should hang naturally, sails should stay behind the cabin, animals should face the activity, and dock accessories should sit on the outer edges. Once every item supports the harbor story, Dreamy Room Level 738 is complete.
Notes and Precautions
Dreamy Room Level 738 is mainly about identifying exact placement rather than rushing through decoration. The biggest mistake is placing the buildings too far forward, which leaves no space for sails, banners, and upper-deck decorations. Always place the tall shop first, then the small cabin, then the mast and sails. Another common issue in Dreamy Room Level 738 is confusing the two levels: café items, octopus decorations, and candles belong on the upper-left deck, while food stalls, stools, animal diners, life rings, and the anchor belong on the lower pier. Watch the edges carefully because the rope posts, seagull, dock extension, and life rings need to sit along the front perimeter. Also avoid hiding small objects behind stair rails or awnings. Dreamy Room Level 738 rewards patient observation, and the final arrangement only works when every tiny harbor detail supports the larger pirate pier layout.
Tips and Tricks from top player
For Dreamy Room Level 738, start with the largest silhouettes first. Place the tall shop, small cabin, pirate sails, and stairway before touching small decorations. This creates a reliable frame and prevents later objects from feeling misplaced. Next, group items by function: café objects go on the upper-left deck, market objects go under the awnings, nautical objects go along the front dock, and tropical objects go on the lower-right side. In Dreamy Room Level 738, color matching is also useful. Red roofs, red-and-white awnings, and red life rings belong in visible front-facing spots, while purple walls and blue poles help define the background. For tiny objects, use nearby anchors: candles go near the open sign, the seagull goes on the front dock, and the anchor hangs below the lower-left pier. This method makes Dreamy Room Level 738 easier and reduces trial-and-error.
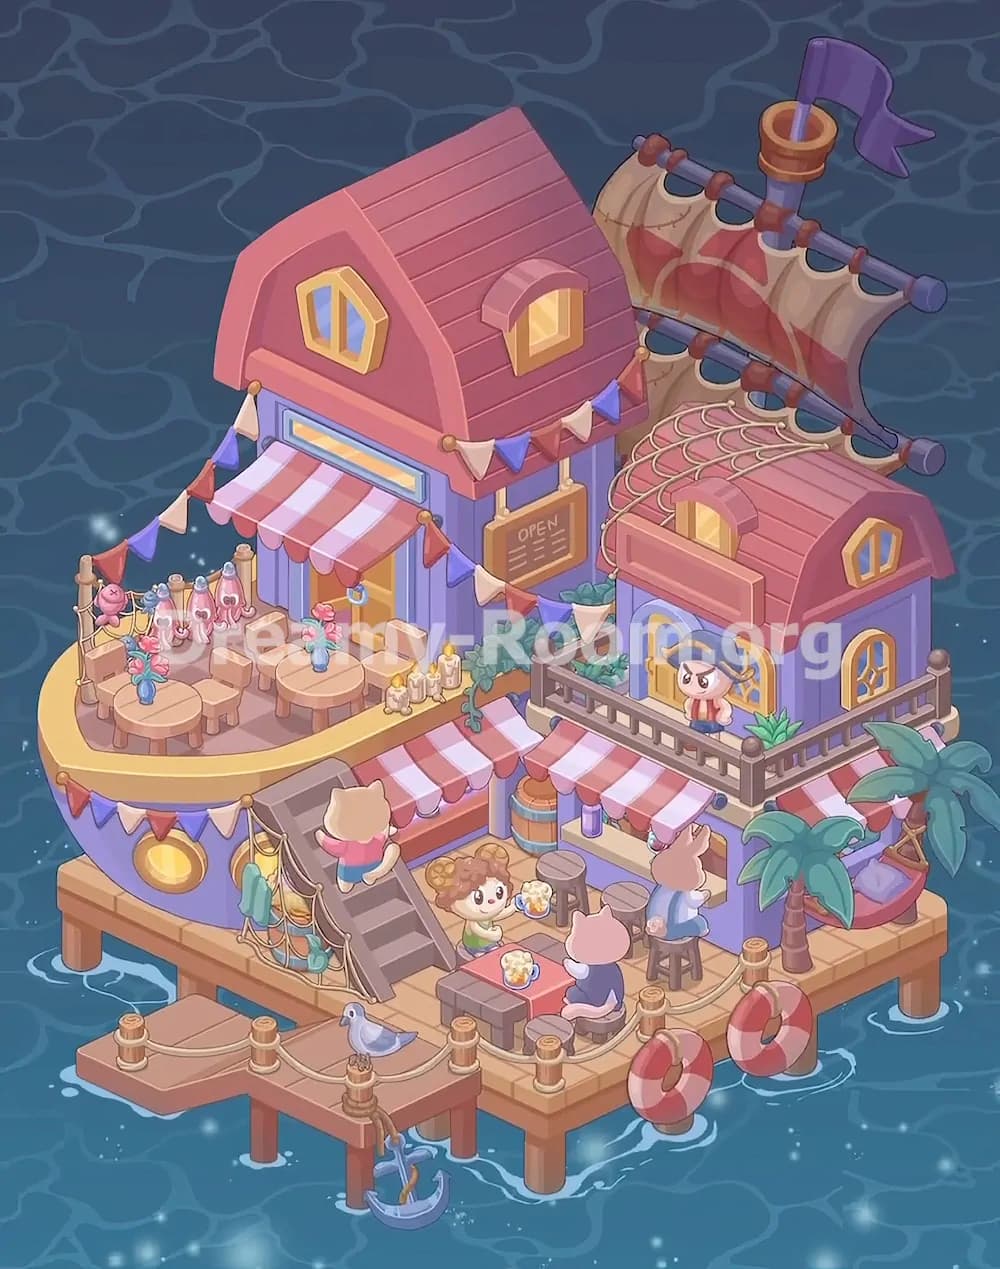
Final Scene Description
The completed Dreamy Room Level 738 scene is a charming pirate harbor entertainment pier floating over deep blue water. A tall purple shop with a red rounded roof, striped awning, and festive banners fills the upper-left deck, where café tables, flower vases, stools, crates, and pink octopus mascots create a playful seaside party. To the right, a smaller cabin sits above the lower market, guarded by a tiny animal on the balcony. Behind it, patched pirate sails, rope netting, blue poles, and a purple flag give Dreamy Room Level 738 its adventurous harbor theme. Below, striped stalls, barrels, snacks, stools, and animal guests fill the dining area. The front dock is finished with rope posts, a seagull, an anchor, two life rings, and a wooden plank extension. With the palm tree and hammock on the right, Dreamy Room Level 738 becomes a cozy pirate pier full of life, food, music, and ocean charm.