Dreamy Room Level 505
Dreamy Room Level 505 guide - Dreamy Room 505 Walkthrough & Solution.
Important Notice Regarding Level Numbering
Due to frequent changes in Dreamy Room's level numbering and differences between platforms (Android/iOS) – for example, level 505 on Android might not be the same as level 505 on iOS – the text guide below may not always match the images and video above. Please prioritize the image and video guides. If you find that the guide content doesn't match your current level, please visit the All Level Walkthroughs page to find the correct guide based on level images. Thank you for your understanding.
Dreamy Room Level 505 Walkthroughs & Guide
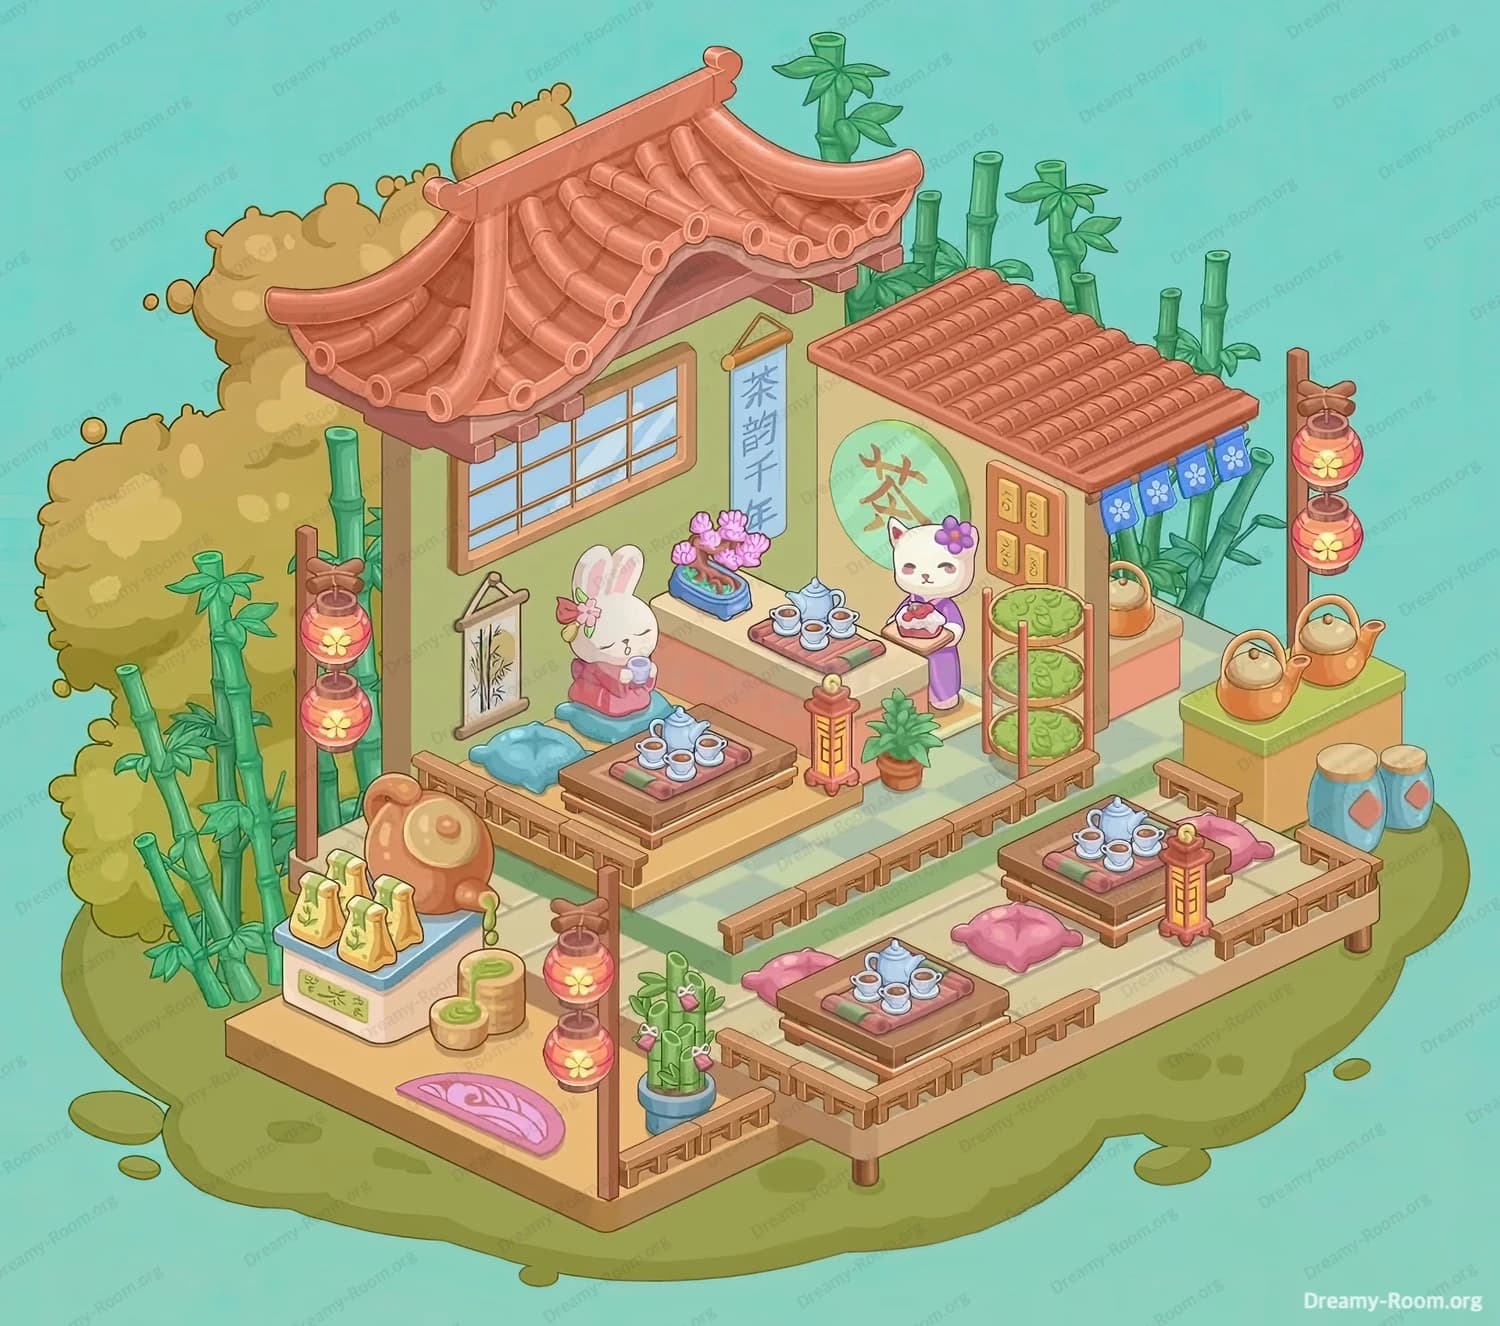
Step 1. Place the main wooden deck base on the grassy island in Dreamy Room Level 505.
In Dreamy Room Level 505, start by anchoring the entire build with the large wooden deck that sits on short legs above the green, puddly ground. Align the plank texture so it runs left-to-right across the front edge, forming the “public” seating terrace. Dreamy Room Level 505 usually expects the deck to be the clean rectangle that defines the playable area, so make sure the deck’s corners match the island’s shape and leave a small border of green visible all around. Next, attach the lighter tan entry slab that juts out at the front-left like a small welcome step. In Dreamy Room Level 505, this piece looks slightly separate and flatter, so don’t accidentally snap it to the higher interior area—its job is to be the outdoor entrance pad.
Step 2. Place the raised mint checkered floor platform toward the back-left in Dreamy Room Level 505.
Dreamy Room Level 505 has a distinct two-level layout: a raised interior floor and a lower terrace. Set the mint-and-cream checkered platform on top of the deck, positioned back-left so it becomes the indoor tea room base. In Dreamy Room Level 505, the platform should sit like a clean rectangle with a visible edge thickness, and it must leave a walkway to the right where the stall area will live. Watch the perspective: the back edge should tuck closer to the bamboo background, while the front edge leaves space for railings and low tables later. Dreamy Room Level 505 rewards noticing tiny gaps—if you see a sliver of deck where the raised floor should cover, nudge it until it snaps flush. This step matters because every later table, character, and lantern in Dreamy Room Level 505 references this platform.
Step 3. Build the main tea-house wall block (green walls) along the back-left corner in Dreamy Room Level 505.
In Dreamy Room Level 505, the main building is a tall green wall that forms the back and left boundary of the interior. Place the large wall panel so it rises from the raised checkered floor, with its broad face pointing toward the front-right. Then add the shorter right-side partition wall that creates the inner corner—this smaller wall is crucial because it frames the serving counter area. In Dreamy Room Level 505, the walls should look like a clean L-shape, with the taller wall on the left and the shorter wall projecting forward on the right. Pay attention to the trim color (warm tan edges) and align it so the edges are crisp, not floating. The main challenge of Dreamy Room Level 505 here is orientation—rotate until the wall’s thickness faces outward and the smooth painted face is inside the room.
Step 4. Install the main curved roof on top of the large wall in Dreamy Room Level 505.
Dreamy Room Level 505 uses a signature bamboo-tile roof shape: rounded, layered “pipes” that curve upward at the corners. Place the largest roof piece on top of the tall left wall so it overhangs slightly, creating a sheltered interior. In Dreamy Room Level 505, the roof ridge sits diagonally, and the left and right ends curl up like a traditional pavilion. Make sure it doesn’t drift onto the right stall space—this roof belongs only to the main room. The correct snap will make the roof’s underside align with the wall’s top trim and create a neat shadow over the window area you’ll add later. Dreamy Room Level 505 often hides the snap point behind the roof’s thickness, so tilt/rotate your view until you see the roof settle perfectly with no wobble.
Step 5. Add the window and hanging wall art on the main building in Dreamy Room Level 505.
In Dreamy Room Level 505, the main wall is decorated with a wide rectangular window and two hanging art pieces. Place the window mid-height on the left wall, centered horizontally, with pale blue panes in a grid. Then hang the vertical blue banner with Chinese characters to the right of the window, closer to the corner where the stall connects. Finally, place the smaller framed scroll beneath the window area (slightly right of center), hanging lower like a decorative accent. Dreamy Room Level 505 is picky about spacing: the banner should not overlap the roof edge, and the framed scroll should look intentionally placed, not randomly floating. If the pieces feel “too close,” they’re usually wrong—Dreamy Room Level 505 expects clean breathing room between window, banner, and the future seating nook.
Step 6. Place the right-side stall structure and its tiled roof in Dreamy Room Level 505.
Dreamy Room Level 505 includes a small tea stall extension on the right: a shorter wall block with a simple brown tiled roof. Set the stall wall along the back-right area of the raised platform, leaving the cat vendor space in front. On the stall wall, you’ll see a circular sign area and a small door panel section; align it so the front faces diagonally toward the lower terrace. Next, add the stall roof—rows of small rounded tiles slanting downward toward the front-right. In Dreamy Room Level 505, this roof is distinctly flatter than the main curved roof, so don’t confuse the two. The correct placement creates a cozy “service corner” and leaves enough room at the stall’s front edge for the blue awning that comes next.
Step 7. Attach the blue floral awning and stall door plaques in Dreamy Room Level 505.
In Dreamy Room Level 505, the stall gains personality with a short blue fabric awning printed with white floral motifs. Snap it to the front edge of the stall roof so it hangs like a noren, facing the outdoor area. Then place the small vertical plaques on the stall door section—these look like golden/tan panels with characters or markings. Dreamy Room Level 505 wants these details to sit flush: the awning should align evenly and not float in front of bamboo stalks, and the plaques should sit centered on the door area, not on the wall beside it. This step is a common mistake point in Dreamy Room Level 505 because the awning can appear “close enough” even when it’s one snap off—use the straight hang and consistent spacing of the floral panels as your confirmation.
Step 8. Place the serving counter, tea trays, and pink flower arrangement in Dreamy Room Level 505.
Dreamy Room Level 505’s interior revolves around the long serving counter that runs along the shorter right partition wall. Place the counter so it forms a bar-like ledge facing the room. On top of it, set a tea tray with a teapot and several small cups arranged neatly. Then add the rectangular planter tray holding pink blossoms (a bonsai-like floral display) on the counter near the window side, so it brightens the service area. Dreamy Room Level 505 is about exact placement: the tray should sit flat, cups evenly visible, and the flowers should not cover the tea set. If the counter feels backwards (with no working space behind), it’s wrong—Dreamy Room Level 505 expects the vendor to stand behind it later, with the tea tray presented to the guest side.
Step 9. Place the rabbit guest, floor cushion, and the low table tea set in Dreamy Room Level 505.
In Dreamy Room Level 505, the left interior becomes a quiet seating nook. Place the soft blue floor cushion on the raised platform near the left wall, below the window. Then seat the white rabbit character on the cushion—facing toward the room and slightly toward the counter, as if waiting for tea. Next, place the low wooden table in front of the rabbit, and set the tea service on top: a teapot with multiple cups arranged around it. Dreamy Room Level 505 tests your eye here: the rabbit should feel snug against the wall but not clipping into it, and the table must leave enough “leg space” between cushion and tabletop. If the tea set looks like it’s sliding off the table edge, rotate until Dreamy Room Level 505 snaps it to the centered position.
Step 10. Place the cat shopkeeper and confirm the wall tea emblem in Dreamy Room Level 505.
Dreamy Room Level 505 features a cute cat shopkeeper in purple attire, standing at the stall/counter zone. Place the cat behind the counter area, near the stall wall, facing outward as if serving customers. The cat holds a small tray/bowl, and it should appear comfortably within arm’s reach of the tea tray on the counter. Behind the cat, ensure the large circular wall emblem with the character for “tea” is visible and centered on the stall wall—this symbol is a major focal point of Dreamy Room Level 505, so don’t hide it behind the vendor or shelving. The main challenge in Dreamy Room Level 505 is layering: characters often overlap props if snapped wrong. You want the cat clearly in front of the wall, but not standing on top of counter items.
Step 11. Add the small potted plant and the interior floor lantern in Dreamy Room Level 505.
Dreamy Room Level 505 adds warmth with tiny accents near the transition between interior and terrace. Place the small green potted plant (a leafy shrub in a brown pot) on the raised floor near the front edge of the counter area. Then place the decorative standing lantern (a warm gold/orange lamp) near the front of the interior—positioned so it visually separates the rabbit’s nook from the walkway toward the outdoor seating. In Dreamy Room Level 505, these pieces act like “space markers,” so they usually snap to precise points along the floor border or near rail posts. If the plant looks too close to the tea-cake rack area (coming next), it’s wrong. Dreamy Room Level 505 wants a clean triangle: counter behind, plant slightly forward, lantern nearer the edge, guiding your eye toward the terrace.
Step 12. Place the wooden rack with three green tea cakes in Dreamy Room Level 505.
Dreamy Room Level 505 includes a vertical wooden rack holding three round green bundles (tea cakes or stacked greens). Place this rack near the stall’s front-right side, on the raised platform, where it’s visible to customers. The three green rounds should stack vertically inside the rack like a neat display tower. In Dreamy Room Level 505, this rack should not block the cat shopkeeper; it belongs slightly forward and right, acting as a product showcase. Make sure the rack’s legs sit flat and its top frame doesn’t clip into the stall roof overhang. This is a classic Dreamy Room Level 505 “snap-test” object: if the circles aren’t centered in the frame, you’re off by one placement. When correct, it feels like a deliberate merchandising display between counter service and the outdoor tea area.
Step 13. Build the lower terrace seating: railings, low tables, and cushions in Dreamy Room Level 505.
Dreamy Room Level 505’s outdoor area is the social heart: a lower terrace with railings and multiple tea tables. Start by placing the wooden railings along the terrace edges, forming tidy borders and small corner turns. Then place the low square tables—one near the center and one toward the right—so they align parallel to the deck planks. Add the floor cushions: pink and purple cushions should sit beside each table, positioned for guests to kneel comfortably. In Dreamy Room Level 505, cushion placement is surprisingly strict: each cushion should sit inside the railing boundaries and not overlap table legs. This step often exposes the real challenge of Dreamy Room Level 505: the difference between “looks okay” and “snaps correct.” Use the table-to-railing spacing as your guide—there should be a consistent margin that makes the terrace look designed, not cramped.
Step 14. Place the outdoor tea sets and small standing lanterns on the terrace in Dreamy Room Level 505.
In Dreamy Room Level 505, each outdoor table gets its own tea service. Place a tea tray on each low table: a teapot surrounded by small cups, arranged symmetrically. Then add the small warm-colored standing lanterns (short, gold/orange lights) near the tables—usually positioned at table corners or along the inner railing line to create evening ambiance. Dreamy Room Level 505 wants repetition with variation: the tea sets should match in style but not feel randomly scattered, and lanterns should create a rhythm along the seating route. Be careful not to put lanterns where a cushion should “belong.” If a lantern blocks a cushion’s natural sitting space, Dreamy Room Level 505 will feel visually wrong even if it places. The correct arrangement makes the terrace feel like three inviting spots to sip tea under lantern glow.
Step 15. Place the tall lantern posts on the left-front and right edge in Dreamy Room Level 505.
Dreamy Room Level 505 features tall wooden posts hung with glowing lanterns. On the left-front corner of the deck (near the merchandise area), place the post with multiple stacked lanterns—this one reads as a vertical beacon at the entrance. Then place the right-edge lantern post near the green-topped kettle counter, with its lanterns hanging outward toward the open air. In Dreamy Room Level 505, these posts must align with deck corners and rail endpoints, like architectural lighting. If you place them slightly inward, they’ll look like obstacles instead of boundary lights. Watch the lantern count and spacing: Dreamy Room Level 505 makes the left side feel richer and busier (more lanterns near the shopfront), while the right side balances the composition with a simpler post. When correct, your eye naturally travels from entrance lanterns → tea tables → stall signage.
Step 16. Complete the front-left merchandise corner: tea packs, kettle feature, baskets, and pink mat in Dreamy Room Level 505.
Dreamy Room Level 505’s cutest detail is the shopfront display on the front-left pad. Place the white display counter with green signage on the entry platform. On top, arrange the small packaged tea items (the little wrapped bundles) in a neat row, angled toward the viewer. Next, place the large brown kettle/urn feature beside it—this piece has a rounded body and a spout-like detail, reading as a tea-brewing or pouring station. Add the two cylindrical green baskets/steamers nearby, stacked like supplies. Finally, place the pink oval floor mat with a swirl pattern on the entry platform, slightly forward so it feels like a welcoming rug. Dreamy Room Level 505 is strict about this corner: everything must fit without covering the lantern post, and the mat must sit fully flat. This area signals “tea shop” instantly, so get the alignment perfect.
Step 17. Place the kettle counter on the right: gold kettles and blue jars in Dreamy Room Level 505.
In Dreamy Room Level 505, the far-right side has a green-topped counter that displays kettles and storage jars. Place the rectangular counter so it sits on the raised platform’s right edge, facing the outdoor seating. On top, place the gold kettles/teapots: arrange them so handles and spouts alternate naturally, creating a balanced lineup. Then set the two blue storage jars on the ground at the right edge, slightly behind and below the counter, like запас supplies. Dreamy Room Level 505 expects these jars to sit snug near the platform boundary without falling into the green “island” area. Also add the small teapot on the stall-side shelf (behind the tea-cake rack area) so it reads as extra brewing equipment. The Dreamy Room Level 505 challenge here is hierarchy: kettles on the counter (top level), jars on the ground (bottom level), nothing overlapping the lantern post.
Step 18. Finish with greenery and the potted flower-bamboo accent in Dreamy Room Level 505.
Dreamy Room Level 505 is framed by nature: bamboo stalks and a fluffy shrub mass behind the buildings. While much of the background bamboo is already present, confirm that the tall stalks visually sit behind the roofs and stall—never in front of awnings or signage. Then place the small blue pot plant near the front railing corner (close to the terrace edge): it looks like a bamboo/flower mix with pink blossoms, acting as a decorative border piece between entrance and seating. In Dreamy Room Level 505, this potted plant should sit inside the railing corner pocket, not floating on the walkway. This final green accent ties the whole scene together: bamboo behind, tea house center, cozy terrace front. If Dreamy Room Level 505 still feels “empty,” it’s usually because a small plant or corner prop is one snap off—scan edges and corners for the missing anchor points.
Notes and Precautions (Dreamy Room Level 505)
- Dreamy Room Level 505 is mostly a snapping accuracy test—if something looks right but feels slightly “off,” rotate the camera and hunt for the true snap point.
- Place large structural pieces first in Dreamy Room Level 505 (floors, walls, roofs), because small items like cups and lanterns are easier once the boundaries exist.
- In Dreamy Room Level 505, watch layering: characters (rabbit/cat) should sit in front of walls but not on top of tables or trays.
- Keep repeated sets consistent in Dreamy Room Level 505: tea trays should be centered on tables, and cushions should mirror table edges so the terrace looks designed.
- Lantern posts in Dreamy Room Level 505 are edge markers—if they’re not on corners/ends, your whole layout will feel crowded.
- Don’t hide key visuals in Dreamy Room Level 505 (the big “tea” emblem, the blue floral awning, the pink blossom tray). These are composition anchors.
Tips and Tricks from top player (Dreamy Room Level 505)
- In Dreamy Room Level 505, “corners solve puzzles.” If you’re stuck, try placing the object at a corner: deck corner, railing end, wall corner, counter corner.
- Use the “shadow test” in Dreamy Room Level 505: correct placement usually produces a clean, believable shadow under legs, trays, and posts.
- For tiny items (cups, tea trays) in Dreamy Room Level 505, zoom in and rotate slightly—most mistakes are a single snap point away.
- Treat Dreamy Room Level 505 like a story flow: entrance merchandise → indoor guest (rabbit) → service counter (cat) → outdoor seating. If the flow feels broken, something is misplaced.
- When several similar props exist in Dreamy Room Level 505 (multiple tea tables), place one fully correct set first, then replicate spacing patterns for the others.
- If a piece “fits anywhere,” Dreamy Room Level 505 usually wants it where it completes a visual triangle (for example: counter–rack–kettle station).
Final Scene Description (Dreamy Room Level 505)
Dreamy Room Level 505 ends as a serene bamboo-side tea house perched on a wooden terrace above a mossy green island. A curved, terracotta bamboo-tile roof crowns the main room, where a white rabbit sits peacefully on a blue cushion beside a low table set with a teapot and cups. Across the room, a long counter displays tea service and a tray of pink blossoms, while wall décor—window grids, hanging scrolls, and a vertical banner—adds a calm, traditional feel. On the right, the stall extension shows a bold tea emblem and a blue floral awning, with a purple-clad cat shopkeeper ready to serve. Outside, low tables, pink cushions, warm lanterns, kettles, jars, and a neat merchandise corner create a welcoming tea garden atmosphere—proof that Dreamy Room Level 505 is all about finding the exact correct home for every object.