Dreamy Room Level 603
Dreamy Room Level 603 guide - Dreamy Room 603 Walkthrough & Solution.
Important Notice Regarding Level Numbering
Due to frequent changes in Dreamy Room's level numbering and differences between platforms (Android/iOS) – for example, level 603 on Android might not be the same as level 603 on iOS – the text guide below may not always match the images and video above. Please prioritize the image and video guides. If you find that the guide content doesn't match your current level, please visit the All Level Walkthroughs page to find the correct guide based on level images. Thank you for your understanding.
Dreamy Room Level 603 Walkthroughs & Guide
Dreamy Room Level 603 Walkthrough
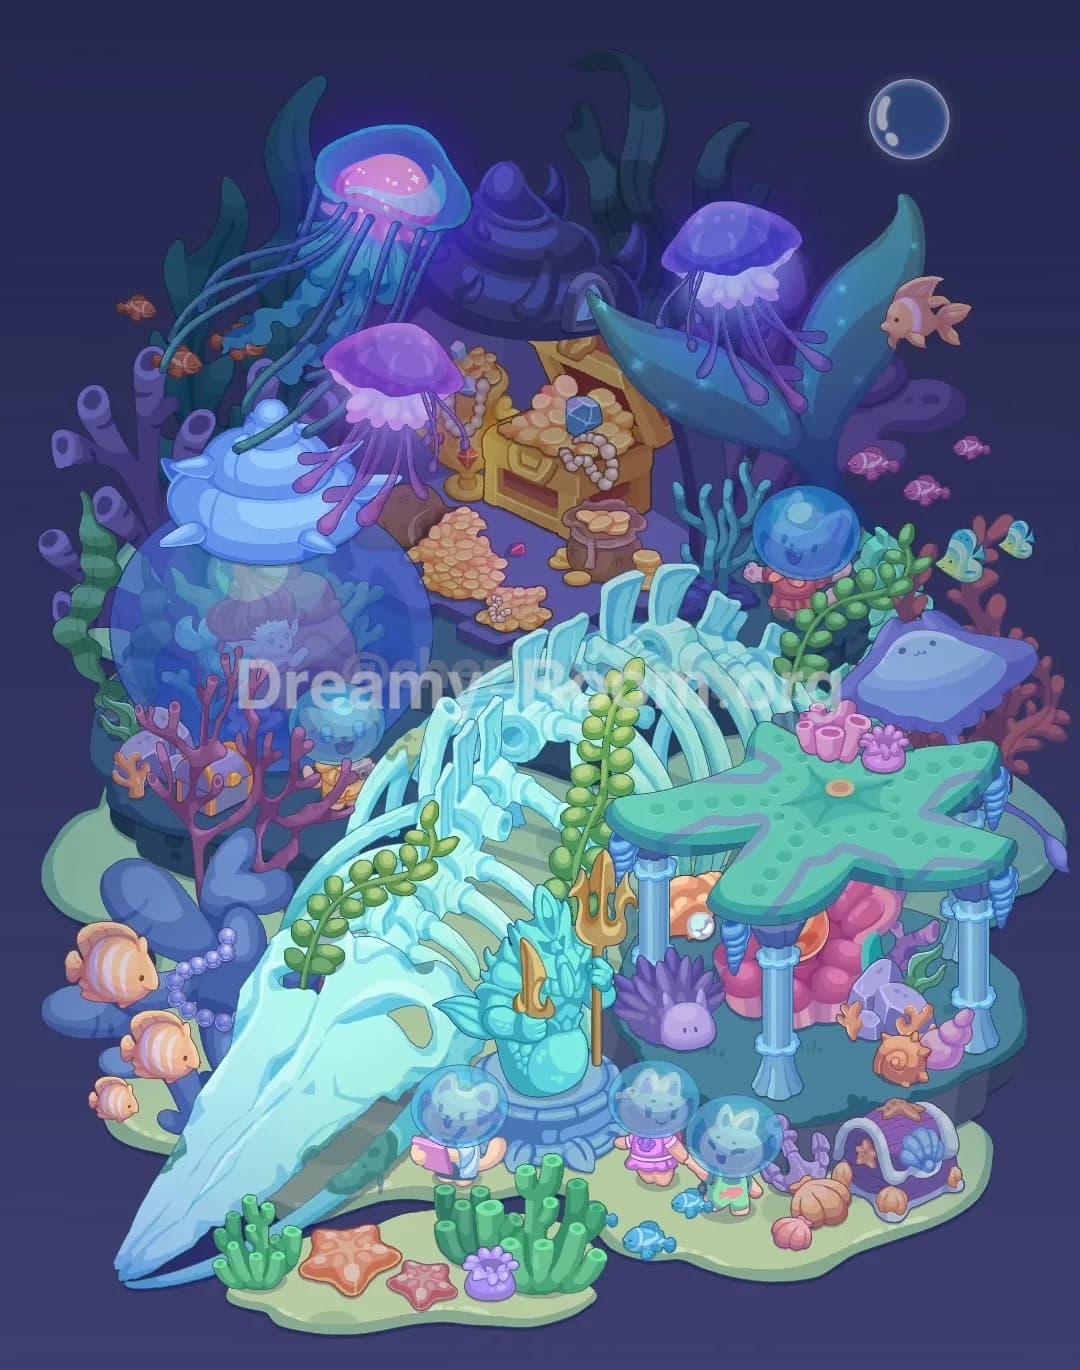
Dreamy Room Level 603 turns a sparse underwater platform into a glowing deep-sea treasure hideout packed with marine life, ruins, loot, and tiny helmeted explorers. The real challenge in Dreamy Room Level 603 is not speed, but recognizing the exact home for every object and building a scene that feels complete, peaceful, and story-rich. That fits the game’s core idea of carefully placing belongings in their perfect spots and enjoying the calm process rather than racing a timer.
Step 1. Build the back-center shell shrine and the tall seaweed in Dreamy Room Level 603
Start Dreamy Room Level 603 by anchoring the background with the biggest fixed landmarks. The purple shell shrine belongs on the raised middle-back stone platform exactly where the empty room already suggests a focal point. Keep it centered, facing forward, with its rounded opening visible from the front. Behind it, place the dark, tall seaweed blades so they rise upward in uneven curves from left-back to right-back. These background plants frame the shrine and create the depth needed for the rest of Dreamy Room Level 603. On the far left-back edge, add the purple tube coral cluster, letting the hollow tubes point outward. On the far right-back edge, place the darker purple reef shape and the reddish coral branches. Once those rear pieces are in place, the level immediately gains structure. This step matters because every later object in Dreamy Room Level 603 lines up around this shrine-and-seaweed backdrop, so if these pieces sit too far forward or too far apart, the treasure zone and marine creatures will look crowded instead of naturally layered.
Step 2. Place the treasure chest, gold piles, sacks, pearls, and gems in the upper middle of Dreamy Room Level 603
Next, fill the upper middle area of Dreamy Room Level 603 with the treasure cluster in front of the shell shrine. Set the open golden chest slightly right of center on the rear platform, angled forward so the lid opens toward the viewer. Inside and around it, arrange the coin piles so the largest stack spills from the chest toward the left-front edge of the platform. Put the large blue gem on top of the chest treasure and drape the pearl necklace across the open lid and front edge. Add the smaller red gem on the ground just below the chest. To the left of the chest, place the hanging gold-and-red pendant or ornament so it drops beside the central purple jellyfish later. To the right-front of the chest, place the small brown sack filled with coins, and leave a few loose coins on the stone floor. Add the little pearl cluster at the front of the coin spill. Dreamy Room Level 603 looks wrong if this treasure sits too low, because it is meant to glow from the back-center like a hidden hoard discovered beneath the sea.
Step 3. Add the glowing jellyfish and the large blue tail-shaped coral feature in Dreamy Room Level 603
One of the prettiest parts of Dreamy Room Level 603 is the lighting created by the jellyfish. Place the biggest blue-and-pink jellyfish in the upper left area, floating over the shell-roof dome zone, with its long tentacles streaming downward across the scene. Then put the medium purple jellyfish slightly lower and nearer the center-left, hanging above the coin piles and ornament. The third jellyfish belongs on the upper right, resting visually over the large blue tail-shaped coral or fin-like structure. That blue structure rises behind the treasure area on the right side and curves upward in two broad points, almost like a giant tail fin. Keep it behind the chest and behind the little diver on the right. Dreamy Room Level 603 depends on these elements for mood: the jellyfish provide soft purple and blue highlights, while the fin-shaped coral balances the left and right sides. If you place the jellyfish too low, they block key objects; if too high, Dreamy Room Level 603 loses the dreamy glowing canopy that makes the scene feel magical.
Step 4. Create the left-side shell dome habitat, corals, and tiny sea-home details in Dreamy Room Level 603
Now complete the left half of Dreamy Room Level 603. Start with the large transparent dome on the left platform, placing it so it fills most of the left-middle zone without covering the treasure area. On top of that dome, set the pale blue spiral shell roof, making sure the shell points slightly left and sits like a cap over the glass bubble. Inside the dome, place the tiny figure with brown hair in the center, surrounded by soft plant shapes. In front of the dome, add the red branching coral. Tucked within that coral sits the small orange-yellow sea-home or submarine-like object with round windows. At the far left edge, add the green striped seaweed growing upward beside the purple tube corals. Just right of the dome, place the small helmeted sea character with a blue bubble helmet and yellow flippers. Dreamy Room Level 603 becomes much richer after this step because the left side changes from empty rock into a lived-in underwater corner. Be careful with spacing here: the dome must stay behind the whale skeleton that comes later, not in front of it.
Step 5. Lay down the whale skeleton bridge, sea plants, and striped fish on the lower left of Dreamy Room Level 603
The giant pale whale skeleton is the dominant foreground piece in Dreamy Room Level 603, so place it carefully. The skull should begin at the lower left corner, angled diagonally upward toward the middle of the room. Its long rib cage stretches from left-front to center-right, creating a natural bridge between the two main sides of the stage. Once the bones are aligned, add the two green vine-like sea plants climbing up through the ribs, one nearer the front-left center and one nearer the mid-right side of the skeleton. On the far lower left, place the family of three striped yellow-orange fish swimming beside dark rocks. Drape the pearl strand between the rocks near those fish. At the very front sand edge, place the green tube corals, the orange starfish, the pink starfish, and the small purple anemone-like flower. Dreamy Room Level 603 uses this skeleton to guide the eye across the whole composition. If its angle is wrong, the level feels flat, and many of the smaller front decorations lose their proper positions.
Step 6. Build the right-side starfish pavilion, the sleeping ray, shells, and reef cluster in Dreamy Room Level 603
Move to the right side of Dreamy Room Level 603 and construct the ruin-like pavilion. The large green starfish-shaped roof belongs on the front-right platform, supported by several pale blue columns underneath. Place it so the roof stretches wide across the right half without covering the whale skeleton’s center ribs. On top of the starfish roof, add the pink tube coral cluster and the small pink seashell ornament. Beneath and behind the pavilion, arrange the rounded pink reef mass, then place the little pearl detail tucked inside the back opening. In front of the pavilion, add the purple sea urchin. To the right of it, place the gray rocks, orange shell, purple shell, and the overturned purple treasure barrel or chest with shells spilling out. Slightly above this area on the right ledge, position the smiling blue-gray stingray-like creature resting on the rock. Dreamy Room Level 603 needs this section to feel like an underwater ruin, so keep the pavilion slightly elevated and neat rather than scattered.
Step 7. Place the front statue, trident, three helmeted explorers, and small fish in Dreamy Room Level 603
The front-center details give Dreamy Room Level 603 its story. Place the turquoise sea statue on a small circular pedestal in front of the whale ribs, slightly left of the pavilion. The statue should face forward and hold the golden trident upright on its right side, with a shell-like golden ornament on the left side of its body. In front of the skeleton and across the lower edge, place the three helmeted explorers. The left explorer stands near the front-left green coral and appears to hold a pink book or tablet. The middle explorer in a pink outfit stands just right of the statue base. The right explorer in a green outfit with a red bow stands nearer the spilled-shell chest. Add the two tiny blue fish on the sand near their feet. Dreamy Room Level 603 looks complete only when these characters are evenly spaced along the front because they act like witnesses admiring the underwater discovery. If they bunch together, the balance of Dreamy Room Level 603 disappears.
Step 8. Finish Dreamy Room Level 603 with the right-side diver, schooling fish, bubble, and final micro-adjustments
To finish Dreamy Room Level 603, add the last living details that make the scene feel active. Place the small round diver with the blue helmet just right of the whale ribs and below the fin-shaped coral, partly hidden by the green plant. In the mid-right water, arrange the three pink fish swimming left to right. On the far right, place the two yellow-and-blue butterfly-like fish beside the red coral. Near the upper right of the screen, keep the large floating bubble visible against the dark water. Add the peach-colored fish near the right jellyfish and the small orange fish near the upper left seaweed. Check that the shell shrine remains visible behind the treasure, the left dome is not blocked by the skeleton, and the starfish pavilion still reads clearly on the right. Dreamy Room Level 603 is all about exact placement, so this final pass is where you nudge any overlapping pieces until the whole underwater composition feels layered, readable, and serene.
Notes and Precautions for Dreamy Room Level 603
In Dreamy Room Level 603, the easiest mistake is placing foreground pieces before the large background anchors. Start with the shrine, seaweed, chest zone, dome, skeleton, and pavilion before worrying about fish, shells, and tiny explorers. Another common issue in Dreamy Room Level 603 is depth confusion: the whale skeleton sits in the foreground, the treasure sits behind it, and the shell dome sits behind the skeleton on the left. The jellyfish should hover above the scene, not sit on the floor. Keep the starfish pavilion on the right platform rather than the center. Also watch the front sand line, because the starfish, green tube coral, and little blue fish need to stay low and visible. The game’s appeal comes from calm, careful placement and finding the perfect spot for each meaningful object rather than rushing.
Tips and Tricks from top player for Dreamy Room Level 603
For Dreamy Room Level 603, work from biggest shape to smallest detail. First confirm the shell shrine, dome, tail-shaped coral, whale skeleton, and starfish pavilion. After that, place treasure and statue pieces, and only then finish with fish, pearls, shells, and characters. A strong tip for Dreamy Room Level 603 is to divide the room into zones: left habitat, upper treasure cove, center skeleton path, and right ruin shelter. That makes it much easier to remember where each object belongs. Another useful trick in Dreamy Room Level 603 is to use visual logic: glowing jellyfish belong high, treasure belongs near the shrine, explorers belong at the front where they can “visit” the ruins, and small sea creatures should fill empty water pockets. When something feels wrong, it usually means the layer order is wrong, not the object itself. Move it backward or forward mentally and the correct location becomes much easier to spot.
Final Scene Description of Dreamy Room Level 603
The completed Dreamy Room Level 603 scene looks like a secret underwater sanctuary built around treasure, ruins, and marine wonder. At the back, a purple shell shrine sits among waving seaweed while glowing jellyfish cast blue and violet light over an open chest overflowing with gold, pearls, and gems. On the left, a shell-roof glass dome shelters a tiny resident beside coral and a little sea-home. Across the front, a massive whale skeleton stretches diagonally like an ancient bridge, decorated with climbing plants, starfish, and coral. In the center-front, a turquoise sea statue raises a golden trident. On the right, a starfish-roof pavilion shelters colorful reef pieces, shells, and a tipped chest. Three adorable helmeted explorers stand along the sandy edge as fish circle the scene. Dreamy Room Level 603 feels mysterious, cozy, and magical, with every object placed exactly where it belongs.