Dreamy Room Level 459
Dreamy Room Level 459 guide - Dreamy Room 459 Walkthrough & Solution.
Important Notice Regarding Level Numbering
Due to frequent changes in Dreamy Room's level numbering and differences between platforms (Android/iOS) – for example, level 459 on Android might not be the same as level 459 on iOS – the text guide below may not always match the images and video above. Please prioritize the image and video guides. If you find that the guide content doesn't match your current level, please visit the All Level Walkthroughs page to find the correct guide based on level images. Thank you for your understanding.
Dreamy Room Level 459 Walkthroughs & Guide
Step 1. Place the café building base in the center
Start Dreamy Room Level 459 by locating the main café building piece with teal walls, gold framing, and the tall glass roof. Snap this large object onto the raised white grid so that it sits slightly toward the back and a little to the right, leaving a two-tile sidewalk visible at the front and a one-tile pavement around the left and right edges. Make sure the front door of the building faces the lower edge of the board, directly toward the street tiles. The right façade with three lower windows must line up above the future right-side seating area, while the left façade faces the future rose planter and fence. If the building is even one tile off, every other item in Dreamy Room Level 459 will misalign, so confirm the base sits exactly centered before moving on.
Step 2. Add the striped awnings over the windows
Next in Dreamy Room Level 459, decorate the two main façades with their awnings. Select the wide teal-and-white striped awning and place it on the left side of the building, directly above the arched window and the long rose planter area. Its scalloped edge should hang just over the future round table, with the left corner nearly touching the blue tree behind. Then choose the second awning of identical stripes and mount it on the right side above the trio of rectangular windows next to the door. Align it so its shadow falls on the right outdoor table area. Both awnings must sit flush with the wall edges, not floating too high or low, because in Dreamy Room Level 459 they visually frame the café façade and help you position furniture precisely underneath.
Step 3. Position the trees and rooftop glass structure
Now focus on the vertical elements that define the silhouette of Dreamy Room Level 459. First, place the large curved glass roof module on top of the building. It should run lengthwise from left to right, with three main glass arches and a rounded window at the right end. Ensure the roof’s golden frame aligns with the building edges so no glass overhangs beyond the teal walls. Behind this, add the fluffy pink tree to the upper left, its crown peeking above the highest arch. Slightly lower and further left, place the pale blue tree so its foliage fills the gap behind the left awning and fence. The trees should appear behind the roofline, never in front of it. Correct placement gives Dreamy Room Level 459 a layered, cozy depth and ensures branches don’t cover windows or signs.
Step 4. Attach vines, skylight, and coffee signage
Dreamy Room Level 459 uses greenery and signage to make the café feel alive. Start by placing the flat glass skylight panel with multiple small panes on the left back portion of the roof, just above the left awning. Then drag the thick green vine piece so it sits like a hedge along the roof edge, beginning near the skylight and continuing across the front toward the rounded right-side window. Some vine segments should drape down over the top of the right awning. Next, add the rectangular “Coffee” menu board on the front wall to the left of the door. The board’s top should line up just below the vine edge. Above this sign, hang the row of three tiny orange lamps so they sit in a straight horizontal line. Correctly placing these details in Dreamy Room Level 459 makes the façade readable and keeps lighting from overlapping the door frame.
Step 5. Build the left terrace: fence, roses, table and chairs
Turn your attention to the left outdoor seating zone of Dreamy Room Level 459. First, place the cream fence pieces with golden posts along the upper-left edge of the pavement, just behind where the left table will go. They should run from just behind the lamp post up to the left wall of the café, forming a safe boundary near the blue tree. Under the left window, snap the long pink-and-white rose planter so it rests directly against the wall, centered beneath the awning. Now place the round wooden café table on the front-left grey tile, almost touching the planter. Add two turquoise plaid chairs: one on the lower side facing up, one on the right side facing left toward the menu. Finally, put the small standing menu on top of this table, slightly toward the back edge. If everything is aligned, Dreamy Room Level 459 will show a perfectly balanced left seating nook.
Step 6. Arrange the lamp post, flower boxes, and corner bollard
To complete the street feel on the left in Dreamy Room Level 459, start with the teal streetlamp. Place it on the outermost dark pavement tile at the bottom left corner, just outside the fence line, with its warm glow directed toward the table area. In front of the fence and just above the streetlamp, put the first long planter filled with blue hydrangea-style flowers on the light pavement row. Then add a second identical planter directly below the left round table, aligned with the first one but closer to the center of the board. Next, place the cream stone bollard between that inner planter and the table, forming a protective boundary. Check that the drain grate object sits slightly right of these planters on the second row of street tiles. When you see a clear diagonal line from lamp to bollard to drain, you know Dreamy Room Level 459’s left street side is positioned correctly.
Step 7. Construct the entrance: stairs, paving stones, and posts
The heart of Dreamy Room Level 459 is the café entrance. Begin by dragging the brown three-step staircase directly in front of the door so that the top step touches the doorway threshold. The stairs should sit centered under the door frame, leaving equal space to left and right. On the grey platform in front of the stairs, place the irregular cream paving stones. Arrange them in an oval path that spreads outward from the bottom step toward the street edge. The largest stones should sit near the middle, with smaller ones near the corners. Around this paved area, install four short posts with golden tops: one at the front-left corner of the platform, one at the front-right corner, and two slightly back near the sides of the stairs. Proper alignment of these posts is crucial; they frame the entrance path in Dreamy Room Level 459 and separate the walkway from seating spaces.
Step 8. Add the umbrella, potted flowers, and right café table
Now we decorate the center-right portion of Dreamy Room Level 459. First, position the tall pink umbrella with gold finial on the grey platform, just to the right of the stair bottom and slightly forward. Its circular base should sit between the right-side posts without touching the paving stones. Behind the umbrella and closer to the stairs, place the square planter with tall green leaves and yellow flowers, angled so its corner points toward the viewer. Then add the second round café table on the right pavement, roughly mirroring the left table’s distance from the building. Put a turquoise plaid chair on the lower side of this table facing up. On top of the table, place the second standing menu and a brown takeaway cup or coffee pot slightly behind it. This grouping ensures Dreamy Room Level 459 feels like a symmetrical, well-organized outdoor café.
Step 9. Set the bunny customer, right planters, and corner bollard
The most charming detail in Dreamy Room Level 459 is the bunny customer. Place the seated bunny character on the right side of the table, perched on a bench or chair so that it faces diagonally toward the center of the scene. Make sure its pink bow and striped outfit remain fully visible above the tabletop. Behind the bunny, add a short fence segment with cream posts to echo the left-side railing. In front of the bunny table, put the third long planter full of blue flowers along the street edge, aligned horizontally with the two left planters. Then add the second stone bollard to the right of this planter, close to the corner, mirroring the left bollard. When placed correctly, the bunny, fence, planter, and bollard complete the right boundary of Dreamy Room Level 459 and keep the composition visually balanced.
Step 10. Fine-tune street tiles, edges, and visual balance
The last step in Dreamy Room Level 459 is subtle but important: overall alignment and edge polishing. Confirm that the light grey platform under the café sits perfectly centered on the darker outer pavement, with even tile borders on all sides. The drain grate should occupy one dark tile in front of the left planter row, not overlapping any edge. Check that no object floats onto the sloping street corners; tables, planters, and posts must all remain on flat, square tiles. Adjust the hydrangea boxes so their golden frames line up exactly with tile boundaries, and nudge the lamp post and bollards if their bases straddle lines. A precise grid layout is what makes Dreamy Room Level 459 look professionally assembled, and a single misaligned tile can reveal that something is out of place, so take a final moment to correct any offsets.
Notes and Precautions
Because Dreamy Room Level 459 is built on an isometric grid, tiny shifts can cause big visual problems. Always rotate each object so that chairs face their tables diagonally and fences follow the tile edges. Avoid overlapping vertical items such as trees, lamppost, umbrella, and vine clusters; if branches or fabric cover the coffee sign or windows, you’ve placed something too far forward. Remember that planters, posts, and bollards all share similar colors—place them carefully to avoid mixing them up. The three blue-flower planters must always sit along the street edge, never up on the platform. Also keep an eye on depth: trees must stay behind the building, not in front of the roof. Saving periodically while working through Dreamy Room Level 459 prevents you from needing to rebuild the entire café if you accidentally clear or move the main structure.
Tips and Tricks from top player
Top players treat Dreamy Room Level 459 like a puzzle of symmetry and mirroring. They first lock the building, stairs, and awnings in place, then build outward in mirrored pairs—left table and right table, left planter row and right planter row—so it’s easier to notice mistakes. A strong trick is to use the paving stones as a centerline: the umbrella and plant pot should sit just to the right of this stone path, while the left table lines up with the center of the rose planter. Another strategy is to place all boundary objects first: fences, bollards, posts, and planters. Once the edges of Dreamy Room Level 459 feel solid, filling the interior with furniture becomes simple. Finally, leave the bunny character for last so you can nudge it slightly to hide any small misalignment between the right table and fence.
Final Scene Description of Dreamy Room Level 459
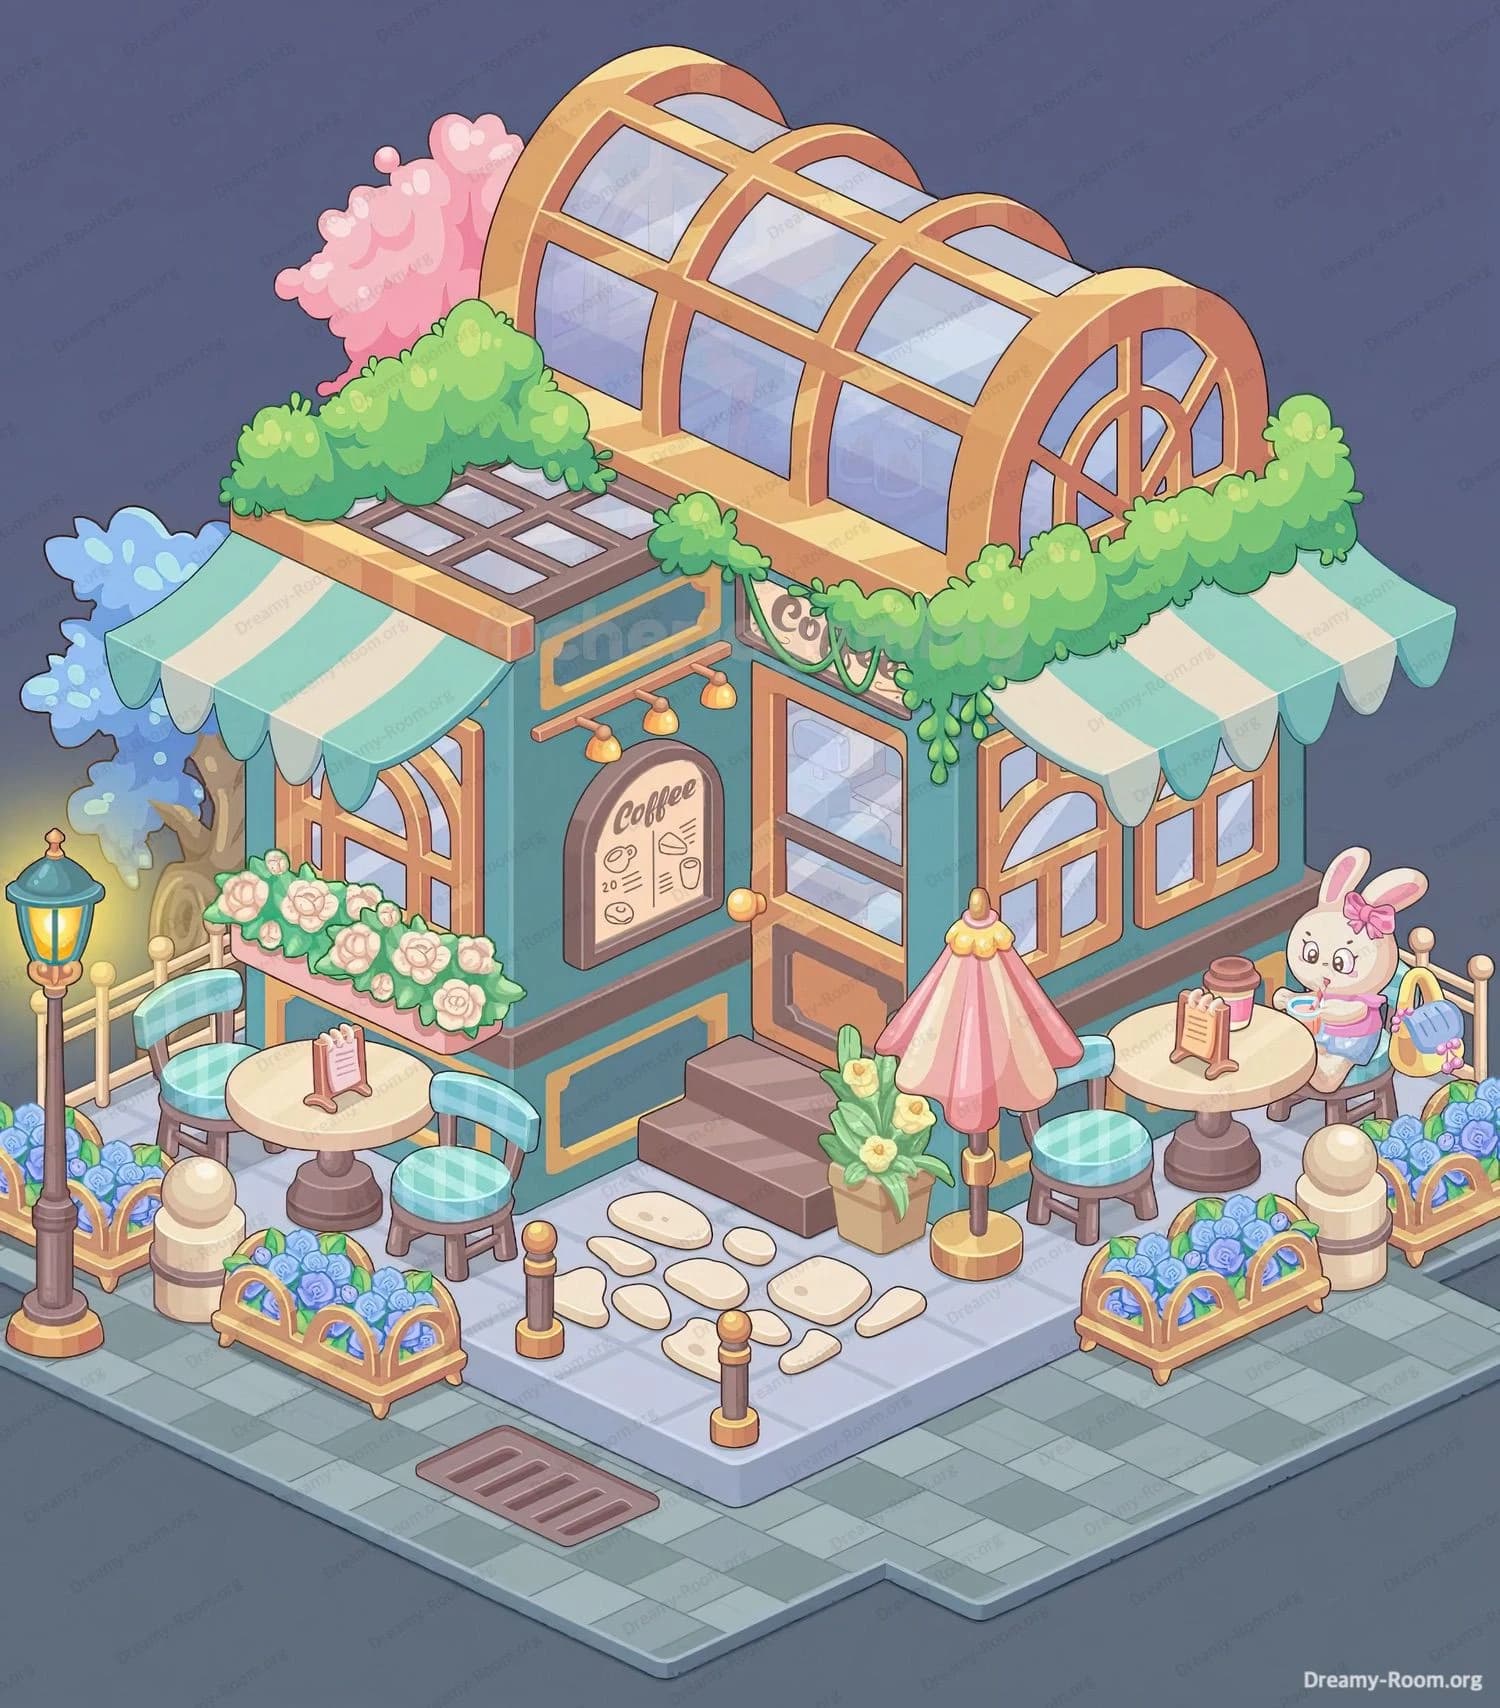
When you finish Dreamy Room Level 459, the once-empty platform has transformed into a glowing street café nestled under a curved glass roof. At the back, pastel pink and blue trees frame the golden arches while bright green vines spill over the façade. Teal-and-white awnings shade both sides of the building, and a warm coffee sign with tiny lamps invites guests in. On the left, a round table with two plaid chairs sits beneath a row of creamy roses, guarded by a teal lamp post and twin blue-flower planters. In the center, neat stairs and cream stepping stones lead to the door, flanked by posts and a cheerful umbrella beside a pot of yellow blooms. On the right, another table and chair welcome a pink-bowed bunny sipping its drink, backed by a short fence and more hydrangeas. The drain, bollards, and tiled pavement complete a charming, bustling little world in Dreamy Room Level 459.