Dreamy Room Level 152
Dreamy Room Level 152 guide - Dreamy Room 152 Walkthrough & Solution.

Important Notice Regarding Level Numbering
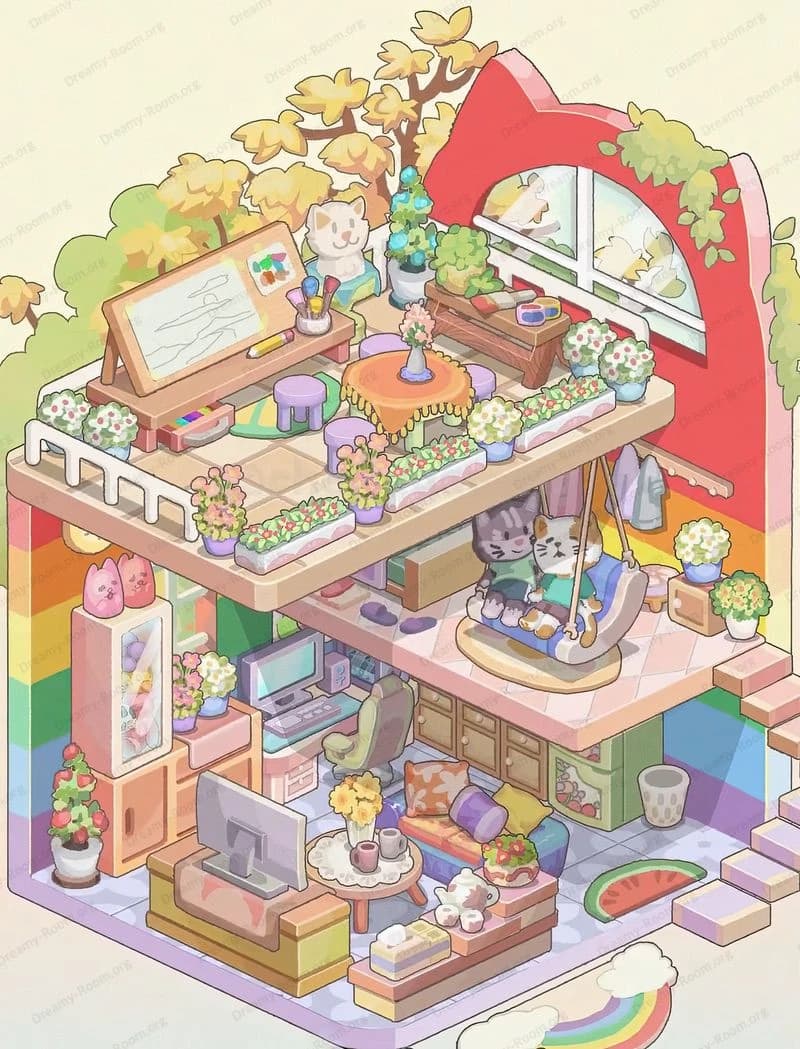
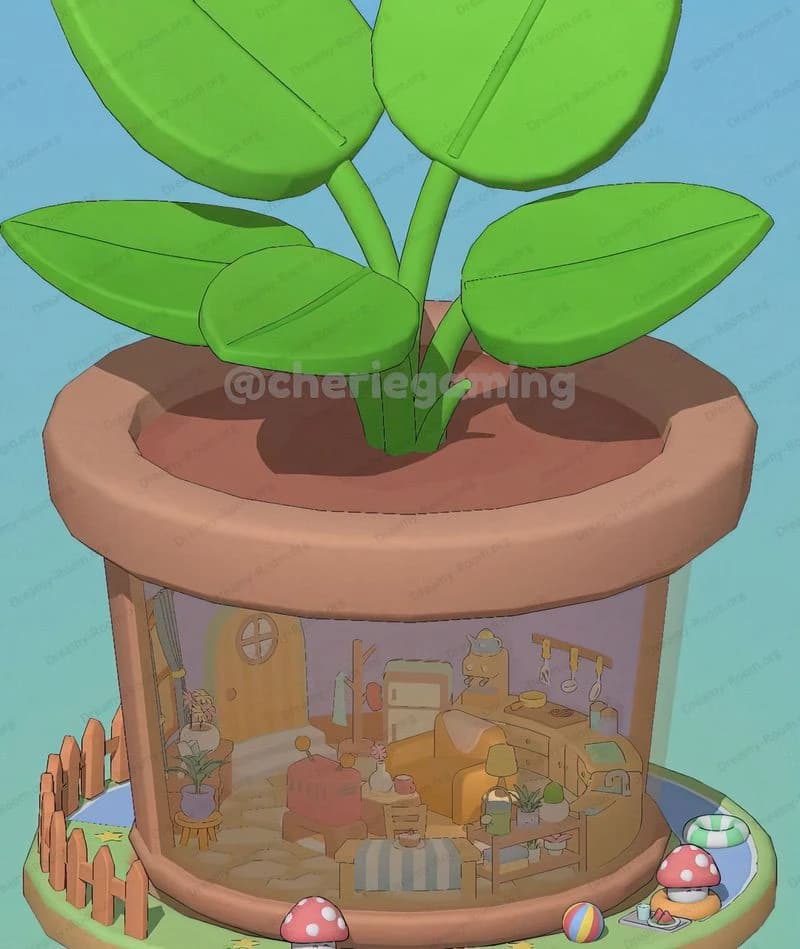
Due to frequent changes in Dreamy Room's level numbering and differences between platforms (Android/iOS) – for example, level 152 on Android might not be the same as level 152 on iOS – the text guide below may not always match the images and video above. Please prioritize the image and video guides. If you find that the guide content doesn't match your current level, please visit the All Level Walkthroughs page to find the correct guide based on level images. Thank you for your understanding.
Dreamy Room Level 152 Walkthroughs & Guide
Welcome to the comprehensive walkthrough for Dreamy Room Level 152. A key aspect of Dreamy Room Level 152 is that the main challenge lies in determining the correct placement for each object, turning an empty space into a serene pagoda courtyard. Follow these ten detailed steps to transform the circular courtyard into a harmonious scene inspired by traditional architecture.
Step 1. Place Bamboo in the Back Left Corner.
In Dreamy Room Level 152, the very first step is to introduce natural elements by placing bamboo in the back left corner. For Dreamy Room Level 152, you should pick the tallest bamboo stalk and position it just inside the circular stone border, aligning it at a slight angle toward the center. This action in Dreamy Room Level 152 emphasizes vertical contrast against the flat floor plane. Remember that in Dreamy Room Level 152, careful spacing and depth cues are crucial to replicating the reference image authentically. Placement precision in Dreamy Room Level 152 will set the tone for subsequent decorations and ensure the scene matches the intended aesthetic. To get the correct effect, drag each bamboo piece until its base is flush with the platform and its tip overlaps the shadow of the adjacent stalk. Pay attention that the distance between trunks is consistent at about one bamboo diameter apart. Use the grid overlay if needed to fine-tune until the grouping looks naturally clustered and balanced.
Step 2. Place Stone Blocks behind the Bamboo Cluster.
In Dreamy Room Level 152, the second step involves adding the smooth stone blocks behind the bamboo cluster. For Dreamy Room Level 152, select the two largest boulders and position them snugly against the inner curve of the circle, nestled between the bamboo stalks. This placement in Dreamy Room Level 152 should mirror the subtle rock alignment seen in the reference, creating a natural backdrop for the foliage. As you drop each stone, be mindful that in Dreamy Room Level 152 the rocks must not overlap the bamboo or extend beyond the base’s ring. Precision in Dreamy Room Level 152 at this stage ensures the stones serve as sturdy visual anchors without crowding adjacent elements. Use the rotation handles to slightly tilt each block so it catches light and shadow realistically. Since these stones frame the bamboo, nudge them carefully until the silhouette looks organic, laying the groundwork for the architectural build-up.
Step 3. Place the Golden Cylindrical Wall Section in the Midpoint.
In Dreamy Room Level 152, Step 3 is about configuring the golden cylindrical wall section on the game’s floor. For Dreamy Room Level 152, drag the curved wall piece to the center of the platform, ensuring its base aligns exactly with the platform’s inner edge. When you position this wall section in Dreamy Room Level 152 it should enclose roughly one third of the circle, leaving space for entry at the front. Remember that in Dreamy Room Level 152 the height of this wall must match the reference so that the subsequent window piece fits perfectly. Accurate placement in Dreamy Room Level 152 is vital for creating the multi-tiered pagoda effect envisioned in the final layout. After snapping the wall in place, inspect all sides in orbit view to confirm uniform spacing. This encircling wall defines the main structure of the level, so any misalignment here will make later steps look uneven. Take advantage of duplicate tools where available to create matching segments symmetrically.
Step 4. Install the Circular Lattice Window on the Upper Wall.
In Dreamy Room Level 152, next you will install the decorative circular lattice window on the upper wall. For Dreamy Room Level 152, select the green-colored lattice window asset and move it upward until it snaps into the designated slot near the top center of the cylindrical wall. This precise operation in Dreamy Room Level 152 ensures the window’s frame aligns flush without gaps or tilts. Be aware that in Dreamy Room Level 152 the window must be oriented so the ornamental pattern faces outward, matching the reference image’s direction. Successful alignment in Dreamy Room Level 152 will allow subsequent items to be placed symmetrically around the window and maintain architectural harmony. Rotate the window slowly if needed to catch the magnet point, and switch to orthographic view to verify it sits perfectly centered on the curved surface. A misaligned window here can disrupt the level’s visual flow, so take your time before confirming.
Step 5. Place the Red-and-Teal Entrance Gate at the Front.
In Dreamy Room Level 152, after completing the upper structure, focus on placing the entrance gate at the front opening. For Dreamy Room Level 152, choose the red-and-teal gate asset and position it so that its base steps rest on the circular floor platform, aligned with the front center axis. This step in Dreamy Room Level 152 creates a welcoming paifang that echoes traditional designs. When placing the gate in Dreamy Room Level 152, ensure it does not collide with the cylindrical wall edges, leaving about half a stone-block’s spacing on each side. Precise placement in Dreamy Room Level 152 will anchor the scene’s symmetrical layout and highlight the main doorway. Use the grid guide to center the gate and press the snap function to lock it in place. Double-check from the front camera angle to confirm straight alignment—any tilt in the gate will break the harmony of the entire courtyard.
Step 6. Add the Pair of Stone Lion Statues Flanking the Gate.
In Dreamy Room Level 152, Step 6 tasks you with adding both stone lion statues on either side of the entrance gate. For Dreamy Room Level 152, place one lion statue on the left base platform and the mirrored counterpart on the right, ensuring their pedestals sit flush with the circular floor. This detail in Dreamy Room Level 152 contributes to the level’s authentic pagoda ambiance. Make sure when placing these statues in Dreamy Room Level 152 that each face outward at a slight angle, matching the reference image’s protective stance. Accurate symmetry in Dreamy Room Level 152 at this point reinforces the courtyard’s formal entrance aesthetic. Fine-tune their orientation using the rotation tool, watching from a top-down view to align their axes parallel to the platform’s diameter. Small adjustments here will make the lions appear poised and balanced, ready to welcome players into the scene.
Step 7. Arrange the Round Wooden Table with Red Cloth at the Center.
In Dreamy Room Level 152, the next step is to position the central round wooden table draped in a red cloth. For Dreamy Room Level 152, select the round table asset and drag it to the exact center of the inner platform, snapping its legs into the floor grid. This table in Dreamy Room Level 152 will become the focal point of the entire scene, so placement precision is paramount. Confirm that in Dreamy Room Level 152 the tablecloth’s edges align consistently with the colored floor ring beneath, creating a visually appealing concentric pattern. Proper alignment in Dreamy Room Level 152 ensures the table serves as the centerpiece for displaying decorative items. Zoom in and orbit around the table to make sure it sits level. If the cloth overlaps the border, use the alignment arrows to adjust until the edge pattern matches the ring’s contours exactly, reinforcing the balanced design.
Step 8. Place the Small Wooden Stools Evenly Around the Table.
In Dreamy Room Level 152, step 8 involves placing the small wooden stools around the central table. For Dreamy Room Level 152, pick up each of the six stool assets and position them evenly spaced in a circle around the table. This arrangement in Dreamy Room Level 152 provides seating continuity and rhythm across the scene. Watch that when you place these stools in Dreamy Room Level 152, each seat is equidistant from its neighbors and aligned toward the table’s center. Maintaining consistent spacing in Dreamy Room Level 152 is critical for aesthetic balance, reflecting the symmetry of traditional seating layouts. Use the radial distribution tool if available, or manually count grid units from the table’s center to each stool. Rotate each stool so that it faces inward, ensuring visual cohesion in the circular seating configuration and harmony with surrounding architectural elements.
Step 9. Set Vases, Teapot, and Tea Cups on Either Side of the Table.
In Dreamy Room Level 152, step 9 focuses on decorating the area beside the table with ceramics and tea equipment. For Dreamy Room Level 152, place the two tall blue-and-white vases on opposite sides of the table against the inner wall. Then select the teapot asset and two matching tea cups, positioning them neatly on small saucer plates. This careful placement in Dreamy Room Level 152 recreates the refined tea ceremony vibe. Be mindful that when you place these objects in Dreamy Room Level 152, the vases don’t block the lattice window and the tea set remains fully visible. Precision here in Dreamy Room Level 152 highlights the level’s emphasis on harmonious display. Use fine adjustment controls to nudge each piece slightly closer or further, depending on how they align with the tabletop marker. Preview from a bird’s-eye camera to verify the grouping’s symmetry.
Step 10. Place Decorative Items: Fruit Bowl and Potted Plant near Window.
In Dreamy Room Level 152, the final step is adding small accent pieces near the circular lattice window. For Dreamy Room Level 152, select the fruit bowl containing vibrant produce and position it to one side of the window ledge. Then pick the small potted plant and place it on the opposite side, creating a balanced pair. This finishing touch in Dreamy Room Level 152 injects a splash of color and life to the scene. Check that when you place these items in Dreamy Room Level 152, they sit flush on the window sill without floating. Attention to detail in Dreamy Room Level 152 ensures the final vignette appears polished and complete. Rotate the plant slightly toward the window to suggest an imaginary breeze, and tilt the fruit bowl so some fruits overhang the edge realistically. These subtle tweaks will make your level feel alive.
Notes and Precautions
In Dreamy Room Level 152, remember that the game relies on a grid-based placement system. If you notice items not snapping correctly, toggle the grid and snap settings to align objects precisely. Additionally, the level includes asset collision checks; overlapping or intersecting objects can cause visual glitches, so avoid pushing pieces too far together. Always double-check from multiple camera angles to catch any clipping or shadow artifacts. Since the core challenge of Dreamy Room Level 152 is perfect placement, take your time and save your progress often in Dreamy Room Level 152 to avoid repeating steps if you need to undo an error.
Tips and Tricks from top player
A top player tip for Dreamy Room Level 152 is to use the game’s align and distribute tools whenever possible. By selecting multiple assets and using the radial distribution feature, you can speed up placement of symmetrical objects like stools and lanterns. Another trick in Dreamy Room Level 152 is to adjust the height snaps to position smaller items like the fruit bowl with millimeter precision. Veteran players recommend customizing your camera hotkeys in Dreamy Room Level 152 to quickly switch between orthographic, top-down, and orbit views to verify alignment from every angle. Finally, experiment with minor offsets and subtle rotations to give each scene a handcrafted feel that stands out.
Final Scene Description
The final scene of Dreamy Room Level 152 presents a tranquil two-tiered pagoda courtyard nestled within a circular stone border. The vibrant red-and-teal entrance gate stands at the front, flanked by two poised stone lion statues, welcoming visitors into the space. Behind them, a series of tall bamboo stalks and carefully placed stone blocks create a natural backdrop against the golden cylindrical wall. The circular lattice window peers over a wooden table draped in red cloth, surrounded by evenly spaced stools, while blue-and-white vases, a teapot set, and a colorful fruit bowl enhance the intimate tea ceremony setting. Soft, muted pastel tones bathing the scene in morning light create a warm, nostalgic atmosphere, and gentle shadows cast by the bamboo and architectural curves evoke a sense of calm reflection, inviting players to pause and appreciate the careful composition. This moment in Dreamy Room Level 152 captures harmony between nature and architecture, reflecting the game’s emphasis on precise placement and peaceful ambiance. Overall, Dreamy Room Level 152 rewards players with a cohesive, storybook-like space that feels both immersive and serene.