Dreamy Room Level 778
Dreamy Room Level 778 guide - Dreamy Room 778 Walkthrough & Solution.
Important Notice Regarding Level Numbering
Due to frequent changes in Dreamy Room's level numbering and differences between platforms (Android/iOS) – for example, level 778 on Android might not be the same as level 778 on iOS – the text guide below may not always match the images and video above. Please prioritize the image and video guides. If you find that the guide content doesn't match your current level, please visit the All Level Walkthroughs page to find the correct guide based on level images. Thank you for your understanding.
Dreamy Room Level 778 Walkthroughs & Guide
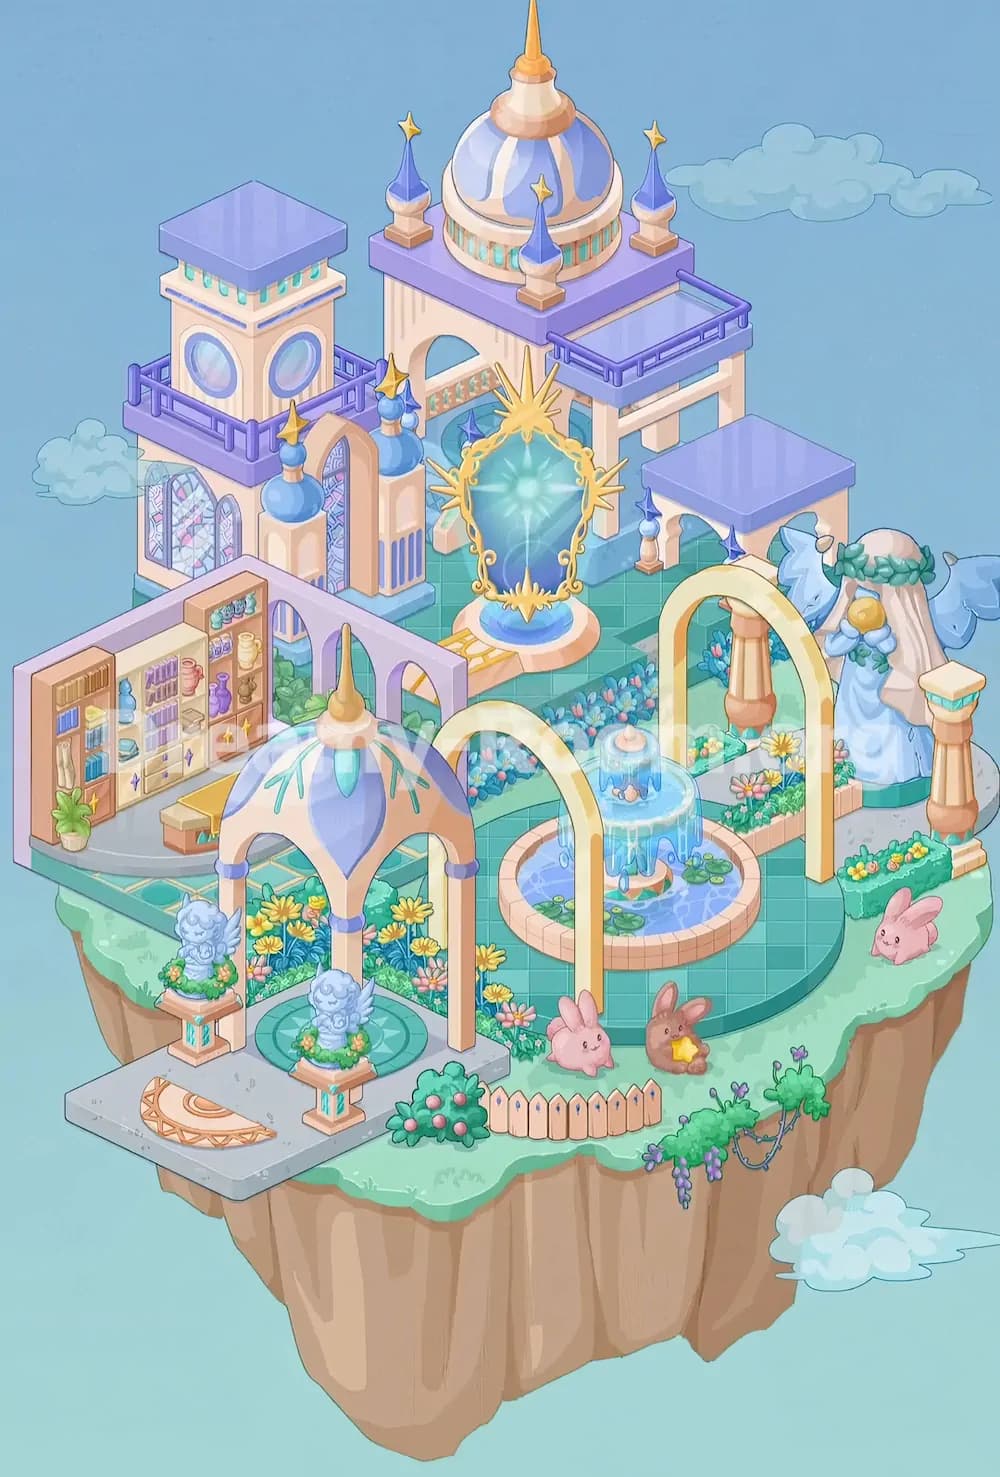
Dreamy Room Level 778 transforms a bare turquoise platform on a floating island into an elaborate celestial palace garden. The level is visually dense, with towers, domes, stained-glass walls, a magical mirror, a fountain, arches, statues, flowers, bookshelves, and several rabbits sharing a compact space. As in the broader Dreamy Room experience, the relaxing gameplay has no timer and focuses on discovering the intended position of every object.
Step 1. Build the central palace and blue dome in Dreamy Room Level 778.
Begin Dreamy Room Level 778 at the back center of the turquoise platform, where the tallest palace structure belongs. Place the large cream-colored central building against the rear edge, leaving enough open space in front for the magical mirror. Set the broad purple roof deck on top, then add the huge pale-blue onion dome with peach-and-cream bands. Its tall golden finial must point straight upward from the dome’s center. Arrange the three smaller blue spires with gold star tips around the dome: one on the left rear corner, one on the right rear corner, and one at the front center of the purple roof. Add the arched opening to the palace façade and position the turquoise-and-peach balcony rail beneath it. Dreamy Room Level 778 uses this central palace as the strongest alignment guide, so confirm its footprint before adding lower decorations. Correct palace placement prevents the roof, portal, and side wings from overlapping later in Dreamy Room Level 778.
Step 2. Complete the left tower and stained-glass wing in Dreamy Room Level 778.
Move to the upper-left side of Dreamy Room Level 778 and install the tall square tower beside the central palace. Its cream walls should rise above the nearby stained-glass section, with two large circular blue windows visible on the front-facing sides. Cap the tower with a flat lavender roof and place a purple railing around the balcony level below it. Under that balcony, align the tall stained-glass windows so their pastel diamond patterns face the viewer. Beside the glass façade, place the narrow peach archway and the two blue bulb-shaped mini domes on their slim towers. Each blue dome receives a gold pointed ornament, while the taller central arch should sit slightly behind the front blue-domed column. In Dreamy Room Level 778, these pieces look interchangeable at first, but their heights reveal the correct order. Keep the tower farthest left, the stained glass below it, and the arched entrance nearer the center so Dreamy Room Level 778 matches the completed palace silhouette.
Step 3. Add the right terraces and winged monument in Dreamy Room Level 778.
Build the right side of Dreamy Room Level 778 by attaching the elevated terrace to the central palace. Place the cream open-sided structure directly under the right purple roof deck, then add the lavender railing around the upper balcony. Farther forward and slightly lower, position the small square pavilion with its flat purple roof and cream arches. Two tiny blue flame-like lamps sit on peach bases near the pavilion’s front openings, one closer to the mirror and one toward the right garden. Behind the large foreground arch, place the monumental pale-blue winged statue on its turquoise base. The figure faces diagonally toward the center, wears a green leafy wreath, and holds a round golden ornament against its body. A cream-and-peach decorative column stands near the far-right flower border. Dreamy Room Level 778 becomes crowded in this corner, so place the statue before the arch. This ordering keeps the wings visible and prevents the pavilion from hiding important details in Dreamy Room Level 778.
Step 4. Position the glowing magical mirror in Dreamy Room Level 778.
The most important decorative object in Dreamy Room Level 778 is the enormous turquoise magical mirror standing in the upper-middle courtyard. Place its peach-and-blue oval pedestal on the floor directly in front of the central palace arch. The mirror should stand upright, with the glowing blue-green glass facing the viewer and the brightest star-shaped reflection near its center. Attach the ornate gold frame around the glass: long sun rays project from the top and sides, curling gold vines trace the edges, and a pointed gold flourish finishes the bottom. A short gold-patterned runner extends forward-left from the pedestal toward the garden. Keep the mirror centered between the left palace wing and the right pavilion without covering the arched doorway behind it. Dreamy Room Level 778 tests precise depth placement here because the mirror overlaps several background elements. When correctly placed, it appears in front of the palace but behind the fountain and cream arches, creating the intended layered composition of Dreamy Room Level 778.
Step 5. Assemble the library nook in Dreamy Room Level 778.
In the lower-left interior of Dreamy Room Level 778, place the lavender partition wall along the back edge of the front terrace. The wall contains three rounded arch openings that look toward the garden, while its solid left section supports the library furniture. Set two tall bookcases against that section. Fill them with tightly arranged books in blue, purple, and gold, along with pastel bottles, jars, cups, vases, and small crystal-like ornaments. The lower cabinets include drawers and doors marked with tiny star decorations. Place the leafy potted plant on the floor at the far-left end of the shelves. A low gold bench or table with a pale cushion belongs in front of the shelving, angled slightly toward the open garden. Dreamy Room Level 778 requires these small objects to stay within the library zone rather than on the outdoor paths. Use the partition wall as the boundary, and keep all shelf decorations neatly inside the nook to preserve the correct layout of Dreamy Room Level 778.
Step 6. Install the domed gazebo in Dreamy Room Level 778.
Place the elegant gazebo in the lower-left center of Dreamy Room Level 778, in front of the library arches but behind the gray entrance platform. Its four peach-and-cream supports form open arches around a circular turquoise floor. Add the segmented lavender-blue canopy panels, then place the cream cap and tall gold finial at the roof’s peak. Teal vine-like lines decorate the canopy and should flow downward from the top toward the arches. On the ground beneath the gazebo, center the round turquoise medallion with its pale star or compass pattern. The gazebo’s right front leg should sit near the small cream arch that crosses the garden path, while its left front leg remains behind the first angel pedestal. In Dreamy Room Level 778, the gazebo is another large anchor object, so do not squeeze it too close to the fountain. Leaving a narrow flower strip on its right side ensures the building, statues, and paths all retain their intended spacing in Dreamy Room Level 778.
Step 7. Place the two winged child statues in Dreamy Room Level 778.
At the front of the gazebo in Dreamy Room Level 778, position two matching pale-blue winged child statues on separate square pedestals. The left statue stands just outside the gazebo’s left front corner, near the gray platform edge. The right statue sits slightly lower and closer to the center, in front of the gazebo’s right opening. Both figures face inward toward the garden rather than outward toward the cliff. Their pedestals are peach colored with turquoise inset panels, and each base is wrapped with small green leaves and orange-yellow flowers. Keep the statues clear of the circular gazebo medallion because neither figure belongs inside the pavilion. Dreamy Room Level 778 uses the pair to frame the entrance symmetrically even though their positions are slightly offset by perspective. Place the left statue first, then use it to judge the right statue’s height and distance. This makes the front entrance of Dreamy Room Level 778 look balanced without blocking the canopy supports.
Step 8. Add the cream garden arches and paths in Dreamy Room Level 778.
Two cream-colored arches organize the middle and right side of Dreamy Room Level 778. Place the smaller arch over the path just behind the fountain, with one foot near the gazebo flowerbed and the other near the blue-and-pink flowers. Then position the much taller arch in the right foreground, spanning the path between the fountain and the winged statue. Its left support stands beside the fountain basin, while its right support rises in front of the statue and flower border. Both arches have warm peach inner supports that make them look like garden gateways. Arrange the turquoise tiled paths beneath and around them, joining the palace courtyard, gazebo, fountain, pavilion, and right garden into one continuous floor. Dreamy Room Level 778 depends on correct overlap: the large arch must appear in front of the fountain and statue, while the small arch remains behind the fountain. If the arches are reversed, the depth of Dreamy Room Level 778 will look immediately wrong.
Step 9. Build the circular fountain in Dreamy Room Level 778.
Place the fountain in the lower-middle of Dreamy Room Level 778, slightly right of the gazebo and directly beneath the smaller cream arch. Start with the round peach-stone basin and fill it with pale-blue water. Arrange several green lily pads across the surface, mainly around the right and lower sections, leaving the central pedestal visible. Set the peach-and-blue fountain column in the center, then add the translucent rounded water canopy above it. The water should spill in soft blue curtains over the canopy’s rim, with individual droplets hanging along the lower edges. A tiny peach cap finishes the top, while small decorative shapes can be seen inside the clear fountain dome. The basin must remain in front of the rear flowerbed but behind the large foreground arch. In Dreamy Room Level 778, the fountain is easy to misplace because its circular outline fits several open areas. Use the two arches as guides so the fountain becomes the visual center of the lower garden in Dreamy Room Level 778.
Step 10. Fill every flowerbed and shrub in Dreamy Room Level 778.
Once the major architecture is stable, fill Dreamy Room Level 778 with its layered planting. Behind the fountain, create a long bed of dense blue foliage dotted with pink and coral buds. Around the gazebo, plant tall yellow daisy-like flowers with blue-green leaves, plus smaller pink blossoms along the path edges. Under the winged statue and beside the large right arch, add mixed yellow, pink, and white flowers in rectangular peach-bordered beds. Continue a low strip of yellow and orange blooms along the far-right cliff edge. Place leafy shrubs behind the library arches and beneath the palace structures to soften the walls. At the front center, set a rounded green bush with several pink berry-like fruits. Dreamy Room Level 778 contains many similar flower clusters, so match them by height: tall yellow blooms belong near the gazebo, dense blue plants belong behind the fountain, and low mixed flowers line the right border. Correct plant grouping gives Dreamy Room Level 778 its finished enchanted-garden appearance.
Step 11. Add the fence, rabbits, platform, and vines in Dreamy Room Level 778.
Finish the foreground of Dreamy Room Level 778 by placing the short pale wooden picket fence across the grass near the front center-right. It curves gently between the pink-fruited bush and the rabbits without reaching the cliff edge. Position one pink rabbit just behind and left of the fence’s right end, close to the gazebo path. Place the brown rabbit to its right, holding the bright yellow star-shaped object against its chest. The second pink rabbit belongs farther right near the flower border and cliff edge, facing inward toward the garden. On the lower-left projection, add the rectangular gray entrance platform and the semicircular peach-and-gold mosaic or doormat near its outer edge. Finally, drape green vines over the front-right cliff, including purple hanging grape-like clusters, curling stems, and small violet flowers. Dreamy Room Level 778 is complete only when these tiny foreground accents are included. They provide scale, story, and a playful finish to Dreamy Room Level 778.
Notes and Precautions for Dreamy Room Level 778
Dreamy Room Level 778 contains several large objects that overlap, so placement order matters. Start with the palace, side wings, gazebo, and right statue before adding arches, flowers, or animals. The magical mirror belongs in front of the central palace but behind the garden structures. The fountain belongs behind the tall cream arch and in front of the low flowerbed.
In Dreamy Room Level 778, similar purple roofs can be confusing. The tall square roof goes on the left tower, the broad platform supports the central dome, and the smaller flat roof covers the right pavilion. Do not place the angel statues inside the gazebo, and do not move the brown rabbit away from the yellow star.
Watch the cliff boundary carefully because the fence, fruit bush, mosaic platform, and hanging vines each occupy different foreground zones. The central challenge of Dreamy Room Level 778 is identifying these exact relationships rather than simply finding an attractive empty space.
Tips and Tricks from top player for Dreamy Room Level 778
A reliable way to solve Dreamy Room Level 778 is to work from back to front and from largest to smallest. First lock in the central dome and left tower, then compare the heights of all remaining architectural pieces. Next, place the unique silhouette objects: the sun-framed mirror, winged monument, gazebo, and fountain. These objects have only one believable location in Dreamy Room Level 778 and quickly divide the remaining floor into smaller zones.
Keep all matching sets together before placing them, especially the two angel statues, three rabbits, roof spires, lamps, and garden arches. Use color as a secondary clue rather than the main clue because many objects share lavender, cream, peach, and turquoise tones. When an object refuses to settle, check whether a larger piece underneath it is misplaced. The fastest Dreamy Room Level 778 strategy is to solve structural layers first, then paths and borders, and finish with books, flowers, droplets, fence pieces, and vines.
Final Scene of Dreamy Room Level 778
The completed Dreamy Room Level 778 becomes a floating celestial palace surrounded by an enchanted garden. A blue-and-cream dome rises above purple terraces, star-tipped spires, circular tower windows, and luminous stained glass. At the courtyard’s center, a turquoise magical mirror glows inside a golden sunburst frame. Below it, cream arches guide the eye toward a clear blue fountain filled with lily pads and falling water. The front gazebo shelters a patterned turquoise floor, while two winged child statues guard its entrance. The left library nook adds books, bottles, jars, crystals, drawers, a plant, and a small gold bench. Across the garden, yellow daisies, blue flowerbeds, pink blossoms, fruiting shrubs, and trailing purple vines soften every path and ledge. Three rabbits gather near the picket fence, including the brown rabbit holding a yellow star. Dreamy Room Level 778 ends as a richly layered, peaceful fantasy retreat suspended among pale clouds.