Dreamy Room Level 797
Dreamy Room Level 797 guide - Dreamy Room 797 Walkthrough & Solution.
Important Notice Regarding Level Numbering
Due to frequent changes in Dreamy Room's level numbering and differences between platforms (Android/iOS) – for example, level 797 on Android might not be the same as level 797 on iOS – the text guide below may not always match the images and video above. Please prioritize the image and video guides. If you find that the guide content doesn't match your current level, please visit the All Level Walkthroughs page to find the correct guide based on level images. Thank you for your understanding.
Dreamy Room Level 797 Walkthroughs & Guide
Because Dreamy Room Level 797 builds upward through several floors, it is especially useful to work from the lowest structural pieces toward the roof. Large walls, balconies, stairs, railings, and awnings establish the placement boundaries for smaller decorations. Once those anchors are correct, the mailbox, laundry, plants, water tank, utility poles, characters, and other accessories become much easier to position. Follow the steps below to complete Dreamy Room Level 797 without repeatedly moving objects between similar-looking locations.
Step 1. Build the blue ground floor on the back-right area of the platform
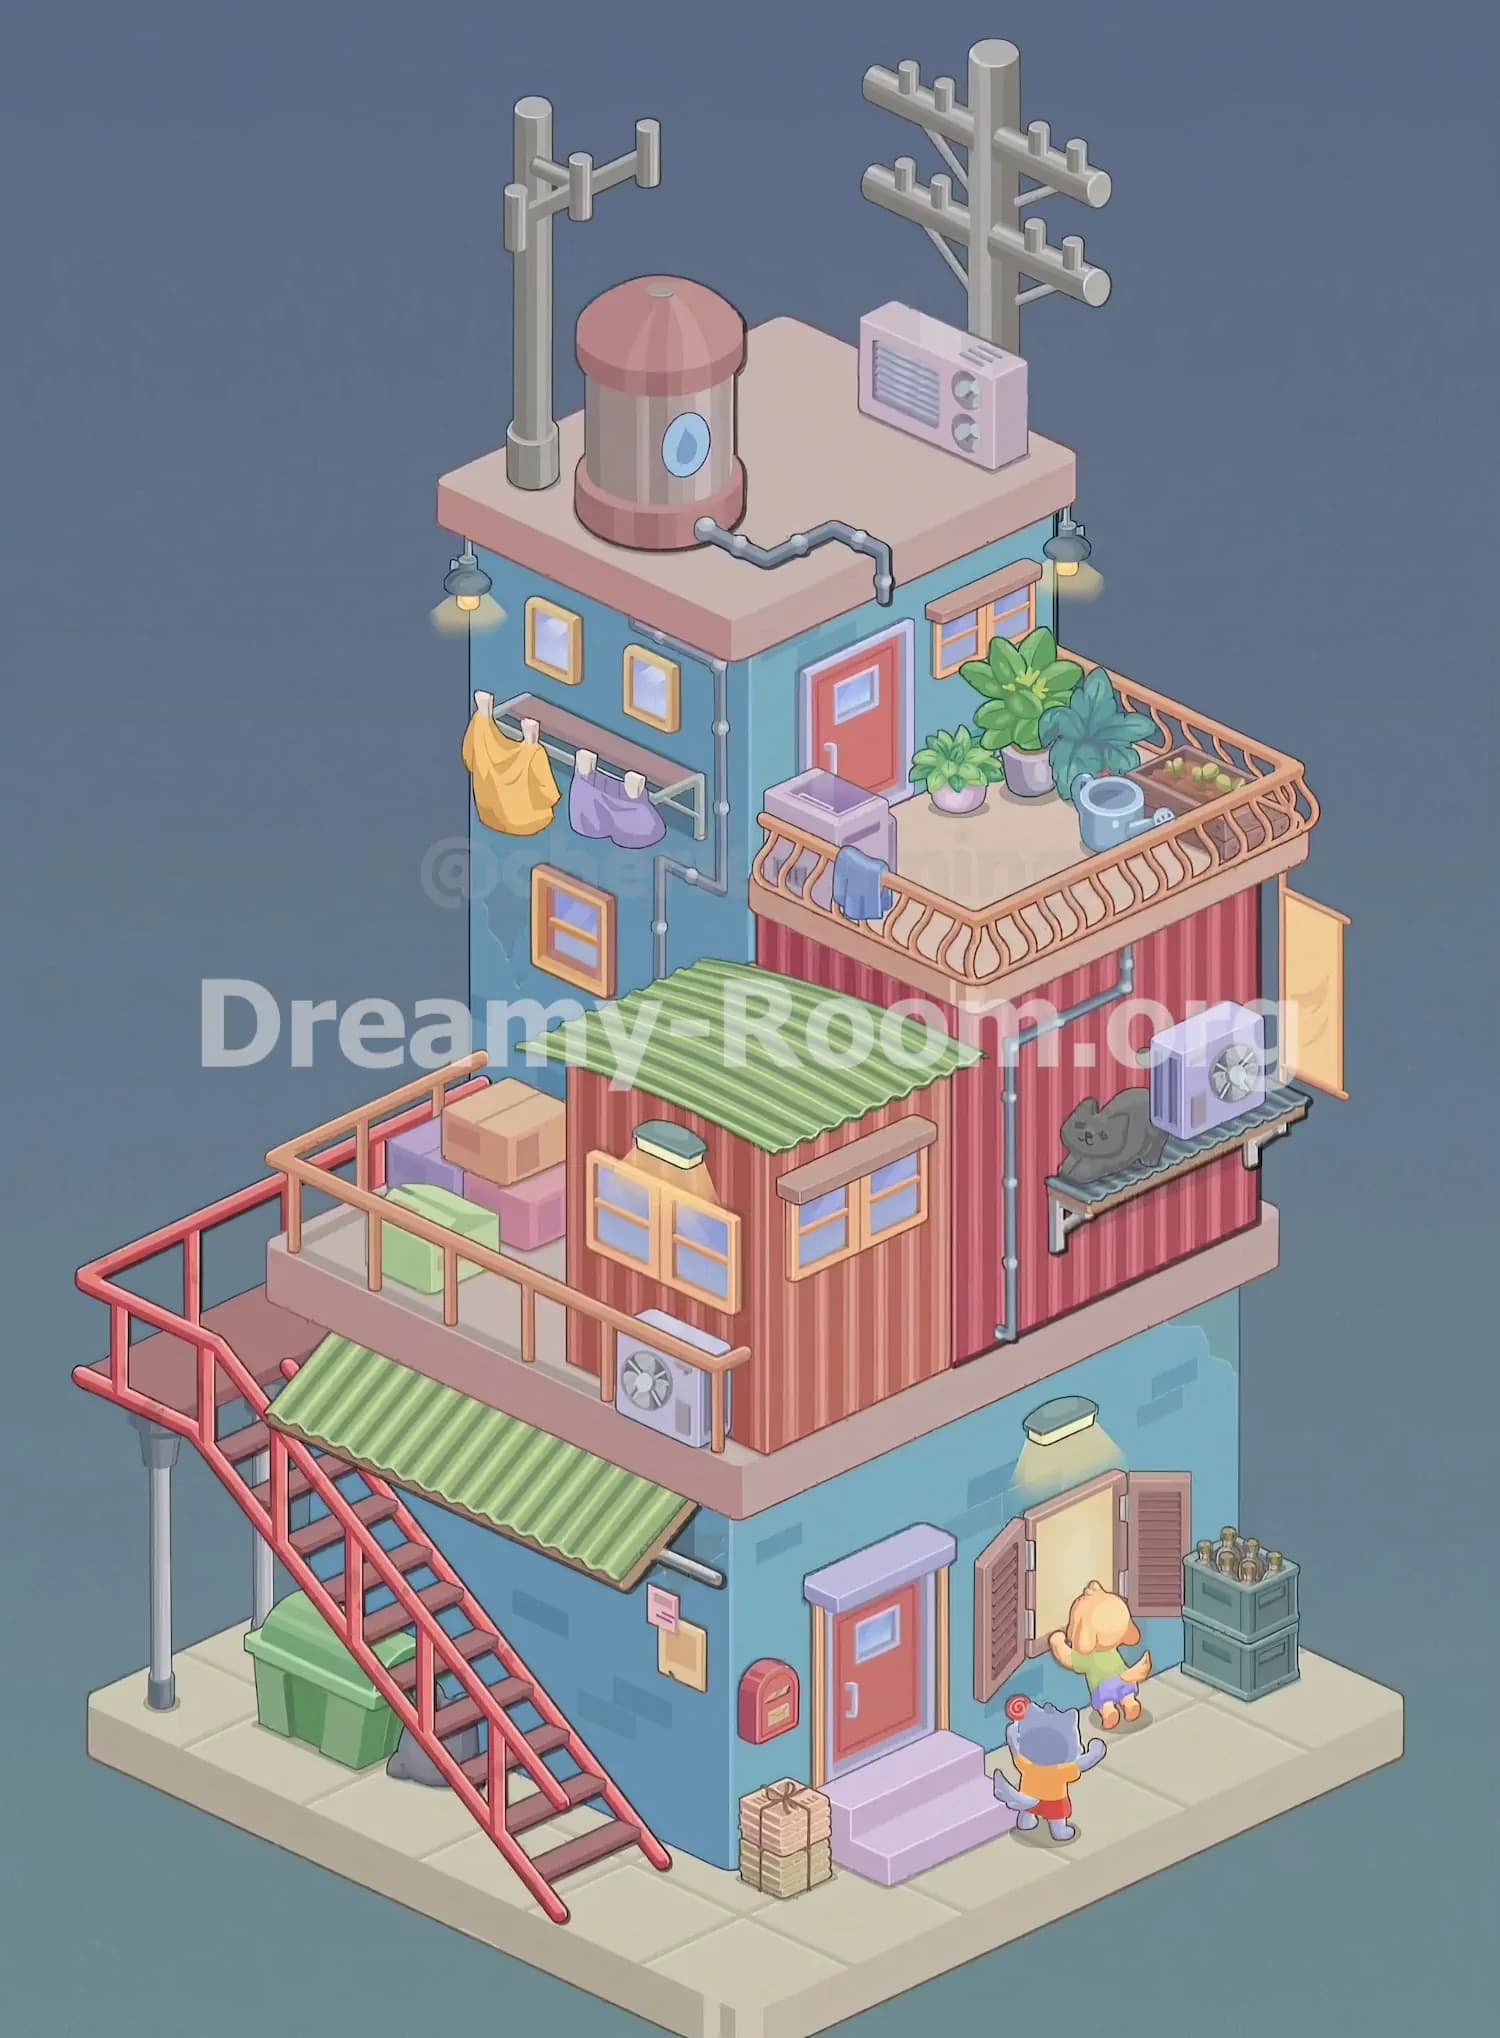
Begin Dreamy Room Level 797 by using the empty cream-colored tiled platform as your reference grid. The main building belongs toward the back-right portion of the base rather than directly in the center, leaving a generous walkway along the front and enough open space on the left for the exterior staircase. Place the large blue ground-floor wall structure first. Its front-facing wall should point toward the lower-right side of the screen, while the left side of the building faces the staircase area. In Dreamy Room Level 797, getting this footprint right is critical because almost every later item connects to this structure. Keep the front-right section clear for the main entrance and window, and preserve the exposed tiled pavement around the building. The distinctive blue walls with darker brick-like patches form the visual foundation of Dreamy Room Level 797 and support the red upper level that will eventually sit above them.
Step 2. Complete the ground-floor entrance, mailbox, signs, steps, and illuminated window
Next, decorate the front of the blue level in Dreamy Room Level 797. Place the coral-red entrance door near the center of the front wall, finishing it with its pale lavender frame, small blue window panel, silver handle, and the broad lavender steps directly beneath it. To the left of the entrance, attach the small rounded red mailbox. Slightly higher and farther left, place the two wall notices: the tiny pink rectangular notice sits above the larger pale square paper. On the ground beside the left edge of the steps, stack the tied bundles of newspapers or parcels. The right side of this wall contains the large illuminated window with brown shutters opened outward. Add the small wall lamp directly above the window so its warm light shines downward. These placements are easy to confuse in Dreamy Room Level 797, so use the red entrance as the central landmark before positioning the surrounding accessories.
Step 3. Add the two characters, bottle crates, and remaining ground-level details
The right side of the ground floor contains several important storytelling pieces in Dreamy Room Level 797. Position the orange animal character immediately in front of the brightly lit open window, facing toward it as though looking or reaching inside. This character wears a purple outfit and stands close to the wall rather than in the middle of the pavement. Place the smaller blue-gray animal character a little lower and to the left, facing the orange character and the window. It wears an orange top and red bottoms and holds a small red spiral-shaped item. At the far right edge of the walkway, beside the window, stack two dark green storage crates. The upper crate contains several glass bottles. Dreamy Room Level 797 uses these small character-and-prop relationships to make the scene feel alive, so do not separate the figures too widely. When correctly placed, the characters, window, light, and bottle crates form one compact activity area on the lower-right corner of Dreamy Room Level 797.
Step 4. Install the red exterior staircase, lower awning, trash bin, and support structure
Move to the left side of Dreamy Room Level 797 and assemble the prominent outdoor staircase. The long staircase begins near the front-left edge of the base and climbs diagonally upward toward the first elevated balcony. Use the red stair frame, reddish-brown steps, and matching red handrails. At the top, connect the stairs to the horizontal landing with red railing around its exposed outer edge. A narrow gray support post descends from the far-left corner of the landing to the tiled platform. Beneath the stairs, place the large green trash container against the blue wall area, with the dark gray bag tucked nearby. Above the lower doorway zone and under the balcony, attach the sloped green corrugated awning. This awning projects outward from the building beneath the upper walkway. The staircase is one of the strongest visual anchors in Dreamy Room Level 797, so if its angle or landing is misplaced, many later balcony items will appear not to fit.
Step 5. Construct the red striped middle room and fit its windows, roof awning, and pipes
The next major structure in Dreamy Room Level 797 is the red vertically striped room sitting above the blue ground floor. Place it toward the right half of the upper platform, leaving the left balcony accessible from the staircase. The room has warm red and pink striped walls and a large green corrugated roof or awning that slopes over its front-left face. Fit the larger yellow-orange framed window beneath this green cover on the front wall, then place the smaller yellow-orange framed window on the right-facing side. A small exterior air-conditioning unit belongs low on the front wall, just beneath the balcony railing. Dreamy Room Level 797 also includes exposed gray utility piping that runs vertically and bends around the right side of the striped room. Make sure the pipe follows the wall instead of floating away from it. When these architectural pieces are correct, the middle section of Dreamy Room Level 797 should look like a compact rooftop apartment added on top of the blue lower building.
Step 6. Fill the middle balcony with packages and add the cat, air conditioner, and hanging cloth
Now decorate both sides of the red room in Dreamy Room Level 797. On the balcony to the left of the striped room, place the blocky storage pieces against the rear portion of the landing: a pale green rectangular package sits toward the front, with purple and pink boxes grouped behind and above it. Finish the stack with the brown cardboard box on top. Keep these items inside the tan balcony railing rather than blocking the staircase entrance. On the right wall of the red room, attach the narrow metal shelf. A curled-up gray cat rests on the left side of this shelf, while a lavender outdoor air-conditioning unit sits immediately to its right. At the far-right side of the wall, hang the long yellow-orange cloth vertically. Dreamy Room Level 797 rewards careful observation here because the air conditioner, cat, and cloth all belong on the same exterior face and can easily be mistaken for balcony decorations.
Step 7. Assemble the upper blue section with its door, windows, pictures, laundry, pipes, and lights
Above and behind the red room, Dreamy Room Level 797 continues with a taller blue section. Place the coral-red door near the right side of its visible front face. To the door's right is the orange-framed window overlooking the rooftop terrace. On the left blue wall, hang two small square framed pictures high on the wall, arranged horizontally, and install the smaller orange-framed window lower down. Next, attach the simple horizontal clothes rail across the left side. The yellow shirt hangs on its left portion, while the purple pair of shorts hangs to the right. Gray utility pipes run vertically and horizontally across this wall, connecting the architectural details. Dreamy Room Level 797 also has small hanging exterior lamps beneath the upper roof edges: one illuminates the left side near the laundry, and another hangs at the right corner above the terrace. These details make the upper blue portion of Dreamy Room Level 797 feel like a lived-in residential space rather than an empty tower.
Step 8. Build the rooftop terrace railing and place the sink and blue towel
The terrace is one of the most detailed areas in Dreamy Room Level 797. It occupies the flat roof of the striped red room, directly outside the upper red door. Surround the exposed front and right edges with the decorative tan railing. The railing has repeated curved vertical bars, so its orientation is easy to recognize once the correct edge is found. Place the small purple utility sink immediately outside and slightly left of the red door. Its faucet should point upward at the back of the basin. On the front section of the tan railing, hang the blue towel so that it drapes over the rail near the sink rather than near the garden. Leave most of the terrace's right half open temporarily for the plants and watering equipment. In Dreamy Room Level 797, placing this railing early is useful because it clearly defines where every terrace object is allowed to sit and prevents larger plants from accidentally being positioned outside the balcony.
Step 9. Arrange the rooftop plants, watering can, and small vegetable bed
Finish the terrace garden in Dreamy Room Level 797 by filling its right side with greenery. Start near the red door with the smallest leafy plant in a rounded pink-purple pot. Just behind and to the right, place the larger bright-green plant in its taller lavender pot. Beside it, closer to the outer railing, position the broad dark teal-green leafy plant. The plants should overlap visually without covering the doorway. Near the front-right portion of the terrace, set down the blue watering can, with its open top visible and its spout directed toward the garden area. Finally, place the narrow rectangular planter along the far-right railing. Several small green seedlings grow in the soil inside it. Dreamy Room Level 797 uses plants of similar size and color, making this section one of the easiest places to swap objects accidentally. Use the watering can and long planter as anchors, then arrange the three potted plants between the window, doorway, and right railing.
Step 10. Finish the top roof with the water tank, utility poles, radio unit, and connected pipe
The highest roof completes the silhouette of Dreamy Room Level 797. Place the cylindrical pink water tank toward the left-center of the flat peach-colored roof. It has a rounded pink cap, darker base, translucent-looking central body, and a blue water-drop emblem on the front. Connect the gray segmented pipe to the lower-right side of the tank and run it across the roof toward the front-right edge. Behind the tank on the left, install the smaller utility pole with its short crossarms and insulators. The much larger utility pole belongs at the back-right corner of the roof, with two broad horizontal crossarms and multiple small pegs. In front of this large pole, position the small pink radio or utility-control unit, identifiable by its gray vent and two circular controls. Dreamy Room Level 797 is essentially complete once these rooftop utilities are aligned, because they create the distinctive industrial skyline shown in the finished reference.
Notes and Precautions
The most important thing to remember in Dreamy Room Level 797 is that several objects share similar colors and appear to belong in more than one location. The green corrugated pieces, for example, serve different architectural purposes, while the multiple air-conditioning units occupy separate floors. Always establish the large building sections before trying to place small props.
Dreamy Room Level 797 also contains many wall-mounted pieces. Pipes, lamps, frames, the mailbox, air conditioners, shelf, clothes rail, and yellow hanging cloth need exact wall positions and may not register if dropped slightly away from their intended surfaces. If an item repeatedly refuses to fit, check the neighboring wall instead of assuming its orientation is wrong.
The terrace is another common trouble spot in Dreamy Room Level 797. Keep the purple sink beside the upper red door, the blue towel on the front railing, plants on the right half, the watering can near the railing, and the seed planter at the far-right edge. Do not crowd the plants around the door.
Finally, remember that Dreamy Room Level 797 is a vertical build. Work from bottom to top whenever possible. Large structures can visually hide attachment points for smaller objects, so completing one floor before moving upward makes the correct placements much easier to recognize.
Tips and Tricks from top player
A reliable way to solve Dreamy Room Level 797 quickly is to sort objects mentally into four groups: structural pieces, wall-mounted pieces, floor-standing decorations, and tiny accessories. Place structural objects first—the blue lower building, staircase, red striped room, roof sections, balcony floors, and railings. These establish almost every remaining placement zone in Dreamy Room Level 797.
Use distinctive objects as landmarks. The red staircase defines the left side, the large green awning identifies the middle apartment, the upper red door identifies the rooftop terrace, and the pink water tank marks the top roof. Once those are fixed, surrounding objects become much less ambiguous.
For small items in Dreamy Room Level 797, match objects by context rather than color. The blue watering can logically belongs beside the plants, the bundled papers belong near the front door, the bottles belong in the stacked crates, laundry belongs on the rail, and the sleeping cat belongs on the quiet exterior shelf.
Another useful Dreamy Room Level 797 shortcut is to finish one visual cluster at a time. Complete the ground entrance, then the staircase, then the middle apartment, then the rooftop garden, and finally the utility roof. This reduces accidental placements and makes missing objects immediately noticeable.
Final Scene of Dreamy Room Level 797
The completed Dreamy Room Level 797 becomes a charming, densely layered neighborhood home rising from a simple cream-tiled platform. The blue ground floor has a welcoming red entrance, lavender steps, mailbox, glowing shuttered window, two small characters, stacked bottles, and parcels. A bright red exterior staircase climbs past a green awning and storage area to the striped red apartment above, where packages fill the balcony and a gray cat naps beside an air conditioner. Higher up, Dreamy Room Level 797 adds laundry, framed pictures, warm hanging lights, exposed pipes, and a peaceful terrace overflowing with potted plants, seedlings, a blue watering can, and a small sink. The very top transforms Dreamy Room Level 797 into a miniature urban rooftop, crowned by the pink water tank, twin utility poles, control radio, and connected plumbing. Every tightly fitted object contributes to the cozy, lived-in vertical scene that makes Dreamy Room Level 797 so memorable.