Dreamy Room Level 823
Dreamy Room Level 823 guide - Dreamy Room 823 Walkthrough & Solution.
Important Notice Regarding Level Numbering
Due to frequent changes in Dreamy Room's level numbering and differences between platforms (Android/iOS) – for example, level 823 on Android might not be the same as level 823 on iOS – the text guide below may not always match the images and video above. Please prioritize the image and video guides. If you find that the guide content doesn't match your current level, please visit the All Level Walkthroughs page to find the correct guide based on level images. Thank you for your understanding.
Dreamy Room Level 823 Walkthroughs & Guide
Step 1. Complete the upper house structure and roof in Dreamy Room Level 823
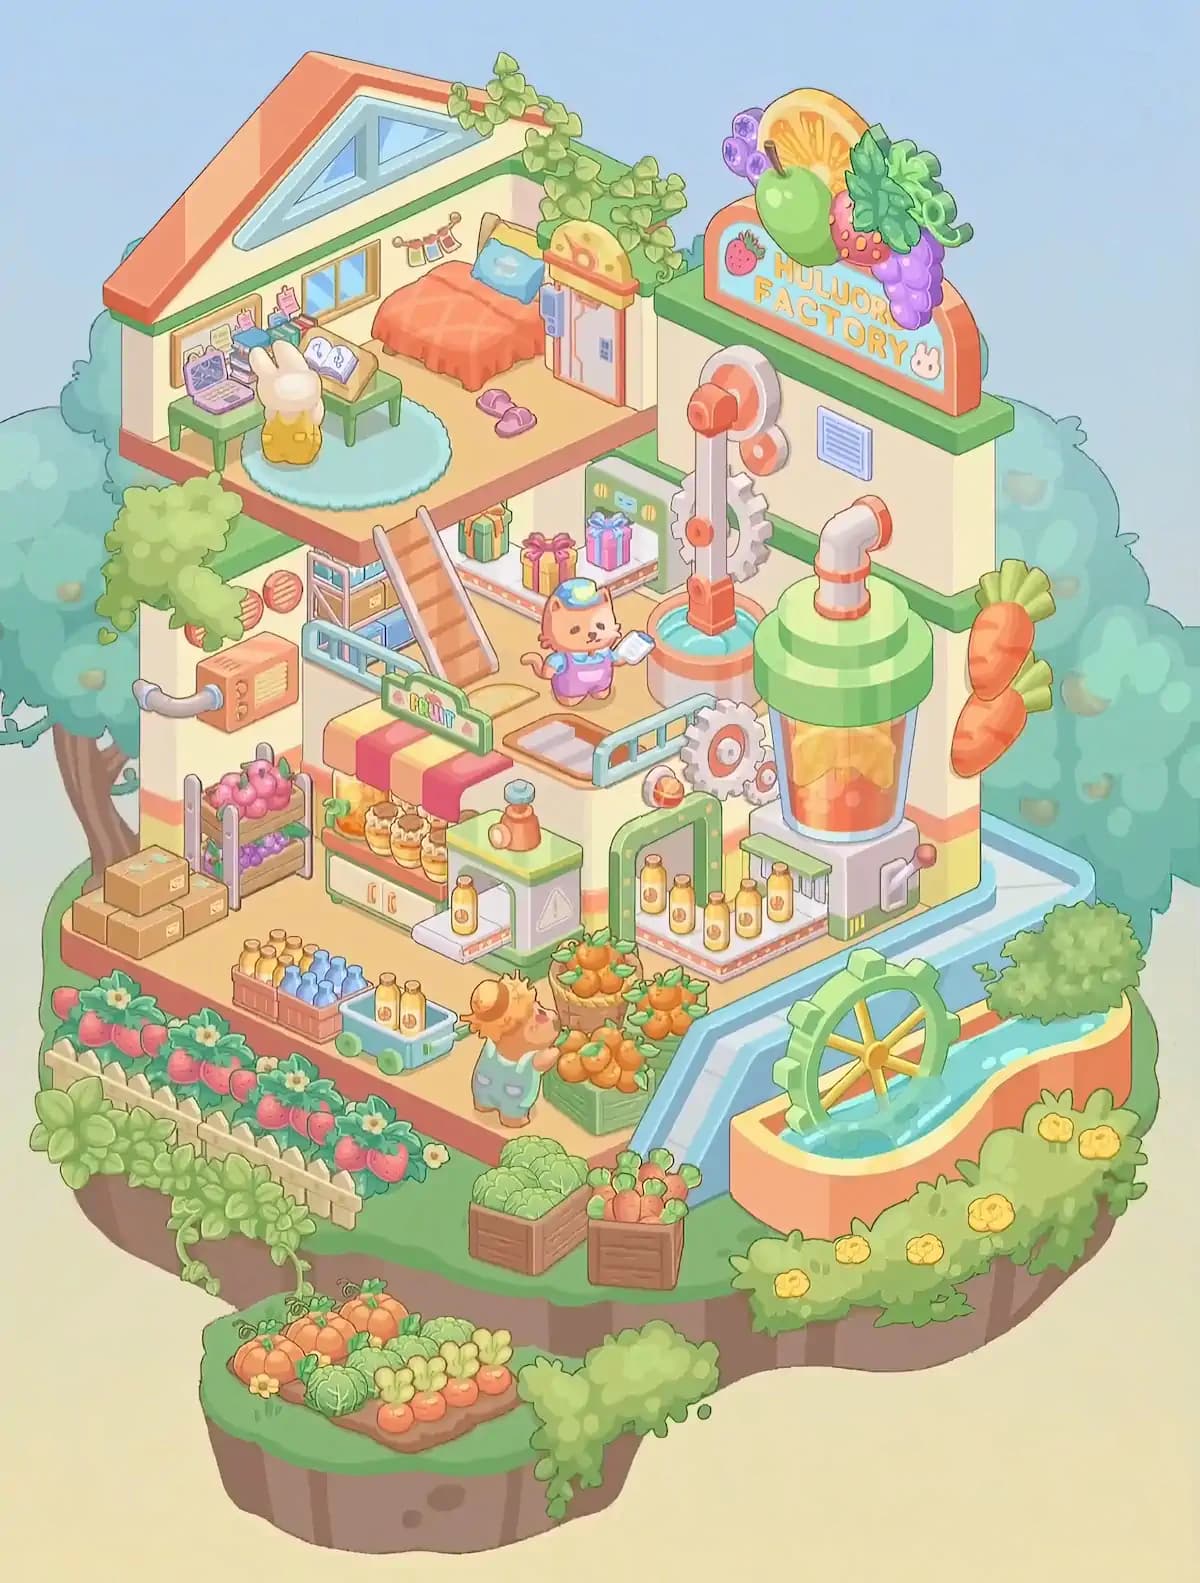
Begin Dreamy Room Level 823 with the large structural pieces around the upper-left portion of the room. The upstairs section needs an orange-red sloping roof that runs along the left and rear edges, forming a triangular gable above the living space. Fit the pale triangular window assembly into the front-facing gable beneath the roof, making sure the blue glass panes sit inside the cream frame. Add the green trim underneath the roof edge and continue the green edging around the adjoining factory walls. A leafy climbing vine belongs across the upper-right edge of the loft, beginning near the roof and spreading toward the factory side. This greenery is easy to confuse with the outdoor plants, so check that it follows the building rather than sitting on the ground. In Dreamy Room Level 823, establishing the roof, windows, and wall boundaries first makes every interior placement much easier to judge.
Step 2. Furnish the upstairs bedroom in the back-right corner
Next, turn the upper floor of Dreamy Room Level 823 into the small bedroom shown in the completed scene. Place the bed against the back wall, slightly right of center. The orange-red quilt should face toward the open front edge of the loft, while the small blue pillow rests at the head of the bed. Immediately to the right of the bed, install the tall pink-and-cream wardrobe or cabinet with the playful yellow cheese-like decoration across its top. Put the pair of purple slippers on the floor in front of the bed and cabinet rather than underneath the desk area. Add the small hanging garland above the bed, stretching between the nearby wall decorations. A compact window with golden trim goes on the wall to the left of the bed. These pieces create a tightly packed sleeping corner, and Dreamy Room Level 823 often becomes confusing here because several small bedroom objects can appear as though they belong in the factory below.
Step 3. Build the upstairs study area and circular rug
The left side of the loft in Dreamy Room Level 823 is a miniature work and study station. Lay the large pale-blue circular rug across the center-left floor first. Position the two small green tables toward the back and left side of the rug. The left table supports the open pink laptop, while the other holds an open book with visible pages. Arrange the surrounding notebooks, papers, stationery, and colorful desk accessories close to the wall and tables, matching the compact clutter of the finished image. Several small cards or notes belong against the wall above this work area. At the front of the rug, place the whimsical white rabbit-shaped seat or decorative figure on its yellow base. Do not place this piece downstairs with the workers even though its animal appearance makes that tempting. Completing this cluster gives Dreamy Room Level 823 its cozy contrast between a private upstairs room and the industrial fruit factory beneath it.
Step 4. Add the staircase, railing, gifts, and upper factory platform
Once the bedroom is complete, connect the loft to the production area in Dreamy Room Level 823. The broad staircase slopes downward from the upper floor toward the middle-left of the factory. Its orange steps should point toward the viewer, with the blue-gray railings positioned along the exposed sides. At the bottom and rear side of the stairs, place the surrounding platform rails so that the walkway forms a clear boundary around the production floor. Behind the staircase, on the raised factory ledge, arrange the brightly wrapped gift boxes. The green, yellow-red, pink, and blue packages sit together as a decorative row rather than being scattered through the room. Add the small platform and wall details around this area before moving to the larger machines. Dreamy Room Level 823 uses the staircase as an important visual landmark, so getting its angle correct will help you determine the positions of the nearby counters, worker, gears, and conveyors.
Step 5. Install the large HULUOR FACTORY sign and fruit decoration
The most recognizable decoration in Dreamy Room Level 823 belongs on top of the large factory wall at the upper right. Place the rounded orange-and-cream HULUOR FACTORY sign directly above the green roof trim. The lettering faces forward and includes the small bunny symbol on the right. Above and around the sign, assemble the oversized fruit display: an orange slice rises at the back, purple grapes cluster near one side, a large green fruit sits near the middle, and strawberries and leafy green produce fill the remaining space. The fruit arrangement should look like a colorful crown over the factory name rather than a pile sitting on the production floor. This is one of the best reference points in Dreamy Room Level 823 because the sign clearly establishes the upper-right boundary. If the sign refuses to snap into position, check that the roof trim and adjacent wall pieces were placed correctly first.
Step 6. Assemble the central pump, gears, pipes, and water basin
The mechanical heart of Dreamy Room Level 823 occupies the center-right section. Start with the shallow circular blue basin on the floor near the back of the main production space. From it, build the tall orange-and-white vertical mechanism upward. The narrow support rises beside several gray gears, with orange circular joints and a horizontal cylindrical component near the top. Large toothed wheels fit behind and beside this vertical assembly, creating a layered machine against the wall. A small blue vent panel also belongs on the wall to the right of the mechanism. Pay careful attention to which gears sit in front and which belong against the wall; their similar shapes make them among the easiest objects to misplace. The completed equipment in Dreamy Room Level 823 should form one connected-looking production system between the staircase area and the giant juice container on the far right.
Step 7. Place the giant fruit tank, pipe, lever, and carrot decorations
The largest individual machine in Dreamy Room Level 823 stands at the far right of the factory floor. Place the tall transparent cylindrical tank on its white-and-gray base. Orange fruit or juice pieces should be visible through the container. Fit the thick green striped circular lid over the top, then connect the curved white-and-orange pipe emerging from the wall above it. The gray control lever with its pink knob belongs low on the tank's right side. On the outer right wall, place the two oversized orange carrot decorations vertically, one above the other, with their leafy green tops pointing outward. Their decorative scale makes them distinct from the smaller carrots found in the garden. Keep the tank close to the factory wall and directly above the blue water channel. In Dreamy Room Level 823, this machinery anchors the entire right side, so its correct placement makes the remaining bottling equipment much easier to position.
Step 8. Build the central bottling and processing stations
Now fill the middle and lower factory floor of Dreamy Room Level 823 with its smaller processing equipment. Place the green-and-cream machine near the center-left foreground, underneath the striped fruit stall area. Its counter has a small orange-colored appliance or container on top, while a bottle rests along its lower dispensing section. To the right, install the green-framed bottling opening with a dark interior. Arrange the orange drink bottles along the shelves and conveyor platform inside and in front of this opening. Several bottles stand in a neat row, so avoid using them as loose decorations elsewhere. Fit the short connecting platforms and railings around these machines, including the small conveyor section near the center. Dreamy Room Level 823 contains many similarly colored cream, green, and orange pieces, and the key challenge is recognizing which ones are structural machine components and which are individual bottles or produce. Use the large tank and staircase as reference points.
Step 9. Set up the fruit counter, storage rack, wall equipment, and boxes
Move to the left half of the ground floor in Dreamy Room Level 823. Place the striped red-and-yellow fruit counter beneath the staircase area, with its green FRUIT sign facing forward. Small prepared fruit items or containers belong on its countertop and shelves. Behind and to the left, fit the tall narrow produce rack against the wall: pink-red fruit fills the upper shelf while purple grapes occupy the lower shelf. Farther left, stack the brown cardboard boxes on the floor beside the rack. Above this storage area, attach the orange wall-mounted machine and its curved gray pipe. Nearby circular orange vents and the blue-gray wall framework complete the utility section. These pieces create the busy storage corner seen in the completed Dreamy Room Level 823 image. Keep the cardboard boxes close to the outer left wall instead of placing them with the vegetable crates at the front; those front crates serve an entirely different part of the scene.
Step 10. Position the factory workers and foreground fruit supplies
Two animal workers bring Dreamy Room Level 823 to life. The smaller cream-colored worker stands near the center of the production floor, just in front of the main machinery. Dress the character in the colorful factory outfit and cap, and make sure the small paper or checklist is held toward the side. The second, larger tan worker belongs farther forward near the orange harvest. This character wears green overalls and faces the baskets and crates of produce. Arrange multiple piles or baskets of oranges around this worker, especially along the front-middle area between the machines and garden edge. To the left, place the large crate of colorful bottled drinks, then park the tiny pale-blue cart beside it with two orange bottles standing upright. These foreground pieces are easy to interchange in Dreamy Room Level 823, so remember that packaged drinks remain toward the left while freshly harvested oranges concentrate around the center.
Step 11. Create the strawberry garden along the front-left edge
The front-left garden is one of the prettiest parts of Dreamy Room Level 823. Run a short pale wooden fence diagonally along the outer edge of the main island. Immediately behind it, plant the dense row of strawberry plants. The bright red strawberries should alternate with green leaves and small pale flowers, forming an almost continuous border from the far-left corner toward the center. Add the leafy vegetation that hangs slightly over the cliff beneath this garden, including the trailing vines near the bottom-left edge. The strawberry bed should remain outside the factory floor but directly alongside it, creating the impression that the fruit is grown and processed in the same location. Because Dreamy Room Level 823 contains numerous green plants, it is important not to confuse these low strawberry plants with the larger shrubs, vegetable crops, or roof vines. Their red berries and fenced position identify their correct location.
Step 12. Construct the right-side water channel and waterwheel garden
On the opposite side of Dreamy Room Level 823, build the water feature. The pale-blue channel starts beside the factory and travels diagonally down toward the front-right corner. At its end, place the curved orange-and-cream retaining wall that forms a small basin. Fit the large green gear-shaped waterwheel inside the water, with its yellow spokes visible through the center. The wheel should stand vertically across the flowing channel rather than lying flat. Surround the outside of this basin with thick green bushes and a line of small yellow flowers. A rounded shrub also sits near the upper-right corner beside the channel. The water should appear to flow naturally from the factory side, past the wheel, and into the decorative basin. This portion of Dreamy Room Level 823 contains several unusually shaped objects, and assembling the channel pieces before the wheel prevents the large gear from obscuring the correct snapping points.
Step 13. Finish the vegetable crates and lower floating garden
Complete Dreamy Room Level 823 by decorating the remaining grassy foreground. Near the center-front of the main island, place two wooden produce crates side by side. One contains pale-green leafy vegetables, while the other holds a mixture dominated by orange carrots and green tops. These boxes sit below the factory floor and above the separate lower garden patch. On that smaller floating platform, create the final vegetable bed. Arrange the orange pumpkins or squash along the left side, leafy green vegetables through the middle, and the smaller pale-green and orange crops toward the right. Add the tiny flowers and leaves around the planting rows, then place the large rounded shrub spilling over the right edge of this lower island. The vegetable garden should look deliberately organized rather than random. Once these pieces are correctly positioned, Dreamy Room Level 823 should closely match the finished image from top to bottom.
Notes and Precautions
The biggest difficulty in Dreamy Room Level 823 is not finding hidden objects but distinguishing between many items that share the same orange, green, cream, and pink palette. Fruit, machine parts, garden vegetables, wall decorations, and packaged products can initially look interchangeable. Always identify an item's function before trying random placements.
Be especially careful with the two carrot types. The giant carrots attach vertically to the right factory wall, while the small carrots belong in crates and the lower vegetable garden. Similarly, the roof vines belong high on the building, strawberry plants stay behind the front-left fence, and the remaining shrubs decorate the island edges.
The gears also need precise positions. Several overlap around the central pump, while the enormous green gear is actually the outdoor waterwheel. In Dreamy Room Level 823, placing large machines, stairs, counters, and garden boundaries first dramatically reduces uncertainty when handling tiny bottles, gifts, stationery, produce, and decorative details.
The upper-floor items deserve extra attention because the bedroom, office, and factory are visually close together. Purple slippers, laptop accessories, books, and the rabbit-shaped seat all belong upstairs. Bottles, boxes, gears, fruit baskets, and workers stay on the production level. If something appears almost correct but does not register, check nearby orientation and layering before moving it to a completely different area.
Tips and Tricks from top player
A reliable strategy for Dreamy Room Level 823 is to unpack according to visual anchors rather than simply placing objects in the order they appear. Start with the orange roof, staircase, factory sign, giant fruit tank, central pump, and water channel. These large objects divide the room into clearly defined zones and make the positions of smaller pieces obvious.
Another useful trick is to mentally divide Dreamy Room Level 823 into five zones: the upstairs bedroom, upstairs study, central factory, left storage-and-market area, and outdoor gardens. When you unpack an object, decide which zone it belongs to before searching for its exact spot. This is particularly effective for bottles, fruits, plants, and small accessories.
For dense clusters, work from back to front. Install wall vents, pipes, gears, and racks before adding foreground counters or workers. Do the same upstairs by completing the windows and wall pieces before the desks and rug. Finally, save loose produce and tiny decorations until the end. This minimizes objects blocking one another and makes the final cleanup of Dreamy Room Level 823 considerably faster.
Final Scene of Dreamy Room Level 823
The completed Dreamy Room Level 823 becomes a charming miniature fruit factory surrounded by gardens. Upstairs, an orange-roofed loft contains a cozy bed, pink cabinet, study tables, laptop, books, blue rug, rabbit-themed seat, slippers, and climbing vines. Below, stairs lead into a lively production room packed with gift boxes, storage racks, a striped fruit counter, bottling machines, orange drink bottles, gears, pipes, a huge transparent fruit tank, and two busy animal workers. The HULUOR FACTORY sign rises above the right wall beneath an extravagant crown of colorful fruit. Outside, strawberries grow behind a wooden fence while crates overflow with oranges, carrots, and leafy vegetables. A blue water channel runs toward a green waterwheel bordered by yellow flowers. The separate lower garden adds pumpkins and more vegetables, completing Dreamy Room Level 823 as a colorful farm-to-factory scene where every carefully placed object contributes to the finished story.