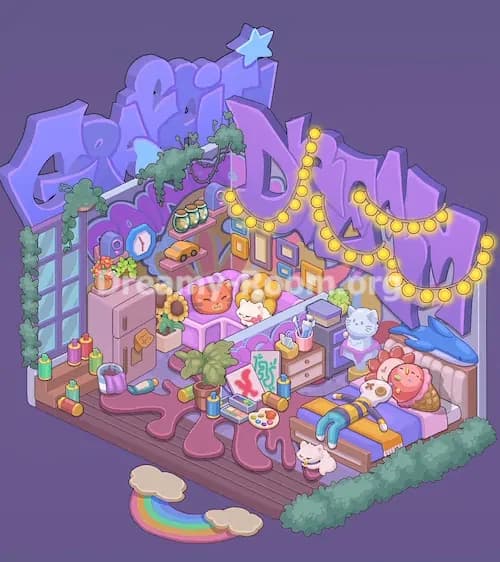
Dreamy Room Level 618
Dreamy Room Level 618 guide - Dreamy Room 618 Walkthrough & Solution.

Important Notice Regarding Level Numbering
Due to frequent changes in Dreamy Room's level numbering and differences between platforms (Android/iOS) – for example, level 618 on Android might not be the same as level 618 on iOS – the text guide below may not always match the images and video above. Please prioritize the image and video guides. If you find that the guide content doesn't match your current level, please visit the All Level Walkthroughs page to find the correct guide based on level images. Thank you for your understanding.
Dreamy Room Level 618 Walkthroughs & Guide
Step 1. Build the outdoor boundary and front approach in Dreamy Room Level 618
Start Dreamy Room Level 618 by shaping the outer boundary of the home, because the fence and front path help define where the rest of the lower-floor furniture should visually sit. Place the wooden picket fence along the entire open front edge, wrapping it from the left side across the front and around the right-side corner. Keep the fence line slightly in front of the stairs and lounge, leaving a gap in the middle-front area for the stepping stones and vehicle. Next, place the irregular stone path just inside the front opening, leading from the yard toward the house. After that, park the small yellow-orange car in the front-center foreground, angled slightly left, with its nose facing toward the fence opening. Add the small orange floor mat near the bottom of the staircase inside the fence. In Dreamy Room Level 618, getting these exterior pieces correct early makes the whole scene feel grounded and helps you judge the spacing for everything else.
Step 2. Place the left-side windows, tall plant, and cat cushion in Dreamy Room Level 618
On the far left side of Dreamy Room Level 618, create the soft garden-facing corner by placing the three tall peach-colored arched window frames against the left wall. They should rise from the floor behind the dining area, with the largest arch toward the middle and the smaller ones staggered around it, forming a layered greenhouse-style backdrop. At the very front-left corner, place the tall leafy plant in the blue pot so it sits just inside the fence and slightly in front of the windows. Then set the square cat cushion against the wall at floor level, tucked between the window frames and the future dining table. The smiling cream-colored cat pillow should feel like a cozy seat by the window rather than a floating decoration. Dreamy Room Level 618 uses this corner to balance the busy right side of the house, so keep the plant, windows, and cushion snug together without covering one another. This section establishes the warm, lived-in feeling before you even start filling the main rooms.
Step 3. Arrange the dining nook in Dreamy Room Level 618
Now build the small dining nook in the lower-left interior of Dreamy Room Level 618. Place the square table with the yellow tablecloth directly in front of the cat cushion and left of the staircase. Around it, position the two green cushioned chairs on the left and right sides, and the round stool in front-left of the table, so the nook feels like a compact tea corner. Once the seating is down, add the tabletop decorations carefully: the vase of white and purple flowers should sit toward the back edge, the group of red apples should spread across the left and front portions, and the tall blue-and-red drink glass should sit on the right side of the tabletop. Keep enough visible tablecloth showing so the arrangement looks tidy rather than crowded. Dreamy Room Level 618 rewards neat placement, and this is a good example of that design logic: every object in this nook has a natural conversational position, making the whole corner read as a calm breakfast or tea spot.
Step 4. Build the kitchen under the stairs in Dreamy Room Level 618
The kitchen in Dreamy Room Level 618 sits beneath the upper level and beside the staircase, so place those compact utility pieces very precisely. First, put the orange refrigerator just left of the stairs, against the back wall. Set the round fishbowl with the red fish on top of the fridge. Beside the fridge on the floor, place the yellow-green potted plant in a blue pot. To the right of the fridge, fit the sink counter under the stairs, making sure the silver faucet and white basin face outward. Add the dish rack and stacked plates on the counter to the right of the sink, and tuck the small green cup or bowl on the little lower ledge near the wall. Above this kitchen area, mount the small wall lamp with the gold shade. Dreamy Room Level 618 hides a lot of charm in this compact section, and the puzzle here is understanding that the fishbowl, plant, sink, and dishes belong together as one tightly organized under-stair kitchen zone.
Step 5. Install the staircase, level transition, and glass dividers in Dreamy Room Level 618
Before the upper rooms feel correct in Dreamy Room Level 618, the structural pieces must be aligned. Place the staircase in the center of the scene, rising from the lower-left foreground toward the upper-right platform. The bottom of the stairs should begin near the dining and car area, then climb toward the bedroom and bathroom level. Once the stairs are set, add the transparent glass dividers around the raised sections. One glass partition belongs along the front edge of the bathroom platform, another marks the side near the shower entry, and another short divider should sit along the front of the bedroom platform near the stairs. Then add the flower-covered green balcony trim along the front edge of the upper-right loft. Beneath that loft edge, set the purple flower vase on the small pedestal table. In Dreamy Room Level 618, these pieces are easy to underestimate, but they are essential because they visually connect the bathroom, bedroom, and lounge while preserving the airy open-plan layout.
Step 6. Finish the bathroom on the upper-left side in Dreamy Room Level 618
The bathroom occupies the upper-left platform of Dreamy Room Level 618, and it should be assembled from left to right. Start with the sink vanity in the far upper-left corner. The oval mirror hangs above it, and the toothbrushes or toiletries rest on the sink counter. To the right and slightly behind, place the bathtub lengthwise along the wall. Add the yellow shower curtain in front of the tub, tied at the middle so the tub still shows behind it. Above the tub, place the small rectangular wall mirror, and on the upper ledge set the pink and blue bottles. On the left wall near the tub, hang the narrow green wall shelf and place the small potted pink flower on it. In front of the bathroom, fit the blue-tinted bathtub wall panels or splash guards. Dreamy Room Level 618 makes this area tricky because the bathroom pieces overlap visually; if something looks cramped, it usually means one item is too far forward instead of flush against the wall.
Step 7. Assemble the bedroom platform in Dreamy Room Level 618
The bedroom is the warmest focal point of Dreamy Room Level 618, so place these objects carefully on the upper-right platform. Set the double bed against the right wall, with the curved headboard touching the back corner. The bedding should face forward, showing the green lower blanket, yellow floral duvet, pink stripe, and two orange pillows near the headboard. To the right of the bed, place the green bedside table and then add the lamp on top of it. On the wall above and slightly right of the bed, hang the pink clock. At the front edge of the bed platform, set the two fluffy yellow cushions or pom-pom pillows beside the railing. Dreamy Room Level 618 depends on keeping this bed centered between the storage cube and wall decor, so avoid pushing it too close to the stairs or too far into the corner. When the bed is correctly placed, the whole upper floor immediately starts to look finished and balanced.
Step 8. Add the bedroom storage, shelf, and wall decorations in Dreamy Room Level 618
Once the bed is down, fill the supporting details that make Dreamy Room Level 618 feel like a real lived-in bedroom. Place the purple cube storage unit to the left of the bed, tight against the divider wall. Put the green bag on top of the cube shelf, and set the pink-and-green framed picture leaning on the lower-left front of that unit. Above the shelf and bed, mount the long floating wall shelf. Arrange the hanging yellow plant on its left side, then the small potted succulent in the center, and the round orange pumpkin-like decoration on the right. Above the storage divider, install the cream-colored air conditioner. On the divider-top ledge near the bathroom side, place the colorful bottles and containers, including the tall pink tube and green bottle. Finally, add the long flower painting and the two smaller framed floral artworks on the right wall. Dreamy Room Level 618 becomes much easier once you realize these decorations are grouped by function: storage on the left, sleeping in the center, and wall beauty on the right.
Step 9. Create the lower-right lounge in Dreamy Room Level 618
The lounge area fills the lower-right interior of Dreamy Room Level 618 and should look like a compact reading room. Place the yellow sofa along the back wall under the large peach window grid. Add the orange pillow on that sofa and leave the open book resting on the right seat cushion. Then place the second yellow sofa on the left side of the lounge, facing inward toward the coffee table, and drape the folded purple blanket over its arm. Between the sofas, set the square table with the yellow checked cloth. On top of it, place the white cup and saucer, the stack of teal and purple books, and the pair of gray tools or remotes near the front edge. Beside the left sofa, add the basket containing the teal bag and colorful craft items. Dreamy Room Level 618 is very strict about this arrangement: if the sofas and table are not centered correctly, the reading corner loses its cozy symmetry and the room looks awkward.
Step 10. Place the bookshelf, pet bed, and final accents in Dreamy Room Level 618
Finish Dreamy Room Level 618 by placing the right-side support furniture and pet details. Set the low pink bookshelf against the lower-right wall, just inside the fence line. Arrange the colorful upright books on the lower shelf, place the two stacked books on the top-left side, and add the blue-and-green globe on the top-right side. In front of the shelf, position the round green pet cushion and place the sleeping tan dog on top of it, curled comfortably near the fence. Make sure the pet bed does not block the coffee table or bookshelf. Check the large peach-framed window structure behind the lounge and confirm it aligns under the upper loft. Also make sure the purple flower vase under the balcony, the wall art, the bedside lamp, the clock, and the dining accessories are all visible. Dreamy Room Level 618 is solved when every corner has a clear purpose and no item looks random, floating, or disconnected from its surrounding furniture.
Notes and Precautions for Dreamy Room Level 618
Dreamy Room Level 618 is less about difficulty through quantity and more about difficulty through layering. Many objects belong on raised platforms, ledges, or surfaces that partially overlap other items. The bathroom is especially easy to misread because the tub, curtain, bottles, and divider panels sit in a tight stack. The bedroom shelf area can also trick you, since the cube shelf, air conditioner, and floating shelf are all separate placements. Another common mistake in Dreamy Room Level 618 is putting lounge pieces too far forward, which makes them collide visually with the fence. Keep watching relative height: wall items must stay on walls, tabletop items must sit on surfaces, and floor objects should not float above steps or rugs. The safest rule is to place large structural pieces first, then furniture, then tabletop decor, then final accents.
Tips and Tricks from top player for Dreamy Room Level 618
A smart way to clear Dreamy Room Level 618 is to sort mentally by room before placing anything. Group bathroom pieces together, then bedroom pieces, then kitchen pieces, and only afterward handle decorative fillers like books, flowers, fruit, and wall art. Another strong tactic is to use visual anchors: the bed belongs under the long shelf, the fridge belongs beside the stairs, the dining table belongs under the left windows, and the bookshelf belongs beside the dog cushion. In Dreamy Room Level 618, transparent rails and loft edges also act like guides, because they show where upper-level items stop and lower-level furniture begins. Top players also zoom in on clusters instead of scanning the whole scene at once. Solve one corner completely, then move to the next. That method prevents misclicks and makes the correct placement logic much easier to spot.
Final scene description of Dreamy Room Level 618
When Dreamy Room Level 618 is fully completed, the empty shell turns into a soft, storybook home surrounded by leafy trees and warm autumn colors. The left side becomes a peaceful tea corner with arched windows, a cat cushion, flowers, fruit, and a tall potted plant. The center holds a compact kitchen below a clean staircase, while the upper-left bathroom glows with pastel bottles, a curtain, a tub, and a vanity. On the upper-right platform, the bedroom feels snug and restful with its floral blanket, bedside lamp, wall clock, cube shelf, and plant display. Below, the right side becomes a welcoming lounge with two yellow sofas, books, tea, a globe, and a sleeping dog near the fence. The car and stepping stones complete the front yard. Dreamy Room Level 618 succeeds because every single object has one exact home, and finding that perfect placement is the entire charm of the puzzle.