Dreamy Room Level 651
Dreamy Room Level 651 guide - Dreamy Room 651 Walkthrough & Solution.
Important Notice Regarding Level Numbering
Due to frequent changes in Dreamy Room's level numbering and differences between platforms (Android/iOS) – for example, level 651 on Android might not be the same as level 651 on iOS – the text guide below may not always match the images and video above. Please prioritize the image and video guides. If you find that the guide content doesn't match your current level, please visit the All Level Walkthroughs page to find the correct guide based on level images. Thank you for your understanding.
Dreamy Room Level 651 Walkthroughs & Guide
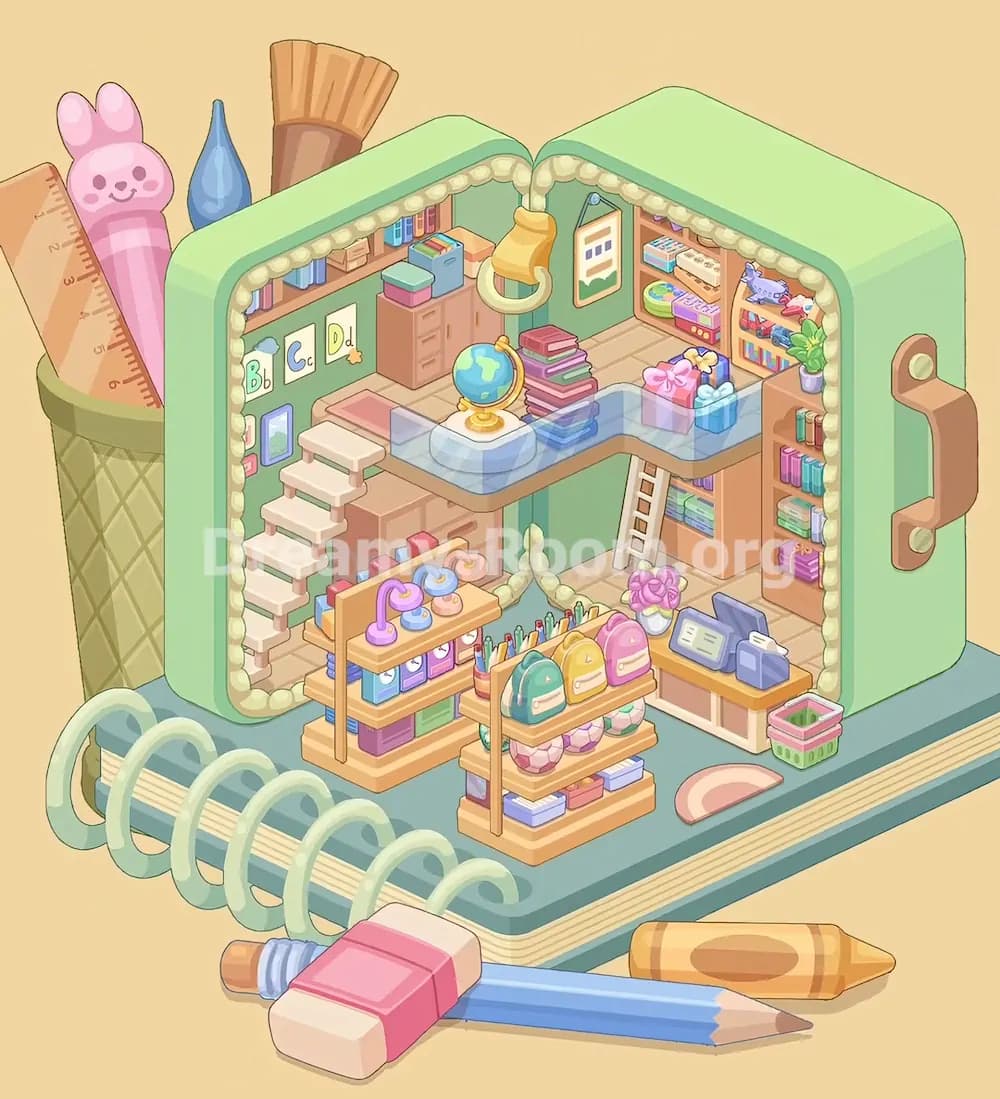
Step 1. Place the trim, hanging lamp, and outer finishing pieces in the book-shaped shell.
Start Dreamy Room Level 651 by completing the structure before worrying about the loose interior items. The two green walls already form the open-book room, but the finished version needs a soft cream bead-like trim running all along the inner arch of both halves. Add this border first so the room instantly feels cozy and finished. Next, hang the yellow ring lamp from the top center seam where the two book covers meet. It should drop slightly forward over the mezzanine, not all the way to the back wall. On the outside right wall, attach the brown handle with two round mounts so the room resembles a portable case. Finally, add the large blue pencil with its pink eraser cap across the front edge of the base and place the yellow-orange crayon to the right of it. In Dreamy Room Level 651, these outer pieces matter because they complete the school-supplies theme and frame the miniature shop correctly.
Step 2. Place the upper-left bookshelf, learning posters, cabinet, bench, globe, and book stack on the left side.
Now build the left upper section of Dreamy Room Level 651. Along the upper-left back wall, install the long wooden shelf and line it with pastel books. Tuck two small storage boxes among the books so the shelf does not look empty. Below that shelf, hang the three alphabet cards in order: “Bb” on the left, “Cc” in the middle, and “Dd” on the right. Near the staircase, place the small framed wall art lower down the left wall. Under the shelf and slightly right of center-left, set the tan cabinet with drawers on the left side and doors on the right side. On top of the cabinet, stack the pink-and-teal lidded box, the blue organizer filled with books or folders, and the small peach box. Add the pink bench or reading pad along the upper-left floor by the glass railing. Then place the globe on its white stand near the center-left edge of the mezzanine and stack the pastel books just to the right of the globe. Dreamy Room Level 651 looks much easier once this study corner is anchored properly.
Step 3. Place the mezzanine floor, glass guardrail, left stairs, and right ladder in the correct positions.
A major part of Dreamy Room Level 651 is the elevated floor. Add the L-shaped mezzanine so it stretches from the left side across the center and then turns to the right wall. Its front edge should sit above the lower retail area, leaving enough space underneath for shelves and floor decorations. Once that platform is fixed, install the transparent blue guardrail along the exposed front edge. It wraps from the left front section across the center and then bends right, stopping near the gift boxes. On the far left, place the white step staircase leading from the ground floor up to the mezzanine. It should hug the left wall and stop beside the pink bench. On the right side, lean the narrow white ladder from the ground floor to the upper level, just left of the right shelving block. In Dreamy Room Level 651, if the stairs, ladder, or railing are even slightly off, the whole room looks unbalanced, so use the platform edges as your alignment guide.
Step 4. Place the rear-right corner shelves, wall picture, gifts, and toy displays on the upper-right side.
Next, focus on the upper-right corner of Dreamy Room Level 651. Hang the framed wall picture on the green right wall just behind the hanging lamp. Then fill the back-right built-in shelving. On the higher shelf, place the colorful rectangular box and the white rectangular model piece beside it. On the lower area, add the round green tray or game board and the pink-purple rectangular box with yellow buttons below. To the far right, use the narrow shelf for the pastel toy display: a purple airplane on the top shelf, small red and blue toy vehicles on the shelf below, and colorful books on the bottom. In front of these back shelves, place the two wrapped presents on the upper walkway, with the pink gift box slightly left of the blue one. This part of Dreamy Room Level 651 creates the toy-and-gift atmosphere, so the presents should sit near the right bend of the glass rail rather than deep in the corner.
Step 5. Place the lower-left display rack and the storage pieces beneath the mezzanine.
The lower-left floor in Dreamy Room Level 651 becomes a neat retail display zone. Start with the freestanding wooden shelf near the front-left center. On its top shelf, place the three curved desk lamps in pastel purple, blue, and peach from left to right. Behind them, add the upright colorful books or block-like items so the top feels fully stocked. On the middle shelf, arrange the taller pastel binders or boxed items with round white labels facing outward. On the bottom shelf, place the larger storage boxes in purple, green, and other soft colors. Behind this rack and under the mezzanine, position the tan storage unit that sits beneath the upper platform. Along the lower interior edges near the back center, add the cream knotted bead-like trim or soft garland detail so the floor transition matches the finished scene. Dreamy Room Level 651 rewards careful layering here, because the shelf must sit forward enough to be visible without blocking the stairs.
Step 6. Place the center rack with pencils, backpacks, balls, and lower trays in the front-middle area.
After that, build the second freestanding rack in the front-middle of Dreamy Room Level 651. This shelf sits slightly right of center and a little in front of the left rack, but not so far forward that it overlaps the notebook spiral. At the back of its top shelf, place the cup full of colored pencils and pens. In front of that cup, line up the three mini backpacks across the shelf: green on the left, yellow in the middle, and pink on the right. On the middle shelf, arrange the pastel balls in a tidy row; they look like soft toy balls or patterned play balls and should be centered under the backpacks. On the bottom shelf, place the flat trays or book stacks in pastel purple, pink, and blue. This is one of the most important visual anchors in Dreamy Room Level 651, because it fills the front space and makes the room look like a real little school supply store.
Step 7. Place the tall right bookcase, flower pot, checkout counter, file holders, basket, and rug on the right floor.
The front-right section of Dreamy Room Level 651 functions like a checkout area. First, stand the tall bookcase against the right interior wall. Put pastel books on the upper shelves, more books and folded items in the middle, and the purple gift-like box tied with string on the lower shelf. On top of this bookcase, place the small potted green plant. Just left of it, add the low checkout counter facing the center of the room. On the counter, place the pink flower arrangement in a vase toward the left side. Then set the open register, tablet, or book display in the middle and the blue file holders with white slips on the right side. On the floor, place the pink-and-green shopping basket beside the counter and lay the pink semicircle rug slightly forward of it. Dreamy Room Level 651 looks cluttered in a bad way if these pieces are pushed too close together, so keep a small walking gap between the counter and the center shelf.
Step 8. Place the final balancing details and check the exact spacing of every small object.
To finish Dreamy Room Level 651, do a slow final sweep from top left to bottom right. Make sure the globe sits slightly left of the stacked books, not directly centered. Confirm the two gift boxes rest on the upper-right walkway beside the railing bend. Check that the white ladder lands below that same upper section. Look at the left staircase and ensure all steps are evenly spaced against the wall. Verify the wall posters, framed picture, books, toy plane, toy cars, and cabinet-top boxes all face forward cleanly. On the floor, keep the two freestanding racks separated enough to show both their shelves clearly. The counter, basket, and semicircle rug should form a neat right-side cluster. Finally, make sure the outer handle, pencil, and crayon are in place, because Dreamy Room Level 651 is won by precision. The whole puzzle is about discovering where each object truly belongs, not merely dropping it somewhere close.
Notes and Precautions
In Dreamy Room Level 651, the biggest mistake is placing the large furniture first without respecting depth. The mezzanine, railing, stairs, and ladder create the room’s structure, so always use them as reference points before placing small decorations.
Another important point in Dreamy Room Level 651 is shelf hierarchy. The rear-right shelves contain several tiny pastel objects that look similar in size. If a box, toy, or book goes on the wrong level, the scene still looks nearly correct, but the composition feels off. Watch especially for the purple airplane, the small toy cars, the pink-purple rectangular item, and the two wrapped presents.
Also be careful not to overcrowd the ground floor. The two freestanding racks, the checkout counter, the flower vase, the basket, and the rug each need breathing room. Dreamy Room Level 651 depends on clear spacing so every object remains visible.
Tips and Tricks from top player
A strong strategy for Dreamy Room Level 651 is to work from the back wall forward. Put in wall décor, shelves, and cabinets first, then build the upper floor, then add freestanding racks, and only after that place the smallest accessories.
Another useful trick in Dreamy Room Level 651 is grouping by function. Keep books with books, school tools with school tools, toys with toys, and checkout items on the right counter. Even before the exact placement is obvious, the theme of each area helps you guess the correct location faster.
Top players also pause after every major section and compare silhouette rather than color. In Dreamy Room Level 651, the shape of the staircase, the bend of the railing, the height of the racks, and the spacing of the upper-right gifts matter more than tiny color differences.
Final Scene Description
The completed Dreamy Room Level 651 becomes a delightful miniature stationery and learning shop tucked inside a green book-shaped case. The upper level feels like a cozy reading loft, with alphabet cards on the left wall, a shelf of books above, a cabinet full of supplies, a pink reading bench, a globe, and neat stacks of books under a warm hanging ring lamp. On the right upper side, toy displays, colorful storage boxes, and two wrapped gifts add a playful classroom-shop mood. Below, two center racks showcase lamps, binders, pencils, backpacks, balls, and flat supply boxes. The right side turns into a checkout area with a flower vase, register-like display, file holders, a shopping basket, and a pink rug. Outside the room, the handle, pencil, and crayon complete the school theme. Dreamy Room Level 651 feels gentle, tidy, and satisfying because every object finally sits in its exact place.