Dreamy Room Level 627
Dreamy Room Level 627 guide - Dreamy Room 627 Walkthrough & Solution.
Important Notice Regarding Level Numbering
Due to frequent changes in Dreamy Room's level numbering and differences between platforms (Android/iOS) – for example, level 627 on Android might not be the same as level 627 on iOS – the text guide below may not always match the images and video above. Please prioritize the image and video guides. If you find that the guide content doesn't match your current level, please visit the All Level Walkthroughs page to find the correct guide based on level images. Thank you for your understanding.
Dreamy Room Level 627 Walkthroughs & Guide
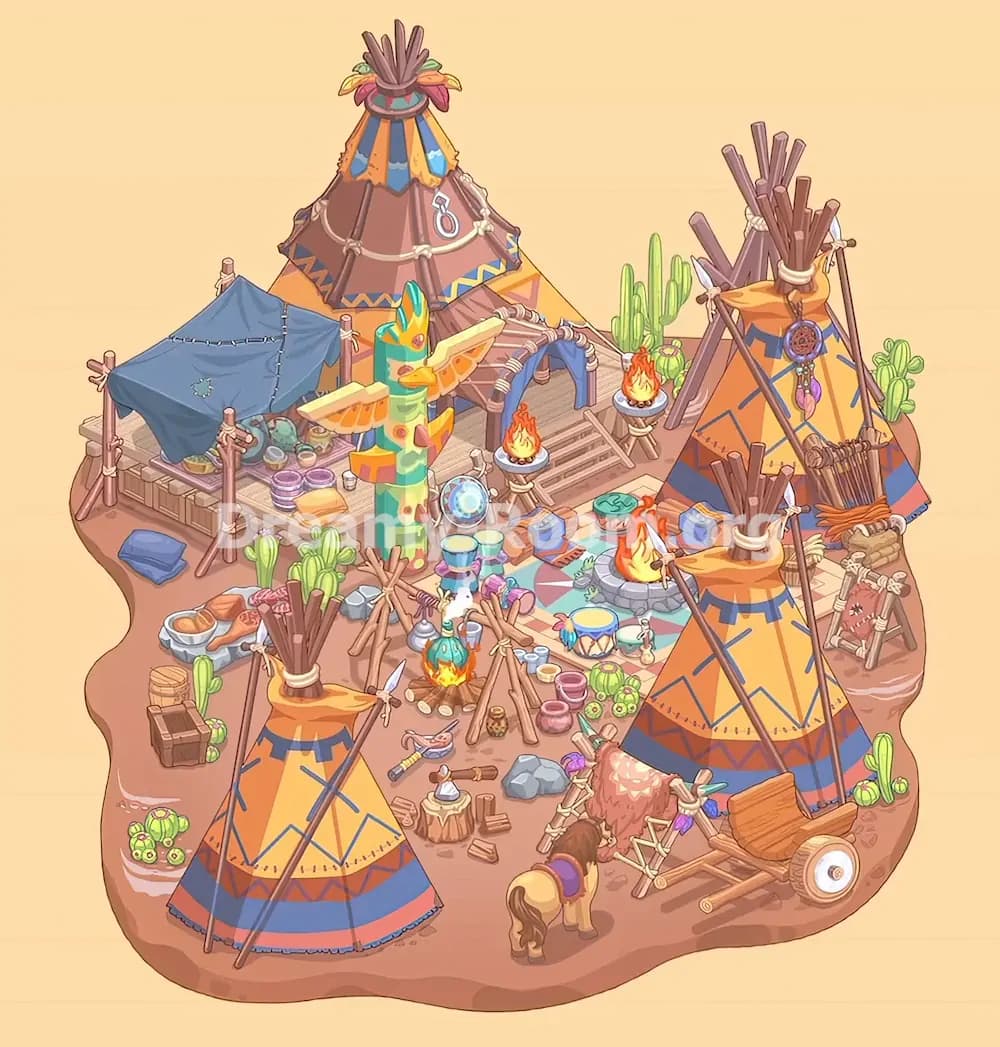
Step 1. Place the raised platform, blue canopy, and supply area in the upper-left corner of Dreamy Room Level 627.
Start Dreamy Room Level 627 by building the upper-left utility zone first. Set the rectangular wooden platform against the left edge of the dirt base, slightly raised above the ground. On top of it, place the blue fabric canopy, stretched between four wooden poles, with the cloth slanting gently downward toward the front. The canopy belongs in front of the large ceremonial tent, not behind it. Under this cover, arrange the camp supplies: several bowls, jars, pots, and dishes grouped tightly near the back and center of the platform. Add the folded yellow cloth or cushion toward the front-right edge of the platform. In front of the platform on the ground, place the dark blue folded cushion. Then add the stone tray with bread or buns just below the platform area. This opening setup matters because Dreamy Room Level 627 uses this corner as the camp’s kitchen and storage space, and later objects must visually connect to it.
Step 2. Place the large ceremonial tent and its entrance at the back center in Dreamy Room Level 627.
The biggest structure in Dreamy Room Level 627 is the tall ceremonial tent positioned near the upper middle, leaning a bit toward the left side. Place this large orange-brown tent behind the platform and canopy so it dominates the background. Its top should have a bundle of upright wooden poles tied together, ringed by colorful feathers. Across the tent front, add the rope decorations and the hanging horseshoe-like ornament. Next, build the entrance extension on the lower-right front side of the tent. This includes the small wooden porch, the striped arched doorway frame, and the short staircase leading down toward the middle of the camp. Put one flaming brazier on each side of the stairs, both on short stands. Behind and to the right of the stairs, add the tall green cactus cluster. In Dreamy Room Level 627, this back-center arrangement sets the camp hierarchy, so the large tent must feel like the chief lodge overlooking the rest of the scene.
Step 3. Place the totem pole and ceremonial center-left decorations in Dreamy Room Level 627.
Once the back structures are secure, place the tall totem pole in the center-left foreground of the ceremonial tent. In Dreamy Room Level 627, this bright green and yellow carved pole stands between the platform area and the central gathering space. Its wings should spread horizontally, and the pole should rise in front of the large tent without covering the stairs. Near its lower-right side, place the round blue decorated shield or drum leaning upright. Around the base of the totem, add the two tall goblet-like cups and the nearby small pots. Also place the rolled blue-and-orange blankets or bedding near the right side of the stairs, partly resting beside the patterned mat area. This is where Dreamy Room Level 627 starts to feel alive, because the totem visually links the food area on the left to the meeting and fire zone in the middle. Make sure the pole remains slightly left of center rather than directly in the middle.
Step 4. Place the upper-right teepee, weapon bundle, and right-edge details in Dreamy Room Level 627.
Now build the upper-right camp section in Dreamy Room Level 627. Position the tall orange teepee in the back-right corner, slightly angled toward the center of the map. Its top must hold a tied bundle of long wooden poles, with extra support poles visible behind it. Attach the dreamcatcher decoration to the front of this tent so it hangs midway down the canvas. Against the lower-right side of the tent, place the large bundle of arrows or spears tied together, resting on a small stack of sacks or straw bundles. To the far right edge, set the hide frame or decorated standing rack, leaning slightly inward. Add the cactus cluster behind and beside the tent to fill the back-right border. Dreamy Room Level 627 depends on careful spacing here: the upper-right teepee should not overlap the central patterned mat or the lower-right teepee, because those pieces need their own clear zone in front.
Step 5. Place the lower-left teepee and the left-front ground items in Dreamy Room Level 627.
The lower-left teepee in Dreamy Room Level 627 sits in the front-left area and helps balance the composition. Place this orange tent so its base touches the lower-left curve of the desert platform, with its blue trim facing forward. The crossing support poles should lean over the tent face. After that, fill the surrounding ground items to complete the left-front corner. Put the small round wooden barrel and the open wooden crate just to the left of the tent, slightly above the bottom-left edge. Add the small cactus beside them. Place the cluster of prickly pear cacti near the very bottom-left edge of the map. Above these, keep the stone food tray with bread near the center-left ground, below the blue canopy platform. In Dreamy Room Level 627, these details are easy to misplace because they are all small, but they belong to a tight cluster that visually transitions from the storage platform down toward the front-left teepee.
Step 6. Place the central campfire circle, patterned mat, and all small utensils in Dreamy Room Level 627.
This is the busiest part of Dreamy Room Level 627, so take your time. In the exact center, place the tripod campfire made from crossed wooden poles. Suspend the blue-green pot over the flames and scatter short cut logs around the fire base. Nearby, add the silver kettle, the knife, the small horn or flute, the short wooden club, and the tiny patterned jar. Around the central area, place the pink mugs and bowls, the pale blue cups, and the extra sticks. Slightly to the right, lay down the patterned square mat. On top of and around that mat, place the stone-ring fire pit with larger flames, the yellow-and-blue drum, the turquoise bowl, and the small hanging charm or doll. Also keep the rolled blankets near the upper edge of this zone and the green cactus fruit cluster near the lower-right of the mat. Dreamy Room Level 627 becomes much easier when you think of this section as one dense ritual gathering area rather than many separate loose objects.
Step 7. Place the lower-right teepee, drying rack, wagon, and right-front objects in Dreamy Room Level 627.
Next, complete the front-right camp in Dreamy Room Level 627. Set the smaller orange teepee in the lower-right quadrant, in front of the upper-right tent and to the right of the central fire zone. Its top should also have a tied bundle of poles, and the long front support poles should cross over the canvas face. In front-left of this teepee, place the wooden drying frame covered with a pink patterned hide and decorated with purple feathers. To the immediate right of that rack, position the wooden two-wheeled wagon angled toward the lower-right corner. Behind the wagon wheel, add the tiny cactus cluster on the edge of the dirt base. Keep the hide frame from Step 4 farther back on the right edge so the two structures do not merge visually. In Dreamy Room Level 627, the lower-right teepee is important because it closes the front of the scene and creates the correct layered depth between the central tools and the right-side transportation items.
Step 8. Place the horse, chopping stump, rocks, and the last foreground props in Dreamy Room Level 627.
Finish Dreamy Room Level 627 with the loose foreground details that make the desert camp feel inhabited. Put the small horse near the bottom center, facing slightly upward toward the middle of the camp. It should stand between the lower-left and lower-right teepees, a little closer to the right side, and it must wear its purple saddle blanket. Just above and left of the horse, place the chopping stump with the small white object on top, then scatter short split logs around it. Add the pair of gray rocks slightly above the stump area, closer to the right side. Keep the knife, flute, and short club near the center-left foreground, below the tripod fire. Make sure the pink mugs, small jars, and cactus fruit remain visible around the middle-right ground. Dreamy Room Level 627 ends only when these tiny props are aligned properly, because they fill the empty gaps and confirm the camp’s final lived-in look.
Notes and Precautions for Dreamy Room Level 627
Dreamy Room Level 627 is a placement puzzle where visual layering matters just as much as location. Large items should be placed first: the platform, the big ceremonial tent, the back-right teepee, and the two front teepees. If you try to place tiny tools too early, it becomes harder to judge which object belongs in front and which belongs behind. Be especially careful with the two fire areas in Dreamy Room Level 627. One is the central tripod cooking fire, while the other is the stone-ring fire on the patterned mat to the right. They are separate and should not be confused. Also watch the right side carefully: the upper-right teepee, lower-right teepee, arrow bundle, hide frame, and wagon all sit close together. On the left, keep the canopy supplies on the raised platform and do not drag them down onto the sand. The biggest mistake in Dreamy Room Level 627 is placing correct objects in nearly correct spots.
Tips and Tricks from top player for Dreamy Room Level 627
The fastest way to clear Dreamy Room Level 627 is to work from back to front and from largest to smallest. Expert players usually place the background tents first, then the raised platform and stairs, then the two front teepees, and only after that do they handle fires, dishes, tools, and animals. Another strong method for Dreamy Room Level 627 is to group objects by function. Kitchen items belong under the blue canopy, ceremonial objects belong around the totem and center, survival and travel items belong on the right, and utility props belong in the foreground. If something feels hard to place, check whether it visually matches wood, cloth, food, ritual, or transport. Top players also use shape cues: tall vertical objects usually belong at the back, while low open objects like cups, logs, and bowls fill gaps in front. In Dreamy Room Level 627, patience beats speed because correct micro-placement is the whole challenge.
Final Scene Description of Dreamy Room Level 627
When Dreamy Room Level 627 is fully solved, the empty desert patch becomes a warm tribal camp packed with character. A grand ceremonial tent rises at the back center, connected to a small stairway and flanked by flaming braziers. To its left, a blue-covered supply platform holds bowls, jars, and food, while a colorful totem stands proudly in front. Three orange teepees fill the rest of the camp, one at the back right and two across the front corners. In the middle, a cooking fire and a second stone-ring fire create a lively gathering zone surrounded by mats, blankets, cups, drums, tools, and carved decorations. On the right, a drying rack, weapon bundle, and wooden wagon add a sense of travel and work. At the front, a small horse, chopped wood, rocks, cacti, and storage crates complete the cozy lived-in atmosphere of Dreamy Room Level 627, where every item finally sits in its perfect place.