Dreamy Room Level 514
Dreamy Room Level 514 guide - Dreamy Room 514 Walkthrough & Solution.

Important Notice Regarding Level Numbering
Due to frequent changes in Dreamy Room's level numbering and differences between platforms (Android/iOS) – for example, level 514 on Android might not be the same as level 514 on iOS – the text guide below may not always match the images and video above. Please prioritize the image and video guides. If you find that the guide content doesn't match your current level, please visit the All Level Walkthroughs page to find the correct guide based on level images. Thank you for your understanding.
Dreamy Room Level 514 Walkthroughs & Guide
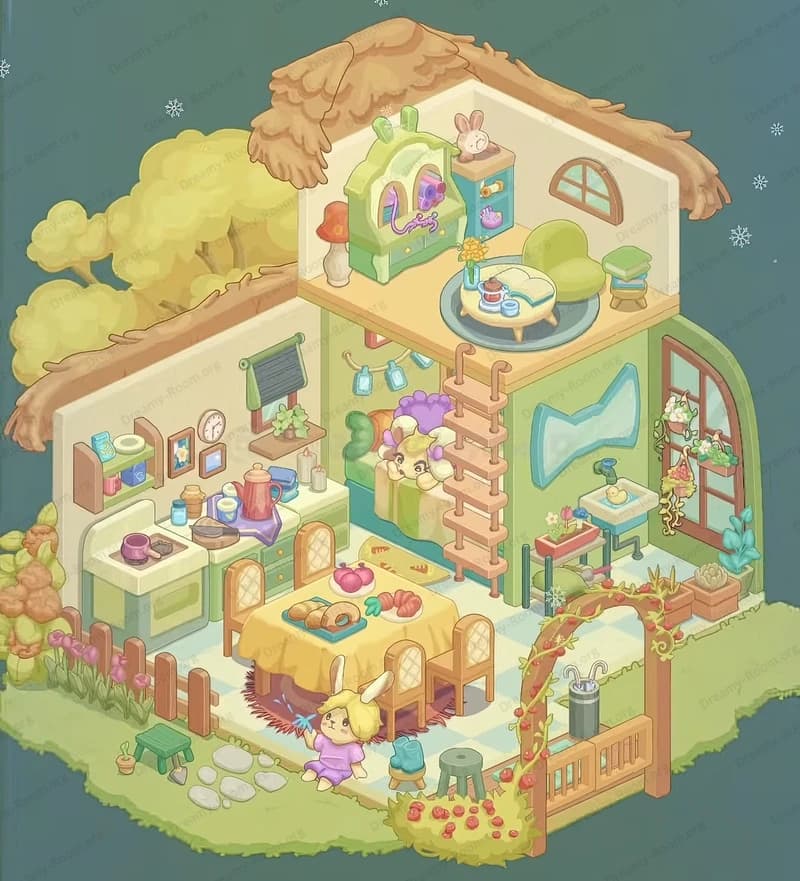
Step 1. Place the cottage roof, attic and vines on the back wall.
Begin Dreamy Room Level 514 by building the silhouette of the tiny cottage above the striped back wall. Snap the tall purple tiled roof so its lower edge rests directly on top of the wall, leaning steeply toward the front of the dome. Fix the pale chimney to the upper-right corner of the roof and the wooden triangular gable just beneath it, making sure the gable’s light wooden beams form an exposed attic frame. Now wrap the roof with greenery: a thick vine should run along the ridge, and a big bushy mass of leaves hugs the left slope, spilling down toward the window. Add the dormer window in the middle of the roof, encircled by a wreath of purple flowers and leaves, with three glowing star lanterns shining inside. Finally, perch the little squirrel on the left roof edge above the foliage, completing the forest-cottage outline for Dreamy Room Level 514.
Step 2. Place the bed, window and bedside corner in the upper room.
Next, focus on the cozy bedroom of Dreamy Room Level 514. Position the large double bed on the upper green platform so the headboard touches the back wall, centered beneath the slanted roof. The wooden headboard should be wrapped in a soft green leafy cushion that curves along the wall. Lay the two pale pillows against it and cover the bed with the golden quilt patterned like a warm waffle; its rounded front edge should end just before the platform’s front line. Behind the bed, install the big window with two green curtains tied back with yellow bows so the forest background shows through. Above that window, hang the short teal string of star lights, each yellow star dangling evenly across the wall. To the left of the bed, place the small bedside table with the green cloth, then arrange the tall pink candle, the blue hexagonal candle holder, and the red mushroom-shaped lamp neatly on top for Dreamy Room Level 514.
Step 3. Place the cat, scratching post and wall decorations beside the bed.
Dreamy Room Level 514 is full of character, and the sleepy pet corner is a key detail. Under the left side of the bed, on the same upper platform, place the round purple cushion with the white-and-orange cat stretched out lazily on it; the cat’s tail should curl upward toward the bed. Tuck the small purple storage box slightly under the right side of the bed frame so that just its edge peeks out. On the floor at the foot of the bed’s right side, position the vertical scratching post with its tan coils and round knob on a blue base; it must stand exactly between the bed and the art area. On the left wall above the bedside table, hang the two tiny framed decorations: the top one shaped like a little hanging house and the lower one a small rectangular picture. These wall accents, together with the pet items, anchor the upper sleeping zone of Dreamy Room Level 514.
Step 4. Place the art lounge, easel and hanging flowers on the right upper platform.
The right side of the top floor in Dreamy Room Level 514 becomes a small art studio and reading nook. On the green platform to the right of the scratching post, place the pale pink chaise lounge facing diagonally toward the left, with its wooden legs near the platform’s back edge. Drape the soft yellow blanket over its right side and rest the round green cushion on the backrest. Just behind the chaise, closer to the wall, set the small blue pot filled with paintbrushes. In front of the round window on the right wall, position the wooden easel so the canvas shows the smiling cloud with rainbow and tiny horn, pointing toward the center of the room. Between easel and platform edge, put the turquoise box overflowing with glittering art supplies. Along the right edge, add the lush teal plant whose leaves spill outward, then attach the dangling purple wisteria and glowing star lights under the pergola of purple flowers to complete this dreamy corner of Dreamy Room Level 514.
Step 5. Place the kitchen counters, appliances and star garland under the bedroom.
Now move down to the mid-level kitchen of Dreamy Room Level 514. Snap the L-shaped counter so it hugs the back and left edges of the wooden floor beneath the upper platform. On the left section, right under the cat’s cushion, place the small purple kitchen appliance, like a coffee maker or blender, with a jar beside it on the counter. Along the back counter, position the two yellow-ringed stovetop burners, making sure they sit directly under the star garland that will hang above. To the right, align the blue sink with its silver faucet just before the fridge. Underneath, ensure the green-and-wood cabinet doors face outward toward the dining area. At the far right end of the counter, stand the tall green refrigerator with the cute bunny magnet on its top door. Beside it, closer to the staircase, set the blue water dispenser. Finally, attach the long string of golden star lights to the underside of the upper platform so they hang across the front of the kitchen in Dreamy Room Level 514.
Step 6. Place the dining table, chairs and small floor details on the ground level.
The heart of Dreamy Room Level 514’s lower floor is the warm dining nook. Center the wooden table with its soft yellow tablecloth in front of the kitchen, leaving space to walk between the chairs and the cabinets. On the tabletop, place the fruit bowl filled with purple grapes and green fruit so it faces the viewer. Around the table, arrange four wooden chairs: one facing directly forward, one back to the kitchen, and one on each side, all with their checkered cushions neatly aligned with the table edges. On the floor to the right of the table and just in front of the fridge, lay the small green rectangular rug with tassels, parallel to the counter. To the left of the table, between dining area and plant corner, place the pair of purple slippers with their toes pointing toward the left wall, as if someone kicked them off casually. These items make the lower half of Dreamy Room Level 514 feel truly lived in.
Step 7. Place the plants, staircase and garden details around the edges.
To finish placing objects in Dreamy Room Level 514, decorate the edges of the floor. On the far left, between the wall and kitchen counter, position the tall potted plant with big round leaves in its yellow pot, then tuck the teal cylindrical bin or bucket just behind it. On the right side, snap the curved wooden staircase so its bottom step sits right behind the green rug and water dispenser, with the purple railing curving upward to meet the art platform above. At the front-right edge of the grassy ring, place the rectangular planter wagon filled with bright yellow flowers, making sure its handle points outward toward the dome glass. The surrounding low hedge of shrubs should circle the wooden floor just inside the glass, while the giant purple and brown mushrooms rest outside on the tree-stump base. These natural touches blend the little cottage of Dreamy Room Level 514 into the magical forest environment.
Notes and Precautions
When solving Dreamy Room Level 514, pay close attention to vertical layering. Many objects visually overlap, so a piece may look as if it fits somewhere but actually belongs slightly higher or lower. The star garlands, for example, have two distinct positions: one above the bed and one under the platform; mixing them up will make the lights clip through the wrong surfaces. The staircase in Dreamy Room Level 514 must line up exactly between the kitchen floor and the right upper platform; if it snaps too far back, the rail will intersect the wall. Similarly, the cat’s cushion only fits under the bed’s left side; trying to put it near the chaise will be rejected by the game. Rotate mental reference often, comparing where legs align with floor edges and where vines meet roof tiles so every element of Dreamy Room Level 514 clicks into its precise snap point.
Tips and Tricks from top player
A top player approaches Dreamy Room Level 514 by grouping items by function and height rather than dragging them randomly. Start by placing large structural pieces—the roof, bed, kitchen counters and table—so you understand the overall layout. Then handle “zones”: bedroom set, art studio, kitchen, dining area and garden. When unsure about a decoration’s position in Dreamy Room Level 514, check shadows and overlaps in the reference image; for instance, the art box clearly sits in front of the easel but behind the hanging wisteria. Another trick is to use matching colors as clues: green objects usually echo plant lines or kitchen cabinets, helping you see where they visually balance the composition. Remember there is no timer in Dreamy Room Level 514, so you can freely experiment—dragging a piece over the scene will often briefly highlight its correct spot. Finally, leave the smallest decorative details, like wall pictures and slippers, until you have every big anchor object placed.
Final Scene Description of Dreamy Room Level 514
When you finish Dreamy Room Level 514, the once-empty platform has transformed into a tiny glass-covered forest cottage glowing in the night. A steep purple roof climbs toward the stars, wrapped in vines and crowned by a wreath-framed dormer window, while a curious squirrel watches from the leafy ridge. Inside, the upper floor holds a golden-blanketed bed under soft green curtains, a sleepy cat curling on its cushion, and a snug art nook with chaise lounge, unicorn-cloud painting and sparkling supplies framed by wisteria and hanging stars. Below, an L-shaped kitchen with mint cabinets, fridge and water dispenser opens onto a yellow-clothed dining table laden with fruit and surrounded by four chairs. Potted plants, a flower-filled wagon, slippers and shrubs ring the floor, all resting atop the carved tree stump with whimsical mushrooms. Dreamy Room Level 514 ends as a perfectly balanced, storybook hideaway glowing gently inside its protective glass dome.