Dreamy Room Level 133
Dreamy Room Level 133 guide - Dreamy Room 133 Walkthrough & Solution.

Important Notice Regarding Level Numbering
Due to frequent changes in Dreamy Room's level numbering and differences between platforms (Android/iOS) – for example, level 133 on Android might not be the same as level 133 on iOS – the text guide below may not always match the images and video above. Please prioritize the image and video guides. If you find that the guide content doesn't match your current level, please visit the All Level Walkthroughs page to find the correct guide based on level images. Thank you for your understanding.
Dreamy Room Level 133 Walkthroughs & Guide
Below is a comprehensive walkthrough for Dreamy Room Level 133, guiding you through every placement detail in Dreamy Room Level 133 to transform the empty room into the fully styled space in Dreamy Room Level 133
Step 1. Place the shoe display units along the left wall.
In Dreamy Room Level 133, your first task is to position the shoe display units flush against the left wall border. Locate two low, rectangular pedestals and slide them neatly onto the wooden floor’s first row of tiles, aligning them precisely with the charcoal baseboard in Dreamy Room Level 133. Place the upper shelf so that it holds the violet sneaker pair on the left, the yellow pair in the center, and the teal pair on the right, creating a balanced color gradient for Dreamy Room Level 133. Position the lower unit one tile below, making sure its top surface sits one notch above the floor level for a consistent look. Double-check that both units align perfectly with the dark gray trim at the bottom of the wall to avoid misplacement errors in Dreamy Room Level 133.
Step 2. Mount the decorative panels and middle shelving unit.
Next, mount three tall, narrow panels evenly spaced along the left and center walls in Dreamy Room Level 133. Start by placing the first panel two tiles to the right of the shoe display, then space the second panel three tiles further, and the third panel another three tiles onward. In Dreamy Room Level 133, ensure the green leaf silhouette, pink shirt silhouette, and aqua water droplet silhouettes face outward and align with the wall grid. Below the middle panel, install the dark gray floating shelf two tiles down so it holds a brown football, red and blue boxing gloves, a pink sunglasses case, and two pastel hat boxes stacked neatly for Dreamy Room Level 133. Double-check in Dreamy Room Level 133 that the shelf is level and sits just below eye level to preserve the room’s immersive feel.
Step 3. Install the clothing rack and floor workout station.
Start by placing a white horizontal clothing bar two tiles above the floor and three tiles from the left wall in Dreamy Room Level 133. Hang six colorful jerseys—green, yellow, pink, blue, purple, and teal—in even intervals along the bar for Dreamy Room Level 133. Beneath this rack, roll out a purple exercise mat two tiles onto the floor, then situate two pink dumbbells and two kettlebells (blue and lavender) at opposite corners of the mat in Dreamy Room Level 133. Finally, ensure the clothing rack aligns directly below the top trim to maintain symmetry in Dreamy Room Level 133 and prevent any collisions with adjacent wall decor.
Step 4. Mount the pegboard equipment and archery target.
Begin by affixing a perforated pegboard panel two tiles above the floor and three tiles to the right of the workout mat in Dreamy Room Level 133. Hang four pastel-colored rackets—pink, yellow, green, and blue—on the top row of pegs for Dreamy Room Level 133. On the built-in shelf beneath the pegs, arrange three small balls (red, yellow, and purple) alongside three white ping-pong balls in Dreamy Room Level 133. Finally, mount the circular archery target next to the pegboard so its center aligns with the racket midline, then insert three darts (pink, blue, yellow) into the bullseye in Dreamy Room Level 133.
Step 5. Set up the registration counter and entrance decor.
Place a light gray counter base one tile from the right wall and one tile from the front edge in Dreamy Room Level 133. Above the counter, mount a green-branded sign at eye level, centering it horizontally for Dreamy Room Level 133. On the countertop, evenly space an open laptop, two modern desk lamps, and two small motion sensors in Dreamy Room Level 133. Finally, attach transparent glass barrier panels along the counter’s front edge to delineate the service area in Dreamy Room Level 133. Ensure the counter base sits flush with the wooden floor grid and that the sign’s neon glow complements the pastel wall palette. Take time to adjust the lamp angles so they illuminate key areas without casting harsh shadows across the display.
Step 6. Position characters and floor attractions.
Begin by placing the orange cat character wearing the number ‘40’ jersey on the left side of the floor display in Dreamy Room Level 133. Position the pink bunny character just behind a single black-and-white soccer ball near the center for Dreamy Room Level 133. Next, set up a miniature bowling alley by arranging six white pins and a green bowling ball on a wooden plank two tiles from the left corner in Dreamy Room Level 133. Finally, anchor two metal poles with red pennants on either side of the mat to guide movement and add visual interest in Dreamy Room Level 133. Double-check that each character’s orientation faces into the room, not towards the walls, to keep the layout inviting and balanced.
Notes and Precautions
When following this guide, ensure that each item snaps precisely to the grid to avoid clipping or misalignment errors. Misplaced objects can break the symmetry and cost you a star in Dreamy Room Level 133. Be particularly careful when mounting wall items; a half-tile offset will look off and may prevent achieving a perfect score. If you need to change placement, use the undo feature rather than manually dragging objects, as this preserves exact positioning. Lastly, double-check spacing after completing each section to maintain consistency across the entire layout for a seamless experience in Dreamy Room Level 133. Also, avoid overlapping items that could become hidden in low-angle views. Keep the Dreamy Room Level 133 brand motif in mind when selecting complementary textures.
Tips and Tricks from top player
To speed up your progress, activate the placement grid overlay before starting any arrangement. This feature highlights exact tile coordinates and helps you place items with confidence in Dreamy Room Level 133. Use the quick-snap option for small accessories like balls and tools to reduce repetitive manual alignment steps. Prioritize locking larger pieces such as display shelves or counters to prevent accidental shifts when adding finer details. Finally, rotate your camera around the scene to spot any misalignments early, ensuring that every object fits perfectly into the layout in Dreamy Room Level 133. Additionally, save your progress before making large adjustments to avoid starting over. Remember that mastering Dreamy Room Level 133 positions you well for upcoming levels.
Final Scene Description
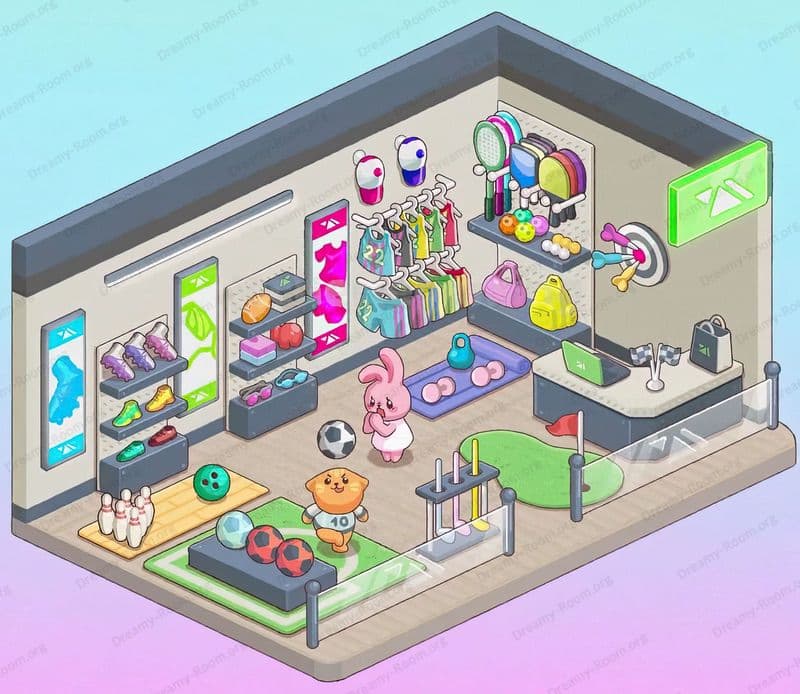
The final view of Dreamy Room Level 133 blends athletic energy with a serene pastel atmosphere through crisp, isometric art. In Dreamy Room Level 133, an orange cat athlete stands confidently on a black mat holding three patterned balls, while a curious pink bunny examines a single soccer ball behind. To the left, the shoe display features purple, yellow, and teal pairs beneath matching green, pink, and aqua wall panels. Along the back wall, the workout area shows a neatly rolled exercise mat with paired dumbbells and kettlebells below a line of rainbow jerseys. On the right wall, a pegboard holds pastel rackets and ping-pong balls next to a bullseye archery target, balanced by a neon-branded sign and a tidy registration counter protected by a glass barrier. Flags and miniature pins punctuate the wooden floor grid, finishing the scene in Dreamy Room Level 133.