Dreamy Room Level 464
Dreamy Room Level 464 guide - Dreamy Room 464 Walkthrough & Solution.
Important Notice Regarding Level Numbering
Due to frequent changes in Dreamy Room's level numbering and differences between platforms (Android/iOS) – for example, level 464 on Android might not be the same as level 464 on iOS – the text guide below may not always match the images and video above. Please prioritize the image and video guides. If you find that the guide content doesn't match your current level, please visit the All Level Walkthroughs page to find the correct guide based on level images. Thank you for your understanding.
Dreamy Room Level 464 Walkthroughs & Guide
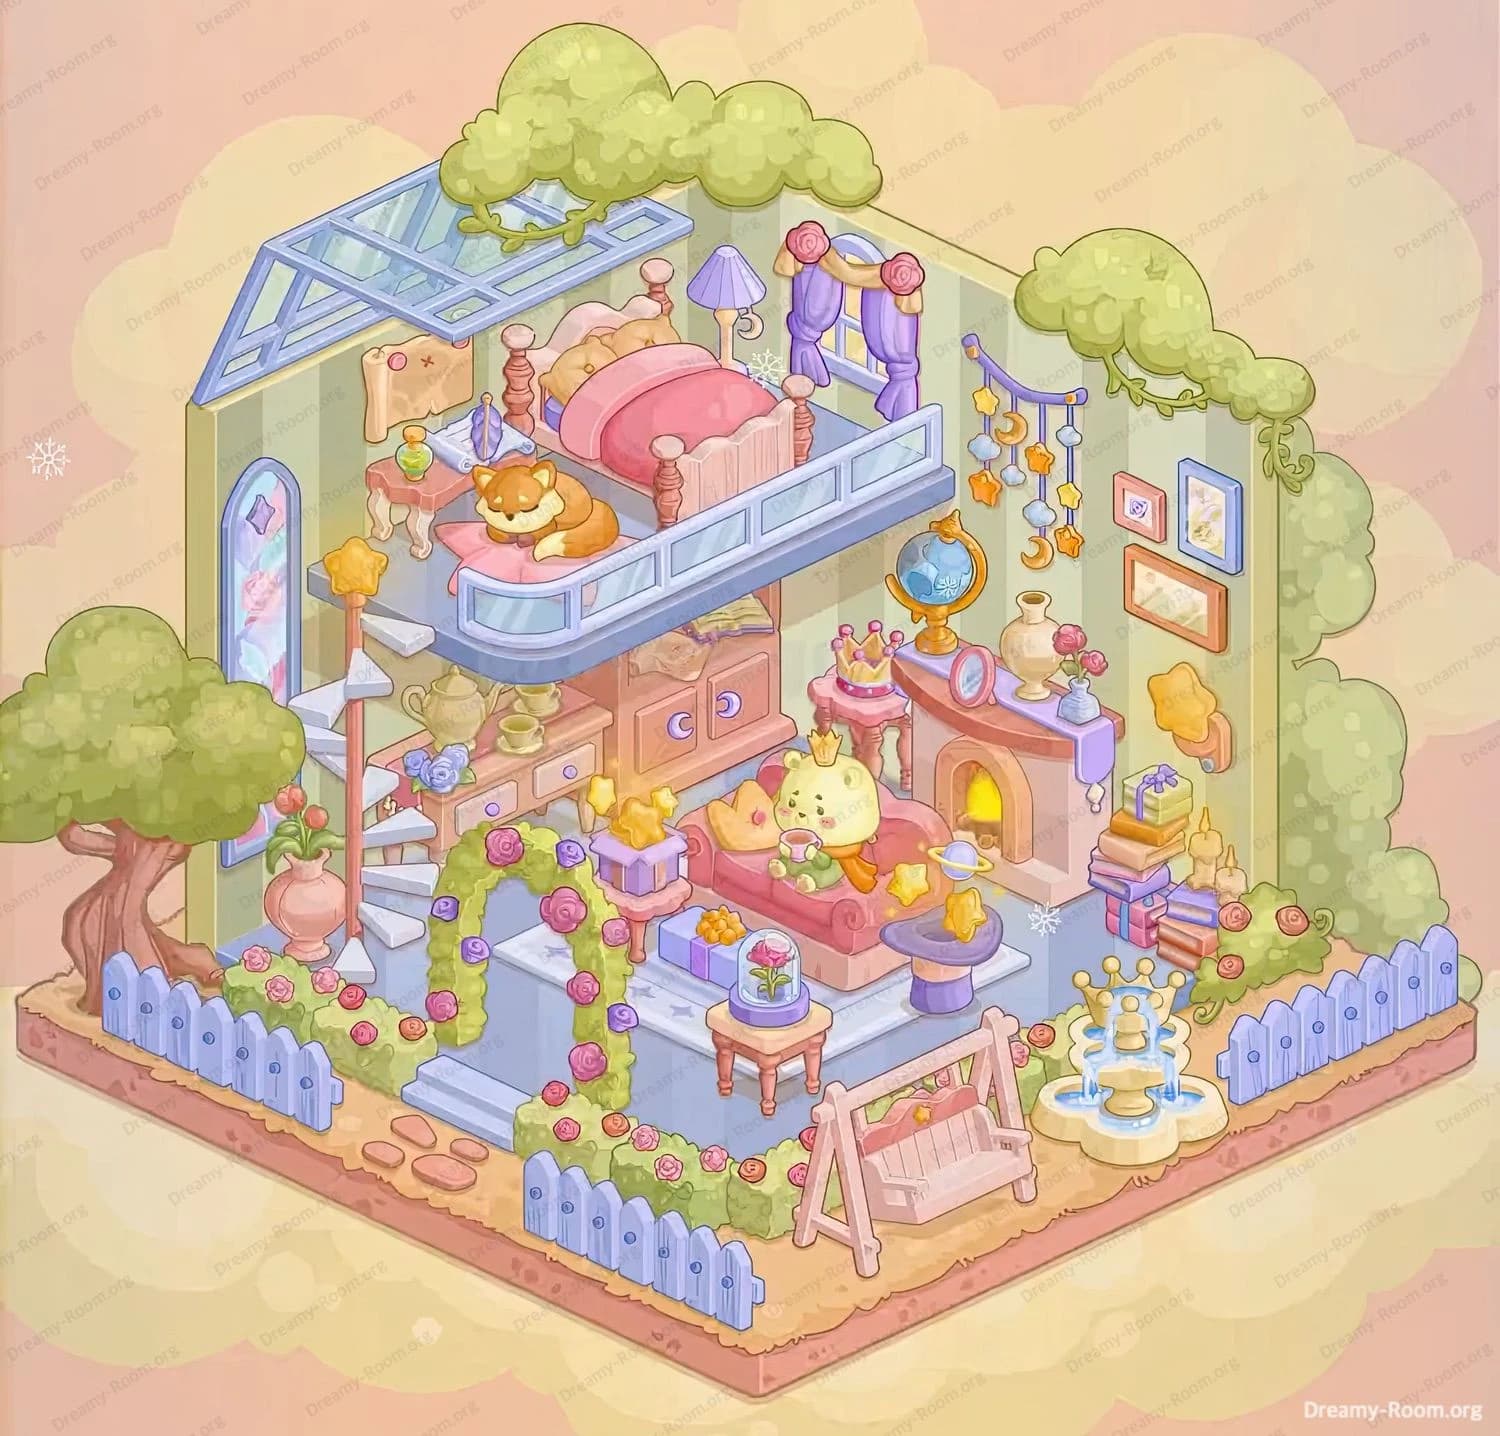
Step 1. Place the fences, paths, and garden border at the front.
Begin Dreamy Room Level 464 by framing the outdoor area. Along the very front and right edges of the platform, place the light blue picket fences, making sure each fence panel lines up neatly with the pink border of the island. In Dreamy Room Level 464 the fence acts as your measuring ruler, so if the fence is misaligned, everything else will look off. Next, lay the three rounded stepping stones near the front-left corner, slightly inside the fence, to form the little path that leads toward the interior stairs. Behind the fence, build the low hedge border: green bushes sprinkled with alternating pink and purple roses should run along the front and then continue around the right side. This rose hedge is vital in Dreamy Room Level 464 because it visually separates the outer garden from the raised living area that you will decorate later.
Step 2. Place the left tree, flower pot, and spiral staircase at the entrance.
Now we anchor the left side of Dreamy Room Level 464. Position the large tree just inside the left fence, with its thick brown trunk rooted near the stepping stones and its fluffy green canopy rising above the fence line. The tree must lean slightly inward so that its foliage overlaps the left wall and almost touches the glass roof that you will add later. In front of the tree, near the first stair, place the big peach-colored vase filled with bright red and pink tulips. Then, in Dreamy Room Level 464, set the white spiral staircase directly behind this vase. The base of the staircase sits on the garden floor, and the steps spiral upward toward the loft, hugging the back of the tree. Make sure the golden star-topped pole of the staircase is clearly visible from the front; it should line up roughly with the center of the left edge of the raised platform.
Step 3. Place the raised interior platform, main stairs, and rose arch.
The heart of Dreamy Room Level 464 is the central raised platform where most indoor furniture sits. At the back of the garden, place the pale blue rectangular platform so it fills most of the interior floor area against the striped walls. Then attach the short stairway of three blue steps that descends from the front edge of the platform down to the garden path. On both sides of these steps, position the low hedge segments that will connect visually to the rose border you already placed. Now add the tall green arch covered with roses at the bottom of the steps. In Dreamy Room Level 464 this arch must be centered so that it frames the stairway perfectly; the roses should sit just above head height of the seated character you will add later. When viewed from the front, the arch should partially overlap the steps without blocking them entirely, creating a tunnel effect.
Step 4. Place the cabinets, trophies, and tea sets under the loft.
Next, fill the left-back interior wall of Dreamy Room Level 464 under where the loft will go. Position the long wooden cabinet with pink doors and purple moon-shaped handles along the back wall, slightly to the left of center. Above its doors, make sure the flat top surface is visible. On this top, arrange the golden trophy, the golden teapot, matching cup, and the stack of plates, all clustered toward the left side. Add the purple rose in a small vase near the right side of the cabinet top. On the lower open shelves tuck extra cups or dishes if your version of Dreamy Room Level 464 includes them, ensuring they follow the same left-to-right progression as the upper items. This cabinet area should sit directly beneath the future bed platform so that the spiral staircase visually leads past the trophies and tea set, hinting at a cozy, lived-in home.
Step 5. Place the royal sofa, prince character, coffee tables, and gifts.
Now we make the lounging area that defines the lower center of Dreamy Room Level 464. Place the pink cushioned sofa on the raised platform, slightly right of center, facing diagonally toward the viewer. The back of the sofa should sit just in front of the fireplace location you’ll set next. On the sofa, seat the round yellow prince-like character wearing a gold crown and a green cape, holding a teacup in his right hand. To his left, add the orange cat curled up on a pink cushion; to his right, add the small star-shaped yellow pillow. In front of the sofa, on the left side, place the pink pedestal table with a purple gift box topped by a yellow bow and little star decorations. Slightly in front and to the right, add the small white rectangular table holding the glass dome with the single pink rose. Between sofa and front edge, add the low purple pedestal table topped with a golden ringed planet and star. All of these placements must match their exact positions in Dreamy Room Level 464 so the scene feels perfectly balanced.
Step 6. Place the fireplace, books, candles, and right wall decorations.
Turn to the right side of the raised platform in Dreamy Room Level 464. Against the right wall, place the pastel fireplace so its opening, glowing with yellow-orange flames, is directly behind the prince on the sofa. On the mantel, arrange several items from left to right: a tall beige vase with roses, a smaller curved vase, the blue globe with golden stand in the center, and the round pink clock or framed mirror to its right. Drape the lilac cloth so it hangs from the right corner of the mantel. On the floor to the right of the fireplace, stack the colorful books in a tidy tower, then add the cluster of golden candles and star-shaped decorations on top. On the wall above these books, hang the star-shaped wall light. Further up and slightly left, hang the string of crescent moons and stars from a purple rod, making sure it arcs vertically. To the right of that mobile, place the three framed pictures—blue, pink, and peach—arranged in a neat group. In Dreamy Room Level 464, this whole right-wall composition must feel dense and vertical, balancing the heavy tree on the left.
Step 7. Place the loft floor, bed, nightstand, and sleeping fox upstairs.
With the ground floor complete, you can finish the upper sleeping area of Dreamy Room Level 464. Place the pale blue loft platform so it floats above the cabinet and sofa, attached to the back wall and supported visually by the spiral staircase. The loft’s front edge should align right above the prince’s head. On this platform, position the pink bed lengthwise from left to right, with the headboard near the short right wall. Add the four wooden bedposts and the curved pink mattress. On top of the bed, place the orange fox (or raccoon-like pet) sleeping curled near the center, facing left. At the head of the bed, attach the canopy frame with purple curtains tied back by pink rose clusters and a golden top beam. To the left of the bed, on the loft floor, add the nightstand with turned legs, then place the rolled scroll, the green potion bottle, and the wizard-style hat on top. On the wall just behind this nightstand, hang the beige banner or pillow with the embroidered face. All these placements must mirror their exact positions in Dreamy Room Level 464 so that the loft looks cozy but not overcrowded.
Step 8. Place the glass roof, lamp, swing, fountain, and remaining greenery.
Finally, add the last structural and garden touches of Dreamy Room Level 464. Above the loft, attach the light-blue glass roof frame so it angles upward, covering the bed and nightstand while leaving the right tree outside. Let the left tree’s upper foliage poke through the roof line for a whimsical effect. To the right of the bed on the loft floor, place the tall lilac floor lamp with its pleated shade. Back down in the garden, position the pink wooden swing set in the front-right area, inside the fence but slightly left of the fountain, facing toward the sofa. The swing’s seat should hang level with the fence tops. In the extreme front-right corner, install the golden fountain: a circular pale basin with a crowned central column where blue water flows. Surround the swing and fountain with the last bits of hedge and rose bushes so they tie into the earlier border. Check that every tree, hedge, star, lamp, and fence piece matches the completed image of Dreamy Room Level 464 before you finish.
Notes and Precautions
Because Dreamy Room Level 464 is all about precise spatial logic, small misalignments can cause big confusion later. Always zoom in and check that each fence panel snaps to the edge of the platform and that all furniture sits either fully on the raised floor or fully in the garden—never floating between levels. In Dreamy Room Level 464, the spiral staircase’s base and the rose arch are common trouble spots; if they overlap the wrong tiles you’ll struggle to fit the cabinet or sofa where they belong. Avoid covering important visual anchors like the fireplace opening or the prince character’s face with foreground objects. Remember that Dreamy Room Level 464 follows a layered depth order: back-wall items first, then mid-platform pieces, then foreground garden details. Place objects in that sequence and you’ll prevent elements from hiding behind the wrong layer.
Tips and Tricks from top player
Top players treat Dreamy Room Level 464 like building a story rather than solving a puzzle. Start by blocking in the biggest shapes—the tree, sofa, fireplace, and loft—before fussing over tiny items like cups or candles. In Dreamy Room Level 464, symmetry is subtle: the heavy tree and staircase on the left are visually counterbalanced by the fireplace and book stack on the right, so keep that in mind when checking your layout. Another expert trick is to use the hedges and fences in Dreamy Room Level 464 as alignment guides: if the rose arch, central steps, and fountain all line up with these borders, almost every other item will naturally fall into place. Finally, remember that the game is designed as a relaxing escape; you can move items repeatedly without penalty until the scene in Dreamy Room Level 464 feels perfectly harmonious.
Final Scene – How Dreamy Room Level 464 Should Look
When Dreamy Room Level 464 is complete, the empty striped room has become a dreamy floating garden loft. A blue fence wraps the front and right edges, protecting flower-laden hedges, a pink swing, and a golden crown-shaped fountain bubbling in the corner. The front path of stepping stones leads through a rose arch up to the raised interior platform. On the left, a great tree shelters a spiral staircase and a cabinet stacked with trophies, teapots, and dishes. Above, under a glass roof, a pink bed with a sleeping fox rests beside a tiny nightstand of magical trinkets. At center, a crowned prince relaxes on a pink sofa, flanked by gifts, a glass-covered rose, and a tiny star-planet table. On the right, a glowing fireplace, globe, books, candles, star sconce, framed pictures, and a moon-and-star mobile light the wall. Everything in Dreamy Room Level 464 feels cozy, balanced, and perfectly placed.

