Dreamy Room Level 518
Dreamy Room Level 518 guide - Dreamy Room 518 Walkthrough & Solution.
Important Notice Regarding Level Numbering
Due to frequent changes in Dreamy Room's level numbering and differences between platforms (Android/iOS) – for example, level 518 on Android might not be the same as level 518 on iOS – the text guide below may not always match the images and video above. Please prioritize the image and video guides. If you find that the guide content doesn't match your current level, please visit the All Level Walkthroughs page to find the correct guide based on level images. Thank you for your understanding.
Dreamy Room Level 518 Walkthroughs & Guide
Step 1. Place the hedge border and entry steps at the front of the floor
Start Dreamy Room Level 518 by framing the circular stone platform. Drag the curved green hedge piece to the very front edge of the stage so it hugs the arc of the floor, leaving a gap on the left side. Into that gap, place the short three-step stone staircase so it lines up perfectly with the tiled pattern on the floor. The lowest step should slightly protrude beyond the hedge, making it look like a real entrance into Dreamy Room Level 518. Getting this foundation right matters, because every later object – the sofas, coffee table, and tall indoor staircase – visually depends on this curved border to feel centered and balanced within the glass-walled room.
Step 2. Place the circular rug, twin sofas, bookcase and coffee table in the center
Next, build the cozy lounge that anchors Dreamy Room Level 518. Position the pale green circular rug in the center of the stone floor, slightly closer to the front than the back so there’s room behind it for the cat and plant stands. Then place the two pink armchairs on the left and right edges of the rug, facing each other across the middle. Make sure their yellow frilled headrest covers sit symmetrically. Slide the small curved bookcase so it fits between the front legs of the chairs, aligned with the front edge of the rug, with its colorful books facing outward. Finally, drop the round coffee table in the middle of the rug: purple tablecloth, yellow-flower bouquet at the center, tiered dessert tray, teapot, cups and a small wooden box all neatly visible. This compact cluster is the visual heart of Dreamy Room Level 518.
Step 3. Place the cat, plant stands, and corner greenery on the left side
Now fill the left side of the bottom floor of Dreamy Room Level 518 with life and greenery. Place the sleeping grey cat just behind the left armchair, head resting toward the coffee table and tail curling back toward the wall. Behind the cat, add the pale yellow low table so it tucks under the balcony above. On top of it, position two small pots: a yellow-flowered plant and a blue-green plant side by side. To the far left, place the triangular green plant stand; line its two visible shelves with bright potted flowers so they cascade down diagonally. In the very left foreground, put the tall brown pot with the lush green plant right against the curved glass wall. This mini garden balances the mass of the staircase on the right side of Dreamy Room Level 518 and prevents the bottom floor from feeling empty.
Step 4. Place the inner curved staircase and under-stair daybed on the right
The iconic sweeping staircase defines the vertical flow of Dreamy Room Level 518. Position the yellow curved staircase on the right side so the lowest step touches the stone floor and the upper landing meets the first wooden balcony. Align the brown handrails with the balcony railing posts so they look continuous. Underneath the balcony and beside the staircase, slide the green daybed so its headboard sits against the back wall and the grey pillow rests on the left side of the mattress. Directly in front of the daybed, keep the curved row of pink cabinets snug against the wall to create a built-in storage feel. This combination makes the bottom right corner of Dreamy Room Level 518 feel like a hidden reading or napping nook beneath the stairs.
Step 5. Place the middle-floor balcony, dining set, ladder, fridge, and kitchen counters
Move up to the middle level of Dreamy Room Level 518. First, ensure the long wooden balcony with vertical posts runs smoothly from the top of the staircase, curving along the back wall and across to the left side above the lounge. Then place the round dining table with its yellow cloth almost in the center of this floor, slightly left of the staircase opening. Set the two orange chairs opposite each other at the table, and anchor a purple vase with white flowers in the table’s center. On the back wall, place the tall blue fridge under the upper balcony, with its handles facing the room. To the right of the fridge, line up the curved run of kitchen counters: sink with blue bowl in the middle, drawers and cabinets beneath, and an oven window on the far right. On the rightmost counter, add the chopping board, dish and a small pot, then tuck a plump green potted plant at the raght end near the railing to soften the corner. Finally, on the far left, connect the wooden ladder to the upper floor: the top should touch the upper balcony railing while the lower steps hover beside the fridge. A small table behind the ladder holds orange and blue items, and a potted plant stands at its base, completing the practical kitchen zone of Dreamy Room Level 518.
Step 6. Place the stair-landing mats, under-balcony storage and details
This step refines vertical transitions in Dreamy Room Level 518. On the middle-floor balcony, drop the soft purple floor cushion right at the top of the staircase where the railing begins to curve; this makes the landing feel comfortable and visually marks the route upstairs. Under that balcony, ensure the curved run of pink storage cabinets continues, mirroring the shape of the dining rail above. Between the staircase and the cabinets, adjust the green daybed so it sits neatly in the wedge-shaped space, with a lilac circular object (like a cushion or speaker) tucked beside it against the wall. These details make the layered architecture of Dreamy Room Level 518 feel intentional, turning empty negative spaces into inviting corners rather than wasted gaps.
Step 7. Place the top-floor desk area, shelves, pictures, and plants on the left
On the highest floor of Dreamy Room Level 518, start with the study corner on the left. Position the wooden top-floor balcony so its posts line up with the middle-floor railing. On the floor near the left rail, set a tall white pot with a leafy green plant. Above it, let the twisting vine climb the wall and curve across the ceiling canopy. To the left wall, place three framed pictures in a vertical cluster: two pastel frames and a central butterfly-like image. Just above the computer zone, mount the long wooden wall shelf and fill it with colorful books and a small potted plant. Beneath this shelf, place the corner desk so its curve follows the balcony edge; the purple computer monitor and mint keyboard sit centered on it. On the left of the keyboard, stack two books and top them with a glass snow-globe-style ornament, casting little snowflakes. On the right, place the yellow desk lamp and the mint wrist rest or mouse pad. Set the pink desk chair right in front of the monitor, and tuck the blue trash bin between the plant and the desk. This transforms the left side of Dreamy Room Level 518 into a tidy, lived-in workspace.
Step 8. Place the wardrobe, bedroom set, window, clock, vines and snowflakes on the right
Finish the top floor of Dreamy Room Level 518 by creating the snug bedroom on the right. Place the large wooden wardrobe along the back wall, roughly centered between study and bed, with its double doors facing out and bottom drawer visible. To the right of the wardrobe, mount the round pink wall clock at eye level. Under the clock, set the small cream bedside table and top it with the pink lamp that has tiny dangling beads. Next, position the big round green bed so it curves along the balcony edge; align the orange-striped duvet so it faces down the room. Two yellow pillows rest at the head, and the teal dinosaur plush sits happily on top. Put the pair of cyan slippers on the floor just in front of the wardrobe, angled toward the bed. Lean the small purple ladder against the front of the bed frame. Finally, on the right wall, place the arched window with purple frame and pink curtains, and wrap thick green vines around its arch and along the room’s upper curve. Sprinkle the floating snowflake effects across all levels, tying Dreamy Room Level 518 together as a magical, wintery vertical home.
Notes and Precautions for Dreamy Room Level 518
In Dreamy Room Level 518, the main challenge is not collecting objects but deciding exactly where each one belongs. Many pieces look similar in size and curvature, especially the railings, cabinets and rounded furniture, so it’s easy to misalign them by a few pixels. Always match curved edges with curved architectural lines: the hedge to the platform arc, the rug to the stone circle, and the balconies to the glass wall. When placing the staircase, check that every handrail post aligns with the posts on the balcony; if even one post is off, later objects such as the purple landing cushion will look misplaced. The ladder must attach cleanly between middle and top floors; if it floats too far from the fridge, the perspective of Dreamy Room Level 518 breaks. Be careful not to hide smaller items like the under-stair daybed pillow, the tiny flower pots, or the glass ornament on the desk behind larger furniture. If something feels “crowded,” it usually means the foreground object should shift slightly toward the center.
Tips and Tricks from top player
Experienced players approach Dreamy Room Level 518 from the ground up, placing large architectural pieces first, then medium furniture, and finally all decorative details. Start with the hedge, staircases, balconies and floors; locking in the room’s skeleton makes later choices obvious. Next, drop the biggest furniture into each zone: lounge set, dining area, kitchen run, desk, wardrobe and bed. Once these anchors are in place, the remaining smaller objects in Dreamy Room Level 518 almost “snap” mentally into the gaps that visually need them – plants fill corners, lamps go by seats, cushions mark transitions. Another strong tactic is to think narratively: imagine how a resident would move through their day. They’d enter by the stone steps, relax on the sofas, make tea in the kitchen, climb to the desk to work, and end their day in the bed near the window. This story naturally suggests the practical placements for slippers, mats, trash bin, and under-stair bed. Finally, if you’re unsure where a plant, frame, or pillow goes, look for symmetry and balance; pairs often mirror across the central vertical axis of Dreamy Room Level 518, giving you subtle alignment clues.
Final Scene of Dreamy Room Level 518
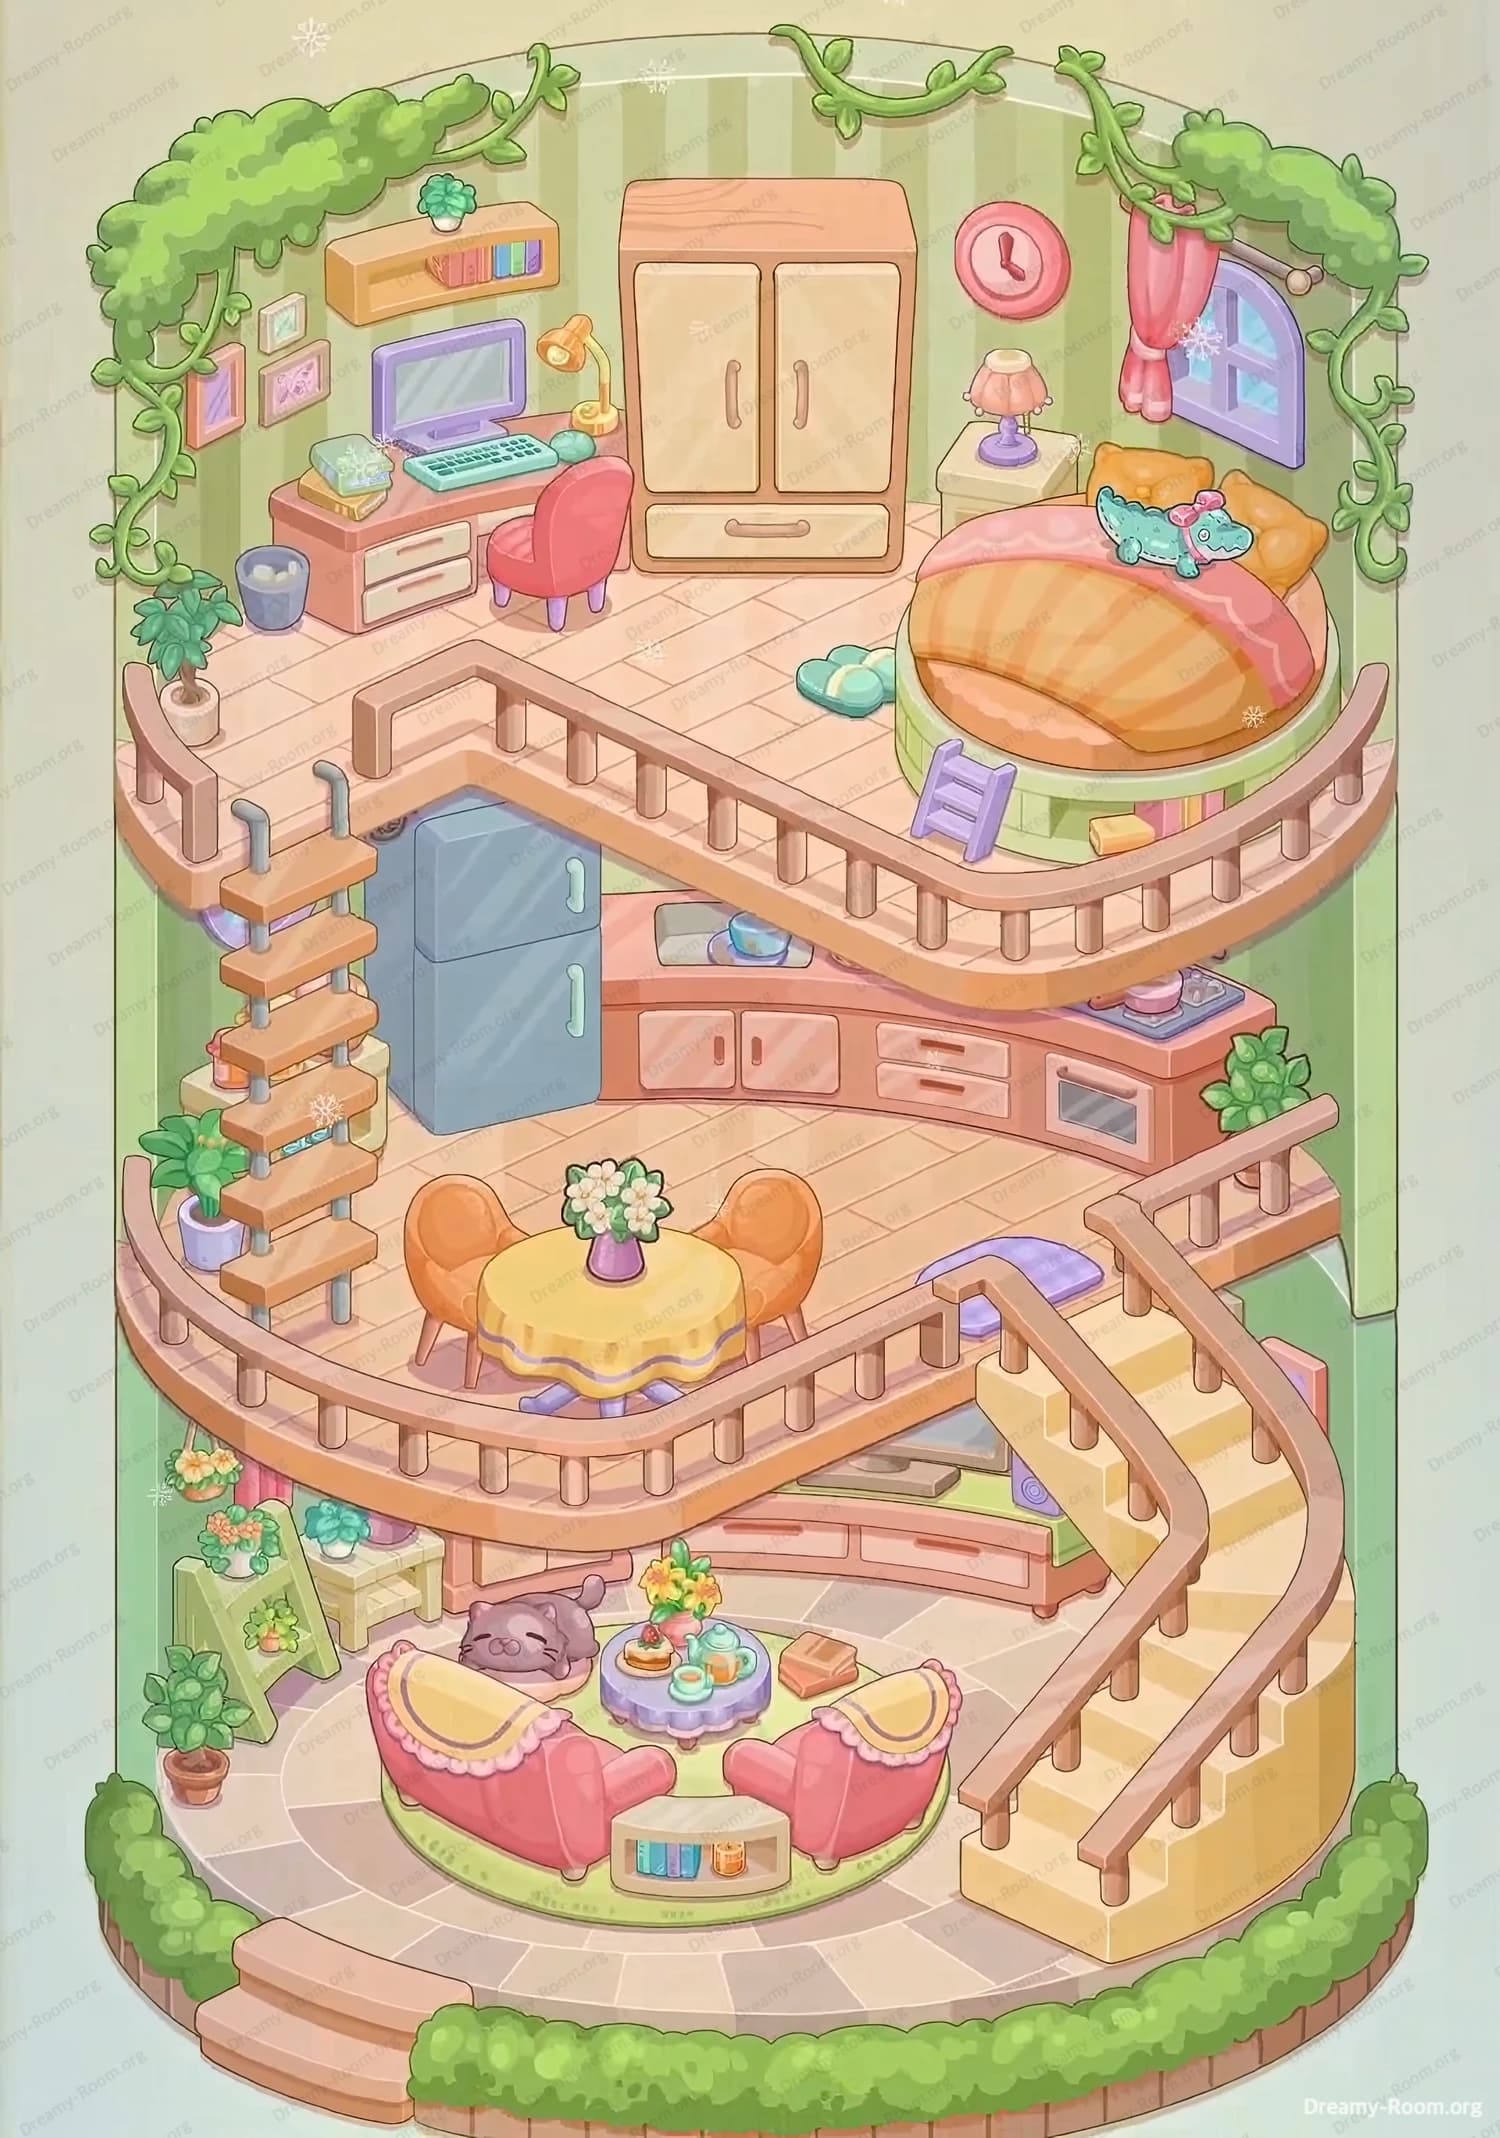
When everything is correctly placed, Dreamy Room Level 518 becomes a charming multi-level indoor treehouse wrapped by a soft green glass wall. At the bottom, the circular stone floor, hedge border and small entry steps lead into a warm lounge where two pink sofas face each other over a dessert-laden coffee table, watched over by a peacefully sleeping cat. Plants and flowers spill from stands and pots, while the sweeping staircase curves upward. On the middle level, a bright kitchen and round dining table create a friendly family zone, with a fridge, sink and counters lining the back wall and a ladder rising higher. Above, the study corner glows with a computer and desk lamp, framed by vines and books, while the right side holds a cozy round bed, dinosaur plush, wardrobe and bedside lamp under an arched window dusted with snowflakes. The finished Dreamy Room Level 518 feels layered, lived-in, and perfectly balanced.