Dreamy Room Level 513
Dreamy Room Level 513 guide - Dreamy Room 513 Walkthrough & Solution.

Important Notice Regarding Level Numbering
Due to frequent changes in Dreamy Room's level numbering and differences between platforms (Android/iOS) – for example, level 513 on Android might not be the same as level 513 on iOS – the text guide below may not always match the images and video above. Please prioritize the image and video guides. If you find that the guide content doesn't match your current level, please visit the All Level Walkthroughs page to find the correct guide based on level images. Thank you for your understanding.
Dreamy Room Level 513 Walkthroughs & Guide
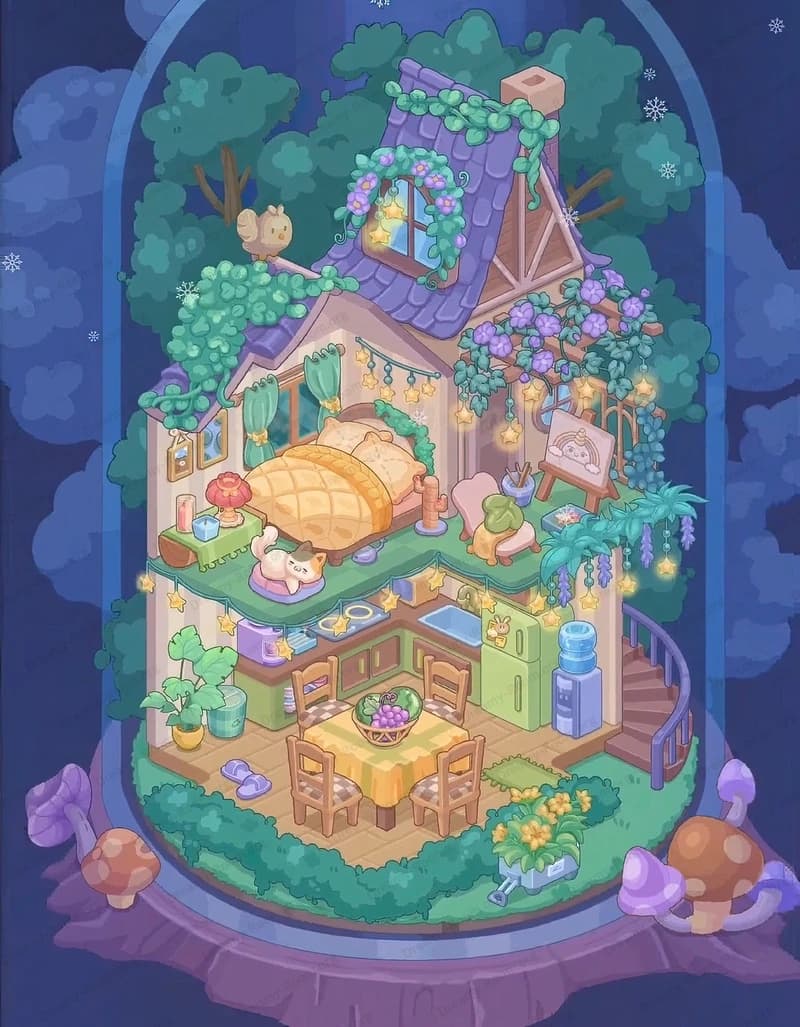
Step 1. Set up the kitchen along the left wall in Dreamy Room Level 513
Start Dreamy Room Level 513 by building the kitchen block along the left interior wall, directly above the grassy strip and stone path outside. First place the pale green stove–counter combo so it sits flush against the left wall, its front edge aligned with the front row of floor tiles. The purple saucepan and shallow pan belong on top of this unit, with the saucepan closer to the back corner. Above it, snap the open wall shelf so the brown side supports hug the wall edge; the white plate goes on the top right, with the blue box and bag on the top left, and colourful cups and boxes on the lower shelf. Below the shelf, line up the little jars and containers on the counter extension to the right, creating a neat row between stove and sink. This precise stacking establishes the visual weight of Dreamy Room Level 513 on the left side.
Step 2. Arrange the main counter and wall décor in Dreamy Room Level 513
Next, extend the kitchen deeper into Dreamy Room Level 513 by placing the longer counter unit to the right of the stove, keeping the front edges perfectly aligned. On this counter, drop the purple cloth first so it drapes diagonally, then seat the tall red coffee pot at the center of the cloth, flanked by the stacked cups, small jars, and the loaf on its wooden board. Above, hang the trio of wall frames—small picture, flower painting, and round clock—in a tight cluster just above the counter line. To their right, attach the short wall shelf and put the potted green plant on top, with two white candles standing on the counter directly below. Finally, center the rolled green blind over the unseen window behind the counter. These exact relationships—shelf over plant, candles under shelf, clock group to the left—are what the game checks in Dreamy Room Level 513, so keep spacing consistent.
Step 3. Build the dining area in the center of Dreamy Room Level 513
Now move to the middle floor tiles of Dreamy Room Level 513 and drop the large rectangular rug so its long side runs parallel to the front edge of the room. The dining table sits squarely on this rug, slightly left of center, with its yellow tablecloth just touching the kitchen counter when viewed diagonally. Place the food tray on the table: the large loaf and ring bread on the left, with colourful fruit and pastries grouped toward the right side. Around the table, snap three identical chairs—two on the far side facing the player and one on the right side. Their backs should line up almost exactly under the table edge, leaving a small gap toward the front where the outdoor bunny will later sit. This dense cluster of table, rug and chairs anchors the lower half of Dreamy Room Level 513 and ensures there’s still a clear path from kitchen to ladder.
Step 4. Create the cozy bedroom corner under the loft in Dreamy Room Level 513
In Dreamy Room Level 513, the sleeping nook is tucked in the back-left center, under the future loft floor. Position the green bed lengthwise along the back wall, with its head just under the kitchen window and its foot pointing toward the right. The bunny with fluffy purple hair must lie on top, leaning over the front edge of the blanket so the face and paws peek out adorably. Slide the small footprint rug onto the floor just below the bed, leaving a thin strip of bare tile between rug and table. On the wall behind the bed, hang the rope of three blue jar-lights so it curves gently above the bunny’s head. To the left, ensure the side of the tall green wardrobe wall is visible; to the right, leave enough room for the ladder to land. This exact nested arrangement is vital to keep the flow of Dreamy Room Level 513 believable and uncluttered.
Step 5. Add the ladder, washing corner and bow-shaped window in Dreamy Room Level 513
Shift your attention to the right side of the bedroom zone of Dreamy Room Level 513. Place the wooden ladder so its top touches the loft edge and its feet land on the tile just in front of the bed’s right corner; the rungs must align in a clean vertical line. On the wall beside it, mount the large pale bow-shaped wall decoration horizontally, almost centered between floor and loft. Directly beneath this decoration sits the blue-rimmed sink, attached to the wall with its green tap and yellow duck floating inside. To the left of the sink, position the red-topped side table with the rectangular flower planter on top, filled with three small blooms. Below, tuck the broom and bucket so their handles lean along the supporting posts. This tidy alignment of ladder, bow window and sink is a major positional check in Dreamy Room Level 513, so make sure every object touches the correct wall tiles.
Step 6. Frame the right wall with door and plants in Dreamy Room Level 513
On the far right edge of Dreamy Room Level 513, snap the tall arched glass door so it hugs the right wall and reaches from floor to loft height. On the door’s inner frame, attach the three hanging planters: the white flowers at the top, the red flower with trailing yellow vine in the middle, and the green plant on the rectangular shelf at the bottom. Just inside the door, place the bright turquoise floor plant slightly forward of the frame. Outside, on the raised platform to the right of the sink, set the two terracotta planters: spiky yellow leaves on the left and the chubby succulent on the right. When viewed together, door, hanging plants and planters should form a continuous vertical garden column. This lush right-hand greenery balances the heavy kitchen area and gives Dreamy Room Level 513 its characteristic indoor-outdoor feel.
Step 7. Build the garden path, fence, and entrance arch in Dreamy Room Level 513
Return to the grassy foreground of Dreamy Room Level 513. Along the left edge below the kitchen, line up the wooden fence posts so they sit just behind the row of pink tulips. In front of the fence, position the small green stool, with the tiny terracotta pot and metal trowel right beside its legs. To the right, place the chain of flat stepping stones leading toward the open gate. The main entrance uses a tall wooden arch on the right; snap it to the front edge so its feet sit on the grass, then drape the red-berry vine over it. Attach the matching wooden gate under the arch, leaving the opening toward the interior. Inside the gate, drop the tall silver umbrella stand or bin, making sure its handles protrude evenly. Scatter the red berries or apples on the grass patch near the arch to complete this welcoming threshold of Dreamy Room Level 513.
Step 8. Furnish the loft with wardrobe, lounge, and tea set in Dreamy Room Level 513
Now turn to the upper floor of Dreamy Room Level 513. First, the thatched roof piece must rest neatly along the top walls, framing the big yellow tree outside. On the left side of the loft, position the round-topped green wardrobe against the back wall; the purple scarf and knobs should face the player. Place the mushroom lamp on the floor to its left, stem straight and cap just under the roof line. To the right of the wardrobe, add the small blue chest with yellow drawer, then seat the bunny plush on top and the pink snail figurine on its side. Center the circular rug and low table near the front edge; on the table, arrange the tea set and dessert plate with the yellow flower vase in the middle. On the right wall, align the arched window, then add the curved green lounge chair and the small square footstool in front. This airy loft completes the vertical layering of Dreamy Room Level 513.
Step 9. Position the outdoor bunny and stools in Dreamy Room Level 513
For the final interactive touches of Dreamy Room Level 513, focus on the characters and loose items. At the very front center, just below the dining rug, sit the yellow-haired bunny in the purple dress on the grass, angled slightly toward the gate. Make sure the blue star wand points diagonally upward toward the table. To the right of this bunny, place the small turquoise stool and then the taller green three-legged stool closer to the arch, creating a gentle curve leading toward the gate. The blue backpack rests squarely on the turquoise stool. Inside the house, double-check that the bunny in the bed is clearly visible between ladder and counter. Once these living touches are in place, Dreamy Room Level 513 feels alive, and every other object—from pots to plants—should already be locked exactly where the game expects them.
Notes and Precautions for Dreamy Room Level 513
Because Dreamy Room Level 513 is all about exact placement, pay close attention to overlaps and edges. Many objects share tiles, but their order matters: the purple tablecloth must go down before the coffee pot, the rug before the table, and the vine arch before the berries. If something looks slightly off-center, the level may not register as complete, so rotate and nudge until silhouettes match the completed preview in your mind. Be careful not to crowd the walking path from gate to sink; in Dreamy Room Level 513 the stones, stools and seated bunny must leave a clear zig-zag route. Finally, remember that plants usually align against walls or frames, not floating on tiles, so always snap them to the nearest vertical surface rather than the middle of the floor.
Tips and Tricks from top player for Dreamy Room Level 513
Experienced players recommend starting Dreamy Room Level 513 with all wall-mounted pieces—shelves, frames, blinds, bow window, and hanging plants—before dropping big furniture. This prevents situations where a tall object blocks the correct snap points. Use the rule of “mirrored weight”: kitchen mass on the left must be balanced by plants and door on the right, with the loft lounge roughly above the dining table. When stuck, hide everything except one area and rebuild that zone from back to front, wall to floor; Dreamy Room Level 513 often fails only because a small detail like the jar-lights string or duck in the sink is missing. Also, remember that character figures usually touch rugs or grass edges, never float in the center of tiles. Zoom in frequently and use silhouette matching; the outline of the roof, arch, and wardrobe are especially distinctive and great reference anchors.
Final Scene: The Completed Dreamy Room Level 513
When everything is placed correctly, Dreamy Room Level 513 shows a snug bunny cottage glowing against a soft, snowy forest backdrop. The left wall is packed with a working kitchen—shelves of dishes, jars, and a steaming coffee pot—flowing naturally into the central dining area where bread and fruit wait on a sunny yellow table. Under the loft, a sleepy bunny leans from a green bed, lit by dangling blue jar-lights, while the right side forms a bright wash corner, bow-shaped wall window, and tall arched glass door veiled in hanging plants. Outside, tulips, fences, stones and a berry-covered gate frame the scene, with a playful bunny sitting on the grass, wand in paw. Above, the thatched roof shelters a charming loft lounge with wardrobe, plush toys, and a tea set, completing the warm, storybook mood of Dreamy Room Level 513.