Dreamy Room Level 145
Dreamy Room Level 145 guide - Dreamy Room 145 Walkthrough & Solution.
Important Notice Regarding Level Numbering
Due to frequent changes in Dreamy Room's level numbering and differences between platforms (Android/iOS) – for example, level 145 on Android might not be the same as level 145 on iOS – the text guide below may not always match the images and video above. Please prioritize the image and video guides. If you find that the guide content doesn't match your current level, please visit the All Level Walkthroughs page to find the correct guide based on level images. Thank you for your understanding.
Dreamy Room Level 145 Walkthroughs & Guide
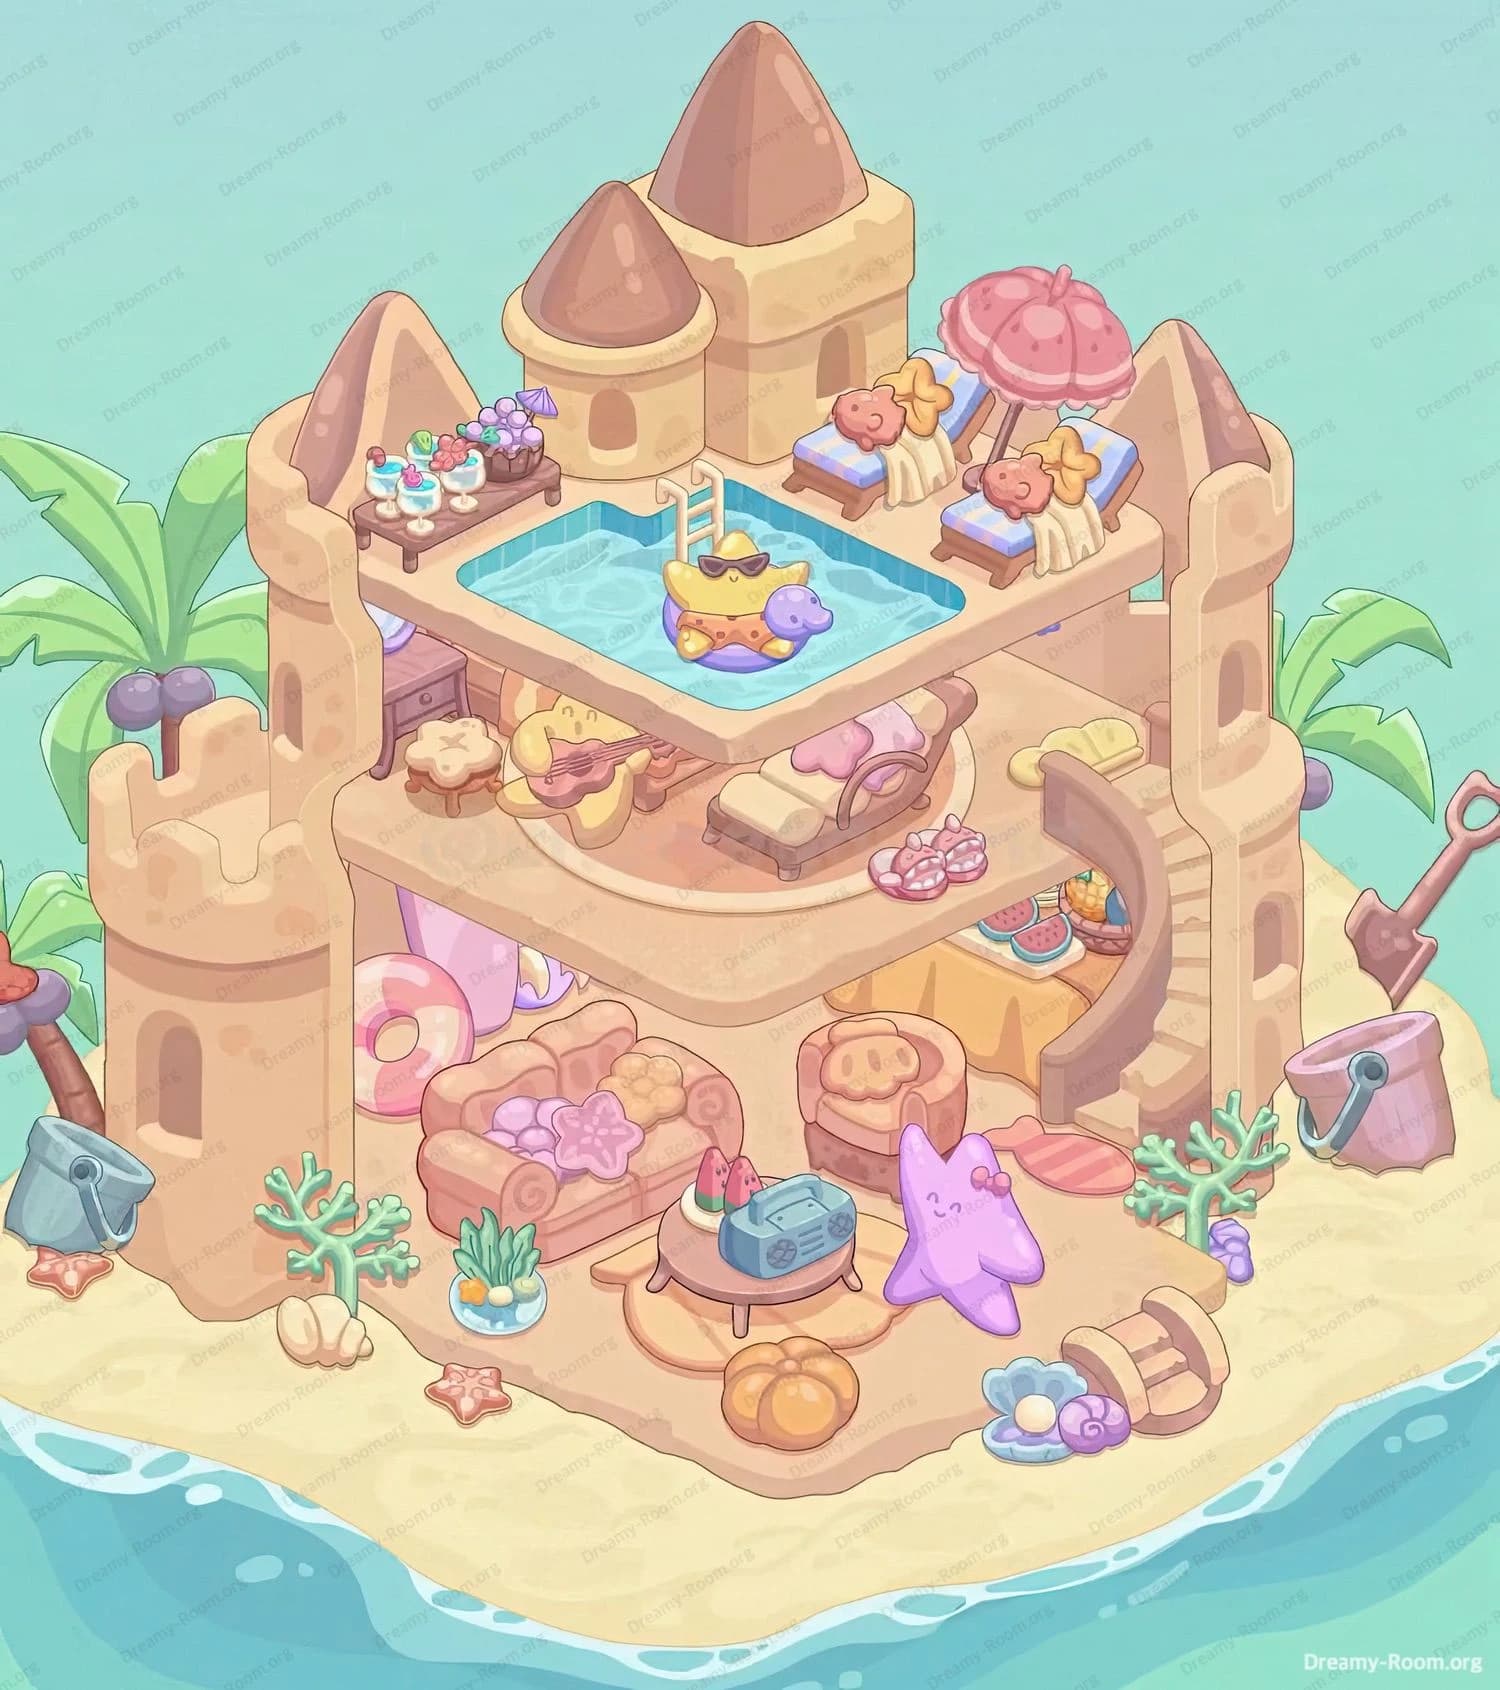
Step 1. In Dreamy Room Level 145, place the bent shovel and metal bucket at the base
In Dreamy Room Level 145, the first objective is to set up foundational ground-level decorations at the base of the sandcastle structure. Begin by selecting the metal bucket and position it just to the right of the central archway on the sandy floor. Next, lean the bent shovel against the bucket handle at a gentle 30° angle so it appears naturally propped. Then, pick the coral cluster and small turquoise plant foliage from your inventory and nestle them into the alcove on the left wall. This careful placement in Dreamy Room Level 145 ensures that the base decor feels balanced and inviting. Players tackling Dreamy Room Level 145 will appreciate how leaving tiny gaps prevents collision glitches with future pieces. Proper placement here sets the mood and helps you avoid accidental resets later in Dreamy Room Level 145 gameplay. Once you see the coral snugly in place, you’re ready to move on.
Step 2. In Dreamy Room Level 145, arrange the cozy living area inside the lower chamber
In Dreamy Room Level 145, the second step is all about crafting a comfortable lounge within the lower chamber of the sandcastle. First, select the plush pink couch and slide it flush against the back wall, perfectly centered between the two support pillars. Next, choose the pastel star cushion and tuck it into the couch’s left corner. Add the inflatable pink donut float to the right side of the couch, letting it lean casually as if awaiting a playful moment. Then, pick the small wooden side table and place it directly in front of the couch, ensuring its legs don’t overlap stone seams. Finally, top the table with the retro radio for a nostalgic touch. By following these precise placements in Dreamy Room Level 145, you’ll establish a welcoming first-floor retreat. Remember that correctly spacing objects in Dreamy Room Level 145 can unlock hidden interactions and aesthetic bonuses.
Step 3. In Dreamy Room Level 145, add floor-level accents and accessories
In Dreamy Room Level 145, step three focuses on infusing the lower floor with character and warmth. Start by placing the tiny starfish stool just to the left of the entrance archway. Then, select the ceramic seagrass planter and push it snugly into the left corner so it peeks out naturally. Next, scatter three small seashell pieces in a gentle cluster on the sandy floor, directly in front of the planter for a lived-in feel. After that, position the purple coral twig next to the seashells to introduce a soft pop of color. To finish, place the miniature silver pail on the right side near the entry. These final touches in Dreamy Room Level 145 help the scene feel complete, and proper floor-level detail in Dreamy Room Level 145 also impacts your star rating—so be precise.
Step 4. In Dreamy Room Level 145, build the rooftop pool centerpiece
In Dreamy Room Level 145, the fourth step transforms the castle’s upper deck into a serene pool retreat. First, drag the rectangular pool basin into position so its edges align perfectly with the castle walls. Next, attach the matching ladder to the rear of the basin, angling it securely against the water. Then, choose the pool water element and fill the basin completely, watching it animate to a calming ripple. After the water settles, place the starfish float in the center so it drifts naturally. Be mindful in Dreamy Room Level 145 that any misaligned water assets can clip through walls and break immersion. Proper construction of the pool in Dreamy Room Level 145 will unlock further decorative options, so focus on precision for a flawless finish.
Step 5. In Dreamy Room Level 145, arrange the poolside lounge area
In Dreamy Room Level 145, step five is dedicated to creating a relaxing sunbathing spot beside your newly built rooftop pool. Begin by selecting the blue-and-white striped lounge chair and place it adjacent to the pool’s right edge, facing inward. Duplicate the chair and position the copy next to its twin, leaving a narrow gap for realism. Next, plant the pink beach umbrella between them, ensuring it shades both chairs evenly. Then, rest the decorative fish pillows on each lounger to add playful charm. Finally, set the wooden side table between the chairs and top it with cocktail glasses. Correct poolside staging in Dreamy Room Level 145 not only boosts your star rating but also balances composition across the upper deck in Dreamy Room Level 145.
Step 6. In Dreamy Room Level 145, set up the mid-tier refreshment station
In Dreamy Room Level 145, the sixth step introduces a delightful snack station on the level just below the pool deck. First, select the narrow wooden console table and slide it against the back wall above the entrance archway. Next, arrange the colorful fruit cocktails evenly along its length, alternating blue and pink glasses for visual contrast. Then, place the grape cluster at one end of the table to anchor the display. After that, insert the purple drink stirrers so they punctuate each glass with whimsy. Pay attention in Dreamy Room Level 145 to ensure no piece overlaps window openings or wall details. Finalizing this snack station properly in Dreamy Room Level 145 will make your mid-tier feel polished and perfectly cohesive.
Step 7. In Dreamy Room Level 145, cap the turrets and add exterior greenery
In Dreamy Room Level 145, the seventh step refines your castle’s silhouette by adding conical turret caps and lush foliage outside. Begin by selecting the tan turret roof elements and attach them to each of the three tall towers, ensuring they sit flush against the battlements. Next, choose the pair of palm tree objects and place one to the left and one to the right of the castle exterior. Then, tuck the coconut cluster into the left tree’s fronds for a natural accent. Proper rooftop and greenery integration in Dreamy Room Level 145 not only strengthens the thematic look but also completes the external framing. Attention to these details in Dreamy Room Level 145 ensures no floating or clipping issues appear at the highest elevations.
Step 8. In Dreamy Room Level 145, apply the final decorative touches
In Dreamy Room Level 145, the eighth and final step involves bringing in every remaining trinket and ensuring total cohesion. First, select the wicker fruit basket overflowing with watermelon slices and position it beside the archway entrance on the lower floor, angled outward for a casual vibe. Next, place the small orange pumpkin just to its left to add autumnal warmth. Then, rest the purple starfish plush against the sofa’s arm for a cute flourish. After that, situate the pastel coral bush next to the bucket on the exterior’s right side to balance the scene. Finally, scatter the three pink seashells and two miniature sea urchin decals across the sand. Carefully checking placements in Dreamy Room Level 145 at this stage will guarantee a flawless final presentation in Dreamy Room Level 145, sealing your victory. Remember, these final adjustments in Dreamy Room Level 145 can make or break your high score.
Notes and Precautions
Below are important notes and precautions for Dreamy Room Level 145 to ensure a smooth and enjoyable decorating experience:
-
Collision Sensitivity: In Dreamy Room Level 145, if two objects overlap too closely, the game will snap one back to your inventory, costing valuable time. Always leave a small gap between items to avoid accidental resets and preserve your progress.
-
Grid-Snapping: In Dreamy Room Level 145, enabling the invisible grid-snapping feature can help align objects with pixel-perfect precision. This is especially useful when lining up pool edges, tables, and castle tiles.
-
Preview Mode: In Dreamy Room Level 145, use the preview or photo mode before finalizing placements. Checking from multiple camera angles helps you catch floating items or clipping that might disqualify a perfect score.
-
Undo Limits: In Dreamy Room Level 145, note that the undo history only stores your last five actions. Plan placement strategies carefully, because exceeding this limit locks in your moves.
-
Inventory Management: In Dreamy Room Level 145, sorting your inventory by category (furniture, accessories, plants) speeds up scene assembly and prevents misplacing small trinkets that are easy to lose during intense builds.
Tips and Tricks from top player
Below are top-player tips to master Dreamy Room Level 145 and consistently earn three stars:
-
Blueprint First: Before setting any piece, sketch out your design by placing placeholders. In Dreamy Room Level 145, this blueprint approach helps you visualize spacing and prevents undo-heavy micromanagement.
-
Mirror Duplicates: Use the mirror-duplicate function in Dreamy Room Level 145 to replicate clusters symmetrically. Place one side perfectly, then flip it to the other, cutting your build time in half.
-
Harmonize Colors: In Dreamy Room Level 145, maintain a pastel palette by grouping soft accessories with muted backgrounds. Avoid jarring hues that clash with the sand and wood textures.
-
Layer Control: Use the layer ordering tool in Dreamy Room Level 145 to send background elements back and bring foreground items forward. Correct layering prevents overlap errors and ensures each piece shows correctly.
-
Checkpoint Saves: Top Dreamy Room Level 145 players use photo mode or quick checkpoints to bookmark progress. If you want to experiment boldly, you can revert to a previous snapshot without losing your core layout.
Final Scene Description
In Dreamy Room Level 145’s final tableau, a majestic sandcastle transforms into a vibrant seaside sanctuary brimming with carefully placed treasures. On the sandy base of Dreamy Room Level 145, pastel shells mingle with a wicker fruit basket overflowing with watermelon slices, flanked by a bent shovel and metal pail. Inside the first floor, a plush pink couch with a star cushion rests beside an inflatable donut and retro radio on a wooden table. Sitting above in Dreamy Room Level 145’s crown, a clear blue pool ripples beneath twin striped lounge chairs and a pink umbrella, complete with a cheerful starfish float. Each turret in Dreamy Room Level 145 is capped by conical rooftops and framed by swaying palm trees, accented with coral and seaweed clusters. This harmonious assembly in Dreamy Room Level 145 emphasizes the game’s core challenge: placing every delightful piece with absolute precision to create an idyllic coastal retreat.