Dreamy Room Level 541
Dreamy Room Level 541 guide - Dreamy Room 541 Walkthrough & Solution.
Important Notice Regarding Level Numbering
Due to frequent changes in Dreamy Room's level numbering and differences between platforms (Android/iOS) – for example, level 541 on Android might not be the same as level 541 on iOS – the text guide below may not always match the images and video above. Please prioritize the image and video guides. If you find that the guide content doesn't match your current level, please visit the All Level Walkthroughs page to find the correct guide based on level images. Thank you for your understanding.
Dreamy Room Level 541 Walkthroughs & Guide
Step 1. Place the sofa corner and window in the rear-right area.
Start Dreamy Room Level 541 by completing the relaxing lounge at the back-right of the truck. Along the right wall, place the beige two-seat sofa so it hugs the corner, with the back against the wall and the right arm touching the rear edge. Put the teddy bear on the left cushion and the red heart-shaped “LOVE” pillow leaning against the back on the right. Above the sofa, mount the double window with the yellow valance and pale-blue curtains exactly centered over the seat. To the left of the window, hang the bunch of green herbs; to the right, fix the narrow mustard-yellow wall cabinet. This cluster locks the right wall visually and gives you a clear anchor for later placements in Dreamy Room Level 541, so adjust until the sofa, window, cabinet, and herbs all align neatly without overlapping the floor edge.
Step 2. Place the coffee table, lamp, breakfast plate, and front bench.
Next, finish the seating nook in Dreamy Room Level 541. In front of the beige sofa, place the blue rectangular coffee table so its long side faces the viewer and its right edge is almost flush with the floor border. On the left side of the table, set the blue lamp with the round shade; on the right, put the white plate with eggs and toast plus the matching cup beside it. Now add the pink gingham bench in front of the table, perfectly parallel so players could “sit” facing the sofa. Ensure a narrow walkway remains on the left side between bench and central aisle. Correct placement is crucial in Dreamy Room Level 541, because if the bench is pushed too far back it will clash with the table, and if it is too far forward it will float off the platform edge.
Step 3. Place the central table, drawer cabinet, plants, and easel.
Move to the middle of Dreamy Room Level 541, where the dining and greenery cluster lives. Just left of the coffee-table area, position the small cabinet with two drawers and the yellow check tablecloth so its back touches the kitchen counter and its right edge lines up roughly with the coffee table’s left side. On top of this cabinet, place the vase bursting with pink and orange flowers, perfectly centered. In front of the cabinet, set the short round wooden stool so it overlaps slightly with the blue kitchen rug. On the floor near the truck’s outer edge, directly in front of the cabinet, place the tall green potted plant, and just to its left, place the wooden easel with the canvas facing the living space. This cluster must sit clear of the stairs and not intrude into the sofa zone, a common misplacement in Dreamy Room Level 541.
Step 4. Place the entrance steps, doormat, fridge, and side shelves.
Now secure the entry side of Dreamy Room Level 541. At the front-left corner of the platform, put the two-step brown staircase so it touches the floor edge and aligns with the truck doorway. Just inside the doorway on the floor, drop the green rectangular doormat, keeping a tiny gap from the fridge. Against the inner left wall, place the cream fridge with the orange top door; its back must be flush with the wall and its left side almost touching the door frame. On top of the fridge, place the trailing potted plant. To the right of the fridge, build the tall open shelf unit: bottom compartment with stacked dishes, middle with bottles and spices, top with jars, plus the hanging bunch of grapes on the side. Placing this vertical tower precisely is key in Dreamy Room Level 541, because it defines the border between the entry and the kitchen.
Step 5. Place the stove, oven rug, utensils, and lower counters.
With storage set, assemble the cooking core of Dreamy Room Level 541. Immediately right of the fridge-shelf block, position the pink stove so its back rests against the wall tiles and its left side almost kisses the shelf. Ensure the yellow-striped oven towel hangs on the door front. On the stovetop, place the orange pot on the left burner and the smaller pan on the right. Above, mount the blue-and-yellow range hood centered over the stove. Between fridge and stove wall space, hang the rod of cooking utensils—spoons and ladles—so they dangle just above pot height. On the floor in front, lay down the long blue rug, spanning from in front of the fridge zone to the sink area. In Dreamy Room Level 541, the rug’s alignment guides many later pieces; if it’s off by a tile, stools and cabinets will snap incorrectly, so use it as your horizontal ruler.
Step 6. Place the sink, window, microwave, and adjacent cabinets.
Continue along the back wall of Dreamy Room Level 541 to complete the wet zone. To the right of the stove, place the base cabinet with the white sink so there is no visible gap between it and the oven side. In the sink, set the silver faucet at the back center, then add the small green bottle (dish soap) and white glass near the front corner. Above the sink, mount the large double window so its bottom edge lines up with the tiles, flanked with peach curtains that hang evenly on both sides. On the counter to the right of the sink, place the orange microwave, leaving a small gap from the edge. Above everything, install the row of upper cabinets: from left to right, the tall yellow block, the green cabinet, the pale-pink cabinet with crosshatched glass doors, and the brown one. Getting this “cabinet skyline” straight is a big part of solving Dreamy Room Level 541 cleanly.
Step 7. Place the right-side top cabinets, herb bunch, and wall decor.
Shift attention to the upper-right wall of Dreamy Room Level 541, above the sofa you placed earlier. To the right of the last brown cabinet from the previous step, add the teal wall cabinet with jars visible through its opening. Leave a small tile of space, then position the mustard cupboard with a single door as the far-right unit. Under these, hang the green herb bunch using the small wall hook so it dangles between the cabinets and the window below. Make sure the herb leaves do not overlap the cabinet doors or the window frame; the game’s placement grid will allow several positions, but only the one matching the reference layout is correct in Dreamy Room Level 541. Double-check that all cabinets share the same top height. This clean horizontal line visually unifies the kitchen and living areas and prevents the wall from feeling cluttered.
Step 8. Place the ladder, loft shelves, rooftop cat area, and exterior details.
The final construction work inside Dreamy Room Level 541 happens vertically. Against the left interior wall, anchor the tall yellow ladder so its top touches the loft edge and its bottom lands just above the entry mat. Above the shelves and fridge, place the long mezzanine shelf stacked with bottles and kitchen items, carefully aligned with the loft floor. On the truck roof above the cab, place the green cushion with the orange striped cat lounging on it, and beside it the small table with a cup or bowl. Slightly behind, set the blue tray or crate near the wall. Now, on the upper back wall, place the cozy loft bed: purple blanket with star prints, blue cloud pillow, and yellow cat pillow against the headboard. Add the three framed pictures above the bed, and string the round fairy lights along the railing edge. Finally, pop the red chimney with the puffing white smoke cloud on the roof corner. This vertical layering is what gives Dreamy Room Level 541 its iconic tiny-home-on-wheels feeling.
Notes and Precautions
In Dreamy Room Level 541, almost every object has neighbors on at least two sides, so slight misalignment early on can cascade into later problems. Prioritize placing the large fixtures first—the sofas, kitchen units, fridge, and bed—before fussing with decor like herbs, plants, and dishes. Watch depth carefully: objects near the platform edge (stairs, easel, plants, benches) must not “hover” beyond the floor outline. The game may allow technically valid snaps that still conflict visually with truck wheels or walls, which means the configuration is wrong for Dreamy Room Level 541. Also pay attention to height: upper cabinets must share one straight top line, and wall hooks should never pierce curtains or window frames. When stuck, temporarily hide small props to check if any major furniture is offset by a single tile—a common cause of unplaceable details in Dreamy Room Level 541.
Tips and Tricks from top player
Top players treat Dreamy Room Level 541 as a puzzle of zones: entrance, kitchen, dining, lounge, loft, and rooftop. Place one complete zone at a time instead of bouncing around. Use color as a guide—pink objects mostly cluster around the oven and seating, greens around plants and cabinets, yellows around textiles and tablecloths—which makes it easier to guess where a stray piece belongs. In Dreamy Room Level 541, another strong strategy is to follow “lines”: align furniture edges either with the back wall or with the blue rug so everything snaps into a clean grid. When you pick up a small prop such as a cup, herbs, or the LOVE pillow, rotate the camera mentally and imagine which surface it naturally sits on; this mindset drastically reduces random trial-and-error and speeds up solving Dreamy Room Level 541.
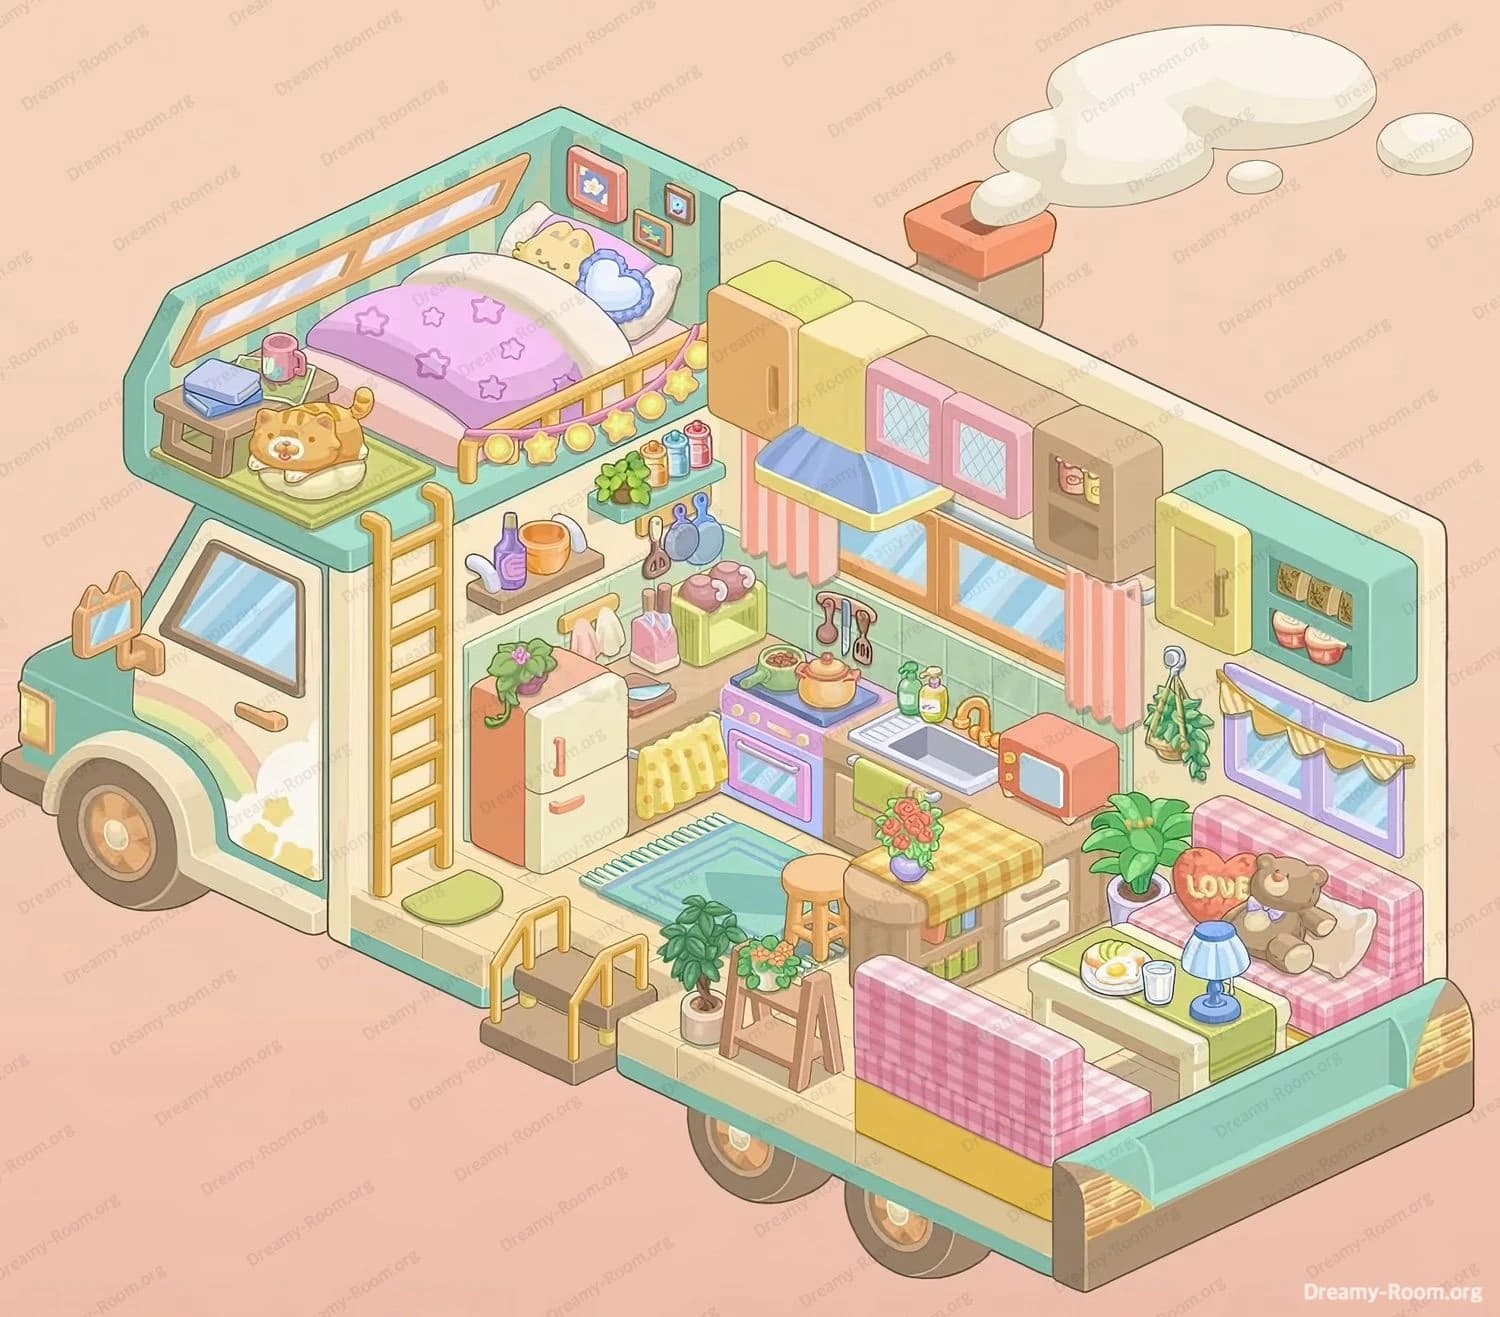
Final scene in Dreamy Room Level 541
When everything is placed, Dreamy Room Level 541 shows a tiny camper that feels like a complete home. The teal-and-cream truck supports a warm wooden floor, twin wheels, and a side door with neat steps. Inside, a fully equipped kitchen glows: pink oven under a blue hood, tidy sink by a sunny window, multicolored cabinets overhead, and shelves bursting with food and dishes. The center holds a checkered table with fresh flowers and nearby plants and easel, while the back-right becomes a cozy lounge with sofas, lamp, teddy bear, and breakfast ready to enjoy. Above, a snug loft bed with starry blanket rests under framed pictures and fairy lights, and on the roof a lazy cat lounges as smoke curls from the chimney. The final Dreamy Room Level 541 scene feels compact, lived-in, and ready to hit the road.