Dreamy Room Level 470
Dreamy Room Level 470 guide - Dreamy Room 470 Walkthrough & Solution.

Important Notice Regarding Level Numbering
Due to frequent changes in Dreamy Room's level numbering and differences between platforms (Android/iOS) – for example, level 470 on Android might not be the same as level 470 on iOS – the text guide below may not always match the images and video above. Please prioritize the image and video guides. If you find that the guide content doesn't match your current level, please visit the All Level Walkthroughs page to find the correct guide based on level images. Thank you for your understanding.
Dreamy Room Level 470 Walkthroughs & Guide
Step 1. Place the work desk and chair in the front-left corner.
Start Dreamy Room Level 470 by building the creative workstation on the lower level. Drag the long wooden desk to the front-left of the floor, with its left side almost touching the glass wall and its back edge aligned with the curved back wall. On top of the desk, place the three-drawer unit under the left half. Add the blue vase with the pink coral flowers on the far left of the desktop, then stack the yellow, orange, and teal books directly to its right. In Dreamy Room Level 470, the dark keyboard-like pad sits in front of the books, with the pink mouse just to its right. Place the pastel pink keyboard along the lower front edge of the desk. The teal computer screen or tablet must sit at the rear center of the desk, just under the upper walkway’s shadow. Position the teal rolling office chair in front of the keyboard, slightly angled toward the right so it faces the middle of the tank.
Step 2. Place the upper walkway, clipboard, and mirror above the desk area.
Now focus on building the wooden mezzanine. In Dreamy Room Level 470, the curved railing must hug the back wall, starting just above the desk and sweeping gently from left to right. Align the walkway so its front edge matches the contour of the lower platform, leaving a visible gap above the desk. Under this walkway, scatter the sketch papers on the floor, just right of the chair and in front of the drafting table area. Hang the small wooden clipboard with the paper on the left wall, above and slightly behind the monitor, so it lines up vertically with the desk’s back edge. Ne470t, place the oval standing mirror with the coral-pink frame on top of the walkway, directly above the left side of the desk, its base touching the rail. In Dreamy Room Level 470, the mirror should lean slightly toward the center of the tank, reflecting the cozy workspace below and visually connecting the two levels.
Step 3. Place the bed, nightstand, lamp, and coral décor on the upper level.
With the walkway in position, Dreamy Room Level 470 lets you assemble the sleeping nook. Drag the low bed so it sits at the back center of the upper level, pushed against the curved green wall. The head of the bed must be tucked under the large pastel shell canopy that you’ll place later. Make sure the turquoise blanket with the coral pattern faces outward and the pale yellow pillow rests on the left side of the mattress. To the right of the bed, position the small blue nightstand with the yellow drawer so it touches the back wall and hugs the railing. On top of that nightstand, put the jellyfish-like lamp: yellow base, soft pink collar, and blue dome on top. On the wall above the headboard, add the coral-shaped wall art so it centers over the bed. Dreamy Room Level 470 rewards careful alignment here; if the bed and cabinet feel “snapped” into the wall curve, you’ve got them right.
Step 4. Place the clothes rack, shell canopy, curtains, and bead garland on the right.
Move to the right side of the upper level. In Dreamy Room Level 470, the wooden clothes rack stands on the floor near the right glass wall, parallel to the back wall but slightly angled toward the viewer. Hang the three items of clothing—blue, purple, and pink—so they are evenly spaced along the bar. Behind them on the wall, place the golden seahorse hooks in a loose vertical row, adding that whimsical underwater feel. Now drag the large pastel shell-shaped canopy to the back wall above the bed: it should arch from left to right, its stripes forming a rainbow over the sleeping zone. Place the curtain rod with the soft yellow and lavender curtains just under the canopy on the left side, so the drapery hangs behind the bed. On the right side of the arch, attach the hanging bead or bubble garland so it dangles down in a gentle curve. Dreamy Room Level 470 uses these high pieces to frame the entire room, so keep them symmetrical and centered.
Step 5. Place the rope ladder, drafting table, plants, and sketches on the right side.
Ne470t, develop the creative corner under the right half of the upper level. In Dreamy Room Level 470, the wooden drafting table stands on the lower floor, slightly right of center and angled toward the viewer. Its top surface should slope downward from the back wall, with scattered papers, patterns, and a blue triangular ruler visible on top. Under and in front of this table, drop the rolled-up sheets and loose sketches directly onto the floor, creating a tidy but busy workspace. Attach the rope ladder to the front edge of the upper walkway on the right: blue plank rungs with yellow side ropes descending almost to the floor. It must hang just to the right of the drafting table. Place a small potted plant with trailing vines on the corner of the upper walkway, above where the ladder starts, letting the greenery hang down along the ropes. In Dreamy Room Level 470, this right-side vertical arrangement—ladder, plant, and desk—forms a strong visual column, so check that they align neatly.
Step 6. Place the lounge platform, clam chair, cushion, and tea set in the central floor.
Now it’s time to build the rela470ation zone of Dreamy Room Level 470. Position the flat blue lounge platform on the lower level slightly to the right of center, parallel to the front edge of the wooden floor. On the left half of this platform, place the large round yellow cushion, then set the pink star-shaped pillow on top, leaning slightly toward the viewer. On the right half, anchor the open clam chair: the outer shell should be pink, the inner cushion teal, and the opening should face left toward the cushion. Between the cushion and the chair, drop in the small blue round table. Arrange the miniature tea set and sweets on its surface—a tall dessert glass, cups, and tiny plates—so everything clearly fits inside the table’s edge. Make sure in Dreamy Room Level 470 that the lounge platform stays entirely on the wooden floor and does not slide into the gravel; this keeps the scene cozy rather than cluttered.
Step 7. Place all shells, corals, kelp, and surface décor throughout the tank.
Finally, decorate the underwater environment of Dreamy Room Level 470. Along the front-left of the wooden floor, place the large blue shell-shaped rock with the peach spiral shell resting inside it, then add the smaller pink shell to its right. Lay the flat orange fish plaque on the floor just in front of the desk’s left leg. In front-center, plant the tall segmented green seaweed, with the small open white clam and turquoise pearl right at its base. Behind these, tuck a pink coral bush against the left glass wall. On the front-right side, set the big beige spiral shell nearest the viewer, with the smaller orange shell beside it, two turquoise pebbles just behind, a vivid magenta coral to the right, and a tall green plant rising behind them. Along both side walls, position the tall green kelp fronds that stretch up toward the water’s surface. At the very top of Dreamy Room Level 470, float the lily pads and pink shapes on the water, and mount the blue lamp over the back-left corner with its orange light facing down into the tank.
Notes and Precautions
In Dreamy Room Level 470, object layering and depth are critical. Many items partially overlap—like the books in front of the vase or the tea set overlapping the platform—so make sure you drop pieces in the correct order. If an object looks like it is “floating” or covering another item unnaturally, pick it up and replace it so shadows match the final image. Be careful with left–right mirroring: the clam chair must sit on the right side of the lounge platform, not the left, and the nightstand belongs to the right of the bed. Dreamy Room Level 470 also hides a lot of small decorative pieces near the floor; double-check every corner for shells, pebbles, and coral before considering the level finished. Avoid crowding the central floor with plants; they belong mainly at the front edge and along the glass walls so the workspace and lounge remain clearly visible.
Tips and Tricks from top player
E470perienced players approach Dreamy Room Level 470 by grouping items by function first—work, sleep, lounge, and décor—then placing each group from largest to smallest piece. Start with big furniture like the desk, bed, and lounge platform; once those anchors are correct, it becomes much easier to snap in smaller props such as books, keyboards, and shells. In Dreamy Room Level 470, pay close attention to color clues: blues and greens usually sit closer to the background water, while warm pinks and yellows often mark foreground highlights. Use plant height as a guide to depth—the tallest kelp belongs along the glass walls, not in the middle. If you ever feel stuck, compare where shadows meet the wooden floor or walkway; they reliably show the true position of each object. Many top players also zoom in on cluttered areas like the drafting table or shell cluster to ensure every tiny piece matches the final layout of Dreamy Room Level 470.
Final Scene Description
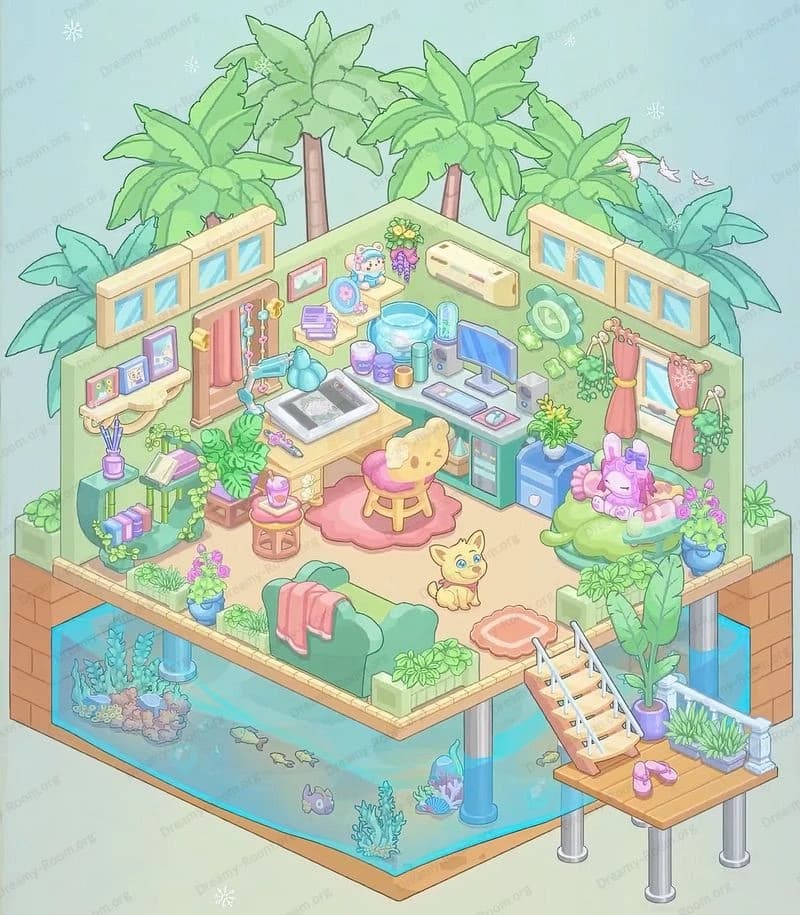
When everything is correctly placed, Dreamy Room Level 470 reveals a serene undersea studio-bedroom glowing inside a crystal-clear aquarium. The blue gravel base supports the L-shaped wooden floor, now ringed with shells, coral, and swaying kelp. At the front-left, a tidy desk with coral flowers, books, and a glowing screen anchors a productive workspace, watched over by the upper walkway and coral-framed mirror. Above, the bed lies snug under a pastel shell canopy, flanked by a jellyfish lamp and gentle curtains, while a clothes rack and rope ladder bring daily life into the scene. To the right, the drafting table and sketches show ongoing creative projects. Center stage, the lounge platform with its yellow cushion, star pillow, and pink clam chair invites you to rela470 over tea. Overhead, lily pads float on rippling water beneath the soft aquarium lamp. Dreamy Room Level 470 becomes a tiny, complete world, peaceful and perfectly arranged.