Dreamy Room Level 466
Dreamy Room Level 466 guide - Dreamy Room 466 Walkthrough & Solution.
Important Notice Regarding Level Numbering
Due to frequent changes in Dreamy Room's level numbering and differences between platforms (Android/iOS) – for example, level 466 on Android might not be the same as level 466 on iOS – the text guide below may not always match the images and video above. Please prioritize the image and video guides. If you find that the guide content doesn't match your current level, please visit the All Level Walkthroughs page to find the correct guide based on level images. Thank you for your understanding.
Dreamy Room Level 466 Walkthroughs & Guide
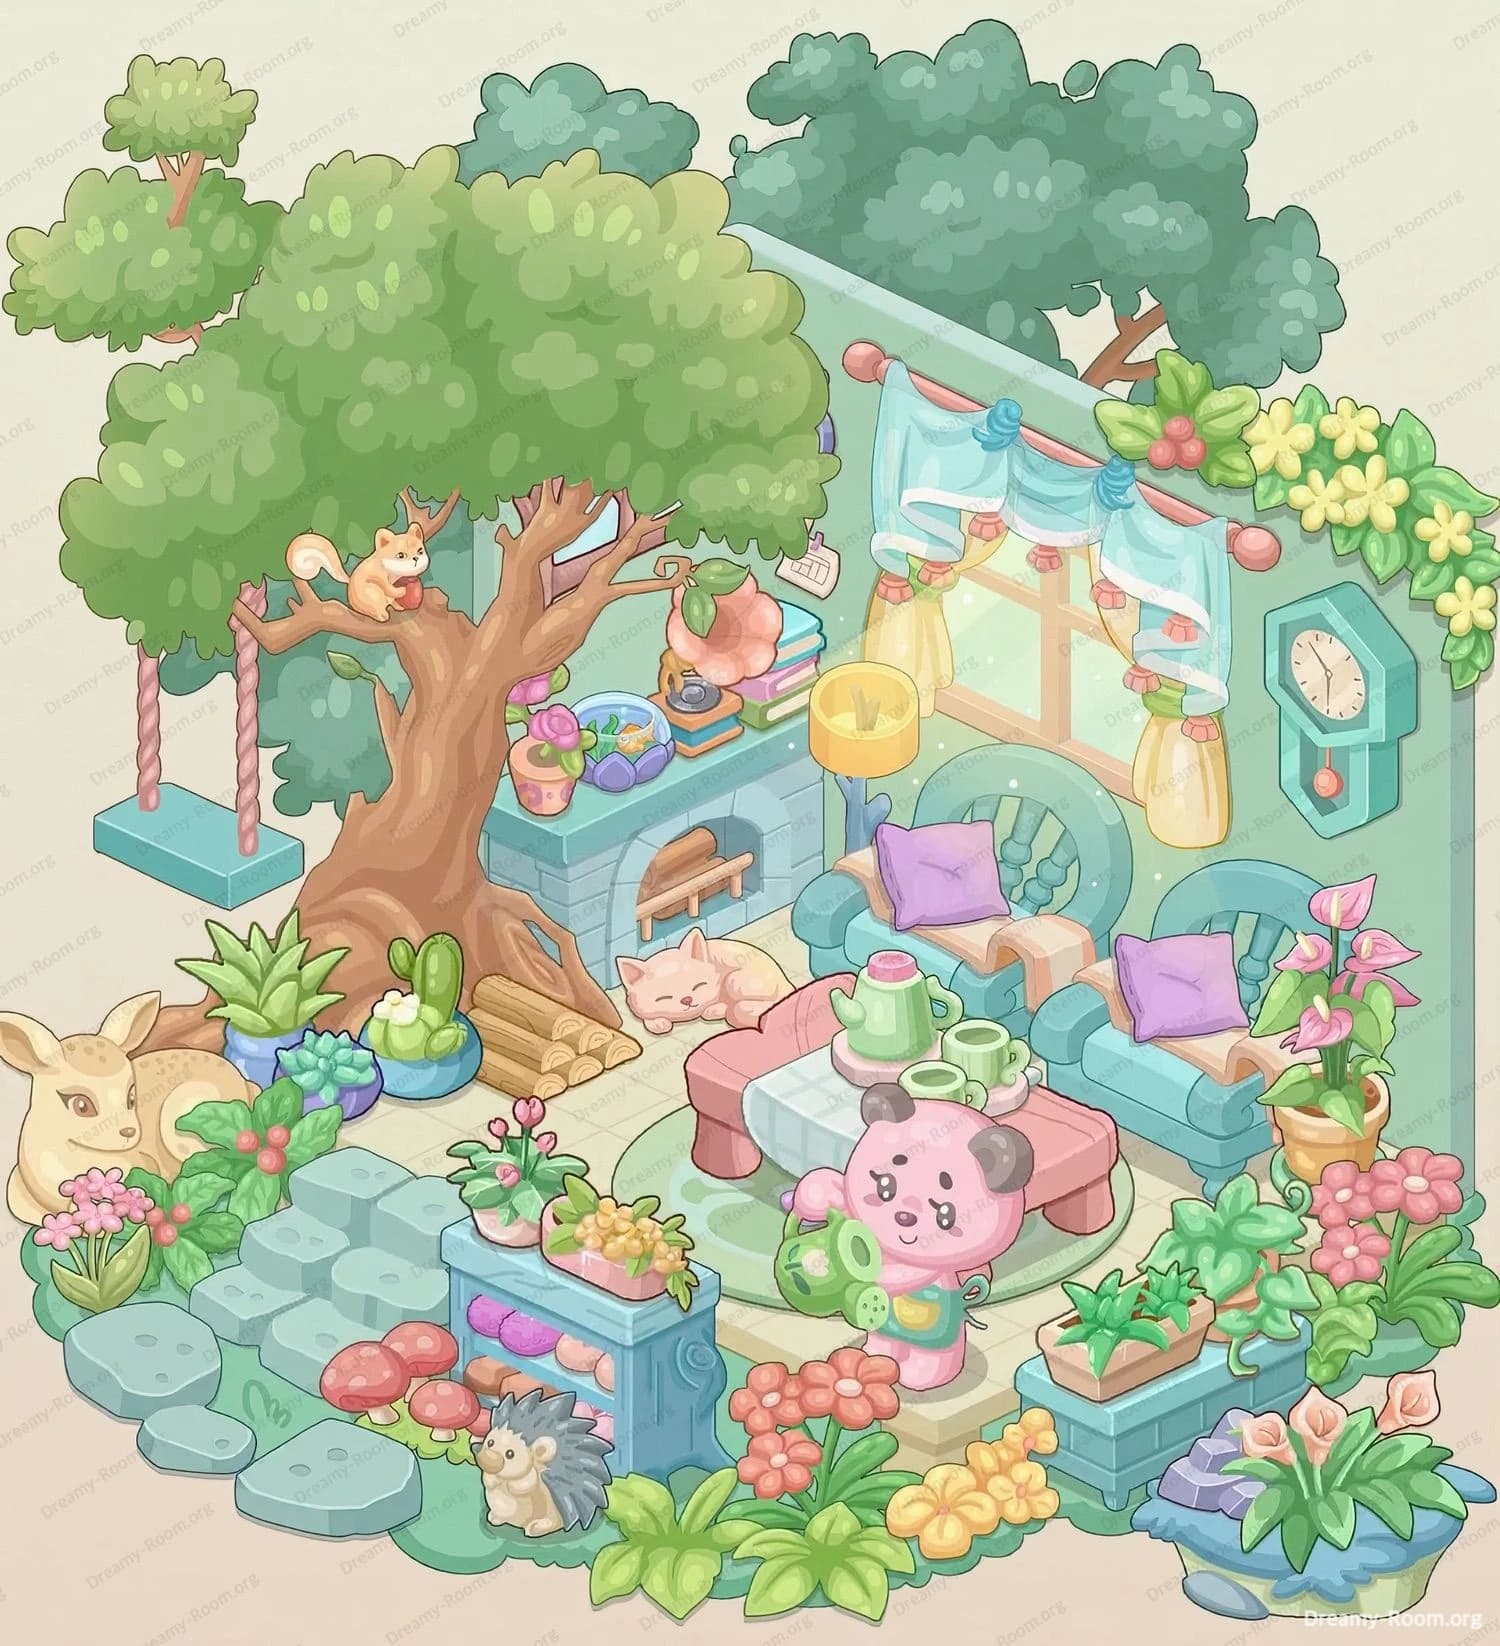
Step 1. Place the Big Tree in the Left Corner.
Start Dreamy Room Level 466 by anchoring the whole layout with the giant tree on the back-left edge of the platform. Snap the trunk so it grows from the floor just left of the central wall corner, slightly overlapping the wall’s base. The tree should lean to the left, with its foliage filling the upper-left quadrant of Dreamy Room Level 466. Attach the pink rope swing to the branch that reaches furthest left; the turquoise swing platform hovers off the platform’s edge, with its wooden seat hanging just below the leaves. On top of that turquoise platform, place the small round tree so it stands behind the swing ropes. Finally, add the orange squirrel sitting on the thick branch near the center of the canopy, facing right toward the room. This tree cluster defines the forest feeling of Dreamy Room Level 466.
Step 2. Place the Deer, Path, and Forest Floor Decorations in the Front-Left Area.
Next, shape the ground at the front-left of Dreamy Room Level 466. Lay down the curved blue stone path starting from the front edge, running upward toward the tree roots. The stones should form a loose arc that guides the eye into Dreamy Room Level 466. To the far left of the path, place the reclining cream deer, nestled on the grassy border and facing inward toward the room, ears perked. Around the deer, arrange dense greenery: large flat leaves behind it, smaller leafy tufts in front, and a bright pink flower cluster at its chest. On the inside edge of the stone path, drop several low green bushes so they hug the stones. This step is all about building a natural forest floor that frames later objects; if these tiles misalign, Dreamy Room Level 466 will feel cramped.
Step 3. Place the Hedgehog, Mushrooms, and Blue Display Cabinet at the Front Center.
Now move to the center-front of Dreamy Room Level 466. At the very front, where the stone path meets the platform lip, place the tiny grey-and-cream hedgehog facing slightly right. Just to its left and a little behind, add three red mushrooms with pale spots, growing beside the path. Right behind the hedgehog, drop the blue ornamental cabinet: it should sit squarely on the tiled platform, centered relative to the front edge. Ensure the sculpted swirl pattern faces forward. Inside the open shelf, line up the folded pink and purple towels so the colors alternate. On top of the cabinet, position the succulent planter overflowing with yellow, pink, and green rosettes that spill slightly over the edges. Tuck a few more flowers at the cabinet’s base to blend it into the plants. This focal point anchors the lower half of Dreamy Room Level 466 with color and detail.
Step 4. Place the Fireplace Wall, Shelf Items, Logs, and Sleeping Cat in the Middle-Back Area.
For the cozy core of Dreamy Room Level 466, focus on the wall and fireplace. Against the back wall, slightly right of the tree trunk, place the blue brick fireplace structure so its top is aligned with the window sill that you will add later. The arched firebox must sit just above floor level, with a neat bundle of logs inside and another log tucked into the horizontal slot in the middle. On top of this structure, line up the books, then the pink seashell lamp, and finally two small potted plants, progressing from left to right. Make sure they sit directly under the tree’s branches so the trunk seems to grow from behind the bricks. At floor level, in front of the right side of the fireplace, place the pale pink sleeping cat, curled up and facing slightly left. Add the small stack of cut logs at the tree’s base. This arrangement is crucial; it forms the story heart of Dreamy Room Level 466.
Step 5. Place the Sofa, Rug Area, Coffee Table, Tea Set, and Bear Character in the Center-Right.
Shift attention to the living area of Dreamy Room Level 466. Position the teal sofa along the right wall, its curved circular back centered under where the window will go. The sofa has two main seat cushions; place one on each side, then add the two purple square pillows, one on the left seat and one on the right. A pale yellow rectangular cushion rests near the right arm. In front of the sofa, leave one tile of space, then place the pink rectangular coffee table. On the table, set the green tea set: tray in the middle, teapot slightly left, two cups to the right. Now add the pink bear character with panda ears standing on the front step, just right of the coffee table, holding a green watering can facing the plants. Ensure the two pale yellow steps leading up to the sofa area are centered. This arrangement defines the social zone of Dreamy Room Level 466.
Step 6. Place the Window, Curtains, Lamps, Clock, and Flower Garland on the Back Wall.
To finish the architectural elements of Dreamy Room Level 466, decorate the back wall. Center the large window above the sofa’s circular back, making sure its wooden frame aligns vertically with the sofa’s middle. Attach the blue curtains: each side panel should hang down to just above the sofa arms, tied with yellow bands. The scalloped valance with pink trim runs across the top of the window. On either side of the window, hang the two drop-shaped yellow lamps at equal height, glowing over the sofa area in Dreamy Room Level 466. To the right of the right lamp, mount the turquoise wall clock with its white face and red pendulum in a small cutout. Finally, run the thick leafy garland along the top-right edge of the wall, packed with yellow star-shaped flowers and red berries that droop over the window frame. This step completes the vertical balance of Dreamy Room Level 466.
Step 7. Place the Front-Right Planters and Remaining Ground Plants.
Finish filling the floor of Dreamy Room Level 466 at the front-right. At the base of the right-hand steps, place the low turquoise block with the yellow flower cluster on top, making sure it sits directly in front of the bear. To the right of this block, place a dense mound of green foliage to bridge into the corner. On the far right front corner, set the purple-blue stone platform, then add the pot of pale pink lilies with large glossy leaves on top. Between the cabinet and the right planters, sprinkle extra green bushes and pink flowers to remove visible gaps. Tuck a few broad-leaf plants around the steps leading up to the sofa so the transition from garden to living room feels natural. When every patch of grass hosts either leaves, blooms, or stones, the floor pattern of Dreamy Room Level 466 is complete and visually cohesive.
Notes and Precautions
Because Dreamy Room Level 466 depends heavily on layering, always check whether an item should sit in front of or behind another piece before confirming placement. Misplacing the big tree or fireplace by even one tile can cause the squirrel, swing, or shelf items to overlap awkwardly, breaking the illusion of depth in Dreamy Room Level 466. Be careful with the stone path: if you extend it too far right, it will collide with the cabinet footprint and confuse the main focal line. The sofa must be perfectly centered under the window; otherwise, the curtains and lamps look crooked. When you place smaller objects like mushrooms, succulents, or hedgehog in Dreamy Room Level 466, zoom in to avoid accidentally snapping them to the wrong tile edge. Remember that the game rewards precision, not speed, so double-check each position before moving on.
Tips and Tricks from top player
One strong strategy in Dreamy Room Level 466 is to build from back to front and from large to small. Place the wall items, tree, fireplace, and sofa first, then layer foreground decor like the cabinet, hedgehog, and mushrooms. This prevents clutter and lets you read the silhouette of Dreamy Room Level 466 clearly. Another tip is to use color groups as guides: blue bricks, blue furniture, and blue stones create a visual zigzag; if that zigzag breaks, you know something is off. Top players also suggest placing all plants of one type temporarily along the bottom edge, then dragging them into their final spots so nothing gets forgotten. When stuck in Dreamy Room Level 466, compare symmetry: the deer on the left balances the lily planter on the right, and the hedgehog plus cabinet balance the bear plus yellow flower block.
Final Scene Description of Dreamy Room Level 466
When completed, Dreamy Room Level 466 becomes a tiny forest lounge bursting with life. The back wall and trees form a soft green canopy, with the giant tree, squirrel, and swing creating a playful left side. The blue brick fireplace and neatly stacked logs add homely warmth, watched over by the curled pink cat. At the center of Dreamy Room Level 466, the teal sofa, glowing yellow lamps, and flower-topped garland turn the window wall into a cozy backdrop. The pink coffee table and green tea set invite a quiet break while the pink bear waters plants at the steps. In the foreground, the blue cabinet, hedgehog, mushrooms, deer, and clustered flowers create a layered garden spilling over the platform edges. Balanced planters on the right complete the composition, making Dreamy Room Level 466 feel like a secret woodland living room where every object sits exactly in its perfect place.

