Dreamy Room Level 554
Dreamy Room Level 554 guide - Dreamy Room 554 Walkthrough & Solution.
Important Notice Regarding Level Numbering
Due to frequent changes in Dreamy Room's level numbering and differences between platforms (Android/iOS) – for example, level 554 on Android might not be the same as level 554 on iOS – the text guide below may not always match the images and video above. Please prioritize the image and video guides. If you find that the guide content doesn't match your current level, please visit the All Level Walkthroughs page to find the correct guide based on level images. Thank you for your understanding.
Dreamy Room Level 554 Walkthroughs & Guide
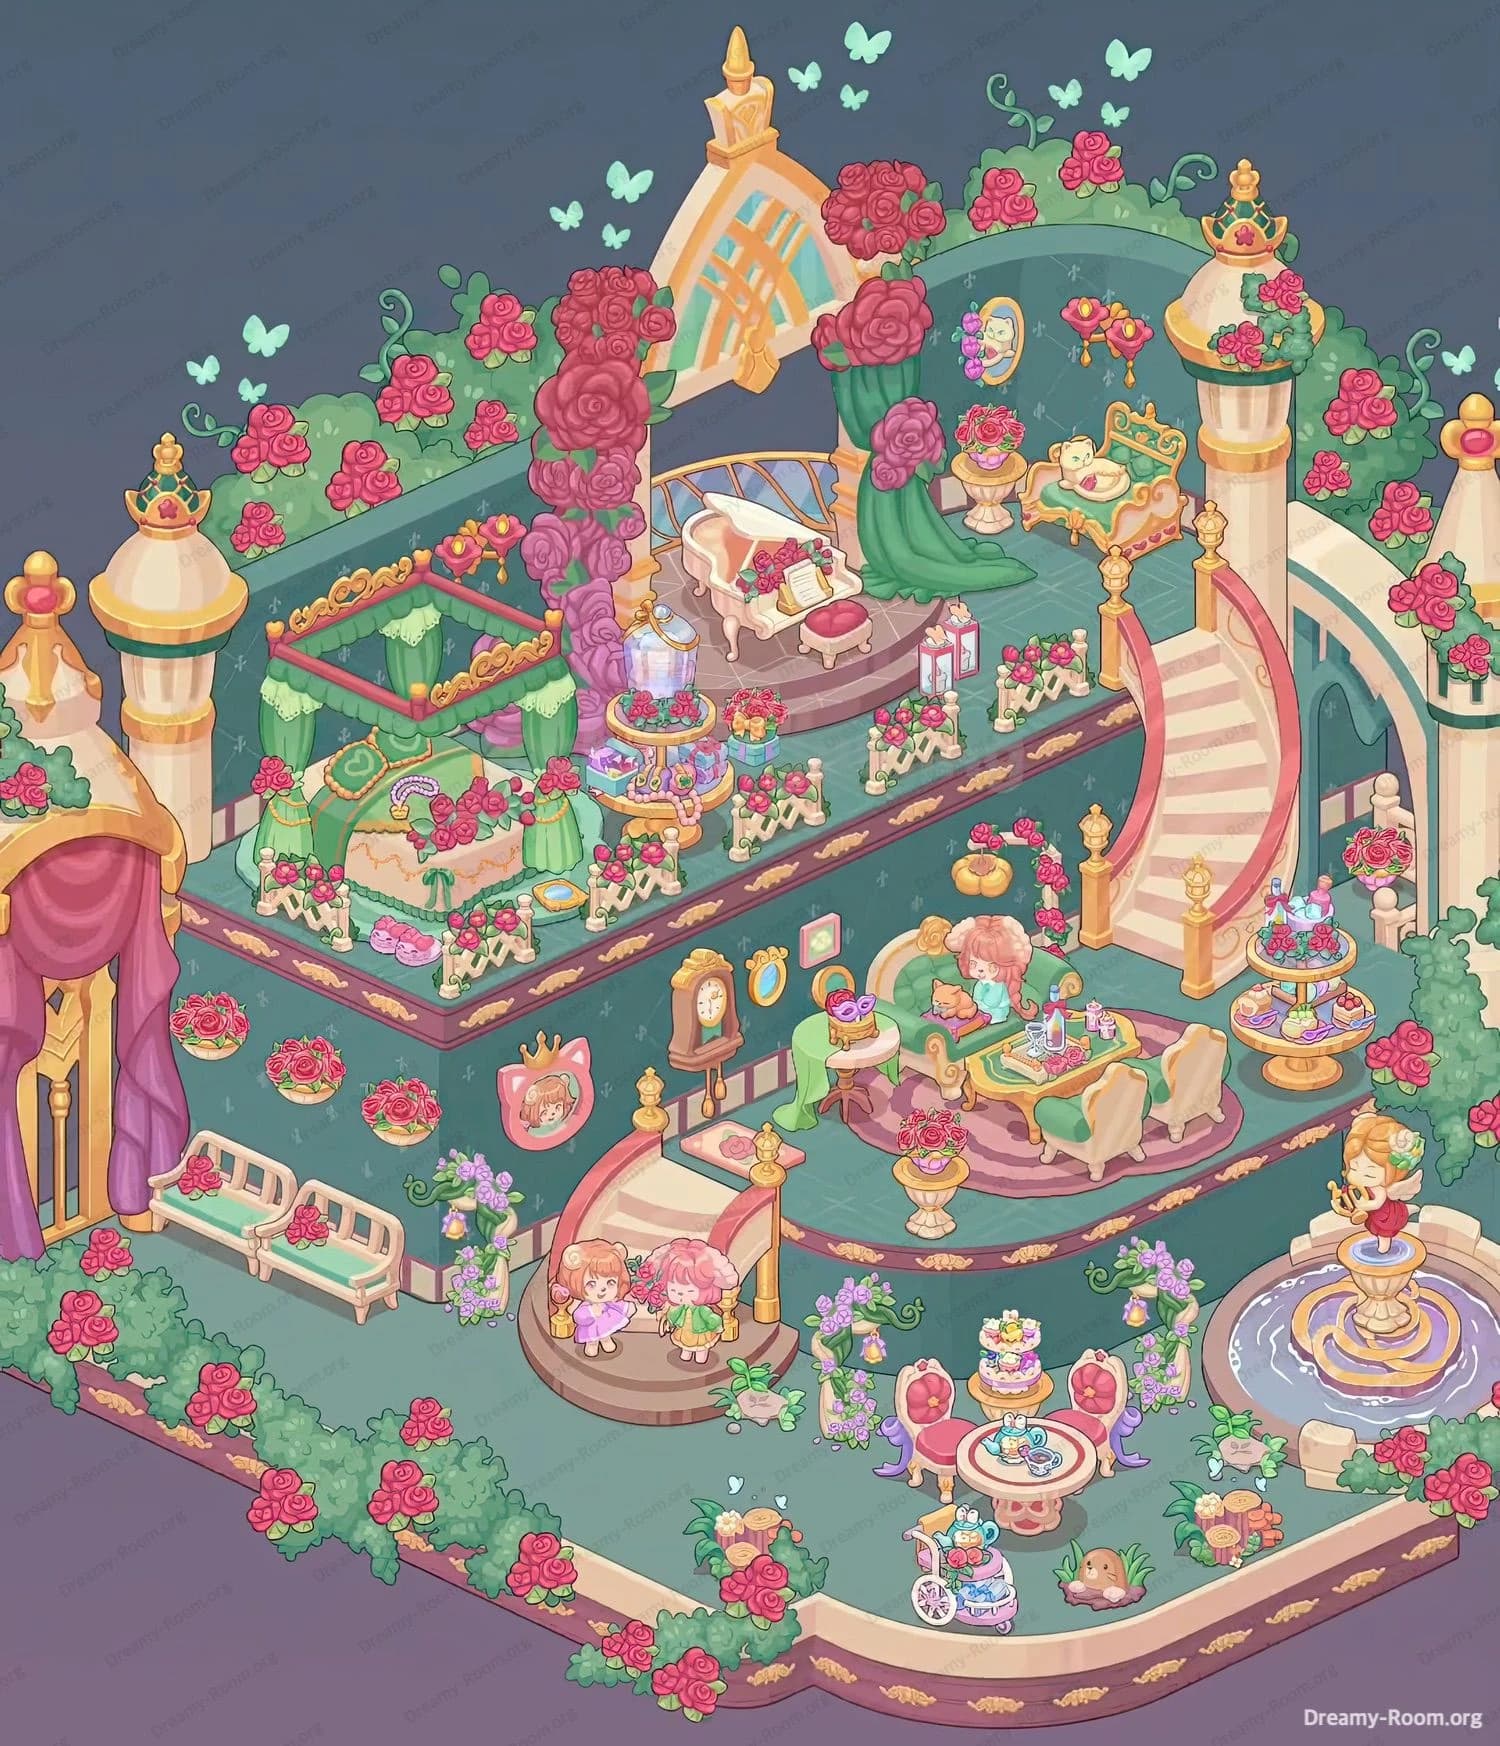
Step 1. Place the rose hedge border around the outer edge
Begin Dreamy Room Level 554 by framing the entire platform with the low rose-hedge border. Follow the contour of the teal base, snapping each hedge piece along the pink trim so the red roses and green foliage run in an unbroken loop. This floral border is the visual anchor of Dreamy Room Level 554 and sets the tone for the royal garden–party theme. Make sure no hedge piece slips onto the inner walking tiles; every segment must sit exactly on the outer rim. Leave gaps only where stairs, the fountain, and the stage already touch the edge. When the hedge is complete, you should see a continuous necklace of roses around the room, with small clusters in the front corners and along the left side, ready to support everything else you will place in Dreamy Room Level 554.
Step 2. Place the fountain and front tea-table in the lower right
Next, focus on the lower-right garden of Dreamy Room Level 554. In the front-right corner of the base, place the round stone fountain so its edge almost touches the rose hedge, but still sits fully on the teal floor. The golden cat statue should stand in the center of the fountain, facing slightly toward the middle of the room, with water jets circling around it. Just to the left of the fountain, position the round pink table with the multi-tier dessert tray; the table should sit one tile back from the front hedge so there’s a slim walking strip in front. Add the two ornate dining chairs opposite each other around this table, heart-shaped backs facing outward. A tiny animal cart and a small critter should sit just in front of this tea-table, between the table and the hedge, creating a cute foreground detail in Dreamy Room Level 554.
Step 3. Place the left benches and theater stage on the ground floor
Shift your attention to the left side of Dreamy Room Level 554. On the front-left corner of the base, place the pair of cream benches with green cushions. Align them side by side against the inner hedge so their backs face the outer wall and their seats look inward toward the room. Between the benches and the stairway area, insert small flower stands and wall-mounted rose wreaths along the edge to keep the floral theme consistent. Behind the benches, at the far-left rear of the base, place the tall golden theater arch with the purple curtains. The arch should sit snugly against the back wall, its base touching the hedge, with the curtains framing an implied stage that opens toward the middle of Dreamy Room Level 554. Ensure the left hedge pieces wrap around the stage base without overlapping. This whole section becomes the cozy spectator zone, balancing the busier right side of Dreamy Room Level 554.
Step 4. Place the central stairs, children, and flower columns
Now build the central circulation core of Dreamy Room Level 554. In the middle-front of the base, place the small circular platform with steps so that it slightly overlaps into the room but stays centered left–right. Attach the short staircase that leads up from this platform toward the mid-level walkway. On the front part of the circular platform, place the two small children characters side by side, facing toward the room’s interior as if greeting guests. Around the base of this platform, add potted purple flowers to frame the steps and bridge the height difference between the platform and the floor. Behind the circular platform and slightly right, position the tall flower columns so they line the staircase path. These columns should sit exactly on the edge of the upper platform, marking the entry into the more elevated area of Dreamy Room Level 554. The result is a clear visual path from the benches and tea-table up into the palace garden.
Step 5. Place the mid-level corridor, clock, portraits, and vanity dining area
Once the stairs are in place, complete the mid-level corridor of Dreamy Room Level 554. On the right of the staircase landing, place the curved golden railing that follows the edge of the raised walkway, decorated with roses. Just beyond the landing, against the inner wall, position the tall grandfather-style clock so that its face is clearly visible when viewed from the lower floor. To the left of the clock, hang the circular princess portrait and the cat-shaped framed portrait; they should sit slightly above the rail height, evenly spaced along the teal wall. On the right side of the mid-level, arrange the small sofa and table where the seated character is applying makeup or enjoying snacks. The sofa should back onto the inner wall, with the table directly in front of the character and small cosmetic or dessert items scattered on it. This entire mid-level sequence makes Dreamy Room Level 554 feel alive with daily rituals, framed by the floral railings on both sides.
Step 6. Place the left upper garden bed, cake pavilion, and gift area
Move up to the left section of the top floor in Dreamy Room Level 554. Directly above the theater and benches, place the square garden bed framed with golden bars and green drapes. It should sit close to the left outer wall, slightly inset from the rail so guests can walk in front of it. Inside this frame, place the plush cake-like bed or platform, decorated with pastel frosting edges and topped with rainbow accents. In front of the garden bed, toward the rail, position a small table bearing cakes and presents, ensuring the arrangement doesn’t block the walkway. Add low flower boxes along the rail in this area, each bursting with roses and greenery, so the view from below is filled with color. This left-top corner of Dreamy Room Level 554 becomes the sweet treat pavilion, mirroring the tea-party fountain zone below while staying visually distinct.
Step 7. Place the central crystal display, carousel desserts, and rose columns
At the center of the upper level of Dreamy Room Level 554, arrange the tall crystal display and dessert carousel. First, place the elegant, multi-tiered circular stand topped with a clear crystal dome on a sturdy pedestal, making sure it stands roughly above the midpoint of the lower staircase. The stand should be surrounded by small plates of sweets and sparkling decorations stacked vertically. Just to the right of this, add the large golden dessert tower with multiple trays of cakes and macarons, aligned parallel with the railing. Around both, place several rose-wrapped columns that connect floor to ceiling; they should sit along the outer edge of the top platform, framing the view. Make sure the railing continues as an unbroken line of posts and flower garlands, with only small gaps where stairs meet the upper level. This central cluster is vital: in Dreamy Room Level 554 it acts like the visual heart of the party, drawing the eye from every angle of the room.
Step 8. Place the piano, canopy, throne lounge, and butterflies on the right upper level
Finally, complete the luxurious right upper wing of Dreamy Room Level 554. On the raised central dais, place the white grand piano so that its keyboard faces left toward the desserts, with the open lid pointing backward. Slide the matching piano stool in front of it, and place the sheet music on the stand. Behind the piano, against the curved back wall beneath the golden roof, install the arched window piece with golden trim and green curtains sweeping outward. In front of the green curtain to the far right, place the golden lounge or daybed with plush cushions and a teddy bear, its back facing the wall and foot toward the staircase. Set the oval mirror on a pedestal next to the lounge, angled inward. Along the railing and on top of the tall corner towers, attach golden crowns and rose clusters. Finally, scatter the mint-colored butterflies in the air space above the top level, concentrated over the central roof. These finishing touches make Dreamy Room Level 554 feel like a royal conservatory in the sky.
Notes and Precautions
In Dreamy Room Level 554, precision of placement matters more than the order in which you drag items out of the boxes. Railings and hedge pieces are the easiest items to misalign, so always check they sit exactly on the edge tiles without overlapping walkways. Small decorations such as wall portraits, flower pots, and dessert plates can snap to multiple positions; verify that each one faces the main viewing angle rather than turning toward the edge. Characters should never block stairways or door-like gaps—if a guest or child stands directly in front of a step in Dreamy Room Level 554, you likely chose the wrong tile. Also watch the symmetry: the outer roses, central desserts, and right-side piano area should all feel balanced. If anything looks oddly empty or overly crowded, you probably skipped or misplaced an item and should re-check the surrounding tiles carefully.
Tips and Tricks from top player
Top players approach Dreamy Room Level 554 by zoning the room before touching any smaller items. They first establish the three main bands—ground-floor garden, mid-level corridor, and upper palace terrace—then subdivide each band into left, center, and right functions. This mental map makes it easier to know where a newly unpacked object should go: fountains and dining sets belong to the lower garden, formal décor like clocks and portraits to the mid corridor, and showpiece items like the piano and crystal displays to the upper terrace. Another useful trick in Dreamy Room Level 554 is to place characters late; since they can hide tile edges, leaving them until near the end lets you verify railing and hedge continuity. Finally, remember that Dreamy Room has no timer and encourages relaxed experimentation, so feel free to temporarily cluster objects while you search for the perfect tile rather than panicking about speed.
Final scene description
When Dreamy Room Level 554 is complete, the room becomes a glowing rose-covered sky palace. A ring of hedges and flowers frames the teal floor, leading your eye from the fountain and tea-table in the lower-right garden across to the cozy benches and theater stage on the lower left. The central staircase rises through columns of blossoms to a busy mid-level corridor where portraits, clocks, and a small vanity dining nook tell stories about the royal residents. Above, the left-side sweet pavilion, the central crystal and dessert displays, and the right-side piano terrace create a layered festival of music and treats. Crowns top the golden towers, butterflies drift above the roof, and every railing is wrapped in roses. The characters scattered around Dreamy Room Level 554—children on the steps, guests at the tables, and a pianist at the grand—make the scene feel like a lively celebration in a floating garden ballroom.