Dreamy Room Level 395
Dreamy Room Level 395 guide - Dreamy Room 395 Walkthrough & Solution.
Important Notice Regarding Level Numbering
Due to frequent changes in Dreamy Room's level numbering and differences between platforms (Android/iOS) – for example, level 395 on Android might not be the same as level 395 on iOS – the text guide below may not always match the images and video above. Please prioritize the image and video guides. If you find that the guide content doesn't match your current level, please visit the All Level Walkthroughs page to find the correct guide based on level images. Thank you for your understanding.
Dreamy Room Level 395 Walkthroughs & Guide
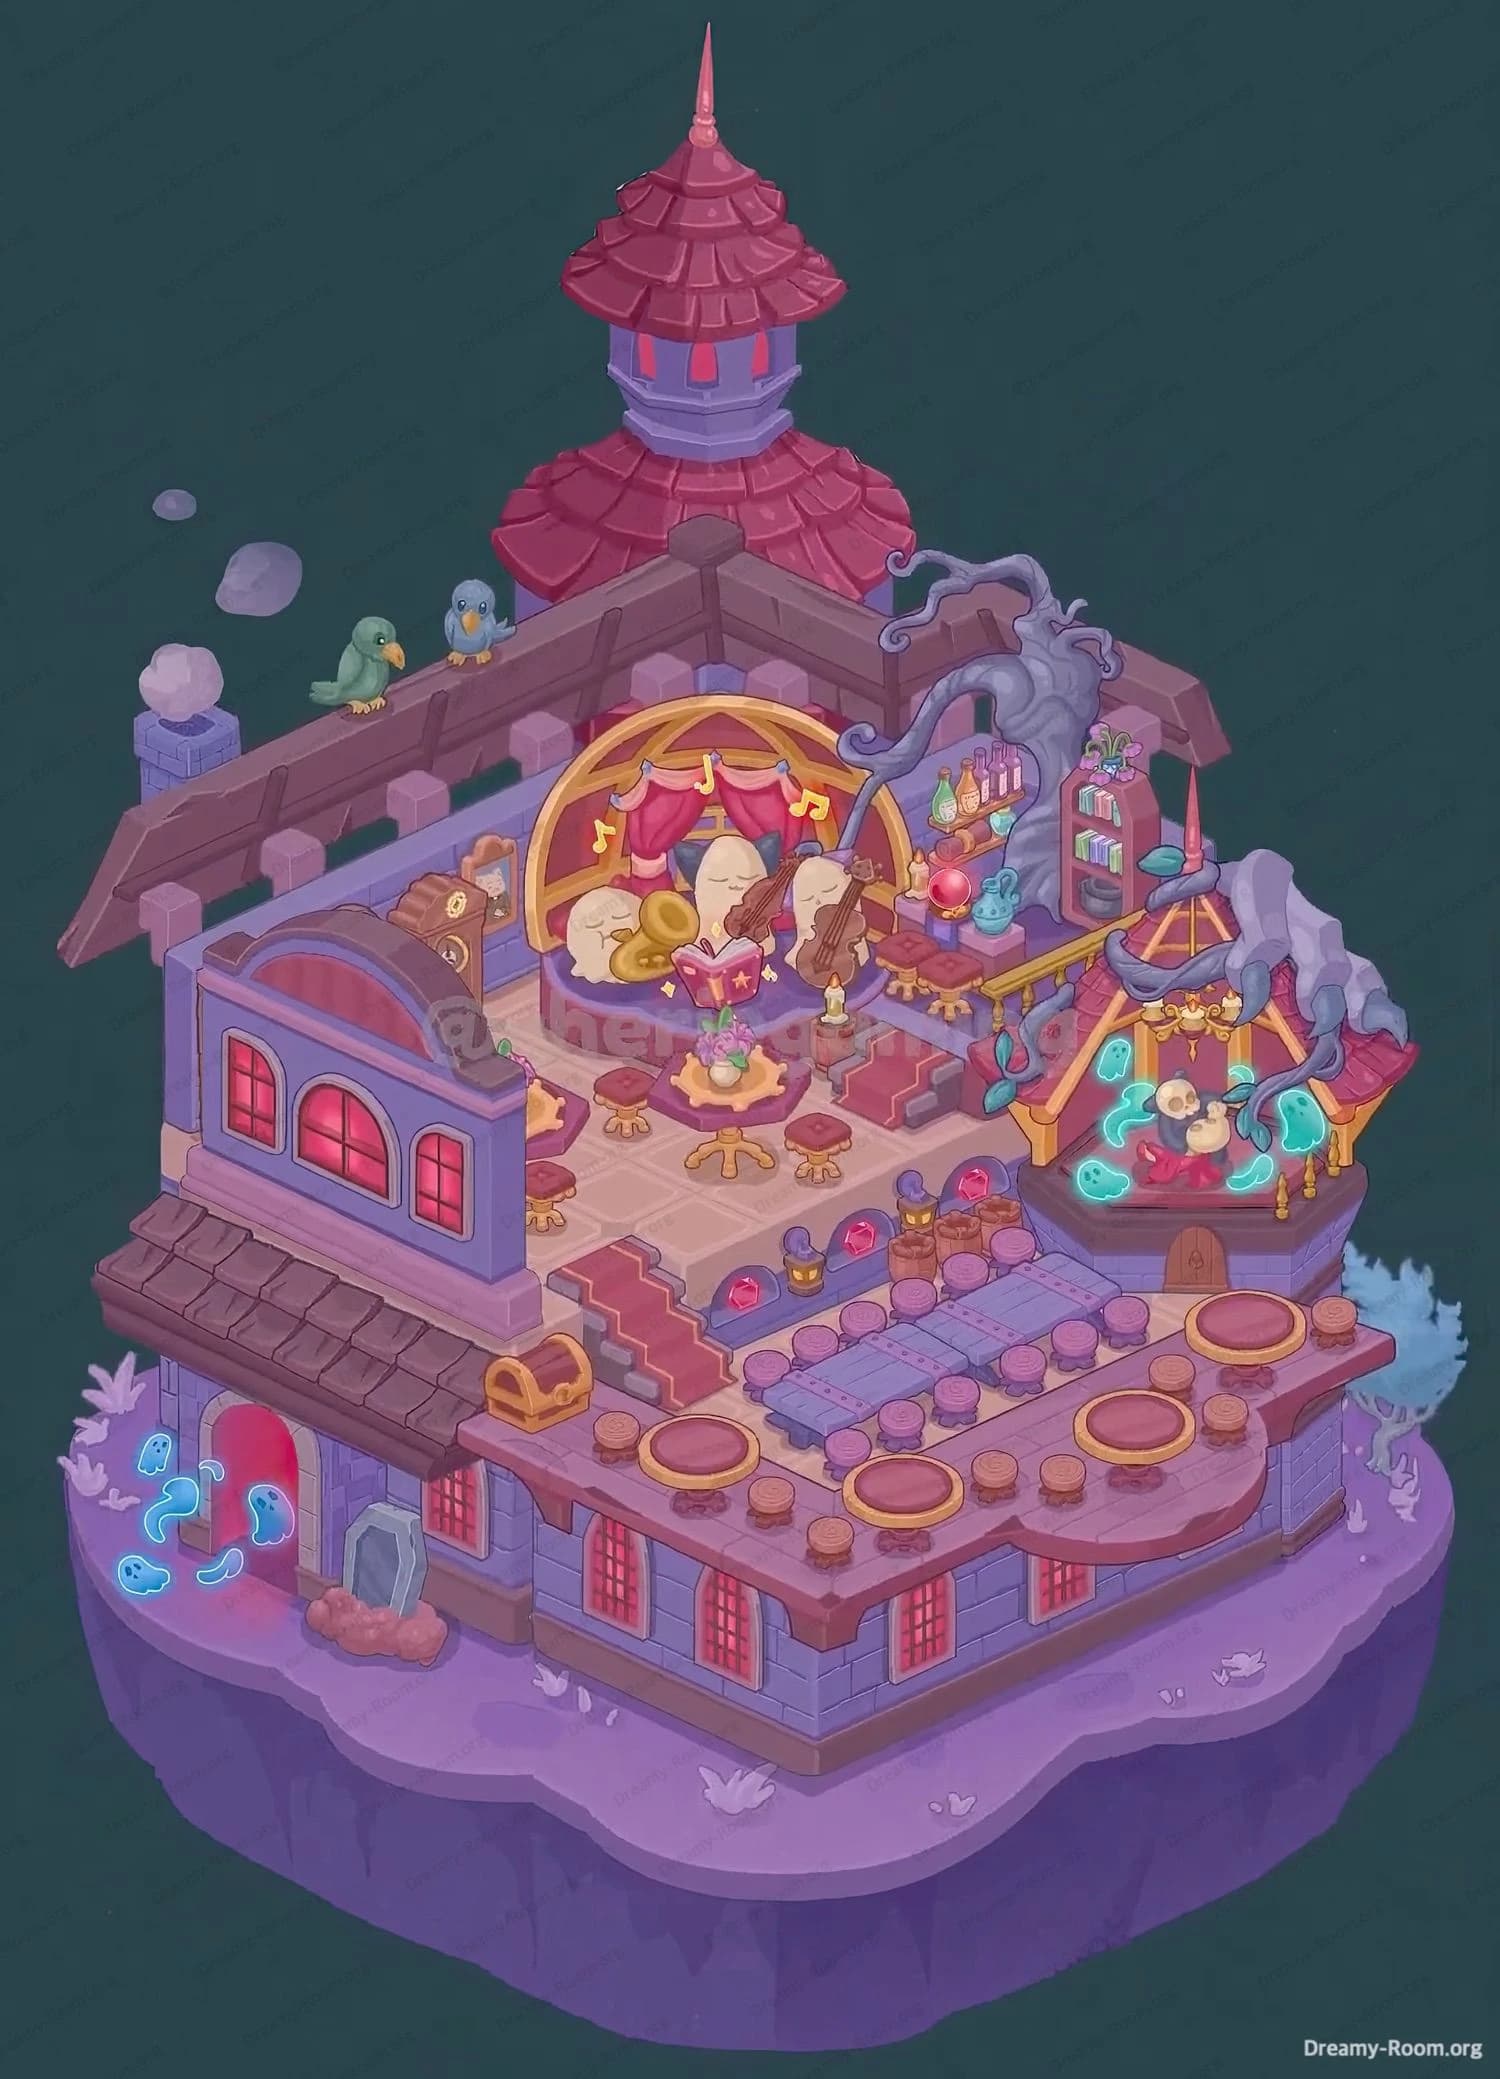
Step 1. Place the roofline and back fence along the rear edge
Begin Dreamy Room Level 395 by restoring the silhouette. Drag the dark brown roofline with chunky posts to the back edge of the upper platform so its angled ends align with the corner columns. This fence should sit just in front of the distant red round tower so the tower peeks above it. The spacing between the fence posts will later host birds, so ensure the top rail is level. Lock the fence before moving on—misaligned fencing will nudge later wall décor out of grid. Correct placement immediately establishes the depth cue that guides every other object in Dreamy Room Level 395.
Step 2. Build the left annex façade with red windows
Next, complete the left annex. Fit the two-story lavender façade with the arched pediment and three glowing red windows onto the lower-left ledge. The annex’s dark shingle awning must overhang the cliff slightly and touch the front cornice. A mail-chest/parcel box slots at the top of the short stair that climbs toward the main floor—make sure its latch faces right. Under the annex arch, leave room for the blue ghost door you’ll add later. In Dreamy Room Level 395, this annex anchors the sightline from foreground to midground; if you push it too far inward, the café seating won’t center under the stage.
Step 3. Install the moon-stage under the golden arch
Now set the heart of Dreamy Room Level 395: the crescent-moon band. Drop the golden halo arch with red velvet curtains against the center-back wall, slightly left of the midpoint. Seat the three sleepy moon characters so the tuba rests left, the open songbook with floating notes sits center, and the violin tilts right. Keep a one-tile gap behind the arch for the wall vines you’ll place later. The stage lip should not cross the step down to the long bench zone; it belongs on the upper floor. If the arch is flush to the fence, the birds won’t fit—maintain that slim interior spacing.
Step 4. Arrange café tables, stools, and the clock to the left of the stage
Furnish the listening area in Dreamy Room Level 395 with two small round tables and low three-leg stools. Place one table directly left-front of the stage, the second a little farther left toward the annex; each table carries a tiny vase with pink flowers. Tuck the grandfather clock between annex roofline and stage arch, angled to read from the seating area. Keep pathways clear: one vertical lane from the parcel box to the front row, and one diagonal lane to the lower bench zone. The circulation pattern is key—if stools block either lane, later ghost effects at the door feel cramped and the bar queue won’t read.
Step 5. Grow the twisting tree-bar and stock the shelves on the back-right wall
On the back-right wall, snap in the gnarled tree-trunk bar whose branches curl into the roof. Right beneath its boughs, hang the arched wall shelf with bottles, books, and a glowing red orb; the blue squid-shaped figurine sits on the right end of the shelf. A sideboard with candle goes on the counter below. This asymmetric, organic mass should hug the wall to frame the stage’s right flank without overshadowing it. In Dreamy Room Level 395, the tree’s top curl also sets up a rhythm that mirrors the golden arch on the left, balancing the composition and leaving a nook for the right shrine in the next step.
Step 6. Build the right shrine gazebo with spirits and bells
Attach the small octagonal shrine on the upper-right turret base: golden fascia, teal under-glow, and a tiny door at its lower edge. Inside the open gazebo, seat the two white spirit-orbs on a cushion; above them hangs a ring of little bells. The shrine roof connects to the tree-bar’s outer branches; ensure its golden posts align with the turret’s rim beads. This element in Dreamy Room Level 395 should sit slightly forward of the back wall so its glow spills over the steps down to the bench hall. If you push it back, the aura overlaps the bottle shelf and looks messy.
Step 7. Lay out the banquet bench hall, barrels, and crystal posts on the lower platform
Shift focus to the lower platform. Center the long pair of blue benches with round purple stools arrayed on both sides like a banquet line. Cap the near corners with two big round standing tables on the front cornice. A barrel parks just behind the benches, and a neat row of pink crystal lamps dots the step edge between upper and lower floors—alternate lamp, cap, lamp for a cadence of light. Dreamy Room Level 395 uses these crystals as a visual handrail; mis-spaced crystals break the staircase rhythm and confuse tile alignment when you add the ghost door and mirror next.
Step 8. Finish the front façade: balcony stools, round tables, and edge detailing
Along the rounded front balcony, place a ring of small wooden stools evenly spaced from left to right, stopping before the turret. Insert a third circular topper near the right curve to echo the two large rounds you set earlier. The balcony’s carved maroon cornice should remain fully visible; do not overlap it with benches or barrels. This front rim is the room’s smile—crowding it flattens the scene. Dreamy Room Level 395 rewards symmetry here: your left and right rounds should frame the central bench line without touching it, leaving a clean negative space down the middle.
Step 9. Populate life: birds on the fence and smoke at the far chimney
Perch two birds—a green one then a blue one—on the left run of the back fence, sitting just right of the small stone chimney that puffs a cottony cloud. The color order matters for visual balance with the red tower. These tiny accents bring motion to Dreamy Room Level 395 without clutter. Keep them on the top rail, separated by one post. If you seat them too close to the golden arch, their silhouettes merge with the curtain highlights and you lose that charming rooftop beat that leads the eye from annex to stage to shrine.
Step 10. Enchant the entrance: ghost door, mirror, and floor glow at the lower left
Return to the lower-left under the annex roof. Install the red-arched doorway that emanates three blue friendly ghosts drifting upward. Lean the silver standing mirror to the right of the door, resting on a small rock cushion. This trio completes the foreground story and ties into the spirit theme at the right shrine. In Dreamy Room Level 395, the ghost door must be tucked into the recess so its glow under-lights the annex wall without bleeding onto the main walkway. If you place it forward, the light clips the parcel box; if too deep, the ghosts collide with the window grid.
Notes and Precautions
- Grid awareness: Dreamy Room Level 395 uses a two-tier floor. Objects like the moon-stage, tree-bar, and shrine belong to the upper tier; benches, barrels, and round tables belong to the lower tier. Mixing tiers causes overlaps.
- Sightline lanes: Keep one clear lane from the parcel box through the café to the bench hall, and a second lane from the steps to the shrine.
- Edge safety: Front-rim stools must not overhang the cornice; if a stool snaps off-grid, nudge the balcony tables first, then reseat.
- Glow stacking: Spirit glows (door, shrine) can stack too brightly. If so, slightly separate the shrine from the bottle shelf and sink the door deeper under the annex.
- Rooftop spacing: Leave a slim gap between fence and golden arch for the birds; otherwise they auto-snap elsewhere.
Tips and Tricks from top player
- Anchor trio first: In Dreamy Room Level 395, place fence → annex → stage before any small props; these three anchors lock the parallax.
- Mirror as ruler: Drop the standing mirror temporarily to check vertical alignment—the mirror’s straight edge helps you keep benches centered.
- Crystal metronome: Count crystals as five beats along the step; if you see four or six, your benches are off by one tile.
- Color balance: If the right shrine glow overpowers the scene, rotate the candle on the sideboard to add a warm counter-light near the bottles.
- Birds last: Place rooftop birds at the very end so you don’t accidentally swipe them while arranging the golden arch and vines.
Final Scene Description
When Dreamy Room Level 395 is complete, the floating terrace becomes a whimsical night café. A dark fence frames the back, crowned by a distant red tower and two tiny birds. Center stage, three drowsy moon musicians perform beneath a golden arch and red curtains, serenading guests at two petite flowered tables while a stately clock keeps unhurried time. To the right, a twisted tree morphs into a bar lined with books, bottles, a ruby orb, and a blue figurine, leading to a glowing shrine where gentle spirits ring tiny bells. Below, twin blue benches and rows of stools create a communal hall edged with rosy crystals, flanked by round tabletops on the curving balcony. At the lower left, a red-arched door releases friendly blue ghosts beside a leaning mirror and parcel box. The room feels warm, musical, and perfectly placed—every object in Dreamy Room Level 395 finds its home.