Dreamy Room Level 379
Dreamy Room Level 379 guide - Dreamy Room 379 Walkthrough & Solution.
Important Notice Regarding Level Numbering
Due to frequent changes in Dreamy Room's level numbering and differences between platforms (Android/iOS) – for example, level 379 on Android might not be the same as level 379 on iOS – the text guide below may not always match the images and video above. Please prioritize the image and video guides. If you find that the guide content doesn't match your current level, please visit the All Level Walkthroughs page to find the correct guide based on level images. Thank you for your understanding.
Dreamy Room Level 379 Walkthroughs & Guide
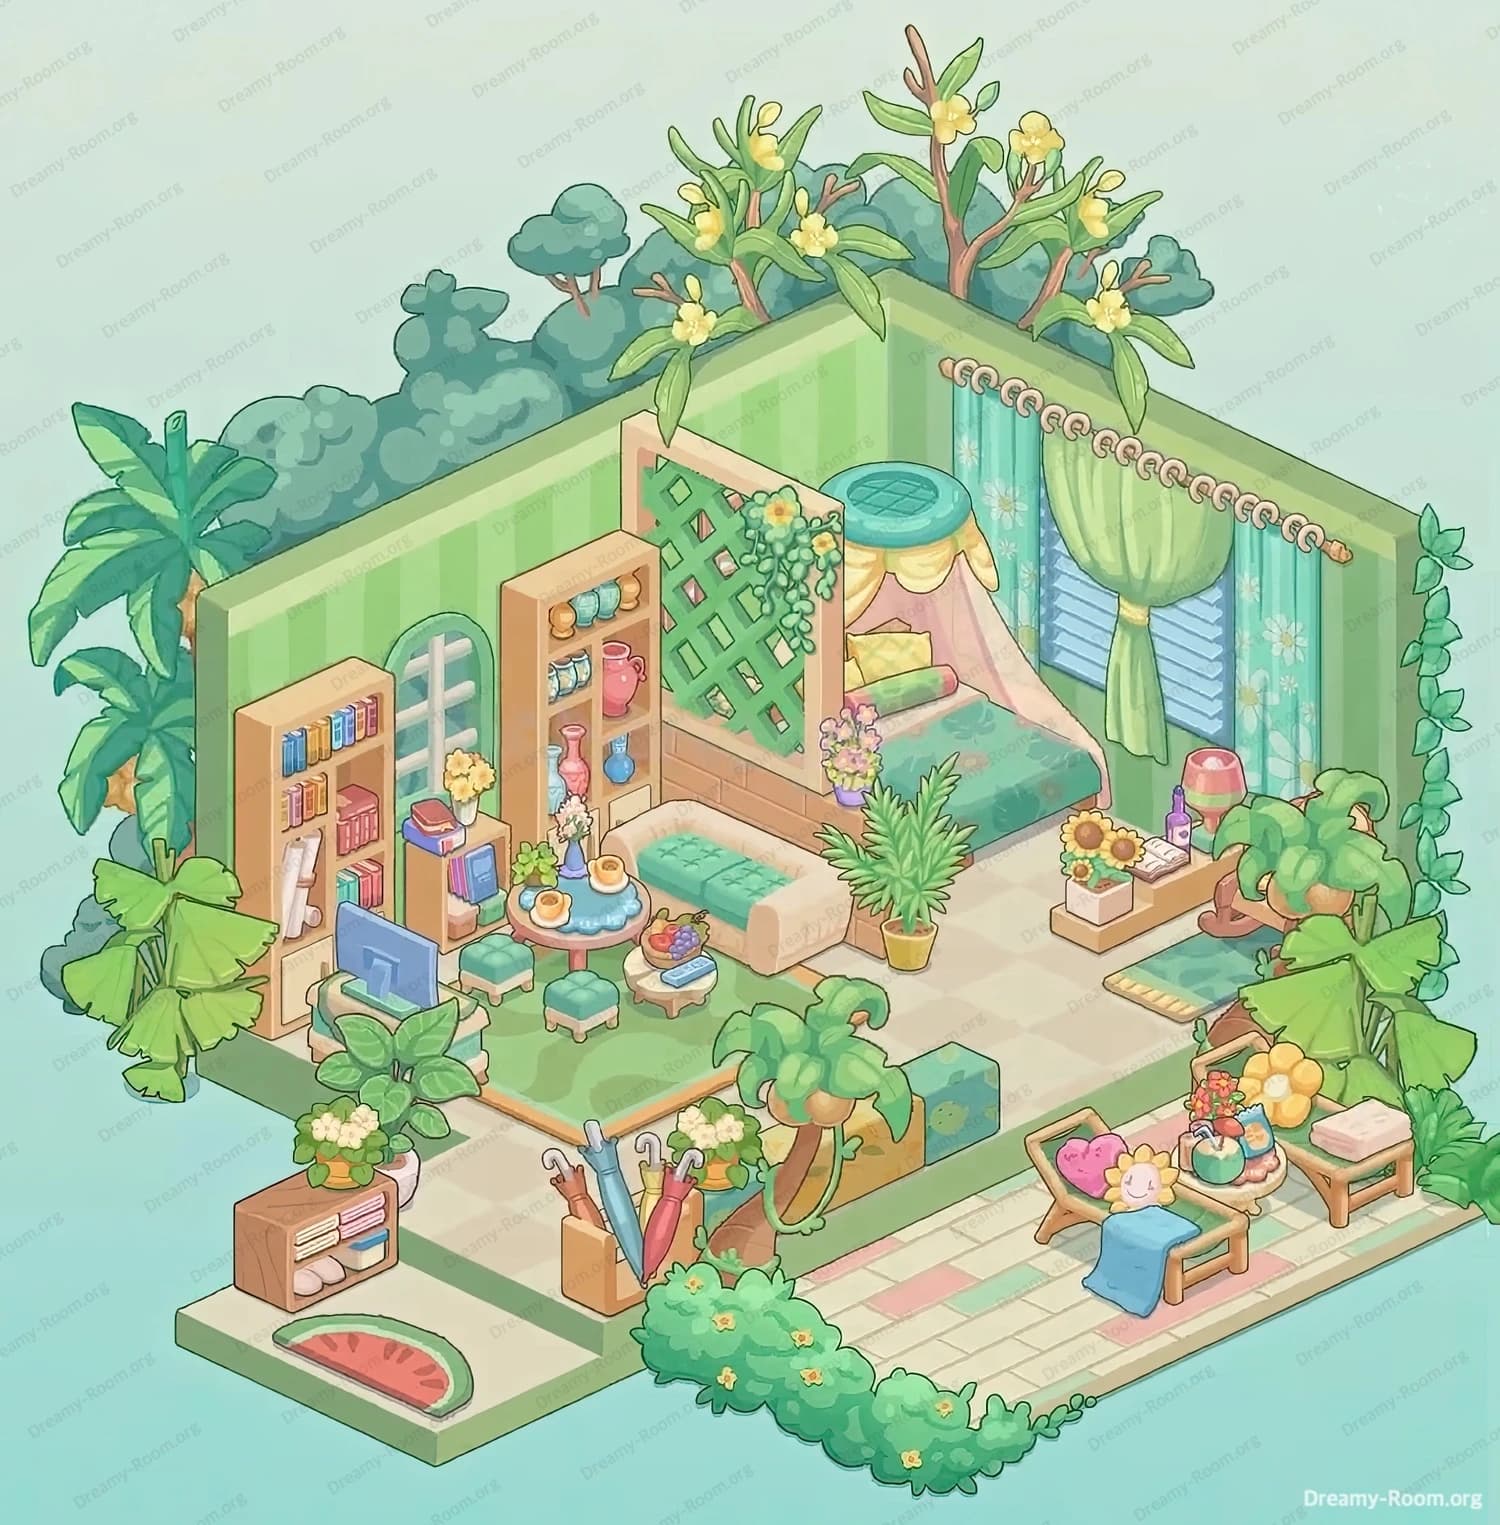
Step 1. Place the base floor plates and entry mat at the front-left entrance.
Begin by laying the main checkered floor on the raised platform and then place the lower step and the patterned outdoor tile in front. In Dreamy Room Level 379, the large pale checkerboard tile sits on the raised main platform; place it flush with the back and right walls. Next, place the single lower step tile centered on the left approach so the stair down aligns with the outside walkway. Finally, snap the long rectangular pastel-brick patterned mat (the outdoor patio tile) directly in front of that step, extending outward to the right, which becomes the patio area. In Dreamy Room Level 379, getting these base tiles correct first sets the scale for all furniture; if these are offset the sofa, chaise lounges, and umbrella stand will all look cramped. Place the watermelon slice mat on the small landing to the left of the entrance — this little accent belongs at the lower-left corner in Dreamy Room Level 379.
Step 2. Place the canopy bed and lattice divider in the back-right corner.
Now position the bed against the back-right wall: the canopy bed’s headboard should be flush with the wall and slightly inset from the corner so curtains can drape. In Dreamy Room Level 379 the round teal canopy top sits exactly above the headboard, and a soft green bedspread and patterned pillows finish the look. Place the wooden lattice divider directly in front of the bed’s left side (between bed and living area) so it reads as a partial room divider — the lattice in Dreamy Room Level 379 holds a hanging trailing plant on the top-left and a small potted bouquet attached to the divider’s right face. On the short ledge at the bed’s right, add the rectangular planter with sunflowers and the low side platform that hosts a pink bedside lamp and a small bottle; these items belong immediately to the bed’s right side in Dreamy Room Level 379. Correct placement of the lattice and bed defines the sleeping nook and separates it cleanly from the lounge area.
Step 3. Install the curtains and window assembly on the right wall by the bed.
Place the window shutters and the curtain rod centered on the right wall, with the long green floral curtains tied back to the left so the window opens toward the center of the room. In Dreamy Room Level 379 the curtain tie-back sits slightly above the bedside platform and the patterned drape almost kisses the floor tile — position it so the curtain rings sit on the decorative rod with the same spacing as in the final image. Add the short rectangular rug in front of the bedside (the pale green runner) so it lines up with the bed’s right side. The lamp and a tiny tray with a phone or a book live on the low platform next to the bed; placing these items correctly completes the right-wall vignette for Dreamy Room Level 379, making the sleeping area feel lived-in.
Step 4. Build the living area: sofa, coffee table, stools, and TV on the left-center.
Place the L-shaped cream sofa with the turquoise cushion against the central-left area, hugging the inner corner formed by the lattice divider. In Dreamy Room Level 379 the sofa faces a small low TV table: put the flat blue-screen TV on the low cabinet just left of the sofa, aligned so it’s visible from both the sofa and the small round coffee table. Center the round coffee table in front of the sofa and arrange three tiny square stools around it — add the blue teapot, two cups, and a small fruit plate onto the table in Dreamy Room Level 379. Place the plush green rug so it sits beneath the sofa and table, with its front edge running parallel to the raised platform’s front edge. Add the small tufted ottoman (teal) near the sofa’s corner; these pieces together create the primary social cluster in Dreamy Room Level 379.
Step 5. Populate the left wall with bookcases, shelves, and decorative vases.
Along the left wall of the raised platform, place the two tall wooden bookcases and a narrower shelf with the small arched window between them. In Dreamy Room Level 379 the leftmost bookcase sits nearest the corner and holds stacks of books and small knickknacks; the arched white-framed window is centered between the stacked shelves and the larger shelving unit. Add colorful vases, rolled textiles, and a few pottery pieces on the shelf directly adjacent to the lattice, and drop a small stack of books with a yellow flower vase on the lower shelf facing the sofa. Put a low cubby with slippers and folded items at the entrance landing — this is the short cabinet with a watermelon rug to its left in Dreamy Room Level 379. The bookshelves anchor the left side and visually balance the bed on the right.
Step 6. Stage the entrance and patio furniture on the outdoor tile to the right of the step.
Now move to the patio: on the long rectangular patterned tile (the patio mat) place two low wooden chaise lounges side-by-side near the tile’s right edge. In Dreamy Room Level 379 the chaise nearest the viewer holds a blue towel and two decorative pillows — a pink heart pillow and a yellow sun pillow — while the other chaise supports a fruit bowl and a vase of flowers on a small side table between them. Place the small green low planter and the potted shrub at the patio’s inner edge (near the raised platform) so the garden hedge visually spills across the front. Add the umbrella stand and place three umbrellas (blue, pink, and red) upright beside the step’s inner corner — in Dreamy Room Level 379 this umbrella cluster sits to the left of the patio, near the front-left platform edge. These outdoor pieces turn the patio into a perfect lounging nook.
Step 7. Add large plants and greenery: palms, potted ferns, and vines on the walls.
Scatter the major plants now: a tall palm goes behind the left corner outside the wall, its fronds peeking above the wall in Dreamy Room Level 379. Place a medium potted fern to the immediate right of the sofa, and a medium-sized leafy plant between the sofa and the bed divider. Attach the climbing vine to the right exterior wall so it grows vertically along that seam — in Dreamy Room Level 379 the vine anchors the room’s verticality. Arrange the bushy low hedge across the front edge of the raised platform; place a potted flowery shrub near the entrance to soften the step. Don’t forget the large flowering branches that appear to overhang the back wall — these big bloom clusters are visible above the back wall and should be tucked behind the corner where the bed sits in Dreamy Room Level 379. Plants finish the room and make placements feel natural instead of staged.
Step 8. Finish with small accents: vases, lamps, rugs, books, and decorative boxes.
Finally, add the remaining accents: the small square green rug in front of the sofa, the tiny decorative boxes on the low green chest near the sofa, and the stack of books with the small blue stool beside the TV in Dreamy Room Level 379. Place the pink bedside lamp on the bed’s right platform and the small bottle beside it. Put the sunflower box on the low shelf by the bed’s foot and the pale rectangular footstool near the bed’s left. Add the tiny desktop items, a bowl of fruit on the coffee table, and a stack of magazines on the patio side table. In Dreamy Room Level 379 the last touches — a couple of rolled towels on the chaise, a small cushion on the ottoman, and the final vase on the bookshelf — tie the whole composition together; double-check alignments and orientation so walkways remain clear.
Notes and Precautions
- Placement order matters in Dreamy Room Level 379: start with floors, then large furniture (bed, sofa), then medium pieces (shelves, tables), and finish with small accents and plants. In Dreamy Room Level 379 misplacing a base item can force you to re-jigger many objects.
- When rotating pieces, avoid clipping into walls: in Dreamy Room Level 379 the canopy and lattice must be slightly inset from the walls so curtains and hanging plants have space.
- Keep the entrance path clear. In Dreamy Room Level 379, umbrellas and the low cabinet at the door should not block the step — test walking animations if available.
- If an item snaps awkwardly, remove nearby small items first. In Dreamy Room Level 379 tiny stools or vases often prevent a larger item from aligning; remove and re-place in sequence.
- Save frequently while building. Dreamy Room Level 379 rewards careful adjustments — save checkpoints after major build stages so you can revert if placement looks off.
Tips and Tricks from top player
- Anchor repeatedly: when working in Dreamy Room Level 379, use the bed and sofa as anchor points for the left and right zones. Once anchors are correct, align everything else against them.
- Use a grid approach: think in thirds of the raised platform. In Dreamy Room Level 379 this helps you place the coffee table, ottoman, and TV so they read as a cluster.
- Group similar items: in Dreamy Room Level 379, keep books and vases grouped on one shelf and decorative pillows together on chaises to avoid visual clutter.
- Micro-adjust frequently. Small nudges (1–2 pixels or small increments) in Dreamy Room Level 379 can be the difference between a perfect visual and a crowded look.
- Prioritize walkable space: test the character path around your layout in Dreamy Room Level 379 early. If the path is blocked, reorganize the ottoman and side tables first.
- If a snap feels wrong, toggle rotation: in Dreamy Room Level 379 sometimes rotating 90° then back re-syncs the snap grid and solves misalignments.
Final Scene
The finished Dreamy Room Level 379 presents a soft green sanctuary where every object claims its place with gentle purpose. The canopy bed hugs the back-right corner beneath floral curtains and a lattice divider, while sunflowers sit on a low platform beside the bedside lamp. To the left, a cozy sofa and green rug frame a round tea table surrounded by tiny stools and a blue-screen TV; stacked books and colorful vases line the tall wooden shelving at the far-left wall. A palm and potted ferns breathe life into the corners, and a climbing vine runs up the right wall, visually linking interior and exterior. Outside, the pastel brick patio hosts two chaise lounges with towels, pillows, and a flowered side table, while an umbrella stand and a watermelon mat mark the entrance. Subtle accents — cushions, magazines, jars, and a fruit bowl — complete the composition, proving the core of Dreamy Room Level 379 is deliberate placement and warm, nostalgic detail.