Dreamy Room Level 378
Dreamy Room Level 378 guide - Dreamy Room 378 Walkthrough & Solution.
Important Notice Regarding Level Numbering
Due to frequent changes in Dreamy Room's level numbering and differences between platforms (Android/iOS) – for example, level 378 on Android might not be the same as level 378 on iOS – the text guide below may not always match the images and video above. Please prioritize the image and video guides. If you find that the guide content doesn't match your current level, please visit the All Level Walkthroughs page to find the correct guide based on level images. Thank you for your understanding.
Dreamy Room Level 378 Walkthroughs & Guide
Step 1. Place the tiled floor and foundation in the center of the scene.
Start by placing the large brown tiled floor square centrally on the lower level: this is the base that anchors every object in Dreamy Room Level 378. The floor should sit flush with the room’s left and right inner walls and extend toward the front edge; its tiles create the grid you’ll use for precise placements. In Dreamy Room Level 378, placing the floor first matters because many objects snap to floor tiles — if you shift the floor later you’ll have to nudge several items. After the large floor is set, place the small raised side platform (the purple tiled alcove on the right wall) at the mid-height of the right wall; this raised tile should be centered inside the alcove recess and aligned with the back-right wall. Confirm both the floor and platform are perfectly centered before proceeding — Dreamy Room Level 378 will reward careful alignment with correct visual overlap and collision detection. This foundation step is fundamental: without it, the two-story layout and balcony will feel off in Dreamy Room Level 378.
Step 2. Erect the purple walls, gold corner trims, and the book spine.
With the foundation fixed, place the two purple wall panels that form the book’s interior: one along the left rear and one along the right rear, meeting at the middle vertical seam (the white book spine). Add the gold corner trim pieces at the top and bottom corners to match the book-cover hardware seen in Dreamy Room Level 378. Make sure the vertical white spine piece sits precisely in the center seam — it visually divides the two floors and acts as an anchor for the upper balcony railing later. In Dreamy Room Level 378, accurate wall placement affects where wall-mounted sconces and the upper window will snap; misaligned walls will prevent wall items from correctly attaching. After walls are placed, preview from isometric view and ensure walls rise just above the upper floor level so the balcony and top-level furniture will be framed by the open book cover exactly as in the completed image. The book-structure is key to the scene’s silhouette in Dreamy Room Level 378.
Step 3. Install the upper balcony platform and the wooden railing (center-right).
Next, place the L-shaped upper balcony platform that sits on the right side of the room at the midpoint height — this is the second-floor walkway in Dreamy Room Level 378. Position it so the balcony overhangs the lower level by one tile and lines up with the alcove platform on the right wall. Then add the wooden railing along the balcony’s outer edge; the railing should run across the front edge of the upper platform and curve slightly at the corner to match the finished layout. In Dreamy Room Level 378, the balcony anchors many top-level items (the cauldron, the desk, stacks of books), so it's critical the railing is placed before adding those pieces. Check the railing’s joins against the central spine and the right wall — if the railing is shifted, the cauldron’s glow and the wizard cat’s position will not match the reference image for Dreamy Room Level 378.
Step 4. Furnish the upper-left workshop: potion shelf, chests, and the small workbench.
On the upper-left section of the balcony, place the tall shelf full of colorful potion bottles against the left upper wall. Arrange the small treasure chests and wrapped boxes on the shelf and floor beside it, staggered in height for visual depth. Add a compact workbench near the shelf’s front edge and set a tiny open box and scroll on it. Put a red-hatted helper cat peeking around the left corner shelf (the red hat character sits on the balcony left side facing slightly inward). These upper-left elements must be clustered in the same pattern as the reference to unlock the decoration combo in Dreamy Room Level 378. Place a wall banner and a small framed token on the left upper wall above the shelf; ensure the banners’ top knobs attach to the wall trim. In Dreamy Room Level 378, the puzzle logic often checks relative offsets between items on the same shelf — keep potion bottles grouped and chests stacked to the left side exactly as shown.
Step 5. Set the upper-center magic station: wizard cat, glowing cauldron, desk, and window.
Center stage on the upper balcony is the magic station. Place the small yellow-hat wizard cat directly in front-center of the balcony platform so it faces the cauldron. Position the cauldron slightly to the right of the wizard cat toward the balcony edge; the cauldron must sit on the balcony tile and emit a faint green glow (add the glowing fish/frog prop inside the cauldron if available). To the far right along the back wall, place the wooden desk with an open spellbook, stacked purple books, a purple crystal globe, and a candle on its corners; align the desk under the window so moonlight appears to fall on the pages. Add two wall sconces and a tall window behind the desk; the window sits in the right upper back wall and should be centered above the desk stack. These items are the heart of Dreamy Room Level 378—their relative placement signals the completion of the top-floor narrative scene. Make sure the glittering star particles around the wizard cat are active; they help the level’s animation trigger in Dreamy Room Level 378.
Step 6. Compose the lower-left lounge: drippy couch, lucky cat, tea table, and mushroom lamp.
On the lower floor, place the purple drippy couch (with the oozing textile) in the front-left quadrant, angled slightly so the couch’s longer side faces the center table. Place the small green lucky cat figure sitting on the couch’s cushion, with two orange pumpkin pillows nearby. In front of the couch, set the low coffee table and populate it with the tea set: teapot, cups, and a small saucer. Add a round purple rug beneath these pieces so the couch and table sit as a cluster. To the far left near the wall, place the teal mushroom lamp on a short pedestal and a hanging pastel dress or wardrobe piece on the left wall. These lower-left placements are critical — Dreamy Room Level 378 recognizes the cozy cluster arrangement and rewards well-balanced spacing. Keep a small wizard hat and an open book on the floor near the rug’s front edge to match the reference composition.
Step 7. Arrange the lower-right hearth: fireplace, pumpkin plant, maneki-neko, pouf, and stacked boxes.
Finish the lower-right area by placing the stone fireplace against the back-right lower wall, ensuring the fire animation faces forward. To the fireplace’s left, add stacked boxes and rolled scroll bundles near the back center; these create the storage pile seen in the reference. On the fireplace’s right, position a smiling pumpkin-plant in a pot so it peeks toward the room center. Add the red-orange pouf in the front-right corner and set the black curled-up cat on top of it. Place the white maneki-neko character holding the oversized toy cleaver to the left of the pouf but in front of the fireplace — this oddball figure anchors the right-lower composition in Dreamy Room Level 378. Make sure all fireplace and pumpkin decorations are slightly inset so their shadows fall naturally on the floor; Dreamy Room Level 378 checks correct shadow alignment for some achievement unlocks.
Step 8. Top cover and tiny finishing touches: skeletal hands, small props, and lighting.
Finally, add the dramatic book-cover details and small props: the two large skeletal hands should be placed gripping the top edge of the open book (one at left, one at right) so they drape over the pages. Scatter tiny potion bottles, extra scrolls, a small wand, and a crystal orb on available surfaces (shelf corners, desk edge, floor nooks). Place the wizard hat and small open storybook near the front-floor edge, and add little candles on wall sconces at upper center. Check the particle and light effects: the cauldron glow, fireplace warmth, and scattered candlelight should all be active. These finishing touches complete the layered composition and are essential to achieving the exact look of Dreamy Room Level 378. Once everything is placed, zoom out and confirm that no two objects overlap incorrectly; slight nudges will correct collision issues the game flags for Dreamy Room Level 378.
Notes and Precautions
- Placement order matters in Dreamy Room Level 378: foundation → walls → balcony → major furniture → small props. If you place tiny props before larger anchors, they may snap to wrong coordinates.
- Watch collision and snap feedback: objects that appear to “pop out” are usually misaligned by half a tile. In Dreamy Room Level 378, correcting these by nudging 1–2 grid units fixes many visual glitches.
- Lighting cues are important: the game sometimes validates lighting (cauldron glow, fireplace flame, candle flicker) as part of the puzzle, so ensure those props have their animated effects enabled in Dreamy Room Level 378.
- Keep backups: if the game lets you save or preview, save a snapshot before you place dozens of small items. Reverting is easier than removing many tiny items in Dreamy Room Level 378.
- Respect theme groupings: clustered sets (potion shelf, tea set cluster, fireplace/pumpkin group) often grant combo points in Dreamy Room Level 378 — don’t scatter pieces randomly.
Tips and Tricks from top player
- Use the grid: toggle any placement grid or snap-assist in Dreamy Room Level 378 to line up rails, shelves, and the spine; top players place the balcony rail first to get perfect perspective.
- Group by anchor rules: place all floor-anchored items, then wall-anchored items, then floating/overlay items in Dreamy Room Level 378 — this prevents reflow when you add the next layer.
- Work from back to front: set back walls and large background furniture first (desk, shelf, fireplace) then layer forward decorations like the couch, table, and pouf; this is the fastest method used by expert Dreamy Room Level 378 players.
- Preserve visual pathways: leave small walking gaps between large clusters so the scene reads clearly in isometric view. In Dreamy Room Level 378, cluttered clusters often fail aesthetic checks.
- Use symmetry hints: the book’s spine is your vertical axis; mirror accents slightly left-to-right so the skeletal hands and top trims look balanced in Dreamy Room Level 378.
Final scene description
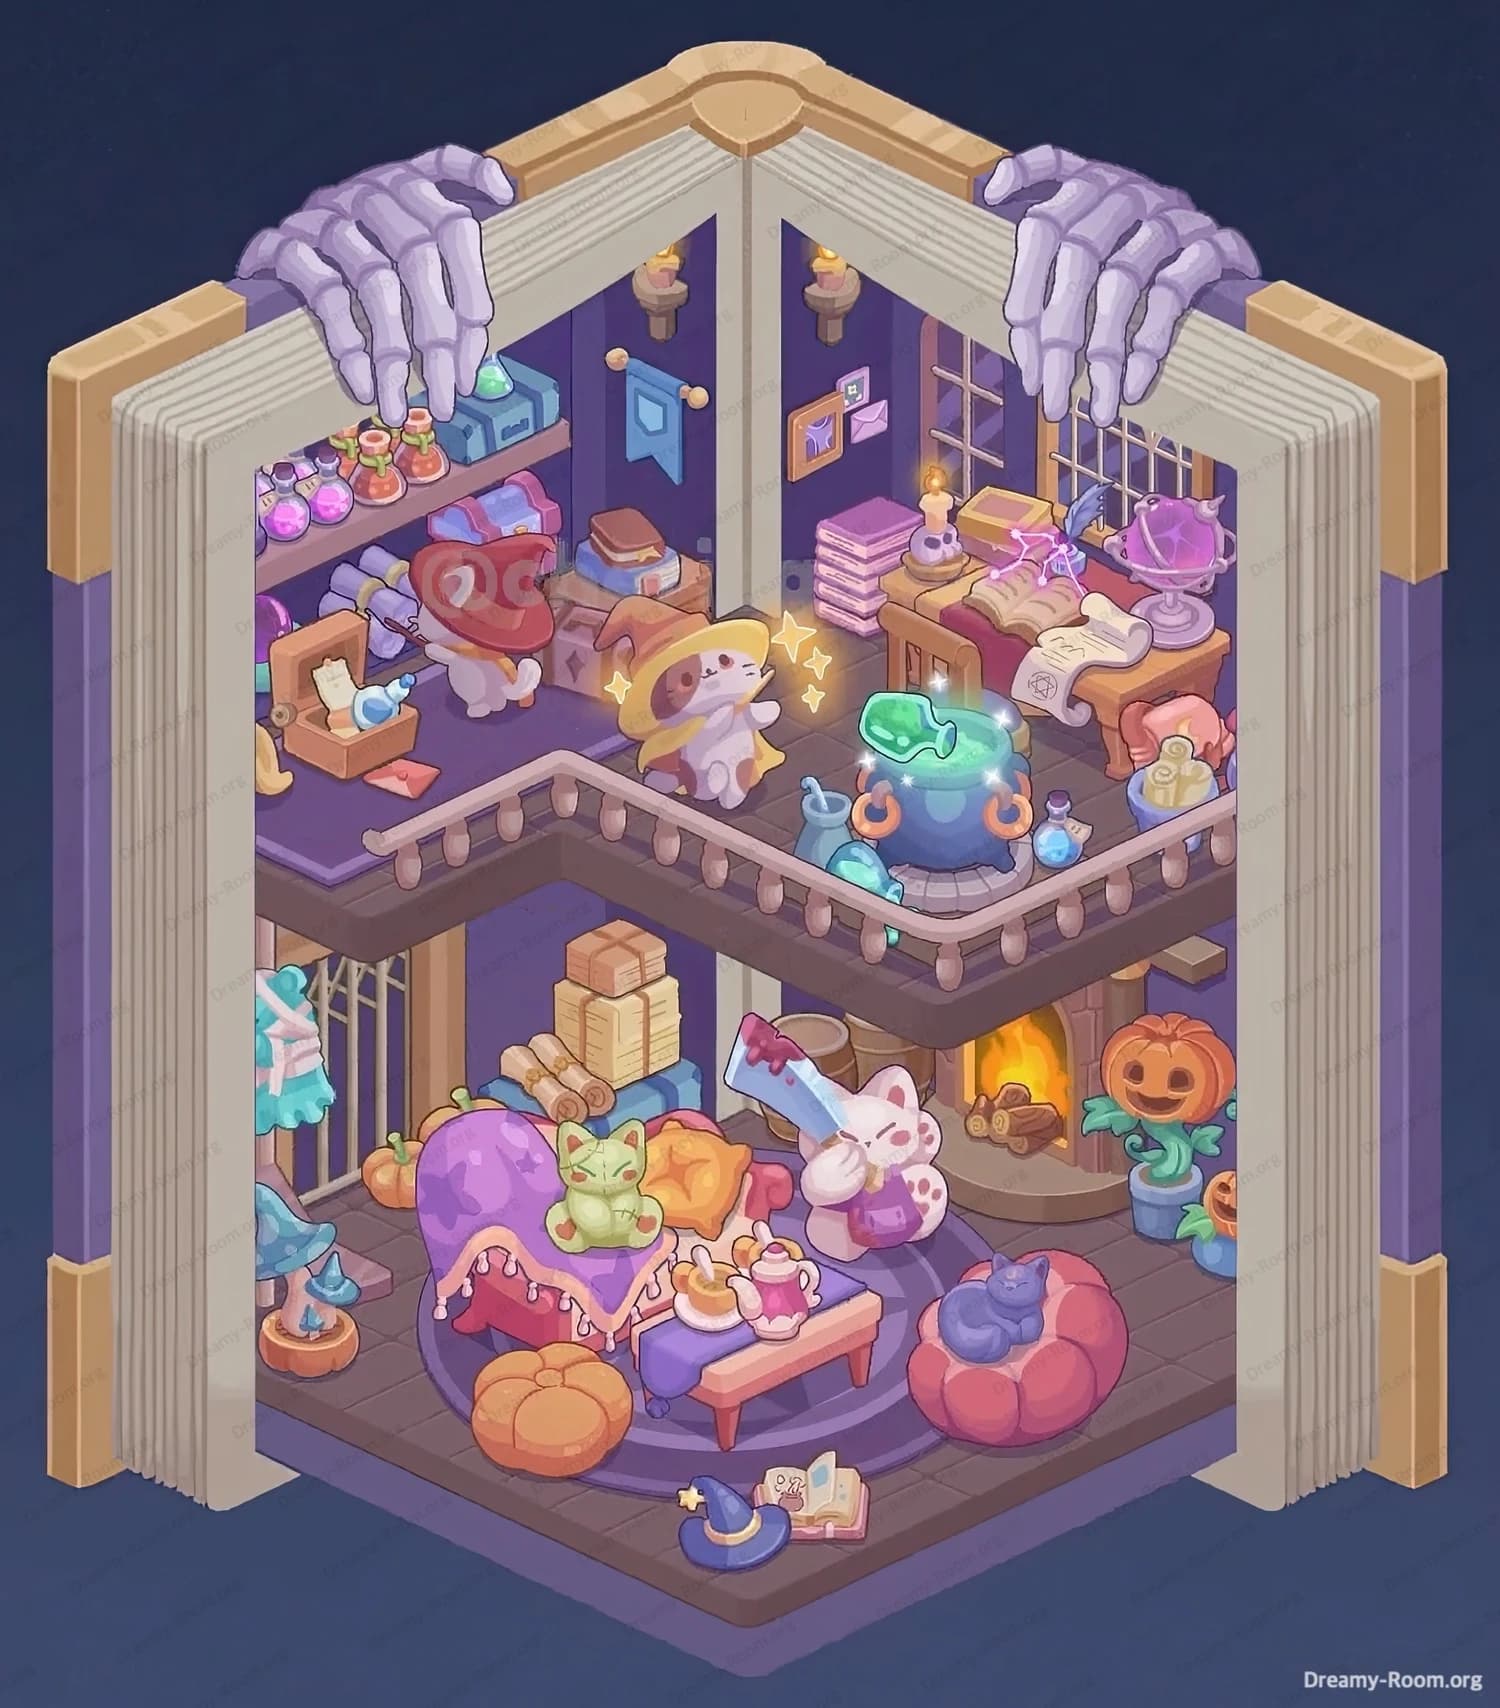
The completed Dreamy Room Level 378 scene reads like a tiny, enchanted two-story diorama tucked inside an open book. On the upper balcony, a yellow-hatted wizard cat tends a glowing green cauldron beside a desk stacked with purple spellbooks, a crystal globe, candlelight, and a window that casts soft moonbeams. The left upper shelf bursts with potion bottles, treasure chests, and a red-hatted helper cat peeking from behind boxes. Below, a drippy purple couch with pumpkin pillows and a green lucky cat sits before a tea table under a mushroom lamp. To the right, a warm fireplace crackles beside a smiling pumpkin plant, stacked crates, and a red pouf cradling a black cat. Tiny props—scrolls, a maneki-neko with a toy cleaver, wizard hat, open books, and skeleton hands gripping the book’s top—tie the theme together. The scene’s charm depends on exact placement: each item aligns with the book-frame, lighting, and railings to create the cozy, storybook atmosphere that defines Dreamy Room Level 378.