Dreamy Room Level 390
Dreamy Room Level 390 guide - Dreamy Room 390 Walkthrough & Solution.

Important Notice Regarding Level Numbering
Due to frequent changes in Dreamy Room's level numbering and differences between platforms (Android/iOS) – for example, level 390 on Android might not be the same as level 390 on iOS – the text guide below may not always match the images and video above. Please prioritize the image and video guides. If you find that the guide content doesn't match your current level, please visit the All Level Walkthroughs page to find the correct guide based on level images. Thank you for your understanding.
Dreamy Room Level 390 Walkthroughs & Guide
Step 1. Place the wooden floor base and rear curved wall in the back-right.
Begin by laying down the wide wooden floor panel that occupies the entire base. In Dreamy Room Level 390 the floor is a pale plank surface with a small rectangular notch centered on the front edge; align this notch so it faces forward toward the camera. Next, place the large pale curved back wall on the back-right edge of the floor. This is the wall with a rectangular cut-out window toward its right side — make sure the rectangular window sits two grid-units from the right edge so it reads as the vertical opening shown in the completed image. The rear curved wall should slightly overhang the back of the floor (a visual lip), producing the thin shadow visible in the screenshot. This foundational layout anchors everything else in Dreamy Room Level 390; if the floor or back wall is misaligned by even a half-tile the rooftop elements and pool will look off, so nudge the pieces until the seams match the image.
Step 2. Place the left curved arch and glass window grid along the left wall.
In Dreamy Room Level 390, the left side features a large arched canopy with a wooden grid window that faces out. Place the left curved arch so its base sets flush with the left edge of the floor and its curved top points back toward the upper left corner. Then add the tall wooden grid window panel inside that arch — it should sit directly against the inner face of the arch toward the rear, forming a glazed wall with a visible mullion grid. Along the base of this left wall add a low strip of greenery (a planted hedge) that runs parallel to the floor edge. The arch and grid window create the open, airy left facade in Dreamy Room Level 390, so align the arch curve so the grid panes sit evenly spaced and the hedge aligns with the lower boundary of the arch.
Step 3. Add the front steps, potted topiaries, and entry planters at the center-front.
Now place the short, three-step stair centered on the front edge of the wooden floor, slightly left of the floor notch. On both sides of those steps, place the rounded yellow planters with stacked green topiary forms — one pair directly flanking the stairs and another pair spaced back along the left edge of the front façade. Add two small potted shrubs in rectangular planters on the right side of the front face under the glass storefront. These planters and topiaries are crucial accent points in Dreamy Room Level 390: they mark the pedestrian entry and balance the composition. Be sure each planter sits flush to the floor edge and that the topiaries’ shadows point to the same light source as the rest of the scene.
Step 4. Furnish the interior left area: shelf with candles, plants, and kitchen elements.
Inside the left, ground-level interior of Dreamy Room Level 390, place a low wooden shelf that runs parallel to the left arch window at mid-depth. On the shelf arrange a blue vase of bright orange flowers, a cluster of lit candles spaced evenly (three to four), and two small potted green plants — one near the left end and one near the center. Below and slightly forward of that shelf place a kitchen counter block (stove/sink module) toward the rear left corner and a small cabinet box nearer the front. Add a round cushioned dog-donut pillow with a heart motif on the upper mezzanine floor behind the shelf. These interior objects must nest tightly against the left wall and shelf — Dreamy Room Level 390 depends on those exact offsets so the decorative items peek through the arch window just like in the screenshot.
Step 5. Build the front garage, yellow cat taxi, and glass storefront at the front-right.
Construct the front-right module by placing a garage bay directly beneath the elevated pool slab, centered on the front edge. Above the garage, mount a rectangular glass storefront wall with a low planter strip along its exterior base. Park the yellow cat-style taxi in front of the garage, slightly offset left, with its cat-ear roof ornament visible and wheels resting on the outer pavement. Attach two small wall lights at the garage corners (one on each side) — these are the round red and white beacons visible in the image. Accurately positioning the cat taxi and garage is important in Dreamy Room Level 390 because they create the foreground scale: make the taxi sit at the right angle so its nose points slightly rightward and its shadow falls under the front of the vehicle.
Step 6. Place the elevated pool, flamingo float, loungers, umbrella, and cat NPC on the upper deck.
On the front-right upper level place the elevated glass-walled pool so it overhangs the garage by one unit. The pool should be a rectangular basin with clear glass sides and two blue water jets on the far side (back edge). Drop in a large pink flamingo inflatable centrally and a yellow-and-white beach ball to its right. On the deck behind the pool place two red chaise loungers side-by-side, a small striped parasol (red and white) over the right lounger, and a low glass partition between the loungers and the stair down into the interior. Position the little cat NPC with sunglasses standing on the deck just behind the pool glass, angled toward the loungers. These elements define the rooftop leisure area in Dreamy Room Level 390 — the flamingo and ball must float inside the pool plane and the loungers must align flush with the deck decking so shadows and reflections match.
Step 7. Install the rooftop statue, coin piles, piggy bank, MEOW sign, and finishing plants/effects.
Finally, set the large reclining cat statue on the rooftop center-back, facing forward and leaning on a rolled cushion. The statue holds a golden goblet in its raised paw; place stacked gold coin piles spilling near its feet and a pink piggy bank to the statue’s right (viewer’s left). Directly under the statue’s forward edge mount the rectangular sign that reads “MEOW” above the upper deck entrance — center it over the pool/garage axis. Scatter small potted plants around the roof edge and add soft snowflake particle effects in the upper background to match the screenshot. These finishing touches are the signature of Dreamy Room Level 390: the statue, coins, and piggy bank must sit exactly on the rooftop pad so the silhouette matches the image.
Notes and Precautions
- The primary difficulty in Dreamy Room Level 390 is precision. Many objects (the pool glass, loungers, rooftop statue, and window grid) must be aligned to sub-tile accuracy. If pieces snap to wrong anchors, use small nudge controls to fine-position them.
- Keep the scale consistent: the yellow taxi, planters, and topiaries set the foreground scale; test their placement early so interior furniture reads the same size.
- When placing transparent elements (pool glass, windows), verify they don’t clip into the floor lip or wall faces — clipping will change shadows and break the composition.
- If the rooftop statue or sign blocks the view of the pool, slightly lower the statue elevation rather than moving it laterally — vertical adjustments preserve the composition in Dreamy Room Level 390.
- Save frequently at waypoints: after base layout, after interior furnishing, and before rooftop decor. This prevents losing complex placements if you need to revert.
Tips and Tricks from top player
- Start with the big shapes first (floor, walls, pool slab, garage). Completing the silhouette simplifies placing smaller props. In Dreamy Room Level 390, getting the rear curved wall and pool slab right saves time later.
- Use ghost/preview mode when available to see how transparent pool glass and the statue overlap; toggling preview helps avoid clipping.
- When arranging clustered items (coins, potted plants, candles), place one, duplicate, then rotate copies rather than placing each from the inventory — this preserves spacing and makes the cluster look natural.
- For the statue and MEOW sign alignment, lock the rooftop slab and then nudge each object in 0.1-unit increments until the shadows match the reference.
- If stuck, hide decorative layers temporarily (plants, small props) to check the underlying architecture; rebuilding the shell is easier than re-placing dozens of small items. These player tricks are proven to speed up completion of Dreamy Room Level 390 while keeping the room faithful to the finished image.
Final Scene Description
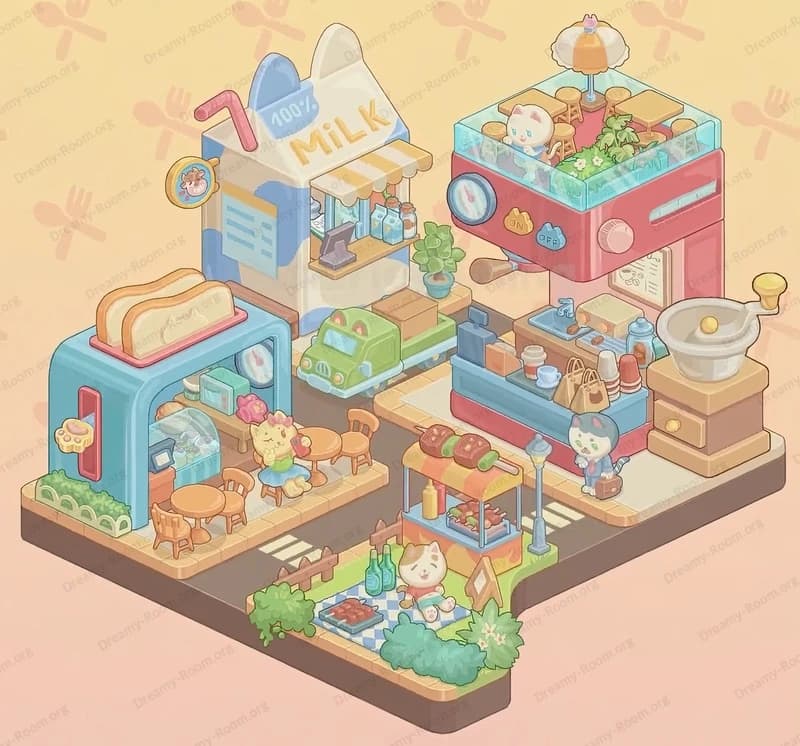
The completed Dreamy Room Level 390 presents a sunlit isometric boutique: a pale wooden plank floor anchors a curved rear wall with a rectangular right-side window, while a graceful left arch and grid window open to the exterior. Center front, neat steps lead between yellow planters up into a cozy interior lined with a long shelf of flickering candles, a blue vase of orange blooms, and houseplants. To the front-right an elevated glass pool sits above a garage, containing a large pink flamingo float and a yellow beach ball; two red chaise loungers and a striped parasol occupy the deck behind it, with a sunglasses-wearing cat strolling near the glass. Above, a reclining white cat statue lounges amid piles of gold coins and a pink piggy bank, its raised goblet catching the light. A bright yellow cat taxi waits at the garage, shrubs frame the glass storefront, and soft snowflake particles drift in the turquoise sky — every object intentionally placed to read like the reference.