Dreamy Room Level 116
Dreamy Room Level 116 guide - Dreamy Room 116 Walkthrough & Solution.

Important Notice Regarding Level Numbering
Due to frequent changes in Dreamy Room's level numbering and differences between platforms (Android/iOS) – for example, level 116 on Android might not be the same as level 116 on iOS – the text guide below may not always match the images and video above. Please prioritize the image and video guides. If you find that the guide content doesn't match your current level, please visit the All Level Walkthroughs page to find the correct guide based on level images. Thank you for your understanding.
Dreamy Room Level 116 Walkthroughs & Guide
Step 1. Prepare the Water Border and Grassy Foundation for Dreamy Room Level 116
Begin Dreamy Room Level 116 by selecting the pale sky-blue frame tile from your décor menu. Carefully align its rounded lip along the bottom edge of the placement grid so it forms a continuous channel of water around your workspace. Once the aquatic border for Dreamy Room Level 116 is snapped in, choose the large irregular green turf piece and fit it snugly into the left section of the blue frame without overlapping the water moat. In Dreamy Room Level 116, this broad grassy mat serves as the primary base for all subsequent builds, so adjust gently until the piece clicks into place. Take your time in Dreamy Room Level 116 to ensure there are no gaps or misalignments, as this initial setup governs the stability and symmetry of every object you’ll add later in Dreamy Room Level 116.
Step 2. Construct the Pillared Platforms for Dreamy Room Level 116
In Dreamy Room Level 116, the next task is to assemble the three towering cylinders and their small matching block. First, locate the tallest light-gray column and press it firmly onto the grass foundation at the center-rear of Dreamy Room Level 116. Next, grab the medium-height cylinder and attach it just to the right of the tallest column, leaving a single grid square clearance between them for perfect spacing in Dreamy Room Level 116. Then place the shortest full-size cylinder in the far right corner of Dreamy Room Level 116, lining its edges parallel to the grid lines. Finally, add the petite cuboid block to the front of the medium column in Dreamy Room Level 116 to create a staircase effect. Accurate placement of these vertical platforms anchors Dreamy Room Level 116’s skyline and establishes reference points for later layers.
Step 3. Position the Blue Shell House and Interior Accents for Dreamy Room Level 116
Proceed in Dreamy Room Level 116 by installing the whimsical cerulean shell-like dwelling onto the green turf, slightly right of the center axis. Rotate the structure so its open face points forward toward the viewer in Dreamy Room Level 116, then press down until it locks. Inside the shell house of Dreamy Room Level 116, place the semicircular wooden balcony rail at the front edge, then set the miniature desk behind it, complete with rolled parchment scrolls, tiny rolled-up maps, and a little lamp ornament. Below the balcony in Dreamy Room Level 116, insert the curved sleeping alcove piece, aligning its curved lip with the shell’s base. These interior furnishings bring life to Dreamy Room Level 116’s centerpiece and create a cozy focal point for your scene.
Step 4. Assemble the Tree Trunk, Leaf Platforms, and Blooming Vines for Dreamy Room Level 116
Next, focus on the towering arboreal feature in Dreamy Room Level 116. Pick the sculpted brown trunk segment and connect its base to the top of the tallest column in Dreamy Room Level 116 until it sits flush. Then gather the three cube-shaped foliage blocks and perch them atop the trunk’s branches—one to the left, one at the center, and one to the right—in Dreamy Room Level 116, ensuring each cube’s green turf top is level with the others. In Dreamy Room Level 116, clip the sinuous green vine pieces around the trunk, weaving in the delicate white flower tendrils so they cascade naturally between the leaf platforms. This lush botanical addition in Dreamy Room Level 116 frames the upper part of the environment and adds organic contrast to the geometric shapes below.
Step 5. Add Bird Companions, Nest Elements, Flora, and Ground-Level Details for Dreamy Room Level 116
The final assembly in Dreamy Room Level 116 involves adding all the enchanting smaller props. Start by placing the pastel-blue bird figurine on the leftmost foliage cube and the pastel-pink bird on the right cube in Dreamy Room Level 116, angling both to face inward toward the scene’s heart. Next, gently set the tiny nest with three white eggs on the center cube in Dreamy Room Level 116, nesting it so it can’t tilt. Then, tuck the small palm-leaf cluster behind the blue shell house and the broad four-leaf component to the left of the grassy mat in Dreamy Room Level 116 for natural detail. On the ground of Dreamy Room Level 116, arrange the trio of oversized mushrooms near the right cylinder, line up the stump stools in front of the shell dwelling, suspend the cauldron from its wooden support, and bridge the water channel with the short wooden walkway. Finally, dot the water border with lily pads and position the tiny frog figure on one pad in Dreamy Room Level 116 to complete the whimsical tableau.
Notes and Precautions for Dreamy Room Level 116
When tackling Dreamy Room Level 116, it’s essential to verify each piece snaps fully into place before moving on. Misaligned bases in Dreamy Room Level 116 can cascade into placement errors later, so after each step, orbit your camera around the scene to confirm there are no gaps. Avoid dragging larger items across existing decorations in Dreamy Room Level 116—always lift and re-drop to preserve the integrity of snapped connections. Monitor your prop count in Dreamy Room Level 116 to ensure you haven’t reached the placement limit, which will prevent additional item additions mid-construction. Should you need to reposition an element in Dreamy Room Level 116, use the dedicated move tool rather than repeatedly using undo, as the undo function can revert multiple steps at once, erasing correct placements.
Tips and Tricks from Top Player for Dreamy Room Level 116
Veteran builders tackling Dreamy Room Level 116 suggest starting with the broadest and tallest pieces first—namely the water frame, grass mat, and pillar structures—so you establish scale and symmetry immediately in Dreamy Room Level 116. Use the auto-rotate feature in Dreamy Room Level 116 to line up symmetrical props like birds and mushrooms without fiddling manually, saving you precious seconds. To speed up assembly in Dreamy Room Level 116, group like-colored items in your quick-access toolbar so you can swap between similar blocks seamlessly. Also, don’t overlook camera shortcuts in Dreamy Room Level 116; toggling to bird’s-eye view helps you spot any overlapping items before finalizing. Finally, when you think your Dreamy Room Level 116 layout is complete, widen your field of view to catch any stray misalignments along the edges.
Final Scene Description for Dreamy Room Level 116
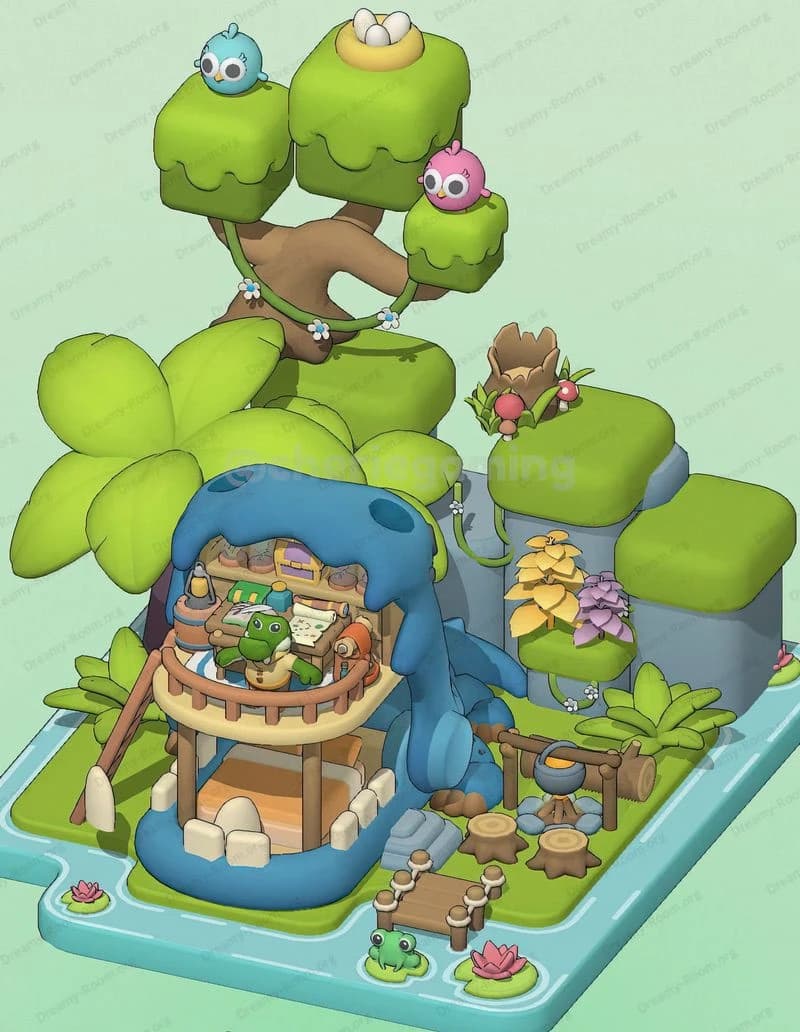
In Dreamy Room Level 116, the completed vista showcases a pastel aquatic frame surrounding a vibrant green meadow platform. At the rear, three graduated gray columns soar skyward, each crowned with lush turf blocks that catch the eye. Just forward sits a shell-inspired blue cottage with an open balcony, its interior detailed with a tiny desk, rolled maps, and a cozy sleeping nook beneath. Rising from the tallest tower is a twisted tree trunk supporting cube-shaped foliage, draped with delicate white blooms and twin bird figures—one sky blue, one blush pink—and a snug nest of ivory eggs. Below, a trio of whimsical mushrooms clusters beside stump seats, a cauldron sways over a log frame, and a rustic footbridge arches gracefully over the water channel. Lily pads dot the moat, and a small frog rests peacefully on one pad, completing the harmonious tableau of Dreamy Room Level 116.