Dreamy Room Level 709
Dreamy Room Level 709 guide - Dreamy Room 709 Walkthrough & Solution.
Important Notice Regarding Level Numbering
Due to frequent changes in Dreamy Room's level numbering and differences between platforms (Android/iOS) – for example, level 709 on Android might not be the same as level 709 on iOS – the text guide below may not always match the images and video above. Please prioritize the image and video guides. If you find that the guide content doesn't match your current level, please visit the All Level Walkthroughs page to find the correct guide based on level images. Thank you for your understanding.
Dreamy Room Level 709 Walkthroughs & Guide
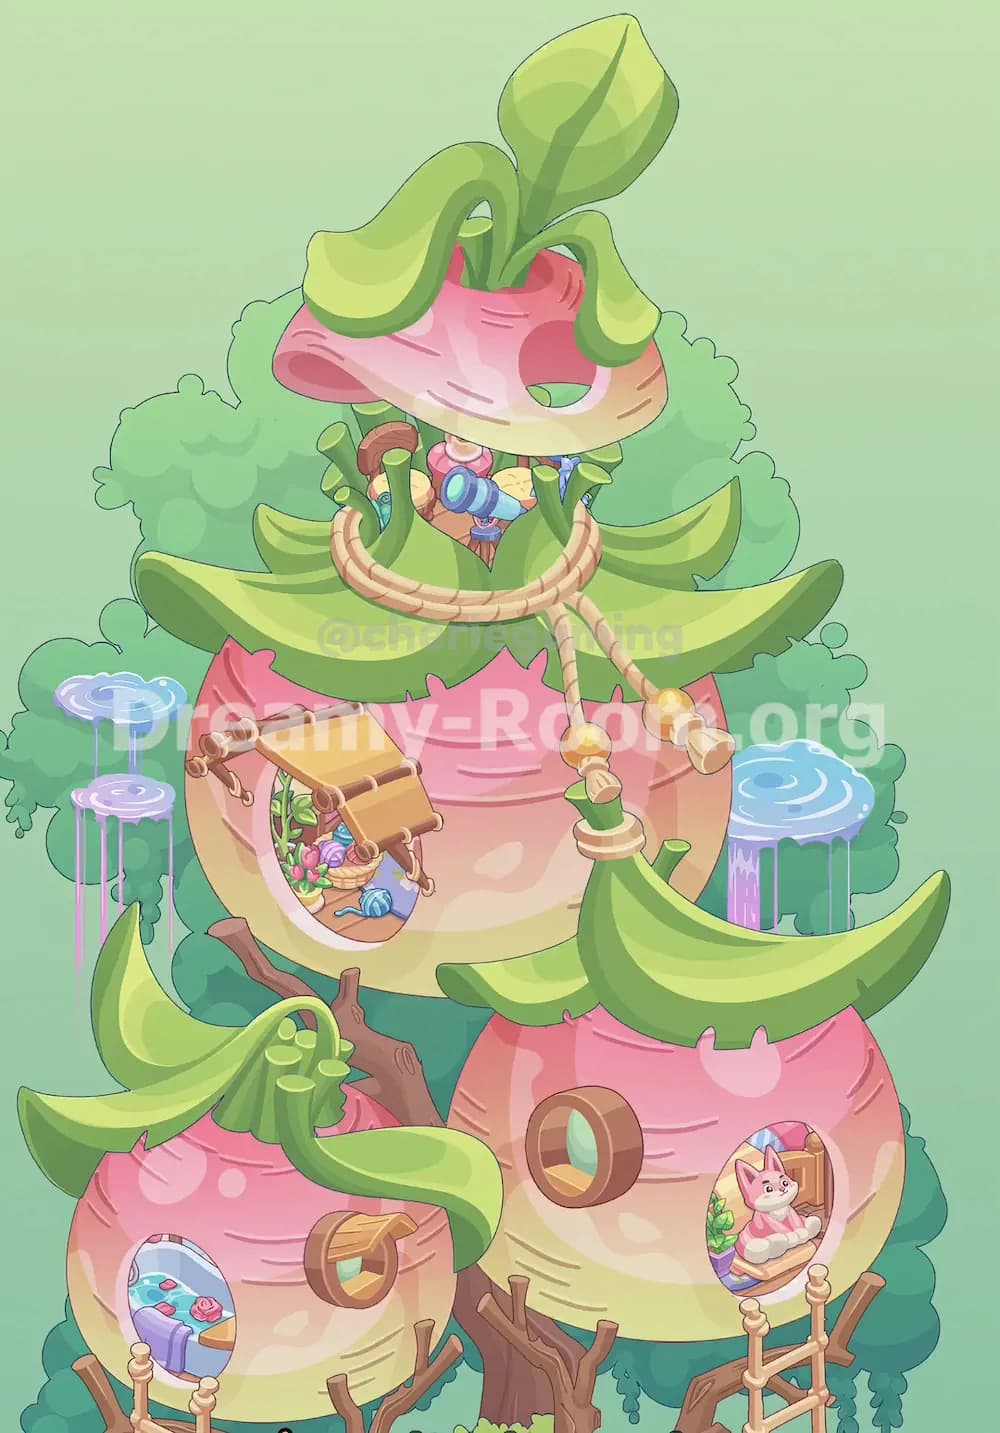
Step 1. Build the main tree structure around the three round rooms.
Start Dreamy Room Level 709 by treating the three empty circular rooms as the skeleton of the final tree village. The largest room should stay near the upper center, the second large room should sit to the lower right, and the smaller room should remain at the lower left. The brown tree trunk rises through the center of Dreamy Room Level 709, supporting all three pods with branching wooden limbs. Do not move the rooms into a straight line; their slightly staggered positions are important. The upper room overlaps the leafy background, the right room leans forward, and the left room sits lower, almost tucked into the branches. This foundation matters because every fruit shell, leaf roof, ladder, balcony, and window in Dreamy Room Level 709 depends on these three exact circular placements.
Step 2. Add the pink strawberry-style outer shells to each room.
Once the three rooms are aligned, place the soft pink fruit-like shells over them. In Dreamy Room Level 709, each pod becomes a rounded strawberry or radish-shaped house with a pink upper body and a pale yellow lower body. The largest pink shell belongs around the middle-upper room, the lower-right shell wraps the right room, and the smaller shell wraps the lower-left room. Make sure the pink outlines and curved bodies follow the circular wooden floors underneath. The shell edges should not cover the interior openings completely; they should frame them like cozy house walls. Dreamy Room Level 709 rewards precision here because the shells create the illusion that the wooden rooms are built inside giant fruits growing from the tree. If the shell looks too high or too low, later windows and leaves will not line up.
Step 3. Place the large green leaf roofs on the lower-left and lower-right houses.
Next, add the oversized green leaf roofs to the two lower homes in Dreamy Room Level 709. The lower-left house needs a dramatic curled leaf roof that sweeps upward on the left, rolls over the top, and extends toward the center. A cluster of short green stems should appear on top of this lower-left pod, giving it a sprouting plant look. The lower-right house needs a broad banana-like leaf roof stretching from left to right, with the pointed tip extending toward the right edge of the scene. These roofs should sit directly on top of the pink fruit shells, not floating above them. In Dreamy Room Level 709, the leaves are major visual anchors, so place them before smaller objects like windows, ladders, or furniture.
Step 4. Complete the top house with its leafy crown and balcony frame.
The top pod in Dreamy Room Level 709 has the most complex exterior. Place the large pink cap at the top center, then attach the big green leaves sprouting upward from it. One tall leaf stands near the top, while two curled leaves droop outward on the left and right. Below this cap, add the circular woven balcony railing around the front opening. The railing should sit across the lower front of the top pod, almost like a small lookout deck. Add the vertical green bamboo-like posts inside the balcony area, making sure they rise through the opening naturally. Dreamy Room Level 709 depends on this layered look: pink fruit body behind, green leaf crown above, and curved woven balcony in front. This is where the upper home changes from an empty round platform into a finished treehouse.
Step 5. Decorate the top balcony with the telescope and tiny objects.
Inside the top balcony of Dreamy Room Level 709, place the small decorative items carefully because they are easy to misread. The blue telescope or spyglass sits near the front-right side of the balcony, angled slightly outward as if someone is looking across the forest. Near it, add the small colorful round details, including the blue circular object on the left side and the tiny warm-toned objects clustered behind the railing. These pieces should stay inside the woven balcony, not on the leaf roof or outside the pod. The balcony also includes small green posts and curved wooden supports, so avoid covering them fully. Dreamy Room Level 709’s challenge is determining this exact layering: the railing goes in front, the telescope rests behind it, and the leaf crown remains above everything.
Step 6. Add the middle house awning and garden alcove.
Move to the large middle fruit house in Dreamy Room Level 709, positioned under the top balcony and slightly left of the lower-right pod. On the left side of this middle house, place the tan roll-up awning made from small wooden rods and pale fabric. It should tilt diagonally over the circular alcove opening. Inside that alcove, add the tiny basket, green plant, pink flowers, blue yarn-like object, and small decorative pieces on the floor. The awning should cover the top of the nook without hiding the objects inside. Dreamy Room Level 709 uses this alcove as a miniature garden-workshop area, so keep it compact and colorful. The exact placement is important because the awning overlaps the pink wall while the items remain visible inside the round opening.
Step 7. Place the lower-left bedroom details and round side window.
The lower-left fruit house in Dreamy Room Level 709 becomes a cozy bedroom. In the left oval opening, place the small bed with its pale blue bedding, purple blanket, soft pillow, and tiny pink decorations near the foot of the bed. The bed should face outward through the arched cutout, with the curved pink wall framing it. On the right side of this same pod, add the round wooden-framed window with a pale blue glass center. This window sits slightly right of center and lower than the leaf roof, not inside the bedroom opening. Dreamy Room Level 709 often tricks players here because the bed alcove and window are both small rounded features. Keep the bed in the left opening and the circular window on the front wall to match the completed scene.
Step 8. Add the lower-right cat room, porthole window, and ladder.
The lower-right house is one of the most recognizable parts of Dreamy Room Level 709. First, place the round wooden porthole window on the left-front side of the pod. It should have a brown frame and a pale blue center. Then place the larger oval room opening on the right side. Inside it, add the pink cat sitting on a white cushion, with a striped curtain or colorful room background behind it. The cat should face outward, centered in the opening, making this pod feel occupied and alive. Below the cat’s opening, attach the pale wooden ladder so it leans up from the lower branches toward the doorway. In Dreamy Room Level 709, the ladder must line up with the cat alcove, not the round porthole window. That alignment is essential for the final look.
Step 9. Arrange the ropes, beads, hanging supports, and connecting details.
After the three houses are decorated, add the connecting details that make Dreamy Room Level 709 feel like a real treetop settlement. From the top balcony, place the two hanging rope lines with round golden beads and tied wooden ends. These ropes drop down toward the large leaves over the lower-right house. They should look like swing ropes, pull cords, or decorative hanging supports, not random ornaments. Add the small branch supports under the pods and make sure the brown limbs appear to hold the fruit houses from below. Dreamy Room Level 709 is very sensitive to overlap: the ropes should appear in front of the middle area, the leaves should sit behind them, and the pink fruit walls should remain visible beneath. These small elements complete the vertical flow of the puzzle.
Step 10. Keep the blue water fountains and leafy forest background visible.
The background decorations in Dreamy Room Level 709 are just as important as the houses. Leave the soft green tree canopy behind all three pods, with rounded bushes filling the upper and side areas. On the left side, place the two pastel blue-purple water platforms or fountain mushrooms, one higher and one lower, with thin dripping water lines descending from them. On the right side, place the larger blue fountain platform with pinkish-purple falling water. These fountains must remain behind the fruit houses, not in front of the rooms. Dreamy Room Level 709 uses the fountains to frame the vertical composition and add a dreamy forest atmosphere. If they are hidden too much, the scene loses depth; if they cover the houses, the puzzle will look incorrect.
Step 11. Finalize the wooden branches and bottom support elements.
Finish Dreamy Room Level 709 by checking all branch and ladder placements around the bottom. The main trunk should rise through the center, splitting into branches that support the lower-left and lower-right pods. Smaller brown limbs stretch outward beneath the houses, especially along the bottom-left edge and under the lower-right pod. The ladder near the lower-right cat room should rest against the branch structure, while the lower-left pod also has wooden supports and rail-like branch pieces near its base. In Dreamy Room Level 709, these supports help explain how the fruit houses stay attached to the tree. Do not cover them completely with leaves or walls. The correct final arrangement should look organic, as though the rooms naturally grew from the tree and were then turned into cozy homes.
Notes and Precautions
In Dreamy Room Level 709, the most important precaution is to avoid placing objects by category alone. Many items look similar, especially the round wooden windows, curved leaves, and circular room openings, but each one has a specific position. The cat belongs only in the lower-right oval room, while the bed belongs only in the lower-left oval room. The garden alcove with the tan awning belongs on the middle house, not the lower-left house. The blue telescope belongs on the top balcony, not in any lower room. Dreamy Room Level 709 also uses layered placement, so always check whether an item should sit behind or in front of another object. Large leaf roofs should go over the pink shells, windows should sit on the fruit walls, and ladders should connect to the correct doorway.
Tips and Tricks from top player
A strong strategy for Dreamy Room Level 709 is to build from large to small. Place the three fruit shells first, then the major leaf roofs, then the openings, and only after that add small details like the telescope, flowers, bed, cat, ropes, and beads. This prevents tiny objects from being hidden or misaligned. Another useful Dreamy Room Level 709 trick is to use the openings as landmarks: top equals balcony and telescope, middle-left equals awning garden nook, lower-left equals bed, and lower-right equals cat room. When stuck, compare the silhouette rather than the object itself. The completed Dreamy Room Level 709 scene has a clear triangular shape: the top pod is highest, the lower-left pod is smallest, and the lower-right pod is broad and forward-facing.
Final Scene Description
The finished Dreamy Room Level 709 scene shows a magical vertical tree village built from three pink fruit-shaped homes nestled among soft green foliage. At the top, a leafy crowned house opens into a woven balcony with a small blue telescope, making it feel like a lookout post. Below it, the middle house has a tan awning and a tiny garden nook filled with plants, flowers, and colorful tools. The lower-left house becomes a peaceful bedroom with blue bedding and a purple blanket, while the lower-right house features a round window and a cheerful pink cat sitting in a cozy oval doorway. Broad green leaves curl over the roofs, wooden branches hold everything in place, and pale ladders connect the homes. Blue waterfall-like fountains glow softly at both sides, completing the dreamy forest atmosphere of Dreamy Room Level 709.