Dreamy Room Level 556
Dreamy Room Level 556 guide - Dreamy Room 556 Walkthrough & Solution.
Important Notice Regarding Level Numbering
Due to frequent changes in Dreamy Room's level numbering and differences between platforms (Android/iOS) – for example, level 556 on Android might not be the same as level 556 on iOS – the text guide below may not always match the images and video above. Please prioritize the image and video guides. If you find that the guide content doesn't match your current level, please visit the All Level Walkthroughs page to find the correct guide based on level images. Thank you for your understanding.
Dreamy Room Level 556 Walkthroughs & Guide
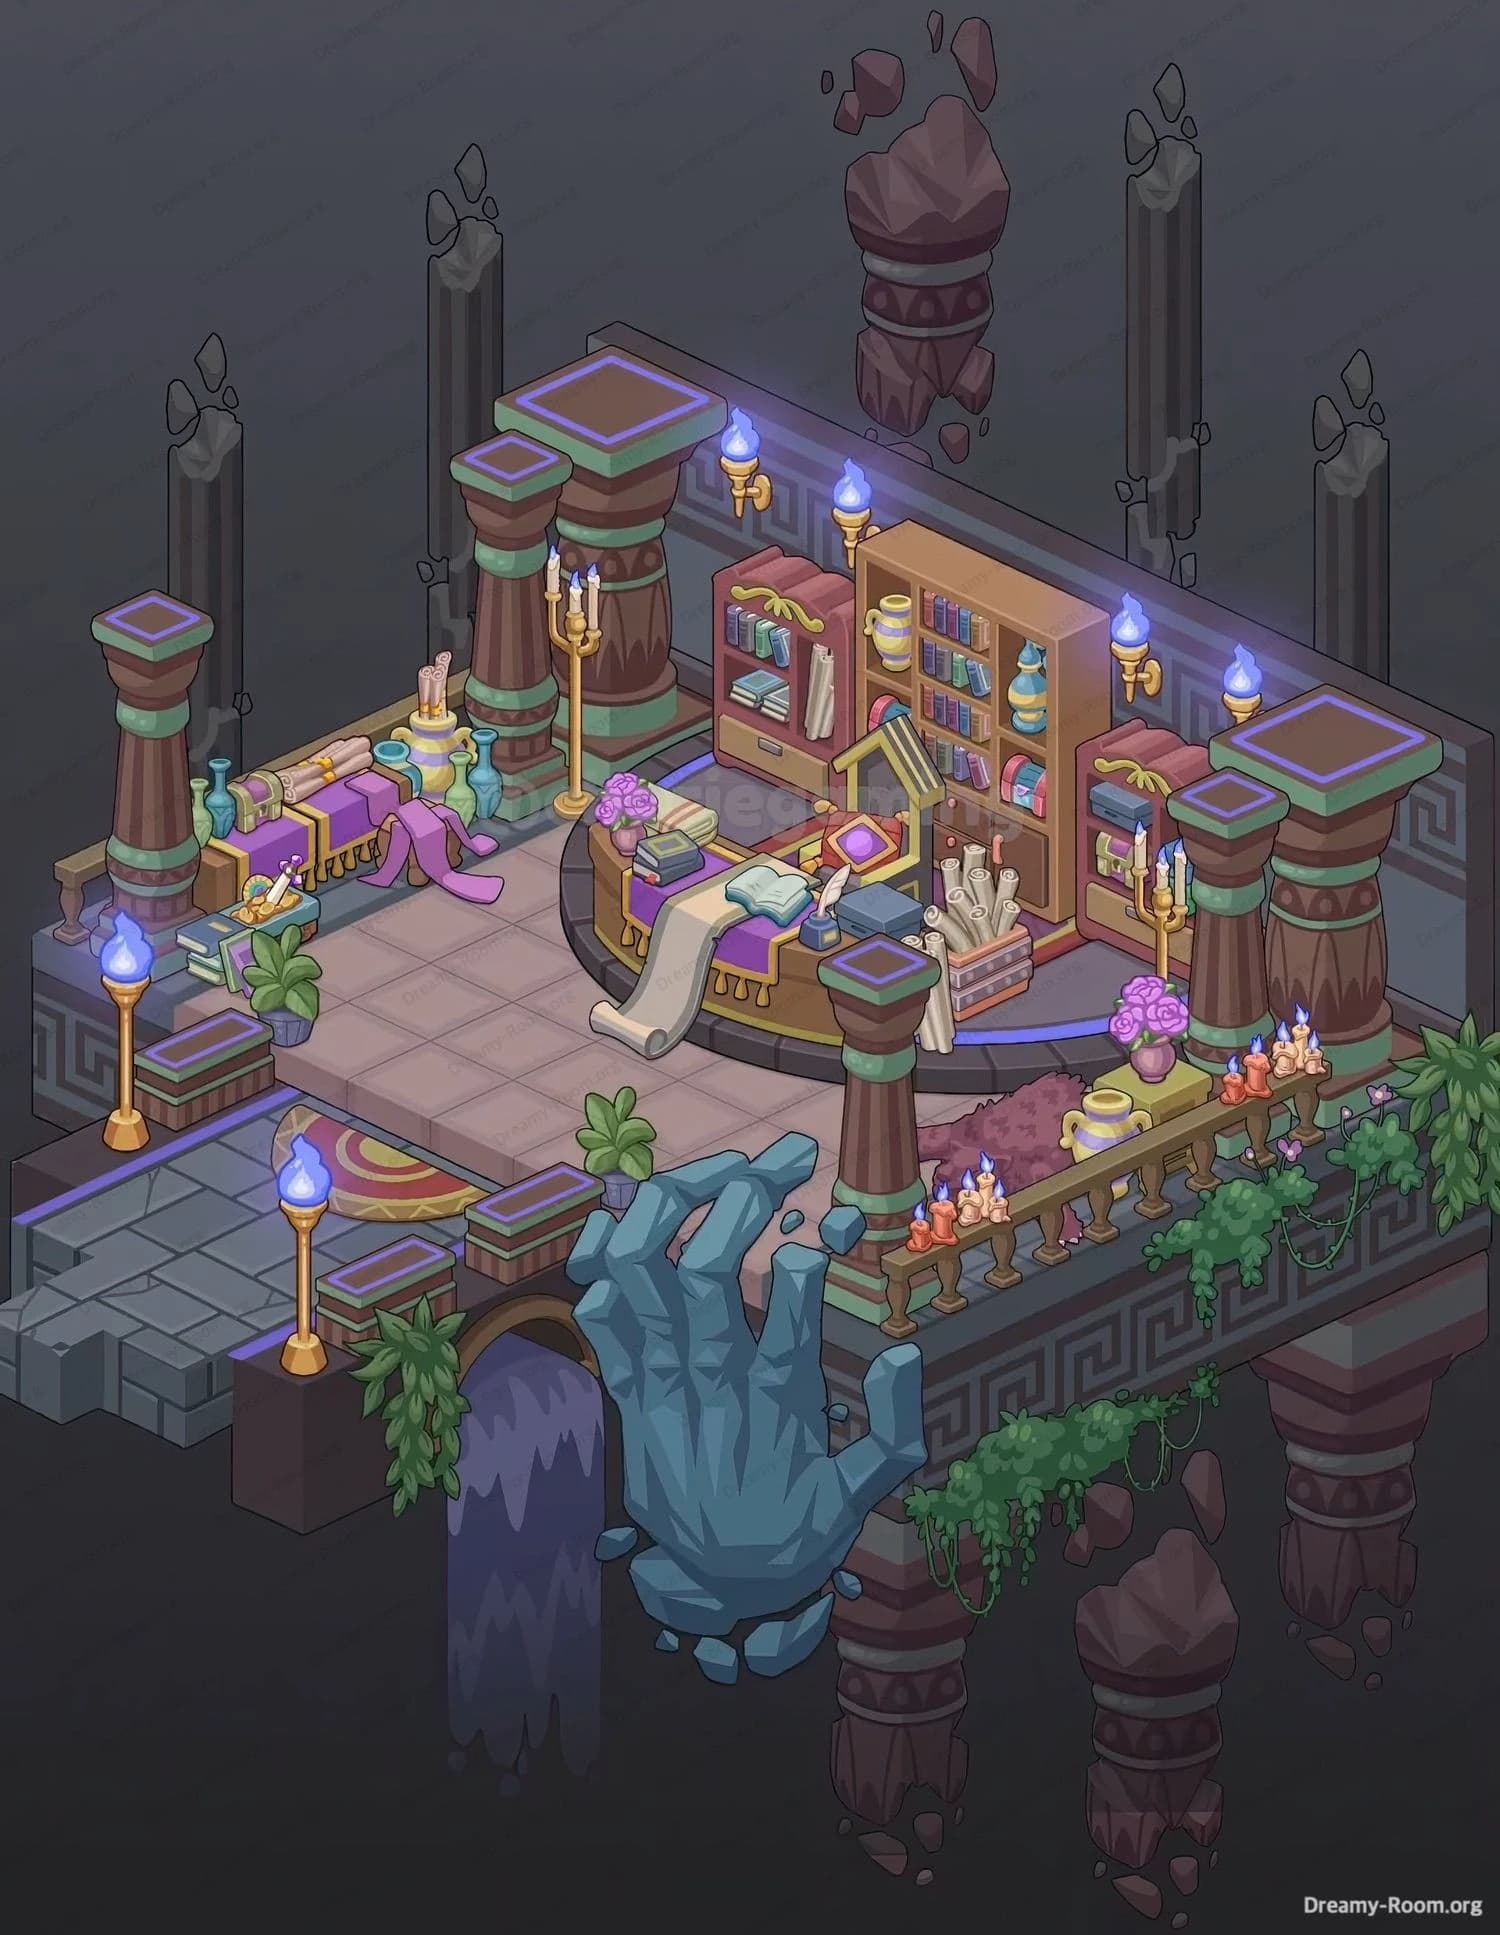
Dreamy Room Level 556 Walkthrough – Floating Wizard Library
Dreamy Room Level 556 is all about turning a bare floating stone platform into a mystical sky-library full of books, candles, plants, and magical blue flames. As in every stage of the series, there’s no timer; the real challenge in Dreamy Room Level 556 is choosing the exact tile where each object belongs so the composition feels balanced and alive.
Follow the steps below carefully and compare each placement to the completed view. If something looks slightly off, it usually means an item in Dreamy Room Level 556 is one tile too far forward, backward, or sideways.
Step 1. Frame the platform with pillars and the broken rocks in Dreamy Room Level 556
Start Dreamy Room Level 556 by dealing with the large structural elements under and around the platform. First, place the two intact stone support pillars beneath the front corners of the platform. Each pillar in Dreamy Room Level 556 sits exactly under a front corner, aligned with the decorative Greek-key trim. On the right side, attach the broken third pillar slightly lower, with the big chunk almost directly under the right edge and its smaller fragments scattered just to the right, giving the sense that the platform is old and crumbling. These heavy pieces are the backbone of Dreamy Room Level 556; if you misplace them, later details like the hand statue and vines will look misaligned. Make sure all pillar tops are hidden behind the platform edge, not sticking through the floor tiles.
Step 2. Place the giant stone hand and waterfall at the front of Dreamy Room Level 556
Now focus on the dramatic centerpiece of Dreamy Room Level 556: the huge blue stone hand and the magical waterfall. The stone hand belongs at the mid-front of the platform, emerging from the void directly below the central gap in the railing line. The palm should face upward, with fingers curling slightly toward the platform so it looks as if the hand is supporting the room. Around the wrist, position the small floating rock shards in Dreamy Room Level 556 to match the curve of the arm, with the smallest pieces closest to the platform. Just to the left of the hand, place the vertical waterfall so that it’s spilling from the underside of the platform edge, not from open air. Its top should tuck under the floor, and its base fades into the darkness. Together these two pieces give Dreamy Room Level 556 its floating-island fantasy vibe.
Step 3. Add the balcony railing, candles, and vines along the front of Dreamy Room Level 556
With the front structure ready, Dreamy Room Level 556 now needs its balcony and greenery. Snap the wooden railing with golden posts along the right front edge of the platform. Each post should sit on a floor tile, following the curve of the platform edge. On top of this rail, line up the cluster of small multicolored candles in Dreamy Room Level 556 so that they form a continuous row starting near the right corner and stopping before the center. Each candle has a blue flame; keep them evenly spaced and avoid placing any on the side ledges. Next, attach the long green vines under the front edge of the platform. Let the thickest vine hang just beneath the balcony area, with smaller tendrils trailing toward the left. These vines must anchor directly to the underside border of the platform in Dreamy Room Level 556; if they float away from the edge, the illusion breaks.
Step 4. Build the left stone walkway, torch, and rug extension in Dreamy Room Level 556
On the left side of Dreamy Room Level 556, extend the platform with the grey stone walkway. This piece attaches flush to the main floor, connecting seamlessly with the left front corner so the grid of tiles continues naturally. Place the square walkway so its outer edge hangs over the void but still feels structurally attached. On the far end of this walkway, position the single golden floor torch with a blue flame; it should stand one tile back from the edge, centered left-to-right. Just where the walkway meets the main floor of Dreamy Room Level 556, drop the circular rug with the swirling pattern so that most of it rests on the main platform while a small slice overlaps toward the walkway. Finally, add the small green potted plant at the inner corner between rug and torch; its leaves should lean slightly over the edge but the pot must remain on solid stone.
Step 5. Stand the tall background columns and floating rocks in Dreamy Room Level 556
The towering background columns give Dreamy Room Level 556 its depth and temple-like feeling. Place four tall dark columns in a loose arc behind the platform: two roughly behind the left side and two behind the bookshelf area on the right. Each column base should hide behind the main platform so it appears to rise from below, and their tops should reach higher than the back wall. Keep consistent spacing so Dreamy Room Level 556 doesn’t look lopsided. Between the right-side columns, hang the large brown floating rock shards. The biggest chunk should sit near the upper right, with smaller fragments trailing downward like debris frozen in the air. Don’t bring any of these background elements in front of the back wall; they must sit visually behind everything else in Dreamy Room Level 556 to preserve the illusion of distance.
Step 6. Arrange the back wall bookshelf, wall sconces, and scroll crate in Dreamy Room Level 556
Now transform the blank back wall of Dreamy Room Level 556 into a magical archive. Snap the large wooden bookshelf against the right half of the wall, resting on the floor tiles and centered horizontally between the right edge and the middle of the room. Fill its shelves with the pre-bundled books, scrolls, and decorative jars; these are usually one combined object in Dreamy Room Level 556, so just ensure the brighter books end up nearer the top shelves. Above and around the bookshelf, place the wall sconces with blue flames—one to the left, one to the right, and one centered higher up so the light frames the bookcase. In front of the lower right side of the shelf, drop the open crate full of rolled scrolls at floor level, angled slightly toward the viewer. This cluster becomes the visual anchor of the right side of Dreamy Room Level 556.
Step 7. Position the curved librarian desk, chair, open book, and floor scroll in Dreamy Room Level 556
In front of the bookshelf, assemble the working area of Dreamy Room Level 556. Place the large curved wooden desk slightly left of the bookshelf center, leaving a narrow aisle between desk and shelf. The curve should bow outward toward the front of the platform. On top of the desk, add the long pale table runner that spills over the left edge, then set the glowing open book and its lectern in the middle. To one side, stack a couple of closed books and a quill stand. Behind the desk, put the high-backed purple chair so that it faces the open book, with its back toward the front railing. At the front left base of the desk in Dreamy Room Level 556, position the long almost-unrolled scroll so it trails from the desk down onto the floor tiles, pointing toward the platform’s center.
Step 8. Furnish the left lounge area with couch, candelabra, bottles, and plant in Dreamy Room Level 556
Shift your attention to the cozy left lounge of Dreamy Room Level 556. Place the ornate purple chaise lounge along the left inner edge of the platform, parallel to the back wall but closer to the front. Its higher backrest should be on the left, with the lower foot end stretching toward the center of the room. On the small side table at the head of the couch, arrange the cluster of glass bottles and scrolls—keep them tight together so they read as an alchemist’s kit. Behind the couch, near its mid-point, stand the tall gold candelabra with multiple candles and blue flames; its base must sit exactly one tile behind the couch so it doesn’t overlap awkwardly. In front of the couch on the floor of Dreamy Room Level 556, add a leafy potted plant to soften the stone, slightly offset toward the walkway side so it doesn’t block the main path.
Step 9. Finish the right balcony corner with flowers, jugs, and extra candles in Dreamy Room Level 556
The right balcony corner of Dreamy Room Level 556 is a still-life of color and flame. Inside the railing, near the right-most corner, place the round pot of bright purple flowers on the floor. Just behind and slightly to the left of this pot, add the golden jug and its matching tray, making sure both sit inside the railing line so they don’t appear to float outside the platform. Along the top rail, reinforce the earlier candle row by clustering a few brighter candles near this corner; in Dreamy Room Level 556 the highest concentration of candlelight should sit beside the flower pot, so adjust their spacing until it looks like a small altar. Double-check that no candle overlaps with the flowers or jugs; all flames must remain cleanly visible to keep the scene readable when the camera zooms out.
Step 10. Add small greenery and lighting accents to balance Dreamy Room Level 556
The final polish in Dreamy Room Level 556 comes from subtle plants and lights that tie areas together. First, place a small floor plant near the center-front of the platform, just left of the curved desk and slightly behind the front edge. This plant in Dreamy Room Level 556 bridges the balcony area and the lounge, stopping the front from feeling empty. Next, check all blue-flame torches: there should be one on the left walkway, one free-standing golden torch near the left front column, and multiple sconces on the back wall. If the free-standing torch isn’t present yet, stand it on the main floor near the left inner corner, opposite the balcony candles, so the light distribution feels symmetrical. Step back and scan Dreamy Room Level 556 for gaps; if any plant or light seems off-center, nudge it exactly one tile at a time until everything matches the finished reference.
Notes and Precautions for Dreamy Room Level 556
Because Dreamy Room Level 556 is isometric, depth can be confusing. Objects that look like they’re on the same row might actually be one tile apart. Always line pieces up with the floor-tile grid, not just by eye. Avoid overlapping vertical elements such as columns, candelabras, and the back-wall sconces; if they visually merge, Dreamy Room Level 556 becomes messy and the game may even refuse placement. The giant hand and waterfall must remain clearly below the platform edge—placing them too high can make them look like wall decorations instead of supports. When working around the balcony in Dreamy Room Level 556, ensure that pots and jugs stay inside the railing, while vines stay attached to the underside. Finally, remember that most difficulty here comes from small offsets of a single tile; if something feels wrong, move it one grid step rather than rotating or replacing it entirely.
Tips and Tricks from top player for Dreamy Room Level 556
Top players approach Dreamy Room Level 556 by placing all the biggest silhouettes first: pillars, hand, waterfall, bookshelf, couch, and desk. Once those are locked, every smaller object in Dreamy Room Level 556 becomes easier to position by aligning with those anchors. Another strong strategy is to work from back to front: start with the rear columns and wall lights, then the bookshelf and desk, then the lounge, and only finish with balcony candles and floor plants. This order prevents you from accidentally hiding important anchors behind foreground clutter in Dreamy Room Level 556. Use visual symmetry: match the left walkway torch with the balcony candles on the right, and the back-wall sconces with the free-standing candelabra. Finally, when stuck, temporarily remove all small items and re-place them in groups—plants, then books, then candles—so your brain can check one category at a time instead of the entire room.
Final Scene Description of Dreamy Room Level 556
When Dreamy Room Level 556 is complete, the empty stone platform has become a suspended wizard’s library. The huge blue hand rises from the darkness, cradling the balcony lined with glowing blue candles and trailing vines. On the right, a tall bookshelf packed with books, scrolls, and jars glows under warm wall sconces, while a curved desk with an open book waits at the center of study. To the left, a plush purple chaise lounge and golden candelabra create a relaxed reading nook beside the stone walkway and its lone torch. Background columns and floating rocks frame the entire scene of Dreamy Room Level 556, and the soft waterfall pours into the void, making the room feel like a secret sanctuary hanging in the sky.