Dreamy Room Level 325
Dreamy Room Level 325 guide - Dreamy Room 325 Walkthrough & Solution.

Important Notice Regarding Level Numbering
Due to frequent changes in Dreamy Room's level numbering and differences between platforms (Android/iOS) – for example, level 325 on Android might not be the same as level 325 on iOS – the text guide below may not always match the images and video above. Please prioritize the image and video guides. If you find that the guide content doesn't match your current level, please visit the All Level Walkthroughs page to find the correct guide based on level images. Thank you for your understanding.
Dreamy Room Level 325 Walkthroughs & Guide
Step 1. Place the pool shell on the lower deck (Dreamy Room Level 325).
Begin at ground level. Drag the translucent rectangular pool so it fits the blue grid on the lower terrace, hugging the curvy inner edge of the platform. On Dreamy Room Level 325 the pool’s left side must align with the small staircase cutout; the right side sits flush against the right wall’s shadow. Add the pale steps inside the pool at the front-left corner so they point up toward the bar area. This step locks the entire scene’s geometry, so take time to nudge until you see the crisp outline snap. The challenge in Dreamy Room Level 325 is positional precision, and the pool establishes all later placements, including the snack rail and floatables.
Step 2. Install the upstairs bar platform and signage (Dreamy Room Level 325).
Move to the upper terrace. Place the L-shaped bar along the front-left rim, leaving a handbreadth of floor between bar and pool edge. On Dreamy Room Level 325 the bar’s short leg should face right; the long counter runs left-to-right. Mount the “HEY PARTY” marquee just behind the bar’s left end so its rounded top peeks above the counter, lights facing forward. Snap the glass/bottle back-shelf to the wall directly under the marquee. Put the small potted plant on the bar’s outside corner ledge, and the snack bowl on the near left of the counter. This exact arrangement is vital in Dreamy Room Level 325 to keep sightlines open to the pool.
Step 3. Seat the four colorful stools in a gentle arc (Dreamy Room Level 325).
Stool order matters in Dreamy Room Level 325. From left to right, place orange, purple, blue, and lilac stools, each tucked one tile off the bar’s lip so their bases sit on the lavender floor, not the ledge. Rotate them so seats face the counter at a slight angle. If a stool snaps too close, the bartender bear can’t appear correctly in Step 4. The arc should mirror the bar’s curve and leave a narrow walkway behind. Double-check that the far-left stool doesn’t overlap the staircase down to the pool. Dreamy Room Level 325 rewards these micro-adjustments with clean, readable silhouettes.
Step 4. Build the birthday lounge: bears, sofa, throne, and cake table (Dreamy Room Level 325).
Place the pink two-seat sofa against the back wall, centered on the inner corner. To its right, add the ornate pink-and-gold throne angled slightly toward the pool. Seat the crowned birthday bear on the throne and the larger bear in a red sweater (with tiny Santa hat) on the sofa’s left cushion. In front of them, set the round, low cake table with a pink-and-white layer cake and two wine glasses—exactly between sofa and throne. In Dreamy Room Level 325, this cluster must sit just left of the DJ area so the “HAPPY BIRTHDAY” screen is visible behind it. The warmth of the lounge defines the party’s narrative in Dreamy Room Level 325.
Step 5. Set the DJ booth, gifts, and birthday screen with speakers (Dreamy Room Level 325).
Move to the right wall. Snap the rectangular DJ booth so its back edge kisses the wall and its front edge aligns with the lounge zone. Place the blue-capped DJ behind the decks, hands up. Immediately to the booth’s left front corner, stack the gift boxes: a tall green present on the bottom, a bright yellow box, and a blue ribboned box forward. Now mount the large “HAPPY BIRTHDAY” display on the right wall, bordered with pastel balloons. Flank the screen with the two tall speaker towers—one on each side. On Dreamy Room Level 325 the right speaker should almost touch the mini tub from Step 6.
Step 6. Add the mini round tub, champagne bucket, and right-side details (Dreamy Room Level 325).
In the back-right nook, place the small circular purple tub so its rim overlaps the corner shadow; seat the party kid inside, facing left. Just in front of that tub, drop the silver ice bucket with a green bottle of champagne; its handle should angle toward the pool. This cluster balances the DJ booth visually in Dreamy Room Level 325. Ensure nothing intrudes on the walkway running parallel to the pool’s glass wall. If the tub is too far forward, it blocks gifts; too far back, it loses the cozy corner effect crucial to Dreamy Room Level 325’s composition.
Step 7. Populate the pool with floatables and the sunbathing baby (Dreamy Room Level 325).
Return to the water. Place the orange swim ring slightly left of center. Float the pink-white beach ball at front-right, one tile from the glass. Line three rubber ducks in a playful diagonal from back-right toward the ring. Add the sunglasses-wearing baby relaxing mid-pool, just behind the ring, angled toward the DJ. Stair placement from Step 1 now matters: the water surface lines should meet the step edge, and the swimmers should not overlap the step’s highlight. These relationships are non-negotiable in Dreamy Room Level 325, where tiny offsets can prevent correct completion.
Step 8. Lay the poolside snack rail and tropical drinks (Dreamy Room Level 325).
Snap the long, low serving rail along the upper edge of the pool, centered front-to-back so it runs parallel to the glass. Set the cocktail tray with tall, colorful drinks on the left side of this rail; place the fruit platter with sliced watermelon and berries to its right. A pair of sunglasses and small sandals rests near the tray—tilt them so they imply someone just hopped into the water. Dreamy Room Level 325 expects these mini props to align with the rail’s metal feet; they should not touch the pool lip. This gives a tidy party-service vibe essential to Dreamy Room Level 325.
Step 9. Finish the bar scene: bartender bear, bottles, shaker, and side car (Dreamy Room Level 325).
Seat the bartender bear behind the counter, facing the stools, with a shaker in paw and two mixed drinks on the near corner. Arrange assorted bottles on the wall shelf: tall green on the left, clear bottle center, amber bottle right. Keep the snack bowl with chips beside the tap. On the outside ground, at the lower-left lawn cutout, slide the red sports car nose-in under the platform so only its hood shows. This small detail anchors the composition in Dreamy Room Level 325 and confirms you’ve left proper floor clearance between the bar lip and pool railing in Dreamy Room Level 325.
Step 10. Build the rooftop cube: windows, bunting, lights, vines, dish, and golden crescent (Dreamy Room Level 325).
Above the bar and lounge sits the rooftop cube. Place the glass-windowed module directly over the back half of the platform; its edges must align with the walls’ posts. Wrap the roofline with triangular bunting and multicolor string lights; dots should sit just below the roof cap. Drape leafy vines on the back-left and back-right edges for softness. Fix the small satellite dish on the roof’s left rear corner. Finally, crown the roof with the gold crescent-and-star sculpture centered on the cap, slightly forward so the star is visible. This vertical finish is the last structural lock in Dreamy Room Level 325, signaling you’re ready for completion.
Notes and Precautions
- The main challenge in Dreamy Room Level 325 is determining the correct placement for each object. If something won’t snap, verify the pool and bar alignment first; those anchors control most snap points in Dreamy Room Level 325.
- Keep walkways clear: one tile in front of the bar, one tile between DJ booth and gifts, and a slim lane on the right by the mini tub.
- Don’t overhang props on ledges. Dreamy Room Level 325 checks for tiny overlaps that can block completion even when the scene “looks” right.
- If the birthday screen won’t accept balloons, move the speakers a fraction outward, then remount the screen.
- Remember: Dreamy Room Level 325 is a relaxing, story-through-objects experience—slow, methodical placement is the intended pace.
Tips and Tricks from top player
- Anchor first. In Dreamy Room Level 325, place pool → bar → lounge → DJ → roof, then fill with smalls. This order minimizes conflicts.
- Use edge echoes. Match arcs: bar curve ↔ stool arc ↔ pool wave. Mirroring shapes helps you guess positions in Dreamy Room Level 325 when guides are faint.
- Micro-nudges matter. If an item jitters, rotate or tug one pixel. Dreamy Room Level 325 often requires a subtle rotation to reveal the snap.
- Balance clusters. Gifts belong left-front of the DJ booth; champagne sits forward of the mini tub. Symmetry cues solve many placements in Dreamy Room Level 325.
- Save floaters for last. Ducks, beach ball, and ring can drift while you nudge steps; lock the stairs first in Dreamy Room Level 325.
Final Scene Description
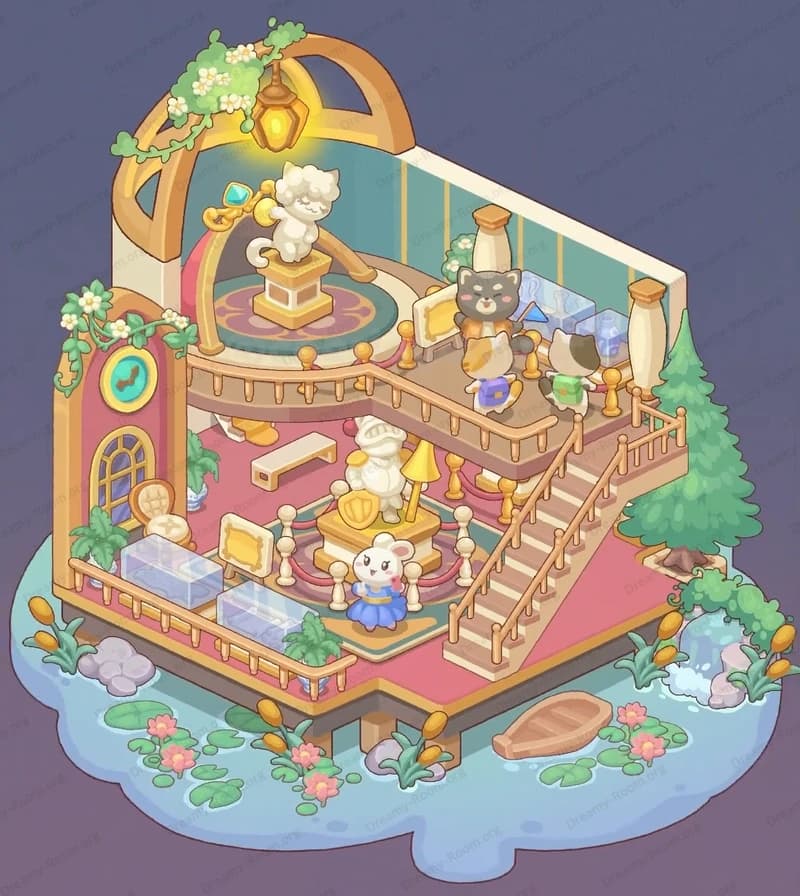
When finished, Dreamy Room Level 325 blossoms into a lavender rooftop birthday bash. The glass-walled pool sparkles below, with an orange ring, three yellow ducks, and a pink beach ball bobbing while a sunglasses-clad baby floats happily. A slim rail along the pool offers cocktails and fruit beside abandoned shades and sandals. Up top, the left side is a lively bar with four colorful stools, a “HEY PARTY” marquee, back-shelf bottles, snacks, a plant, and a smiling bartender bear. Center-back, a pink sofa and a gilded throne host two cuddly bears, cake table between them. To the right, a blue-capped DJ pumps tunes before a balloon-trimmed “HAPPY BIRTHDAY” screen flanked by speakers, with stacked gifts nearby and a bubbly mini tub behind, champagne on ice. Above it all, strings of lights, bunting, vines, a satellite dish, and a golden crescent crown the cube, while a red car peeks from the lawn below—celebration complete in Dreamy Room Level 325.