Dreamy Room Level 442
Dreamy Room Level 442 guide - Dreamy Room 442 Walkthrough & Solution.
Important Notice Regarding Level Numbering
Due to frequent changes in Dreamy Room's level numbering and differences between platforms (Android/iOS) – for example, level 442 on Android might not be the same as level 442 on iOS – the text guide below may not always match the images and video above. Please prioritize the image and video guides. If you find that the guide content doesn't match your current level, please visit the All Level Walkthroughs page to find the correct guide based on level images. Thank you for your understanding.
Dreamy Room Level 442 Walkthroughs & Guide
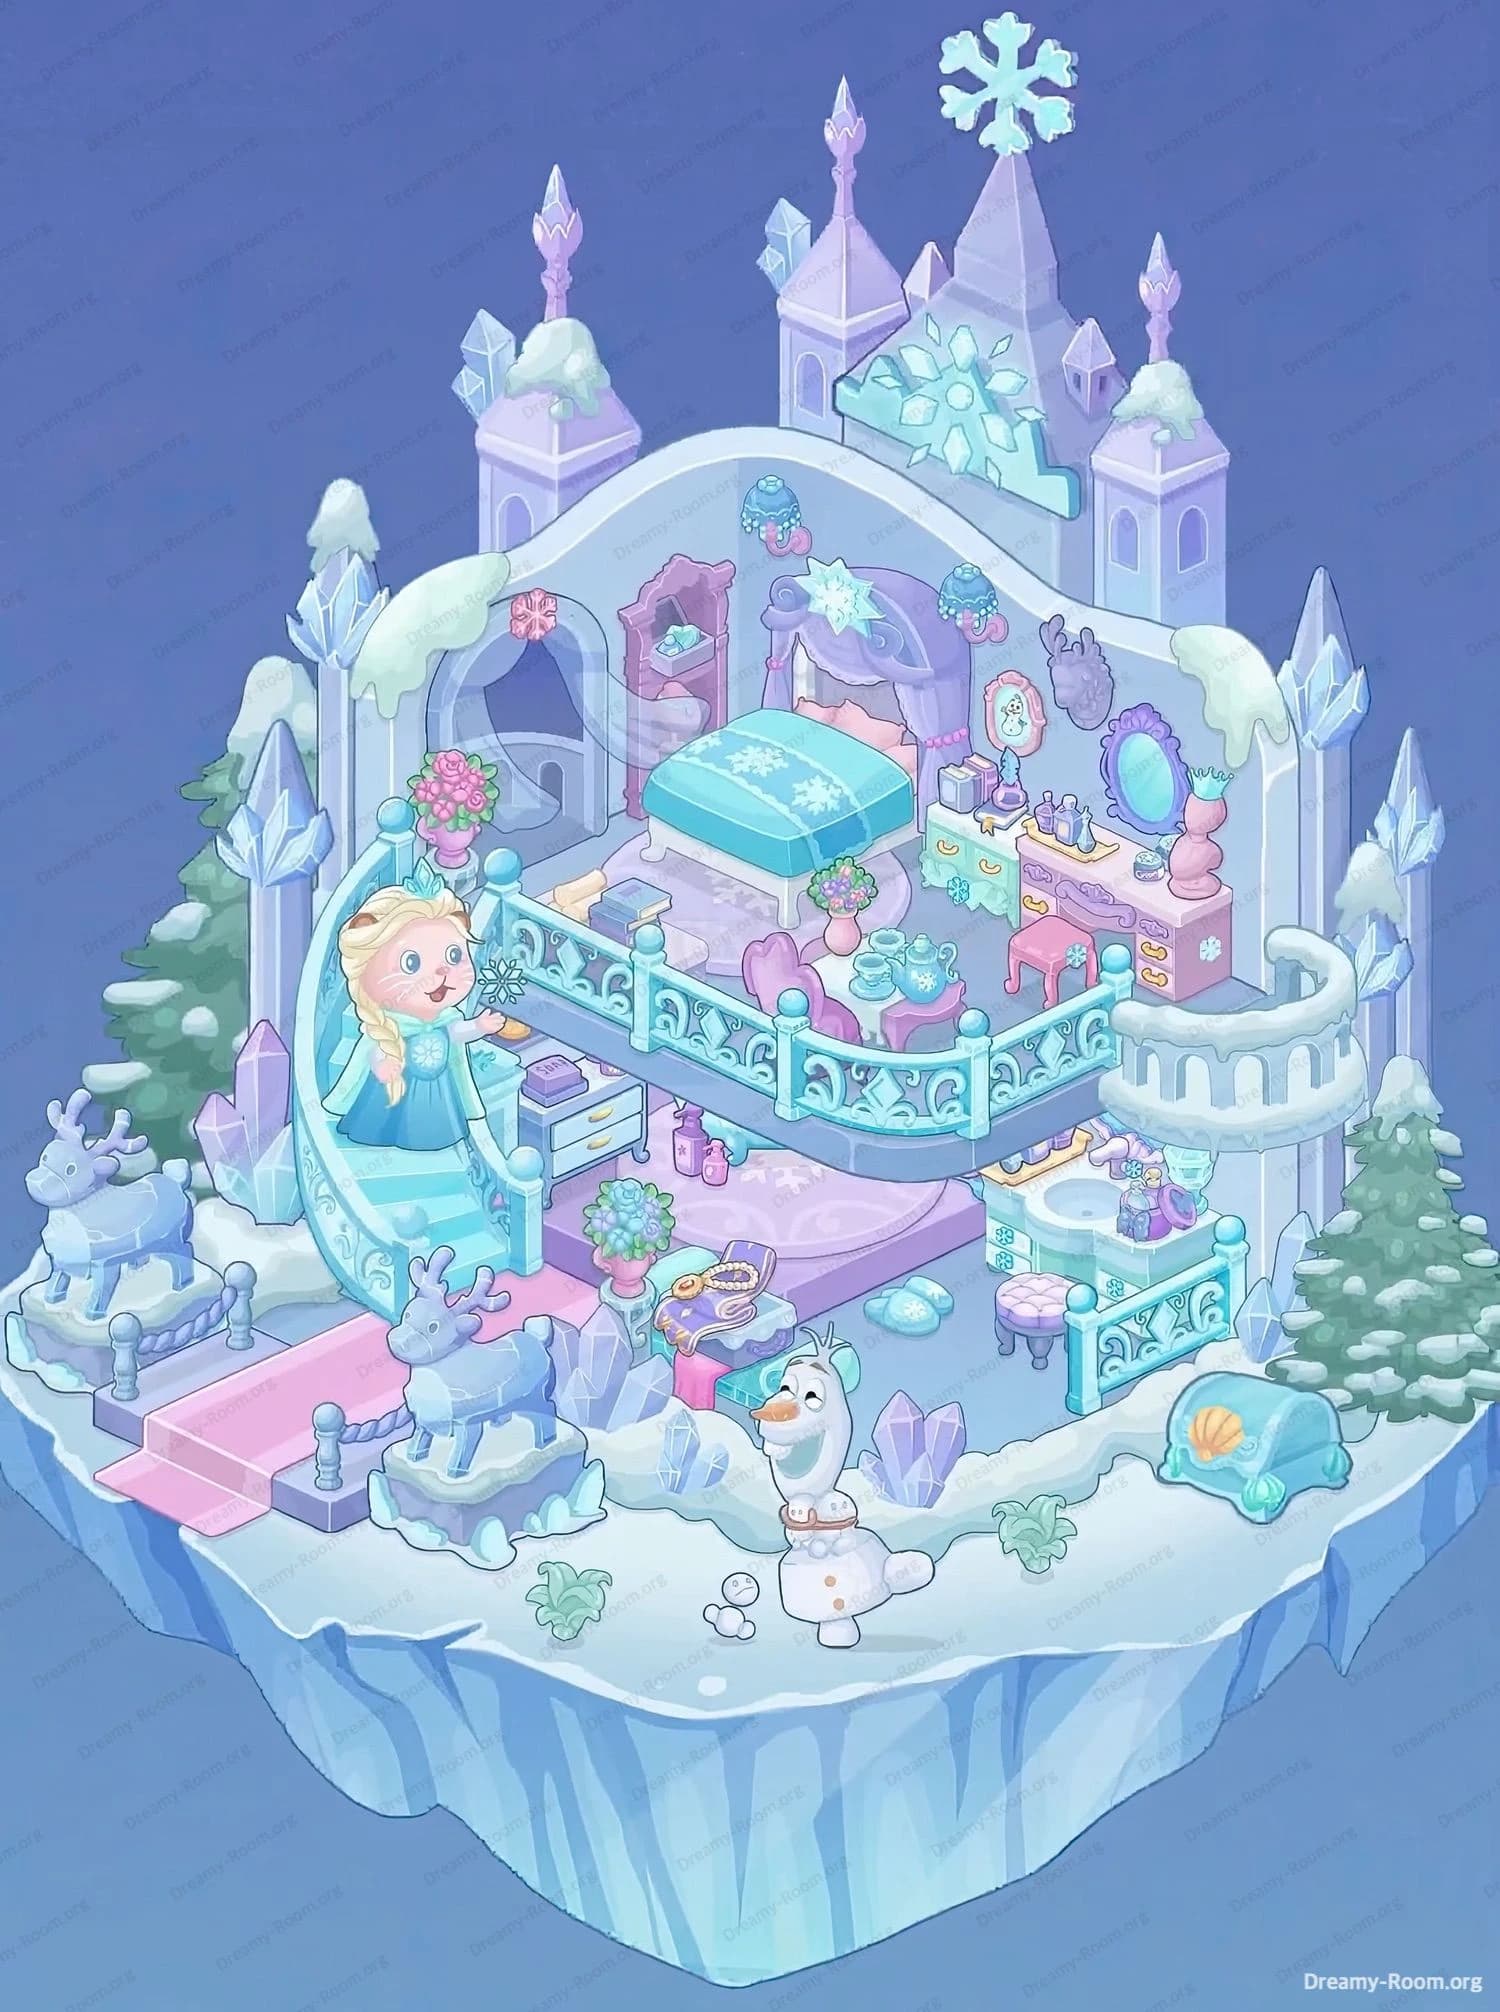
Step 1. Place the ice slide on the left balcony
Start Dreamy Room Level 442 by building the dramatic left side. Select the tall curved ice slide and snap its top to the upper-left edge of the inner wall, right where the balcony begins. The slide should curl down to the lower front terrace, ending just behind the left crystal reindeer. Next, place the blue railing that runs along the top balcony, lining it from the left tower towards the middle, so that the posts line up with the slide’s starting point. Add the Elsa-like cat character halfway down the slide, facing forward toward the viewer. On the left outside edge, behind the slide, keep the snowy fir tree and tall ice crystals untouched, as those background pieces are already fixed when Dreamy Room Level 442 begins and help you align the new items.
Step 2. Place the crystal reindeer at the front entrance
Now focus on the snowy front platform of Dreamy Room Level 442. Place the pink staircase at the very front-left corner so its top step touches the edge of the main terrace. On this terrace, you must position two blue crystal reindeer statues symmetrically: one on a pedestal to the left of the slide’s landing and one to the right, both facing inward toward the center path. Between them, add the short turquoise posts and rails to form a low fence that frames the entrance. Behind the left reindeer, tuck a cluster of faceted blue and purple crystals, slightly overlapping the reindeer’s base. This area of Dreamy Room Level 442 looks like a ceremonial approach to the castle, so check that neither reindeer is too close to the edge and that the pedestals sit flat on the snow, mirroring each other.
Step 3. Place the bed and wardrobe along the back wall
Move to the upper interior of Dreamy Room Level 442. Center the turquoise bed against the back wall, with its snowflake-patterned blanket pointing forward and the pink-padded headboard against the wall. Above it, hang the ornate purple canopy with the large glowing snowflake crest in the middle, and put the two hanging blue lanterns with pink bows on either side of the crest. To the left of the bed, place the tall pink wardrobe; align its back perfectly with the wall so the open middle shelf holding the small cyan object faces forward. Further left, add the arched doorway with the swirling pattern, then hang the pink snowflake decoration above that arch. At the foot of the bed, drop a stack of books and a tiny side chest near the balcony rail. These bedroom anchors define the central living space of Dreamy Room Level 442 and must touch the curved wall without gaps.
Step 4. Place the vanity and wall decorations on the right
On the upper-right side of Dreamy Room Level 442, create the dressing corner. First, position the two-tone dresser so that the yellow drawers are on the left and the pink drawers on the right, pressed firmly against the wall. On top of the dresser, place the bottles and jars: perfumes on the left, taller containers and a jewelry box on the right. Directly above the left half, hang the framed portrait of the cat princess; above the right half, mount the large turquoise mirror on its pink stand so it leans slightly forward. To the far right of the back wall, hang the purple reindeer head trophy between the mirror and the curved stair starting point. Make sure the curved white balcony edge sits in front of this area, flowing into the spiral staircase that descends to the lower floor. When arranged correctly, this part of Dreamy Room Level 442 feels like a luxurious dressing alcove.
Step 5. Place the tea corner, plants and storage on the mezzanine
The center balcony of Dreamy Room Level 442 doubles as a cozy tea space. Inside the railing, place the circular turquoise rug directly in front of the bed. On this rug, put the low snowflake table in the middle, then set the tiny teapot and two cups on top. Add the two pink heart-shaped chairs facing each other across the table. Near the left chair, place the round flower stand with the bouquet of bright pink and green blossoms, just inside the balcony rail. Under the balcony, on the lower-left interior, slide the small white and blue chest of drawers against the wall, then stack a couple of books and potion bottles beside it. This cluster of tea set, flowers and storage defines the social heart of Dreamy Room Level 442 and must stay tight to the rail and wall so characters can “walk” around it without overlapping objects.
Step 6. Place Olaf, crystals and treasures on the lower snowfield
Now decorate the front center of Dreamy Room Level 442. Place Olaf the snowman slightly to the right of the middle, on the open snow patch in front of the balcony. His carrot nose should point toward the viewer, and his twig arms should be clear of other items. To Olaf’s left, drop two small snowballs in a diagonal line, suggesting he has been playing. Scatter a couple of small green bushes behind and to the sides of him. Just behind Olaf, place the low rectangular cushion or trunk in purple and gold, then lay the open storybook with the golden necklace across it. Slightly left of this trunk, position another potted flower, matching the style of the upper bouquet. To Olaf’s right, fix a cluster of purple and blue crystals and another small plant. This snowy play area is what gives Dreamy Room Level 442 its lively, animated feel.
Step 7. Place the study corner and shell carriage on the right
Finally, finish the lower-right side of Dreamy Room Level 442. Start with the spiral staircase: its top should connect to the upper-right balcony where the dressing area ends, and its steps should curve down to the lower-right platform. Along the edge of that platform, place the turquoise railing that matches the upper balcony. Inside this space, position the curved desk against the inner wall, then place the stack of scrolls, jars and tiny bottles across its surface. Add the small round stool with the lilac cushion in front of the desk. To the outer right on the snow, place the turquoise shell carriage or chest so that its golden shell emblem faces forward, just in front of the right-side fir tree and crystal pillar. When this corner is placed correctly in Dreamy Room Level 442, it looks like a cozy study and storage nook beside a magical sled.
Notes and Precautions
Because the main challenge of Dreamy Room Level 442 is precise placement, avoid relying only on size and instead watch the silhouettes and overlaps. Many pieces—like the reindeer statues, potted flowers and small potion bottles—are similar in color and can easily be swapped by mistake. Always check how an item interacts with the curved back wall and balcony rail; if anything floats away from the wall or clips over the railing, it’s probably in the wrong spot for Dreamy Room Level 442. Be careful with vertical alignment too: the slide must meet the upper floor exactly, and the spiral stairs must connect both levels without a visible gap. Finally, before dropping Olaf or the shell carriage, make sure the surrounding crystals and plants are down so you don’t accidentally cover their intended footprint and break the clean layout of Dreamy Room Level 442.
Tips and Tricks from top player
A top player approaches Dreamy Room Level 442 by thinking in layers: back wall first, then upper floors, then lower snowfield. Start with the tallest anchor items—the bed, wardrobe, dresser and door—so you lock the proportions of the room early. In Dreamy Room Level 442, symmetry is a major clue: the reindeer statues, crystal clusters and balcony rails almost always mirror each other left and right. Use their reflections to double-check your placements. When dealing with tiny items like books and potions, zoom in and look for shadows; Dreamy Room Level 442 uses soft, clear shadows to show exactly where an object should touch the floor or furniture. If something feels off, remove nearby clutter and rebuild that zone from its biggest object outward instead of trying to nudge lots of small pieces around.
Final Scene in Dreamy Room Level 442
When everything is in place, Dreamy Room Level 442 becomes a sparkling winter palace floating on a chunk of glowing ice. The tall crystal towers and snowflake crest rise above a cozy two-story bedroom, where the turquoise bed and tea corner sit under shimmering lanterns. To the right, a rich vanity corner and curling staircase lead down to a busy study and the shell-like carriage. On the left, the turquoise slide carries the cat princess down between two proud crystal reindeer that guard the pink steps. At ground level, Olaf plays among snowballs, green bushes and gem-like crystals, with books and treasures scattered behind him. Evergreen trees and icy spires frame the scene so Dreamy Room Level 442 feels alive, balanced and perfectly organized—a tiny storybook castle where every object has found its one correct home.