Dreamy Room Level 462
Dreamy Room Level 462 guide - Dreamy Room 462 Walkthrough & Solution.
Important Notice Regarding Level Numbering
Due to frequent changes in Dreamy Room's level numbering and differences between platforms (Android/iOS) – for example, level 462 on Android might not be the same as level 462 on iOS – the text guide below may not always match the images and video above. Please prioritize the image and video guides. If you find that the guide content doesn't match your current level, please visit the All Level Walkthroughs page to find the correct guide based on level images. Thank you for your understanding.
Dreamy Room Level 462 Walkthroughs & Guide
Step 1. Place the underwater walls, glass floor, pipes, and elevator structure
At the start of Dreamy Room Level 462, the striped mint-and-cream back wall and lilac side walls are already in place, as well as the transparent tiled floor with aquarium panels showing seaweed outside. Your first job in Dreamy Room Level 462 is to add the building infrastructure around this shell. On the left exterior wall, attach the vertical copper pipes that run from the bottom to the middle of the building, along with the blue electrical box near the lower third. On the right exterior, add the grey utility box near the middle and the tall glass elevator shaft that runs from the bottom level to the roof. Make sure the elevator hugs the right edge and each story has a small door cut-out; this elevator position is crucial for clearing space inside Dreamy Room Level 462 for the shops and café.
Step 2. Place the machinery and planters on the bottom hydroponic floor
The lowest floor of Dreamy Room Level 462 is a plant and machinery zone that sits directly above the underwater windows. On the back-left corner, place the tall white machine with a screen, then put the squarer unit with the visible hose directly in front of it; connect both to the left wall pipes so Dreamy Room Level 462 looks like it has a working filtration system. In the middle of the floor, arrange two wooden benches running front-to-back, each with pale green square planters at their ends. Add lush green plants in every planter so Dreamy Room Level 462 feels vibrant and alive. Between the benches, slightly toward the front, place the small sink block with a silver faucet. Finally, add two more low planters along the front edge, lining them up with the glass so the foliage appears against the aquarium background.
Step 3. Place the music stage and audio equipment on the middle-left floor
Now you move up one level in Dreamy Room Level 462 to build the entertainment hub. On the left half of this middle floor, snap in the curved orange stage so its flat side hugs the back wall and its rounded edge faces forward. Around the front rim, make sure the small yellow lights are visible; these are important visual cues in Dreamy Room Level 462. Center a pig-like singer character on the stage with a microphone stand directly in front of them. Put one large speaker to the left and one to the right on the stage. Against the far left wall, slightly behind the stage, mount the purple sound-wave monitor screen. Below it, add the white and mint sound equipment units so the cables visually connect to the pipes from below. This precise alignment keeps the stage from overlapping the café space that will fill the right side of Dreamy Room Level 462.
Step 4. Place the café bar, central garden tables, and round seating area
The right side of the same middle floor in Dreamy Room Level 462 becomes a cozy café full of plants. Start by placing the long wooden dining table in the center-right area, parallel to the front edge. Line the table with dense green plants in rectangular planters along the middle. On the far right wall, place the bar counter with bottles, glasses, and mixers; attach four pink stools in front of this counter facing the bar. Dreamy Room Level 462 also needs two small round tables near the front-right corner; each table should have three matching stools and a yellow-flower pot in the middle. At the back, between the bar and the elevator, position a side counter with fruits, juice containers, and cups. Finally, drop a small character behind the bar and two customers near the central table. Their spacing is part of the layout logic of Dreamy Room Level 462, so don’t crowd them.
Step 5. Place the supermarket shelves and checkout area on the upper floor
Climb another level up inside Dreamy Room Level 462 to transform the empty upper floor into a busy mini-market. Along the back wall, slightly left of center, place the tall stack of blue-topped boxes and the beige crates to build a stock corner. In front of that, nearer the viewer, add the pale-blue multi-tier shelf full of bottles and cartons. To its right, align the glass refrigerator against the back-right wall, filled with vertical rows of drinks. On the front-right area of Dreamy Room Level 462, position the curved produce display overflowing with fruit and bread; it should sit just in front of the refrigerator. On the far front-left, install the checkout counter with a large blue screen facing outward and a pink gift bag on the edge. Place the cashier character behind the counter and a small shopping animal in front. Neatly arranging these pieces is key to solving Dreamy Room Level 462.
Step 6. Place the side pantry, hanging goods, and elevator occupants
There are a few supporting details that make Dreamy Room Level 462 look finished and they’re easy to miss. On the mid-right wall of the supermarket floor, between the bar code poster and the elevator, hang the trio of beige sacks or shopping bags so they dangle slightly forward. Behind the produce counter, attach the wall rack that shows extra items and labels at eye level. Inside the glass elevator of Dreamy Room Level 462, add the small animal character standing roughly at the level of the supermarket floor, giving the impression they are traveling up or down. On the middle café floor, add another character looking toward the elevator door so the shaft feels integrated with the interior life of Dreamy Room Level 462. These small but precise placements prevent empty or awkward spaces and reinforce that every object in Dreamy Room Level 462 has a deliberate, story-driven location.
Step 7. Place the rooftop railings, greenery, solar panels, and train
The final construction layer of Dreamy Room Level 462 is the dramatic rooftop. First, outline the roof edge with the dark railing posts and rope, running them from the front-left corner all the way around to the front-right. In the central strip behind the railing, place the elongated hedge of green plants; this separates the train from the cliff-like roof edge in Dreamy Room Level 462. On the right side of the roof, install the slanted array of blue solar panels, making sure they rest on the lower right platform and tilt toward the viewer. Behind them, attach the signboard with the green arrow panel. On the far right, add the square grey rooftop structure that caps the elevator. Finally, lay down the raised track and snap the orange train on the left-side roof, headlights facing left. Snowflakes and the large moon should remain unobstructed in Dreamy Room Level 462, framing the scene.
Notes and Precautions
Because Dreamy Room Level 462 is entirely about exact object placement, small misalignments can block later items. Always zoom in before locking anything, especially the stage, benches, and bar, since these form the core grid for Dreamy Room Level 462. Avoid overlapping furniture with the elevator doors; the game often rejects placements that clip into the glass shaft. When arranging plants on the bottom floor and central table, keep them centered in their planters; leaving gaps may make Dreamy Room Level 462 look unfinished even if the game technically accepts it. Place shelves and refrigerators flush with the back wall so they don’t stick out into walking paths. Finally, remember that characters usually snap to specific “slots”; if one won’t stand where you expect, rotate or nudge nearby furniture rather than forcing it, preserving the intended traffic flow of Dreamy Room Level 462.
Tips and Tricks from top player
Experienced players treat Dreamy Room Level 462 like stacking layers of a cake: infrastructure first, then big furniture, then décor, then characters. Start on the lowest floor and do not touch the rooftop train until everything below feels locked in; this prevents you from overlooking tiny items that belong in Dreamy Room Level 462, such as wall bags or fruit bowls. Use the repeated plant shapes as alignment guides: once one planter is correctly placed, clone its position pattern for the others to keep symmetry across Dreamy Room Level 462. When unsure about an item, compare its color to nearby pieces—the game often groups similar colors on the same floor. Save after finishing each level of the building so you can easily revert without redoing all of Dreamy Room Level 462. Lastly, place characters last; they act like a visual checklist confirming every zone of Dreamy Room Level 462 is complete.
Final Scene – Dreamy Room Level 462 Completed
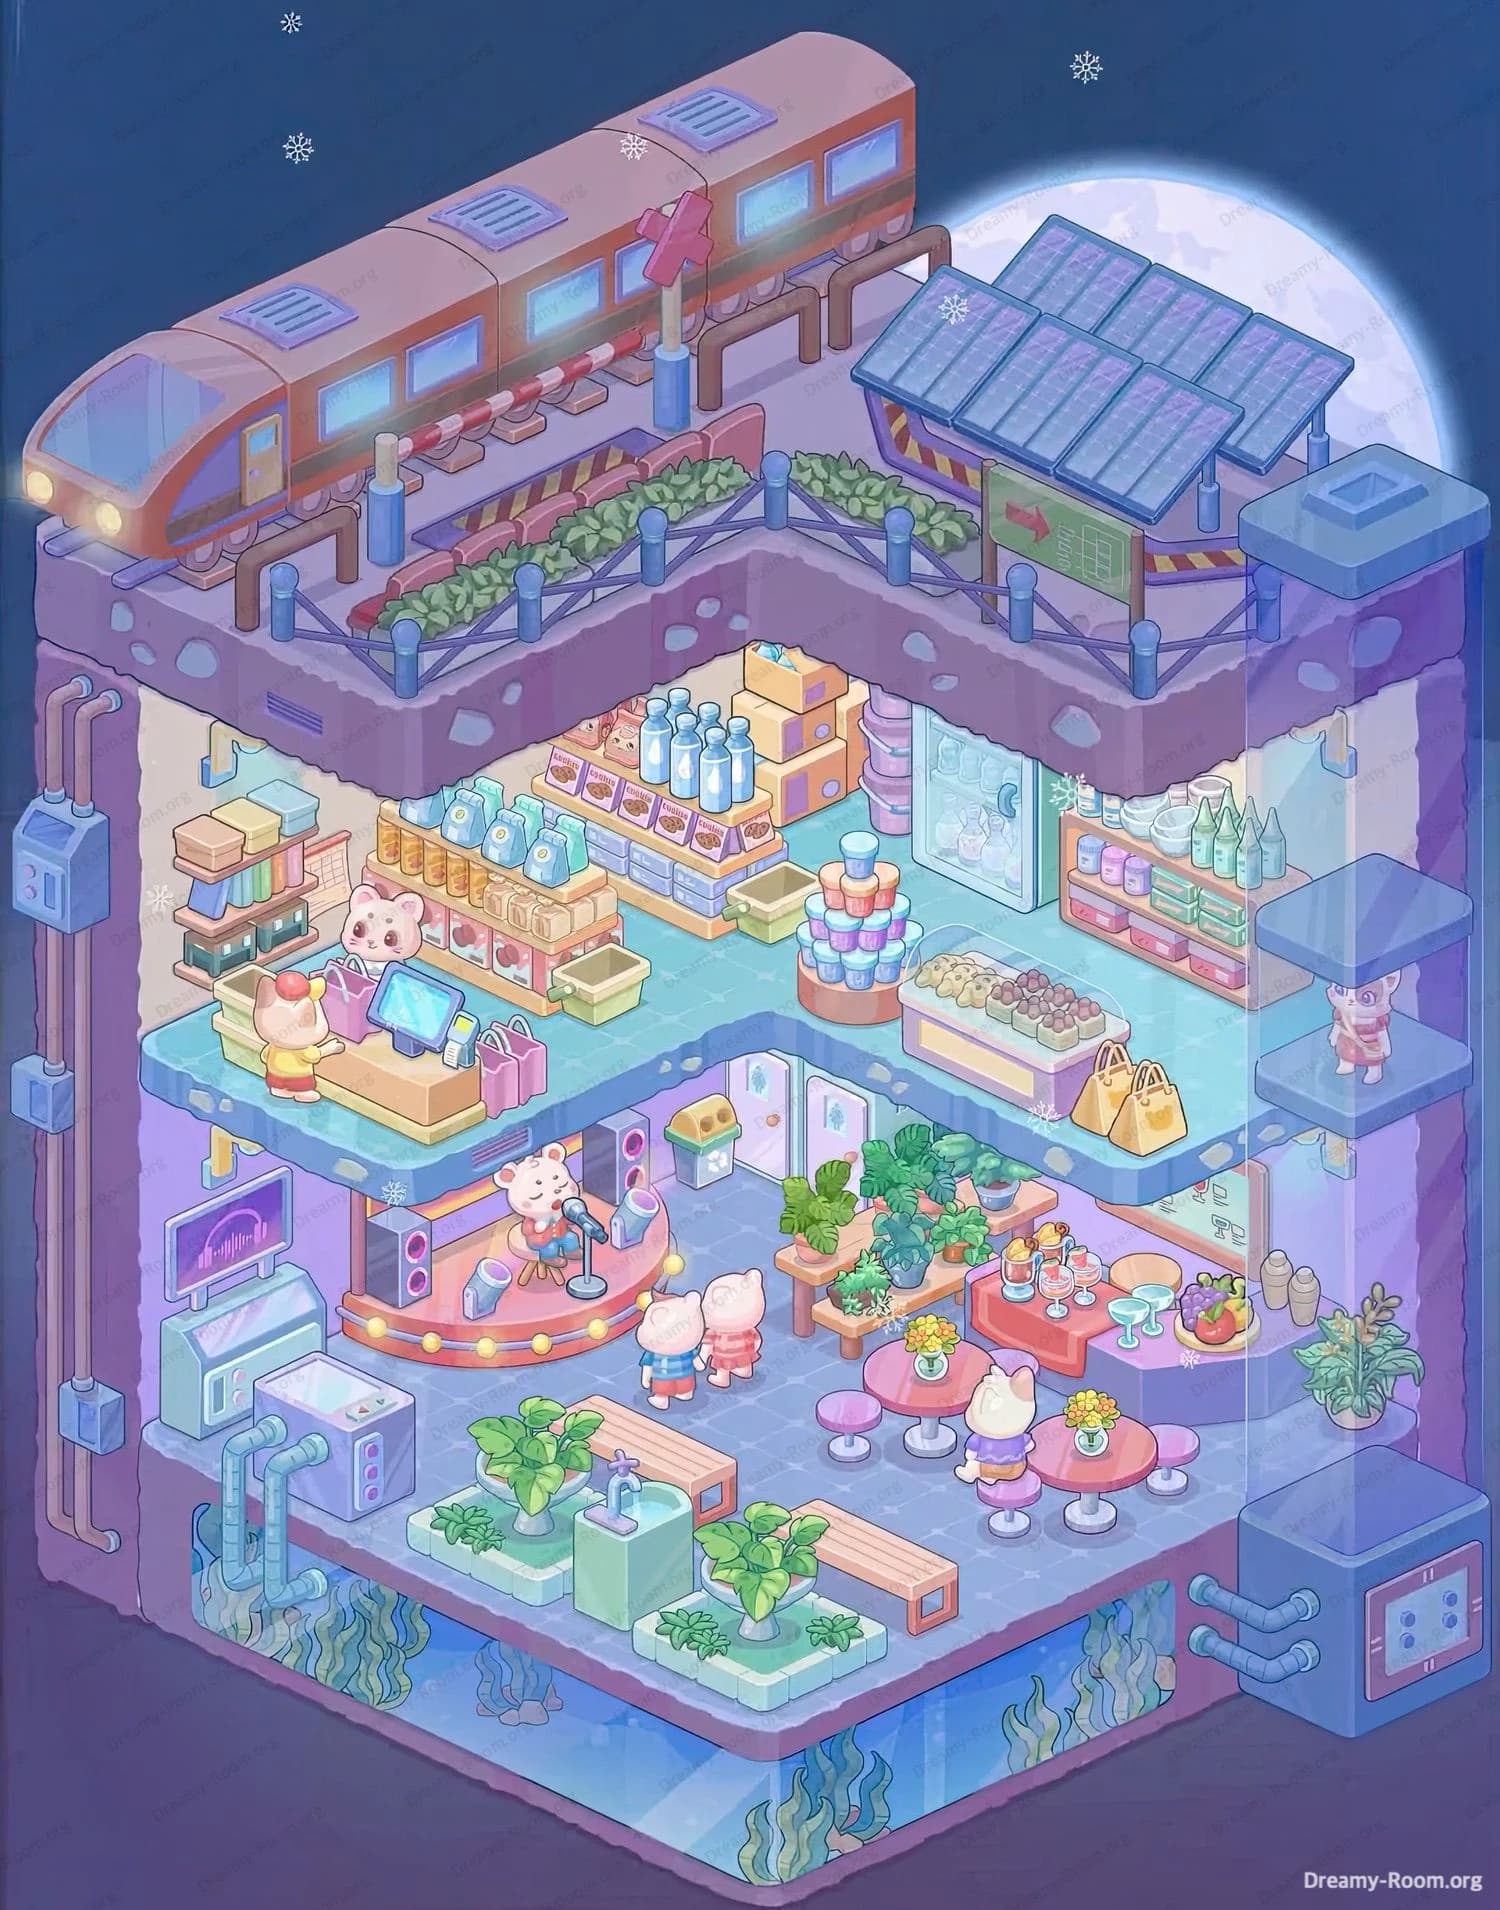
When every object is correctly placed, Dreamy Room Level 462 becomes a glowing vertical world stacked against a huge moonlit sky. At the base, soft blue water shimmers through the glass walls while tidy planters and humming machines suggest a self-sustaining hydroponic lab. Above it, the middle floor of Dreamy Room Level 462 buzzes with life: a singer performs on a curved stage framed by speakers and neon screens, while nearby guests relax at plant-lined tables, sipping drinks at the cozy café bar and chatting around round tables crowned with yellow flowers. The top interior floor of Dreamy Room Level 462 transforms into a tiny supermarket overflowing with shelves of bottles, boxes, a bright refrigerator, and a welcoming checkout counter. Crowning everything, a sleek train glides along the rooftop beside solar panels and rooftop greenery, snowflakes drifting through the night as Dreamy Room Level 462 glows like a miniature floating city.