Dreamy Room Level 436
Dreamy Room Level 436 guide - Dreamy Room 436 Walkthrough & Solution.

Important Notice Regarding Level Numbering
Due to frequent changes in Dreamy Room's level numbering and differences between platforms (Android/iOS) – for example, level 436 on Android might not be the same as level 436 on iOS – the text guide below may not always match the images and video above. Please prioritize the image and video guides. If you find that the guide content doesn't match your current level, please visit the All Level Walkthroughs page to find the correct guide based on level images. Thank you for your understanding.
Dreamy Room Level 436 Walkthroughs & Guide
Step 1. Place the drapery and greenery along the back beam
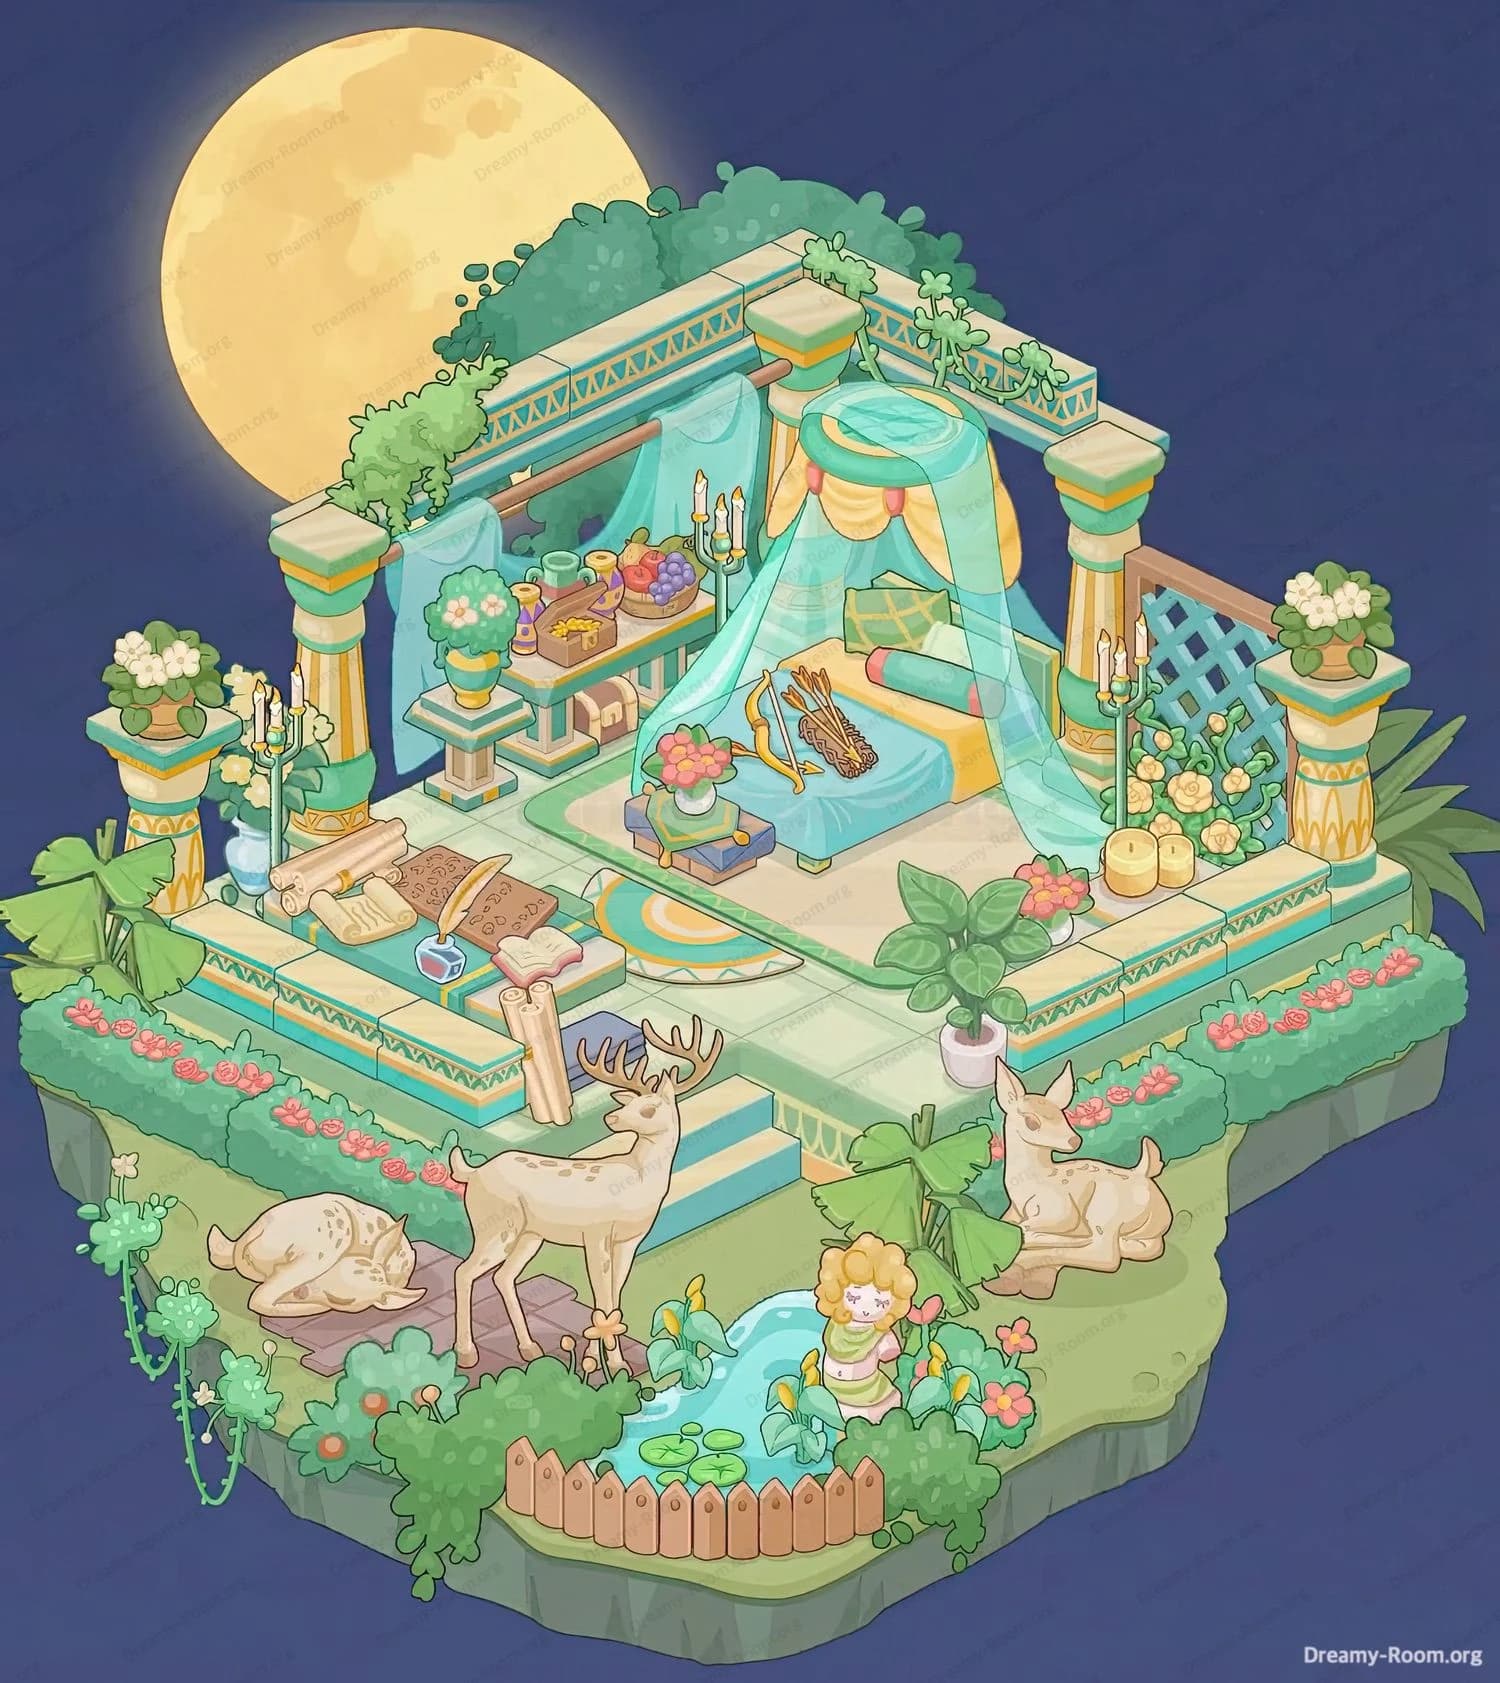
Start by dressing the three-column pergola that’s already on the platform. For Dreamy Room Level 436, hang the large turquoise curtains along the back and left spans so they fall just inside the tiles, not over the grass border. The right-hand edge of the back curtain should align with the right rear column; the left-side panel should hang between the left rear column and the center column. Now seat the vine strip on top of the back beam, letting three small tufts peek over the corners. This establishes the backdrop height for Dreamy Room Level 436 and creates the correct overlap for anything you place beneath it later. The moon and tree remain part of the scene background, so don’t try to move them in Dreamy Room Level 436.
Step 2. Place the bed, canopy ring, and linens under the pergola
Center the raised bed platform slightly right of the middle of the tiled area, keeping one tile of walkway visible on the front and right. In Dreamy Room Level 436 the round canopy ring sits directly above the bed head, and the sheer turquoise net drapes forward and to the right, kissing the floor with a soft triangular fold. Put the teal-and-gold pillows at the headboard; lay the golden lyre/harp diagonally across the blanket near the foot, strings facing left. A small low tray with a pink potted blossom goes at the end of the bed, front-left corner of the mattress. This grouping anchors Dreamy Room Level 436; verify that canopy fabric overlaps the headboard but does not clip the back curtain in Dreamy Room Level 436.
Step 3. Place the scholar’s bench, scrolls, and writing set on the left front tiles
Along the left front edge of the platform, position the long low bench so it runs parallel to the border trim. In Dreamy Room Level 436 the open book sits at the bench center, the feather quill dips into a blue inkwell at its right, and rolled parchment scrolls stack to the left and slightly in front. Leave a thumb of tile visible behind the bench so hedge pieces can sit later without conflict. This is the “study” zone of Dreamy Room Level 436, providing narrative cohesion with the bed’s musical theme. Keep the scrolls angled toward the player so their edges read clearly; a tidy, readable orientation is critical to scoring clarity points in Dreamy Room Level 436.
Step 4. Place the console table of bottles, fruit, and candles along the back-left
Push the long console table against the back-left inner tiles, just below the curtain line. In Dreamy Room Level 436 the tabletop carries colorful jars, vials, and goblets, a cluster of grapes, and a five-candle candelabrum toward the right end. To the table’s left, stand a floor candelabra with two high tapers beside the left column; its flames should rise just below the top planter bowl later. Add the two-tier flower pedestal between the bed and the console: the white blossoms on top should sit level with the bed’s canopy folds. This trio—table, candelabrum, pedestal—creates a height staircase in Dreamy Room Level 436, balancing the visual weight of the trellis you’ll place on the opposite side of Dreamy Room Level 436.
Step 5. Place the trellis, yellow roses, round canisters, and right-side plant
Move to the right rear corner. In Dreamy Room Level 436 the blue lattice trellis with a brown frame leans along the right edge, one tile in from the border, with its base aligned to the back-right corner tile seam. Wind the yellow rose vine so blooms cluster near the upper middle and the lower right of the trellis. Set the two round storage canisters (cream-colored, lidded) on the floor in front of the trellis, left canister slightly ahead of the right. Place the tall potted big-leaf plant at mid-right edge of the platform, leaves pointing toward the bed. These objects form the garden counterpart to the study zone, completing the interior symmetry of Dreamy Room Level 436 and helping frame the bed vista in Dreamy Room Level 436.
Step 6. Place planters, hedge strips, and perimeter flowers around the platform
In Dreamy Room Level 436, two ornamental pedestal planters crown the scene. The first sits atop the front-left standalone pedestal at the platform corner, filled with white flowers and trailing greens. The second sits on the left structural column’s crown, creating a vertical echo above the earlier floor candelabra. Now run the trimmed hedge strips with pink blossoms along the left and right outer tiles, forming a continuous raised border that stops at the platform’s front steps. Dot small flower clusters at the right-front and left-front corners. This green perimeter is a key puzzle cue in Dreamy Room Level 436: hedge height tells you which interior objects should slightly overlap it (bench and plant) and which should not (canisters and trellis) in Dreamy Room Level 436.
Step 7. Place the rug and light sources around the bed
Lay the circular rug with teal and gold rings on the floor just in front of the bed’s step, centered to the mattress. In Dreamy Room Level 436, two gold candelabra flank the sleeping area: one stands to the left near the console/curtain intersection, the other to the right close to the trellis but outside the netting’s sweep. Ensure the flame tips sit below the canopy ring to avoid awkward overlaps. Confirm the bed tray flower is visible through the net. These warm pools of light are essential for the nighttime mood of Dreamy Room Level 436 and subtly guide the player’s gaze from left study, to central rest, to right garden—exactly the narrative rhythm intended by Dreamy Room Level 436.
Step 8. Place the pond, fence, and child at the front-center grass
Drop the short wooden picket fence along the very front center grass strip, curving gently. Inside that fenced pocket, set the little round pond with two lily pads; the pond lip should touch the fence at two points. In Dreamy Room Level 436 the curly-haired child stands to the right of the pond, feet on grass, holding a wide leaf like an umbrella angled left. Trail creeping vines along the cliff rim below the fence to connect the scene vertically. This front micro-garden is your focal anchor outside the tiles in Dreamy Room Level 436; getting its spacing right leaves room for wildlife on both sides and keeps the pond reflections unobstructed in Dreamy Room Level 436.
Step 9. Place the deer trio and path stones across the grass band
On the left grass, lay two flat stepping stones angled toward the bench. Position the sleeping fawn just behind those stones, head curled toward the platform. In the front-center grass, place the standing stag with antlers proudly forward; a small star-shaped yellow flower should sit in front of his forelegs. On the right grass, seat the relaxed doe facing left toward the pond. Dreamy Room Level 436 reads best when the three deer form a gentle arc around the water feature, so keep their hooves on grass, not tile. The wildlife completes the pastoral storytelling of Dreamy Room Level 436 and gives motion cues that lead the eye back up to the bed canopy in Dreamy Room Level 436.
Notes and Precautions
- Collision order matters in Dreamy Room Level 436: place curtains before the bed so the netting overlaps correctly, and place hedge strips before bench/plant to allow tasteful overhangs.
- Keep flames away from fabric edges; in Dreamy Room Level 436 the candle flames should never pierce the canopy ring or curtains.
- The trellis belongs one full tile in from the right border; farther forward causes the canisters to clash with the potted plant in Dreamy Room Level 436.
- Wildlife must sit entirely on grass; if a hoof touches tile, you’ll get a subtle misplacement nudge in Dreamy Room Level 436.
- The pond must live inside the picket fence pocket; swapping their order will break the composition and the level won’t validate in Dreamy Room Level 436.
Tips and Tricks from top player
- Anchor from the bed first. In Dreamy Room Level 436, once the canopy ring and net are correct, everything else keys off their shadows.
- Mirror balance. Use the console/pedestal/candelabrum stack on the left to “weigh” the trellis/canisters/plant on the right; this symmetry accelerates completion of Dreamy Room Level 436.
- Read height by overlap. If an object should touch the hedge top in Dreamy Room Level 436, it belongs on tile; if it disappears behind the hedge, it’s too low or too far back.
- Place animals last. Movement silhouettes can trick your eye; finishing all gardening around the pond first makes the deer positions in Dreamy Room Level 436 obvious.
- Nudge by half-tiles only. Many misplacements in Dreamy Room Level 436 come from casual quarter shifts; use full or half-tile offsets to lock the intended composition.
Final Scene Description
The completed tableau of Dreamy Room Level 436 glows under a huge moon, a turquoise canopy bed centered beneath a vine-crowned pergola. Sheer netting billows to the right while teal-and-gold pillows and a golden lyre rest atop soft bedding. To the left, a scholar’s bench holds scrolls, a quill, and inkwell; behind it, a long console displays jars, fruit, and a candelabrum. To the right, a blue lattice trellis blooms with yellow roses, two round canisters at its base, and a lush potted plant near the edge. A ringed rug and twin candle stands warm the floor. Hedges trimmed with pink flowers frame the tiles. On the grass, a fenced pond with lilies sits center-front, a child under a leaf nearby, flanked by a sleeping fawn left, a noble stag center, and a resting doe right—Dreamy Room Level 436 at perfect peace.


