Dreamy Room Level 211
Dreamy Room Level 211 guide - Dreamy Room 211 Walkthrough & Solution.

Important Notice Regarding Level Numbering
Due to frequent changes in Dreamy Room's level numbering and differences between platforms (Android/iOS) – for example, level 211 on Android might not be the same as level 211 on iOS – the text guide below may not always match the images and video above. Please prioritize the image and video guides. If you find that the guide content doesn't match your current level, please visit the All Level Walkthroughs page to find the correct guide based on level images. Thank you for your understanding.
Dreamy Room Level 211 Walkthroughs & Guide
Step 1. Place the Treasure Island Entrance Signboard at the Upper Left Corner of the Grass Platform in Dreamy Room Level 211
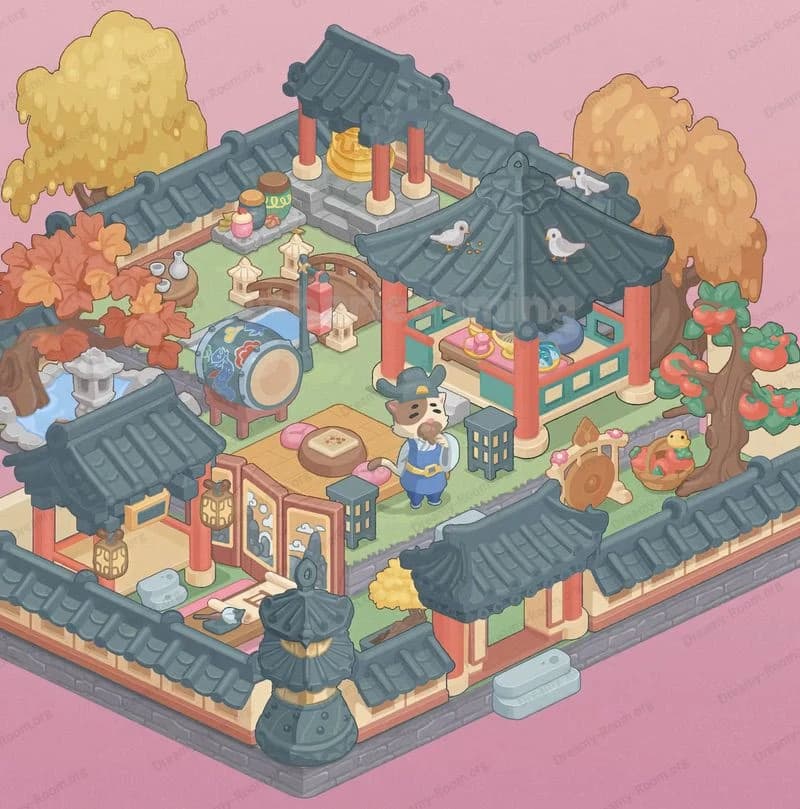
At the very beginning of Dreamy Room Level 211, you are presented with an empty mint-green grass platform bordered by soft, scalloped edges. To establish the treasure-hunt theme in Dreamy Room Level 211, the first object to place is the oversized wooden signboard labeled “Treasure Island.” Slide this signboard so its bottom edge sits flush against the grass border at the rear-left corner of the platform, angling the top slightly toward the center. Ensure the bulb accents around the frame face forward for maximum visibility. Proper placement of the entrance sign in Dreamy Room Level 211 sets the narrative anchor and visual focus for every subsequent decoration.
Step 2. Position Palm Trees on Both Rear Corners of the Grass Platform for Dreamy Room Level 211
Next in Dreamy Room Level 211, you’ll frame the scene with tropical foliage. Place two palm trees at the rear-left edge of the grass platform: one directly behind the sign’s left post and the other slightly left of that. Mirror this arrangement on the rear-right corner so that all four palms form a natural archway around your entrance. In Dreamy Room Level 211, each trunk should emerge just above the grass border, and their fronds should lean inward without overlapping the signboard. As you adjust the palms in Dreamy Room Level 211, check that the coconuts remain visible and unobstructed by future bushes to maintain that lively island vibe.
Step 3. Position the Main Wooden Play Deck at the Center of Dreamy Room Level 211
With your entry framed, it’s time to construct the central platform in Dreamy Room Level 211. Select the pastel-pink and blue wooden deck piece and snap it into place at the platform’s center, making sure its base sits evenly on the grass. The deck should cover roughly two-thirds of the width, leaving space on both sides for side-platform details. In Dreamy Room Level 211, confirm that the deck’s back edge aligns just in front of the palm trees and signboard, and its front edge hovers slightly above the grass border. Correct assembly of the deck in Dreamy Room Level 211 creates the sturdy foundation for playground elements like stairs, slides, and decorative props.
Step 4. Install the Curved Purple-Blue Slide on the Left Side in Dreamy Room Level 211
In Dreamy Room Level 211, the iconic wave-shaped slide brings motion and color. Attach the purple-and-blue slide to the left side of the wooden deck, ensuring the slide lip locks onto the top rail. The slide’s base should point diagonally toward the front of the main platform, with the curve ending just above the grass edge. When you place the slide in Dreamy Room Level 211, make certain there’s a small gap between its exit point and the ground to show depth. This precise angle in Dreamy Room Level 211 ensures the slide appears dynamic and ready for bunny adventurers to zoom down into the soft grass.
Step 5. Set Up the Central Wooden Stairs between Slide and Deck in Dreamy Room Level 211
Now that the slide is secure, mount the set of wooden stairs in Dreamy Room Level 211. Locate the three-step pastel staircase and anchor it at the middle-front of the deck. The staircase should connect the deck’s wooden planks to the grass surface, directly between the slide exit and the deck entrance. In Dreamy Room Level 211, align each stair tread so they form a uniform incline without tilting. Once you’ve placed the stairs in Dreamy Room Level 211, test the fit by visualizing a bunny climbing up; the steps should land flat on the grass and meet the deck’s floor without any gaps.
Step 6. Attach the Pirate Flag Mast and Net Ladder at the Deck’s Rear Center in Dreamy Room Level 211
To add adventurous flair in Dreamy Room Level 211, install the tall pirate-flag mast and climbing net. Click the gray mast into the deck’s back-center slot, then affix the purple skull-and-crossbones flag at its peak. Next, secure the rope-net ladder to the right-rear corner of the deck, so the net hangs beside the mast. In Dreamy Room Level 211, the flag should flutter above the deck by about one bunny-height, and the net should drape naturally without intersecting the palm fronds. Proper installation of these items in Dreamy Room Level 211 invites players to scale the heights and engage with the pirate theme.
Step 7. Hang Multicolored Fish Spring Riders along the Deck Railings in Dreamy Room Level 211
In Dreamy Room Level 211, the railings come alive with playful fish spring riders. Select the row of pastel fish-shaped seats and attach them one by one to the front railing of the deck. Space them evenly so that each fish bobbing spring is visible from the front view. When attaching these riders in Dreamy Room Level 211, ensure their tails do not collide and that none obscure the anchor decorations you’ll add next. These merry fish springs in Dreamy Room Level 211 create movement and color contrast against the wooden deck, making the playground feel interactive and whimsical.
Step 8. Decorate with Anchor Emblems and Pastel Rings under the Deck in Dreamy Room Level 211
Now in Dreamy Room Level 211, enhance the nautical motif by adding anchor emblems and oversized pastel rings. Snap two golden anchor icons onto the deck’s front pillars—one on each side of the fish riders. Then, beneath the deck on the grass, place three large pastel ring-toys grouped slightly to the right of center, and scatter piles of shiny gold coins around them. In Dreamy Room Level 211, the anchors should sit flush against the wood, and the rings should rest firmly on the grass without sinking. These details in Dreamy Room Level 211 bring depth and sparkle, reinforcing your seaside adventure theme.
Step 9. Arrange the Treasure Chest and Bucket on the Left Platform in Dreamy Room Level 211
At this point in Dreamy Room Level 211, position the small raised platform on the deck’s left side and place a closed treasure chest atop a pastel-colored stand. Next to it, add the open treasure bucket filled with coins. Ensure the chest faces forward so its latch is visible and that the bucket’s interior sparkles under the ambient light. In Dreamy Room Level 211, both props should sit flush with the platform rails without overlapping the fish riders. Correct placement of these items in Dreamy Room Level 211 signals hidden riches and invites exploration from every angle.
Step 10. Position the Digging Bunny, Shovel, and Shell at the Front-Center Sand Pit in Dreamy Room Level 211
To bring life to your scene in Dreamy Room Level 211, add the crouching bunny, shovel, and shell near the sand pit area at front center of the main deck. First, place the bunny doll facing downward as if digging. Then drop a small shovel handle into its paw and a shiny seashell on the ground beside it. In Dreamy Room Level 211, align the bunny so it kneels just behind the grass edge, and tilt the shovel at a playful angle. This careful arrangement in Dreamy Room Level 211 creates a charming vignette of discovery and ties together your treasure-hunt narrative.
Step 11. Lay Cobblestone Path Pieces and Enclose with a Pastel Picket Fence in Dreamy Room Level 211
Now ground your design in Dreamy Room Level 211 by scattering the stone pathway: place three larger cobblestone tiles and two smaller ones in an irregular cluster directly in front of the deck stair base. Next, pick the pastel picket fence panels and attach them around the perimeter of the grass platform, leaving a one-panel gap at the stair entrance. In Dreamy Room Level 211, ensure each fence picket is upright and evenly spaced, creating a low barrier that frames the playground. Proper assembly in Dreamy Room Level 211 provides structure and enhances the whimsical charm of your completed scene.
Step 12. Build the Mini Sandy Annex with Bridge, Bunny, Sign, and Props in Dreamy Room Level 211
Finally, in Dreamy Room Level 211, shift to the small sand patch annex at the lower right. Place the sand square flush with the grass border, then attach the wooden bridge piece so it connects from the main fence opening to the sand. Position the map-reading bunny on the bridge, holding its scroll. Behind it, stick the red-arrow sign just off the grass edge. Add a tiny chest, a starfish, a seashell, and a miniature shovel around the bunny’s feet. In Dreamy Room Level 211, each prop should face the viewer and not overlap the bridge rails. Completing this annex in Dreamy Room Level 211 adds a final touch of exploration to your treasure island vignette.
Notes and Precautions
- Object Overlap: In Dreamy Room Level 211, overlapping items can glitch rendering. Always confirm each prop snaps fully onto its intended tile before moving to the next step.
- Alignment Checks: Use the grid lines on the grass surface as guides in Dreamy Room Level 211 to keep fences, signs, and platforms perfectly aligned.
- Item Lock-In: After placing bulky items like the deck or slide in Dreamy Room Level 211, rotate your camera slightly to verify nothing floats or sinks into the grass.
- Depth Perception: Be cautious when layering bushes and palm trees in Dreamy Room Level 211—placing foliage too close to the signboard can obscure icons.
- Bunny Placement: Ensure each bunny figure in Dreamy Room Level 211 has enough space to be clearly visible; tight corners can make them appear clipped.
Tips and Tricks from Top Player
- Batch Placement: Place similar items (palm trees, fence panels) in batches when playing Dreamy Room Level 211 to speed up the layout process.
- Camera Angles: Tilt the view slightly downward in Dreamy Room Level 211 before locking in decorations to catch any misaligned edges.
- Use Undo Sparingly: In Dreamy Room Level 211, the undo feature resets one object at a time—plan your steps in advance to minimize backtracking.
- Save Regularly: If you’re on a mobile device for Dreamy Room Level 211, tap “Save” after every major section (deck complete, fence up) to prevent data loss.
- Quick-Snap Trick: Hold the shift key (or tap the snap icon) in Dreamy Room Level 211 to lock props to the grid, ensuring perfect symmetry without manual nudging.
Final Scene Description
In Dreamy Room Level 211, a soft-edge mint-green grass platform sets the stage for a pirate playground. To the left, a “Treasure Island” signboard illuminated by bulbs stands between palm trees and bushes. At center, a pastel wooden deck supports a purple-and-blue wave slide and a matching stairway, topped by a fluttering pirate flag and adjacent net ladder. Along the deck railing, multicolored fish spring riders sway over anchor emblems, while piles of gold coins and three oversized pastel rings sparkle below. A treasure chest and bucket occupy the left platform beside a digging bunny with shovel and shell. Surrounding the main area, a low pastel picket fence leads to a sandy annex. That annex hosts a wooden bridge with a map-reading rabbit beside a red-arrow sign, small chest, starfish, shovel, and scattered shells. This detailed, endlessly charming tableau captures the vibrant spirit and joy of Dreamy Room Level 211.