Dreamy Room Level 715
Dreamy Room Level 715 guide - Dreamy Room 715 Walkthrough & Solution.
Important Notice Regarding Level Numbering
Due to frequent changes in Dreamy Room's level numbering and differences between platforms (Android/iOS) – for example, level 715 on Android might not be the same as level 715 on iOS – the text guide below may not always match the images and video above. Please prioritize the image and video guides. If you find that the guide content doesn't match your current level, please visit the All Level Walkthroughs page to find the correct guide based on level images. Thank you for your understanding.
Dreamy Room Level 715 Walkthroughs & Guide
Step 1. Place the main rink structure on the right side.
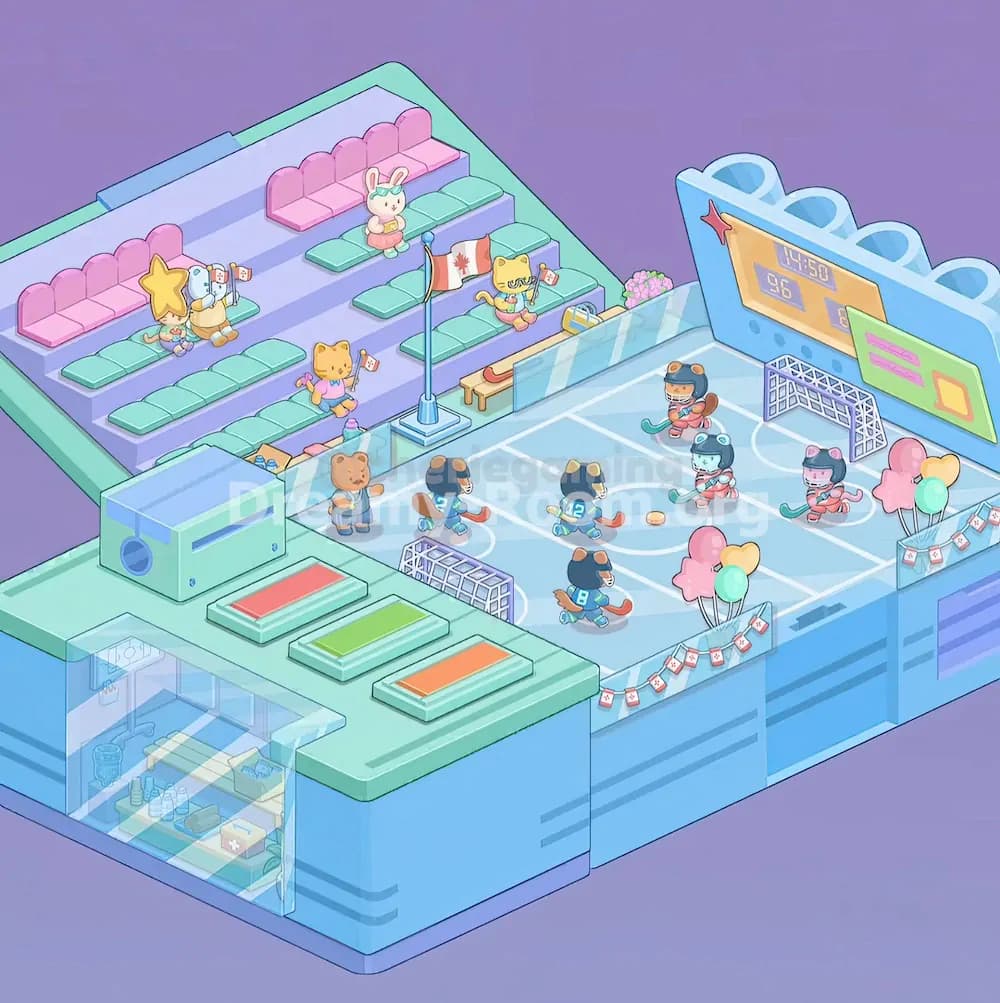
Begin Dreamy Room Level 715 by treating the large blue rectangular block as the heart of the arena. The white hockey rink markings belong on the top-right platform, covering most of the icy blue surface. Make sure the center circle sits near the middle of the rink, with the faceoff circles and curved goal areas aligned toward the upper-right and lower-left ends. The rink should feel slightly raised above the surrounding base, with the pale blue walls visible along the front and right sides. In Dreamy Room Level 715, many later objects depend on this first placement, especially the hockey goals, players, glass panels, scoreboard, and front decorations. If the rink is even slightly misaligned, the small athletes and puck will look crowded or out of position.
Step 2. Build the spectator stand on the back-left platform.
Next in Dreamy Room Level 715, fill the large mint-green rear platform with the stepped spectator area. Place the lavender bleachers diagonally along the back-left side, rising upward toward the rear wall. The pink rounded seats belong on the upper rows, forming two separate groups: one on the far left and another near the upper center. The mint-green cushion seats go on the lower rows, spreading across the front and middle sections of the bleachers. Dreamy Room Level 715 uses these seat colors to divide the audience area clearly from the ice area, so do not mix the pink and green cushions randomly. The stand should face the rink on the right, creating the feeling that the plush spectators are watching the hockey match.
Step 3. Add the plush spectators and small Canadian flags.
After the seats are in place, Dreamy Room Level 715 needs its audience characters. Put the star-headed plush near the lower-left section of the bleachers, seated close to the rink side. Beside it, place the small horse plush holding a flag, with another tiny flag nearby. Put the bunny plush with a flower crown on the upper middle row, sitting in front of the pink seats. The small cat spectator belongs lower and closer to the center aisle, also holding a Canadian flag. Finally, place the elephant-like mascot on the right side of the stands near the glass edge. Dreamy Room Level 715 relies on these tiny character placements to make the arena feel alive, so keep each mascot facing toward the rink rather than toward the back wall.
Step 4. Install the central flagpole and rink-side glass panels.
Now place the tall flagpole near the middle-left edge of the ice rink, right where the spectator zone meets the rink area. The Canadian flag should wave toward the right, rising above the rink-side boundary. Around it, Dreamy Room Level 715 uses transparent blue glass boards to separate the crowd from the players. Place the long glass panels along the left side of the rink, just in front of the bleachers, and continue the shorter panels toward the rear-right edge. These panels must look like they are standing on the rink border, not floating over the ice. Add the small flower cluster near the back glass area, behind the rink boundary. In Dreamy Room Level 715, the glass panels are easy to overlook, but they are essential for creating the arena layout.
Step 5. Place the scoreboard and wall decorations on the upper-right side.
The large scoreboard belongs at the back-right corner of the rink. In Dreamy Room Level 715, this is the most noticeable vertical decoration: a blue frame with rounded loop shapes along the top, a yellow display board in the center, and digital numbers showing the game information. Position it directly behind the right-side goal so it overlooks the ice. The red starfish-shaped detail goes on the left side of the scoreboard panel. The green signboard with pink lines and an orange square belongs in front of the scoreboard, angled along the right wall. This sign should sit above the rink-side boards, not on the ice itself. Dreamy Room Level 715 uses this scoreboard cluster to make the room read instantly as a hockey arena rather than a simple skating rink.
Step 6. Set the two hockey goals and the puck.
Dreamy Room Level 715 has two white hockey nets. Place the larger goal at the upper-right end of the rink, directly in front of the scoreboard. Its opening should face toward the center of the ice. The second goal belongs near the lower-left side of the rink, closer to the front boundary and slightly behind the nearest player. Keep both goals aligned with the rink lines so they do not overlap the faceoff circles. Then place the small orange puck slightly right of center, near the players in pink uniforms. The puck is tiny, but in Dreamy Room Level 715 it is one of the key gameplay clues because it tells you where the action is happening. Once the nets and puck are correct, the rink starts to look like an active match.
Step 7. Arrange the hockey players across the ice.
The players are the most placement-sensitive objects in Dreamy Room Level 715. Put the orange-brown bear-like player near the left side of the rink, facing inward. Place the dark-helmet player in blue and green near the lower-left center, holding a hockey stick toward the puck. Another dark-helmet player with the number 12 belongs in the middle of the rink, slightly above center. The number 8 player goes near the lower middle, skating toward the action. On the right side, place the pink-uniform goalie or defender near the upper-right area close to the goal, another pink-uniform player near the puck, and the pink-uniform character with a visor near the lower-right rink edge. Dreamy Room Level 715 looks best when every player faces the puck or goal naturally.
Step 8. Decorate the front rink rail with bunting and balloons.
The lower-right edge of the rink in Dreamy Room Level 715 should be bright and festive. Place the curved railing or rink board along the front side, then attach the small Canadian flag bunting across it. The flags should run in a gentle arc along the front boundary, starting near the lower-middle area and continuing toward the right corner. Add the balloon cluster near the front-right rink edge: pink, yellow, mint, and peach balloons gather around a pink cloud-shaped decoration. A second balloon group sits farther right near the side wall, close to another small string of flags. These decorations should not cover the players. In Dreamy Room Level 715, the front decorations frame the rink and help balance the large scoreboard at the back.
Step 9. Add the front-left roof platform, vents, and colored pads.
Move to the front-left exterior section of Dreamy Room Level 715. Place the mint-green roof platform extending from the blue building body. On the left side of this platform, set the pale blue rectangular machine or air-conditioning unit, with its circular vent facing forward-left. In front of it, place three flat rectangular pads in a row: the red-orange pad goes closest to the machine, the green pad sits in the middle, and the orange pad goes farthest to the right. These pads should line up neatly on the mint platform and remain outside the rink boundary. Dreamy Room Level 715 uses this area as an exterior service or equipment zone, so keep it clean and parallel to the building edges.
Step 10. Complete the transparent lower-left service room.
The lower-left corner of Dreamy Room Level 715 contains a glass-walled room beneath the front platform. Place the transparent walls so the interior can be seen from the outside. Inside, arrange the small storage and service objects: shelves, boxes, bottles, a bench or counter, and a first-aid-style box with a cross. A tiny hoop or circular wall detail appears on the back wall, adding a sporty locker-room feeling. Keep the interior items tucked inside the glass room rather than on the roof above it. Dreamy Room Level 715 rewards careful separation between interior and exterior spaces; the service room should feel like a support area under the arena, while the hockey action stays on the raised rink above.
Step 11. Add the rink-side bench, equipment, and small props.
Before finishing Dreamy Room Level 715, place the small bench along the back-left side of the rink, near the glass panels and below the scoreboard area. A red hockey stick or curved equipment piece rests near this bench. Add the small bag or gift-like item beside the glass near the rear-middle area. These props should sit outside the active skating lanes but still close enough to feel like arena equipment. Check the tiny flags attached to the side rail and spectator zone, making sure they face outward and do not overlap the glass boards. Dreamy Room Level 715 includes many small decorative objects, and these final props often decide whether the completed room matches the reference image exactly.
Step 12. Review alignment and finish the full arena composition.
The final placement pass in Dreamy Room Level 715 is about alignment. Confirm that the bleachers occupy the back-left side, the ice rink fills the right side, the transparent service room sits in the lower-left corner, and the exterior platform with colored pads stays in front. The scoreboard should rise behind the upper-right goal, while the flagpole should stand between the stands and rink. Make sure the players are distributed naturally across the ice, with the puck near the center-right action. Dreamy Room Level 715 can look incorrect if one object is only slightly shifted, especially the glass panels, goals, and front bunting. Once every object has its exact location, the empty room becomes a complete hockey arena scene.
Notes and Precautions
In Dreamy Room Level 715, the biggest mistake is placing items by category instead of by location. The pink seats, green seats, mascot spectators, flagpole, glass panels, hockey players, and service-room props all have very specific positions. Do not place the bleacher animals on the ice, and do not place the hockey players in the stands. Watch the direction of the goals: both openings must face the center of the rink. The scoreboard belongs behind the upper-right goal, not on the left platform. The lower-left glass room should remain visible, so avoid covering it with the exterior machine or colored pads. Dreamy Room Level 715 is mainly a placement puzzle, and the challenge comes from reading the completed image carefully.
Tips and Tricks from top player
A reliable strategy for Dreamy Room Level 715 is to place large structures first, then medium dividers, then tiny decorations. Start with the rink, bleachers, scoreboard, and lower-left room. After that, add glass boards, goals, seats, and the flagpole. Only then should you place the mascots, hockey players, puck, balloons, bunting, bags, and small equipment. In Dreamy Room Level 715, this order prevents small objects from hiding under larger ones or snapping into the wrong zone. Another useful trick is to use the rink lines as anchors: players should sit around the circles and center marks, while the goals align with the end zones. Save the flags and balloons for last because they are decorative finishing pieces.
Final Scene Description
The completed Dreamy Room Level 715 scene is a cheerful pastel hockey arena packed with playful detail. On the left, lavender bleachers hold pink and mint seats filled with cute plush spectators, tiny Canadian flags, a star mascot, a horse, a bunny, a cat, and an elephant-like character. In the center, a tall Canadian flagpole marks the boundary between the audience and the rink. On the right, the icy blue hockey rink is alive with helmeted animal players, two white goals, a small puck, clear glass boards, and festive front bunting. The upper-right scoreboard towers over the goal with bright digital numbers, while balloons and signs decorate the rink edge. At the front-left, a glass service room and a roof platform with vents and colored pads complete the arena. Dreamy Room Level 715 feels lively, organized, and ready for a tiny championship match.