Dreamy Room Level 622
Dreamy Room Level 622 guide - Dreamy Room 622 Walkthrough & Solution.
Important Notice Regarding Level Numbering
Due to frequent changes in Dreamy Room's level numbering and differences between platforms (Android/iOS) – for example, level 622 on Android might not be the same as level 622 on iOS – the text guide below may not always match the images and video above. Please prioritize the image and video guides. If you find that the guide content doesn't match your current level, please visit the All Level Walkthroughs page to find the correct guide based on level images. Thank you for your understanding.
Dreamy Room Level 622 Walkthroughs & Guide
Step 1. Build the upper platform and wall structure for Dreamy Room Level 622
Start by placing the large blue mezzanine platform along the left half of the room so it stretches from the left wall toward the center. Add the gray safety railings around the exposed front and right edges of that upper level, then attach the ladder on the front-left side so it connects the floor to the loft. Hang the dark NOS sign from the front railing panel in the middle. On the walls, install the small window on the left wall and the longer rectangular window on the upper right wall. After that, place the gray electrical control box with its warning symbol beneath the left window, making sure its two pipe-like connectors point upward. This first stage matters because Dreamy Room Level 622 depends on layering: the loft defines the whole room’s vertical layout. Once the platform, railings, ladder, windows, and wall box are in place, the rest of the items will start making visual sense, and it becomes much easier to identify where the lounge, workstation, and car service area should go.
Step 2. Furnish the loft storage and computer workstation
Next, fully decorate the upper level. Against the back-left wall, place the green storage cabinet first. Put three small cans on its top surface, rolled blue-and-pink mats or posters on its upper shelf, colorful books across the middle shelf, and a yellow drawer at the bottom. Immediately to its right, position the taller yellow bookcase. Fill its top shelf with upright books, set the turquoise storage box in the middle compartment, and place the pink and white folded boxes on the bottom shelf. Then create the desk area along the back wall: a purple computer tower sits on the left side of the desk, the large monitor and keyboard go centrally, and the open laptop rests on the right side. Add the orange desk chair in front of the keyboard, the small green canisters behind the monitor area, the paper or clipboard behind the laptop, and the purple bottle on the far-right desk corner. Finally, hang the gauge-style wall sign above the desk and place the pink cat character leaning over the front railing. This arrangement gives the garage its “office above workshop” feel.
Step 3. Create the under-loft living corner in Dreamy Room Level 622
Under the mezzanine, build the cozy rest area that softens the industrial look of the garage. Start by placing the glowing green bench or lighted platform directly under the catwalk. Then set the green cabinet or mini fridge against the left support wall, and place the pink radio on top of it. Mount the orange wall unit just above and slightly forward from the cabinet. In the center, position the red two-seat sofa against the back side of the living nook and add the two cream-and-yellow checkered pillows. Put the matching red armchair in front-left of the sofa, angled toward the coffee table. The coffee table goes in the middle, with two green bottles, one blue cup, and the glass pitcher of orange drink arranged neatly on top. Under the table, place the two purple round drum-like stools. This is one of the easiest areas to misread in Dreamy Room Level 622, because the furniture is tucked beneath the loft supports. Keep the sofa centered, the armchair forward, and the table exactly between them so the lounge looks intentional rather than crowded.
Step 4. Fill the left floor with storage, supplies, and garage entry pieces
Now turn to the lower-left floor. Place the sloped blue car ramp at the front-left edge of the room with its yellow arrow markings pointing inward. At the top-left side of the ramp, set the purple-and-yellow striped barricade. Behind that area, add the loose tires stacked on the floor near the ladder. Against the left wall, build the storage cluster: set down the small cardboard boxes first, then place the tall beige shelving cabinet above and behind them. In the cabinet, the top opening holds a fan or vent unit, the middle opening displays a wheel rim, and the bottom section stores small supplies. Beside the cabinet, place the vertical stack of purple water jugs or drums. After that, position the green gas cylinders with pressure gauges near the yellow sports car’s future parking spot. Add the small rolling utility cart nearby, with bottles or cones on the top shelf, a notebook or paper pad, and rolled towels or parts on the lower shelf. This section in Dreamy Room Level 622 is all about functional clutter: every item should look useful, but still leave enough open floor for the cars and characters.
Step 5. Assemble the right-side workshop wall and service equipment in Dreamy Room Level 622
The right side of the room is the mechanical heart of the level. Begin by mounting the pegboard on the right wall. Attach the two purple steering wheels across the upper portion, line up the red-handled screwdrivers vertically beneath them, hang the green wrenches on the right side, and place the square tool near the lower-right corner. Above this pegboard, install the tire rack and stack the spare wheels neatly across it. To the right, hang the pair of fire extinguishers side by side. On the wall between the lounge and the tool board, place the orange target-style wall decoration, then stick the blue dart into it. Beneath that, arrange the two stacks of green barrels. In front of the barrels and between the lounge and cars, lay the long purple spare body part or bumper piece on the floor. This area is crucial in Dreamy Room Level 622 because incorrect spacing makes the right side look messy fast. Keep the tool board high, the barrels tight together, and the long spare part low on the floor so the workshop zone stays readable.
Step 6. Park the three cars in their exact bays
With the environment complete, place the vehicles carefully. The yellow sports car belongs in the front-left service position, angled slightly toward the ramp. Make sure its gray rear wing is attached, its dark hood panel sits centered, and its side decals face outward. The black muscle car goes in the center-right bay, parked lengthwise near the front edge of the room. Its exposed silver engine must remain visible above the hood line, because that is part of the garage’s performance-shop identity. The lime-green sports car fits behind and to the right of the black car, tucked closer to the right wall and partly overlapping the space behind the center vehicle. This car should sit beneath the right window and near the barrels. Vehicle placement is the main visual puzzle here: if you misplace one car, every nearby prop feels wrong. In Dreamy Room Level 622, always anchor the yellow car first, then the black car, then slide the green car into the remaining rear-right slot. That order keeps the garage balanced and prevents the lounge or tool area from feeling blocked.
Step 7. Add the characters, cleaning items, and final finishing touches for Dreamy Room Level 622
Finish the scene by placing the two bear mechanics and the last service props. The smaller bear belongs beside the yellow sports car on the left, holding tools and facing the car as if working on it. The larger bear stands beside the black muscle car with arms crossed, positioned between the yellow and black vehicles but slightly closer to the black one. In front of the black car, place the low trolley carrying the orange oil bottle and the purple toolbox. Set the teal bucket near the yellow car’s front-right corner. Double-check the cat on the upper railing, because it visually links the loft and garage below. Also confirm the radio, bottles, pillows, cylinders, stacked tires, and wall tools are all facing outward cleanly. The last step of Dreamy Room Level 622 is less about adding new large objects and more about precision. Tiny misplacements matter, and this level only looks finished when every mechanic, vehicle, tool, and decoration supports the idea of a cozy but fully functional custom garage.
Notes and Precautions
The biggest trap in Dreamy Room Level 622 is assuming that similar garage items can go anywhere. They cannot. The barrels, loose tires, stacked tires, extinguisher pair, and rolling tools all have very specific visual relationships to the cars and walls. Keep the under-loft lounge compact, or it will invade the car area. Keep the upper workstation aligned to the back wall, or the loft will feel uneven. Also remember that Dreamy Room is meant to be relaxing and untimed, so careful observation works better than rushing from item to item.
Watch especially for these easy mistakes: putting the right window too low, setting the sofa too far forward, placing the black car before the yellow one, or forgetting that the yellow car’s wing should sit above the rear rather than as a loose floor part. The challenge of this level is always correct placement, not speed.
Tips and Tricks from top player
A strong approach for Dreamy Room Level 622 is to solve it in layers. First do permanent structural pieces such as platform, ladder, railings, windows, desk, pegboard, and tire rack. Then place medium furniture like the sofa, cabinet, barrels, and storage units. Only after that should you position cars, characters, and small handheld items. This prevents visual confusion.
Another useful trick is to group by theme. Put all office items on the loft, all comfort items under the loft, all heavy workshop items on the right wall, and all entry clutter on the left floor. When you are unsure about a small object, ask what story it tells. If it helps fix cars, it probably belongs near the cars or pegboard. If it makes the room feel lived in, it likely belongs in the lounge or loft. That mindset makes Dreamy Room Level 622 much easier to finish cleanly.
Final scene description
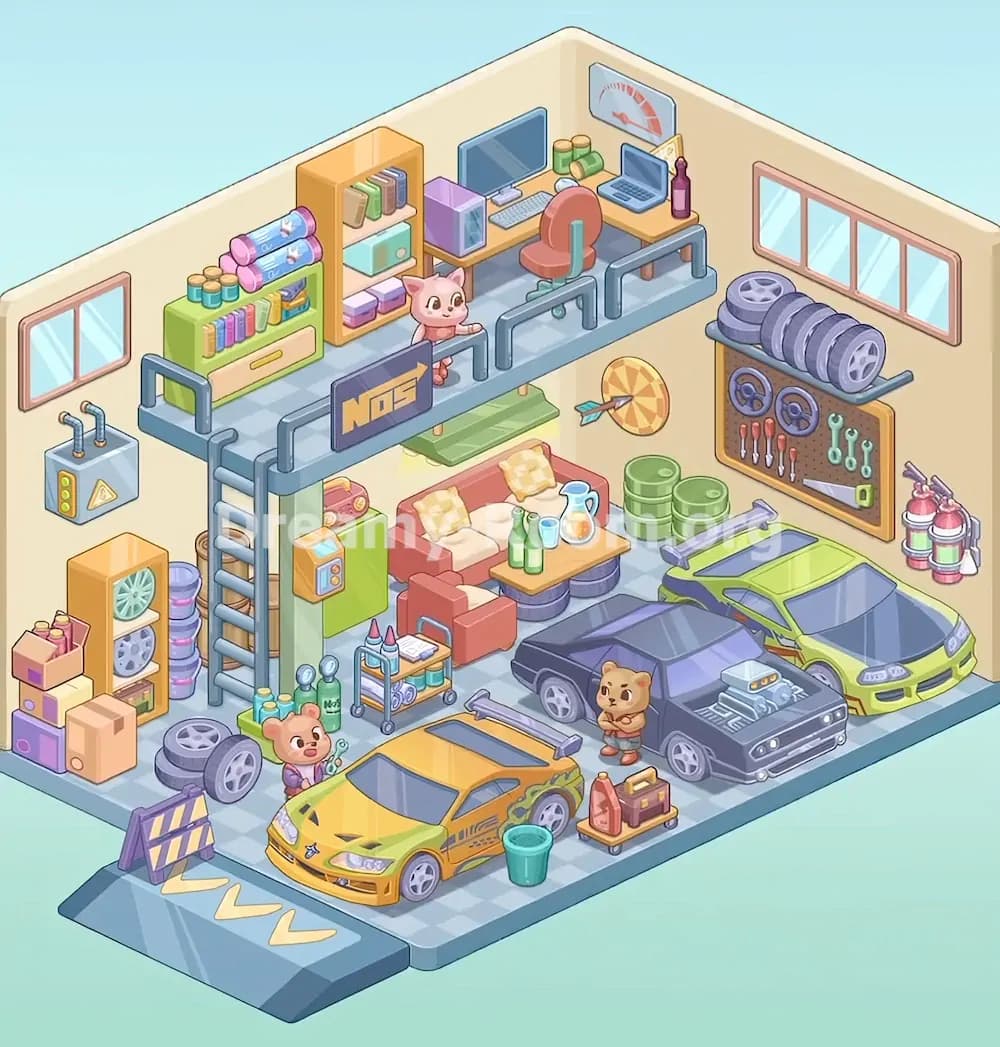
When completed, Dreamy Room Level 622 becomes a charming hybrid of racing garage, mechanic’s workshop, and cozy hangout. The left side is practical, with boxes, spare tires, a vented cabinet, utility cylinders, and an entry ramp leading toward the bright yellow sports car. The center softens into a lounge tucked under the loft, where a red sofa, armchair, drinks table, and radio make the workshop feel lived in. Above that, the mezzanine turns into a tidy office with bookshelves, a computer setup, a laptop, and a cat peeking over the railing. On the right, stacked spare wheels, a tool pegboard, barrels, fire extinguishers, and a target decoration frame the black muscle car and lime-green sports car. Every object in Dreamy Room Level 622 has a precise home, and once all pieces are correctly placed, the room feels busy, warm, and perfectly organized.

