Dreamy Room Level 788
Dreamy Room Level 788 guide - Dreamy Room 788 Walkthrough & Solution.
Important Notice Regarding Level Numbering
Due to frequent changes in Dreamy Room's level numbering and differences between platforms (Android/iOS) – for example, level 788 on Android might not be the same as level 788 on iOS – the text guide below may not always match the images and video above. Please prioritize the image and video guides. If you find that the guide content doesn't match your current level, please visit the All Level Walkthroughs page to find the correct guide based on level images. Thank you for your understanding.
Dreamy Room Level 788 Walkthroughs & Guide
Step 1. Prepare the L-shaped foundation and position the lower structural walls
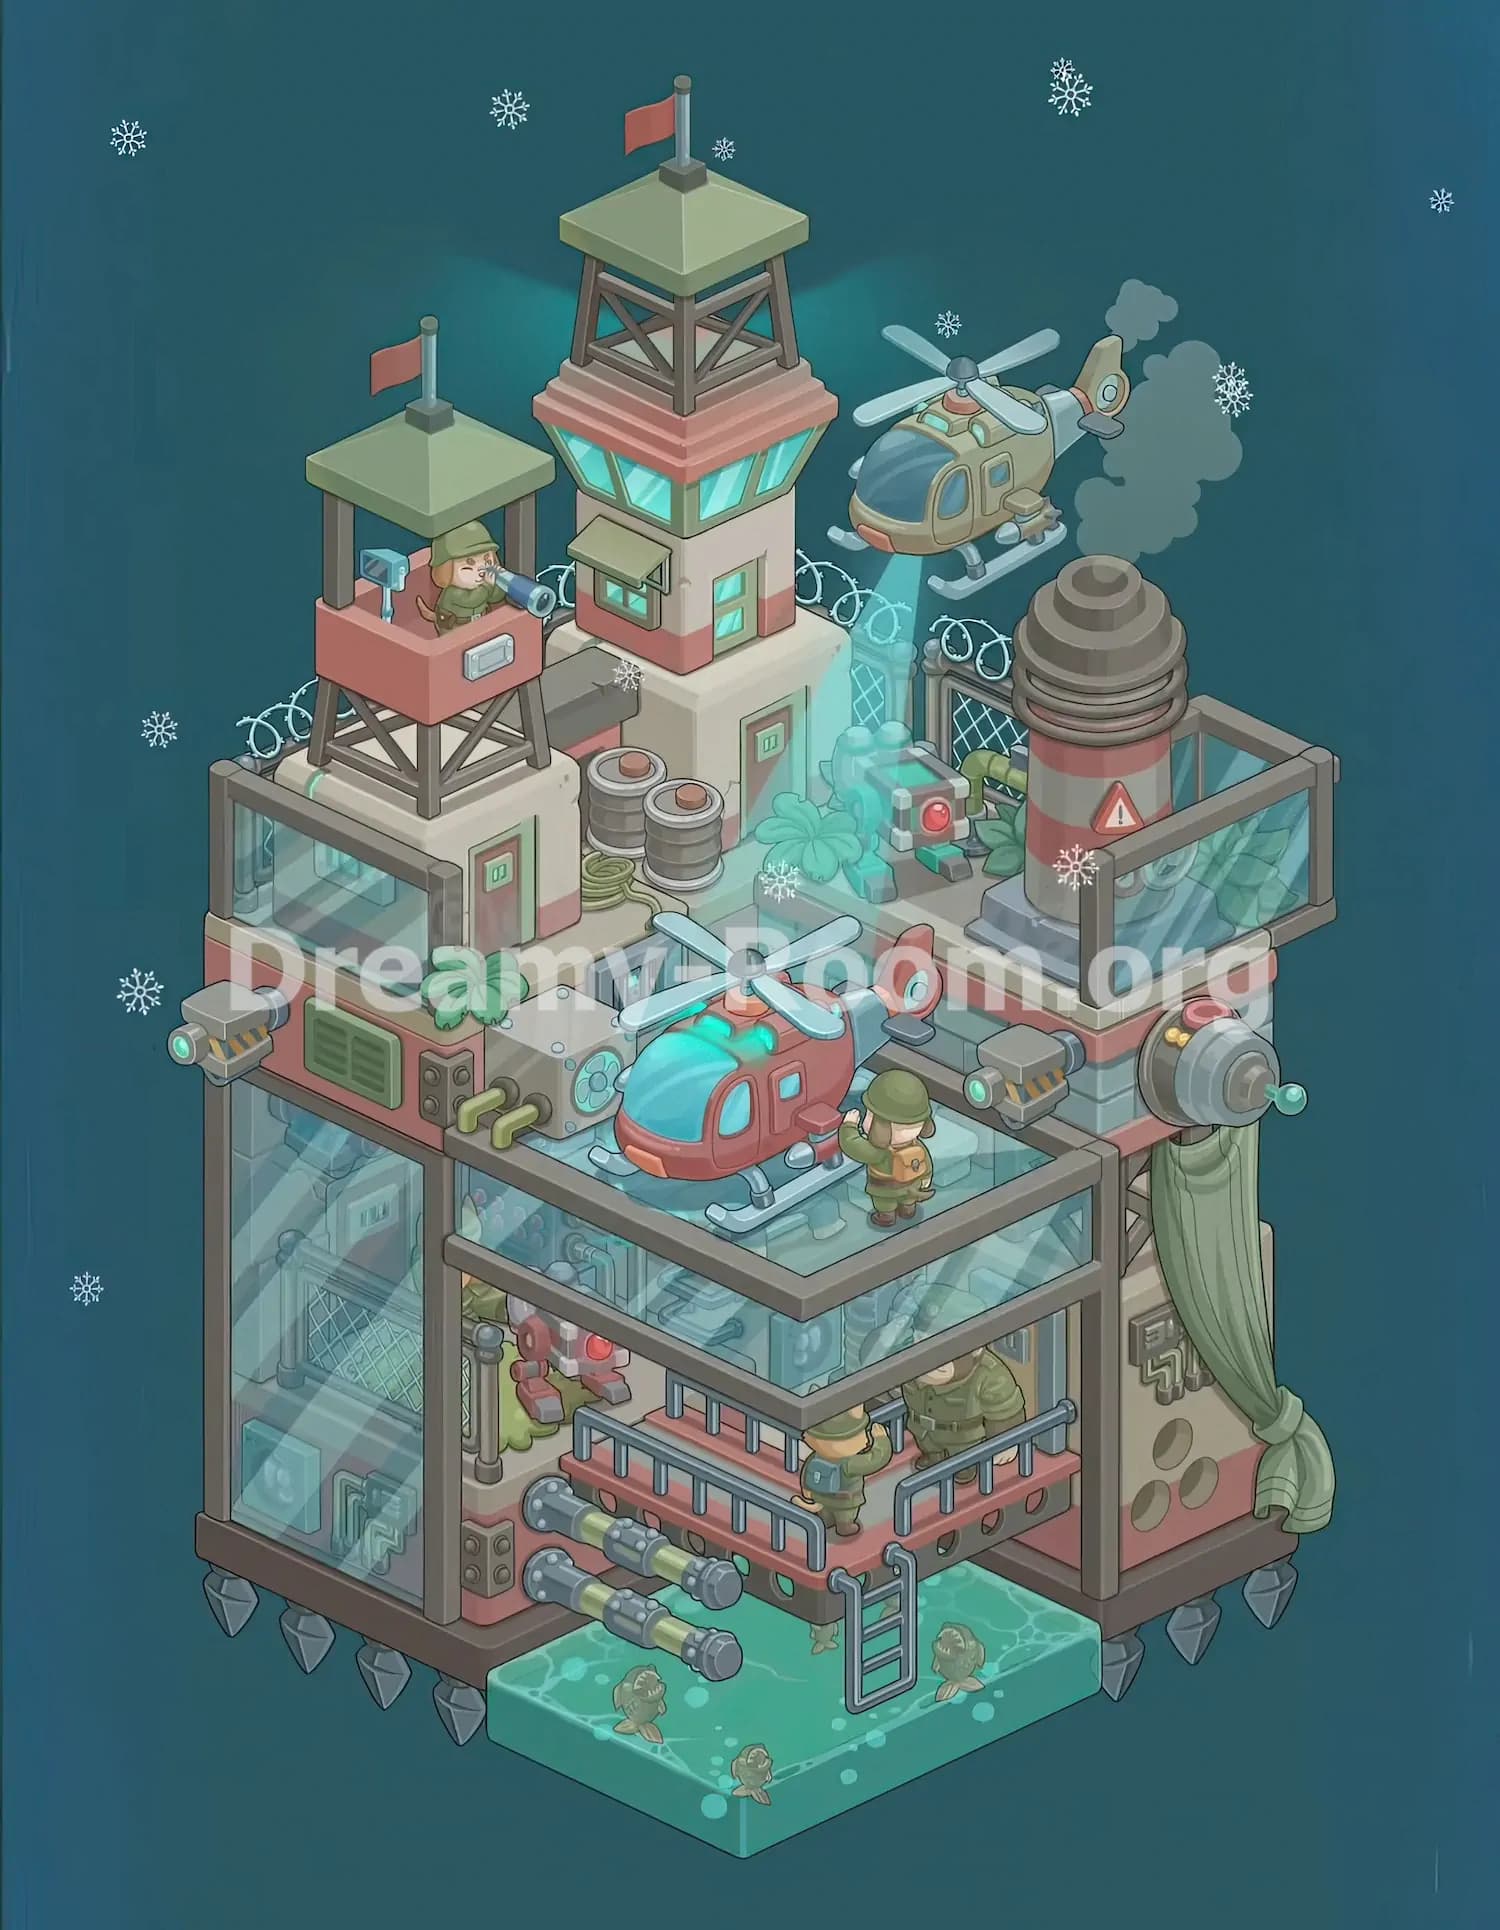
Begin Dreamy Room Level 788 with the empty brown L-shaped platform. Keep the inward corner facing toward the front-right side of the screen. The pointed crystal-like supports already hanging beneath the platform establish the outer footprint, so use them as alignment markers while constructing the base. Place the tall glass-walled room on the left portion of the foundation. Its transparent front and left panels should face outward, allowing the interior pipes, industrial equipment, staircase, and mesh barrier to remain visible. Build the main open-sided room on the right portion, leaving its front exposed for the balcony and pool. Install the cream and red wall sections around both rooms, then place the right wall with circular ventilation holes near the curtain opening. Correct placement at this stage is essential because almost every later object in Dreamy Room Level 788 attaches to these lower walls.
Step 2. Build the lower balcony, railings, pipes, and access ladder
Across the front-middle of Dreamy Room Level 788, install the raised red balcony connecting the lower rooms. The balcony should sit above the future water pool and slightly behind the outer edge of the platform. Attach dark metal safety railings along the front and right sides, keeping the central standing area open for the personnel. Place the short vertical posts evenly along the rails. Two large horizontal industrial pipes project from the left-front underside of the balcony; position them parallel to one another, with their rounded mechanical ends extending over the pool. Attach the narrow metal ladder to the balcony’s front-right corner so it descends vertically into the water. Inside the lower area, add the visible wall pipes, control panels, machinery, red mechanical unit, mesh fencing, and storage equipment. These components can look interchangeable, but Dreamy Room Level 788 only accepts them when their connectors and wall-facing sides are correctly oriented.
Step 3. Add the turquoise pool and the small aquatic animals
Place the large rectangular turquoise pool directly beneath the balcony, extending forward beyond the brown foundation. Its rear edge should tuck under the two projecting pipes and align below the ladder. The water block has rounded bubble patterns and a brighter surface, so make sure the water surface faces upward rather than toward the front. Add the three small brown aquatic animals at separate positions: one near the left side of the pool, one toward the front-center, and one closer to the right-rear area below the ladder. They appear to be playful otter-like creatures standing or swimming in the shallow water. Leave visible spacing between them instead of grouping them together. In Dreamy Room Level 788, these tiny characters are easy to overlook because the much larger military structures attract attention first. However, the level cannot be completed until every animal occupies its designated spot within the pool.
Step 4. Place the lower-floor guards and interior equipment
Populate the lower section of Dreamy Room Level 788 with the military personnel visible behind and upon the balcony. Place one smaller soldier near the center-front railing, facing the larger guard on the right. The larger guard belongs farther back inside the right room, partially framed by the wall and curtain opening. Another figure or mechanical operator appears within the left interior, close to the red machinery and vertical pipes. Their bodies may be partly hidden by the transparent walls and balcony rails, so use their hats and green uniforms to identify the correct placement points. Fill the remaining lower room with the wall-mounted panels, small green pipes, industrial cylinders, conduits, and gridded barriers. Do not place the guards on the rooftop merely because similar characters appear there later. Dreamy Room Level 788 uses several nearly identical uniforms, and matching each character to the correct floor is one of the level’s most deceptive placement puzzles.
Step 5. Construct the glass-enclosed middle rooftop and install the red helicopter
Build the broad middle rooftop above the lower rooms. Surround its front and side edges with transparent glass panels held by dark brown frames. The rooftop should form a secure landing pad directly over the lower balcony. Place the large red helicopter in the center-left portion of this platform, facing toward the lower-left corner. Its turquoise cockpit window should point outward, while its tail extends toward the right-rear side. Attach the pale blue landing skids beneath the aircraft, the four-bladed rotor on top, and the glowing turquoise equipment along the upper fuselage. Position the small green-uniformed ground crew member to the helicopter’s right, facing the aircraft as though inspecting it. Keep a narrow walking space between the character and the helicopter. This aircraft is the visual centerpiece of Dreamy Room Level 788, so its direction must match the completed scene exactly.
Step 6. Install the rooftop machinery, spotlights, vents, and curtain assembly
Along the left side of the middle rooftop in Dreamy Room Level 788, place the white rectangular mechanical unit with its circular fan facing outward. Connect the three short green pipes to the unit’s front-lower area. Add the dark speaker-like panel beside it and the pair of green rectangular ventilation grilles farther left. Mount the gray spotlight or surveillance device at the outer-left corner; its glowing lens should point diagonally away from the building, and its support includes yellow-and-black hazard markings. Mirror that visual balance on the right by placing another hazard-striped spotlight above the wall. Attach the large circular gray mechanical fixture to the upper-right wall, with its red cap and small turquoise handle facing outward. Finally, hang the long green curtain from the right opening, gathering and tying it near the bottom. The curtain should drape down the wall without covering the circular ventilation holes. These small orientation details frequently cause errors in Dreamy Room Level 788.
Step 7. Build the upper-left guard tower and place its lookout
On the rear-left side of Dreamy Room Level 788, construct the smaller guard tower. Start with the cream lower building and its narrow green door. Above it, place the dark cross-braced support frame, followed by the red observation booth. Add the four upright posts and the pale green pyramidal roof. The red flag belongs on the roof’s left-rear corner, mounted on a short gray pole. Inside the booth, position the bearded guard in a green cap and uniform. He should face toward the right while looking through or operating the blue-gray mounted telescope. Place the small blue monitoring device on the booth’s left side and the silver plate on the red front wall. Add the coils of barbed wire along the surrounding rooftop edge. The tower’s stacked pieces must be assembled in order; otherwise, the lookout may appear to float or collide with the roof in Dreamy Room Level 788.
Step 8. Assemble the central command tower and its rooftop flag
The tallest structure in Dreamy Room Level 788 belongs at the rear-center of the complex. Begin with its cream lower block, aligning its door and turquoise windows toward the visible front and right sides. Attach the small pale green awning above the front-left window. Above this base, install the red-edged control room with luminous turquoise windows on all visible sides. Continue upward with the dark cross-braced observation framework. Finish the tower with the larger pale green pyramidal roof and the red flag mounted at its peak. The flagpole rises from a small dark square base and should lean neither forward nor backward. Place coils of security wire around the nearby rooftop perimeter. This tower is taller than the left lookout and must sit slightly behind it. Distinguishing between the two pale green roofs is another major challenge in Dreamy Room Level 788 because they have similar shapes but noticeably different dimensions.
Step 9. Arrange the rear utility zone with drums, hose, hologram, plants, and control device
Fill the central rear utility area of Dreamy Room Level 788 between the command tower and the right-hand reactor platform. Place the two gray metal drums beside one another near the left side of this zone, with their reddish circular caps facing upward. Coil the green hose on the floor beside and partly behind the drums. Near the middle, install the raised turquoise pedestal and place the translucent blue holographic soldier or frozen figure on top. The figure should stand upright and face toward the front-right area. Surround the pedestal with broad green leaves and small glowing crystal-like shapes. Place the compact gray control device to the hologram’s right; its prominent red circular lens faces forward, while two small green foot pedals or blocks extend from its base. Add the dark mesh fence and loops of barbed wire behind everything. Dreamy Room Level 788 requires close attention here because the hologram, plants, controls, and fencing overlap heavily.
Step 10. Construct the glass reactor platform on the upper-right side
Create the elevated right platform of Dreamy Room Level 788 using the red and gray wall base. Enclose its exposed edges with transparent glass railing panels and dark support posts. In the center, position the large cylindrical industrial reactor or exhaust unit on its square gray footing. Its lower body is red, a broad gray band wraps around the middle, and a white triangular warning symbol faces toward the front. Stack the dark ringed sections above the cylinder, finishing with the stepped dome-like cap. The warning symbol must remain visible through the glass railing. Add the partially visible plant leaves and mechanical tubing behind the reactor, but do not push them in front of the cylinder. The unit should stand higher than the red helicopter but lower than the central command tower. Its layered silhouette provides the strongest visual weight on the right side of Dreamy Room Level 788.
Step 11. Place the hovering rear helicopter and complete the rooftop security details
Position the smaller tan helicopter in the upper-right background of Dreamy Room Level 788, behind the command tower and above the security fencing. Its rounded blue cockpit faces toward the lower-left, while the tail points toward the upper-right. Attach the pale rotor blades, landing skids, side windows, and tail structure. A gray smoke plume rises behind the tail, so place the smoke pieces in a loose upward curve rather than directly over the rotor. Because this helicopter is airborne, it should not touch the reactor platform or the barbed wire. Complete the roof by adding any remaining wire coils, fence segments, turquoise lights, small machinery parts, and structural trim. Check that the rear helicopter remains visually separate from the rooftop landing craft. Dreamy Room Level 788 uses two helicopters with different sizes, colors, and elevations, making accidental swapping one of the most common mistakes.
Step 12. Add the atmospheric snowflakes and perform the final placement check
Finish Dreamy Room Level 788 by adding the decorative snowflakes around the exterior scene. Distribute them through the teal background at varying heights: several belong around the upper flags and hovering helicopter, others sit beside the guard tower, reactor platform, glass rooms, and lower pool. Keep them outside the physical structure because they represent falling snow rather than mounted decorations. Then inspect the entire base from bottom to top. Confirm that the pool projects from the front, the ladder reaches the water, the two pipes extend over the pool, the balcony personnel face one another, and the red helicopter sits inside the middle glass enclosure. Verify that both lookout flags are visible, the reactor warning label faces forward, and the tan helicopter floats in the background. The main difficulty of Dreamy Room Level 788 is recognizing these exact placement relationships rather than simply grouping similar items.
Notes and Precautions
Dreamy Room Level 788 contains many layered objects, so place the structural pieces before characters, aircraft, or accessories. Transparent walls can make an item appear correctly positioned even when it belongs one layer farther forward or backward. Watch the difference between the two pale green tower roofs, the two red flags, the two hazard-striped spotlights, and the two helicopters.
Several green-uniformed characters look similar. Use their actions to identify them: the left tower guard operates the mounted telescope, the middle-roof soldier inspects the red helicopter, and the lower-floor personnel stand near the balcony and machinery. The holographic figure is translucent blue and belongs only in the rear utility area.
Do not confuse decorative background snowflakes with structural objects. Also check that the curtain remains tied to the right wall, the water animals stay inside the pool, and the reactor’s warning triangle faces outward. In Dreamy Room Level 788, a single reversed machine or misplaced small character can prevent completion even when the overall base looks correct.
Tips and Tricks from top player
Build Dreamy Room Level 788 in vertical layers. Complete the pool and lower rooms first, then the balcony, middle landing pad, upper buildings, and finally the background aircraft. This method prevents large objects from obscuring smaller attachment points.
Use distinctive colors as anchors. The turquoise pool identifies the front, the red helicopter defines the middle landing pad, the glowing cyan hologram marks the rear-center utility area, and the striped red reactor identifies the upper-right platform. Once these four landmarks are correct, most smaller objects become easier to position.
Place paired objects together. Install both drums before the hose, both main spotlights before the wall machinery, both tower roofs before their flags, and all glass panels before filling enclosed platforms. When an item refuses to settle, rotate it and compare its visible face with the finished scene. Dreamy Room Level 788 often uses tiny asymmetrical details—doors, warning labels, lenses, handles, or awnings—to reveal the intended direction.
Final Scene of Dreamy Room Level 788
The completed Dreamy Room Level 788 is a compact Arctic military and research outpost built across several busy vertical levels. A turquoise pool with three playful aquatic animals extends beneath the lowest balcony, while pipes, ladders, guards, and industrial machinery fill the transparent lower rooms. Above them, a bright red helicopter rests inside a glass-walled landing area as a ground crew member inspects it. Two flag-topped towers rise from the rear, including a smaller lookout occupied by a telescope-wielding guard and a taller central command tower illuminated by turquoise windows. Drums, a coiled hose, plants, a glowing holographic soldier, and a red-lensed control unit crowd the secure utility zone. On the right, a warning-marked cylindrical reactor stands behind glass barriers. A second tan helicopter hovers beyond the base, trailing smoke into the snowy teal sky and completing the fortified winter atmosphere.