
Dreamy Room Level 918
Dreamy Room Level 918 guide - Dreamy Room 918 Walkthrough & Solution.
Important Notice Regarding Level Numbering
Due to frequent changes in Dreamy Room's level numbering and differences between platforms (Android/iOS) – for example, level 918 on Android might not be the same as level 918 on iOS – the text guide below may not always match the images and video above. Please prioritize the image and video guides. If you find that the guide content doesn't match your current level, please visit the All Level Walkthroughs page to find the correct guide based on level images. Thank you for your understanding.
Dreamy Room Level 918 Walkthroughs & Guide
Step 1. Position the Main Pink Cottage in the Center of the Island
Begin Dreamy Room Level 918 by establishing the main cottage structure on the raised island. The starting scene contains a small, pink, open-walled room with a purple checkered floor, surrounded by an irregular blue landscape and a darker grassy section in the front-right corner.
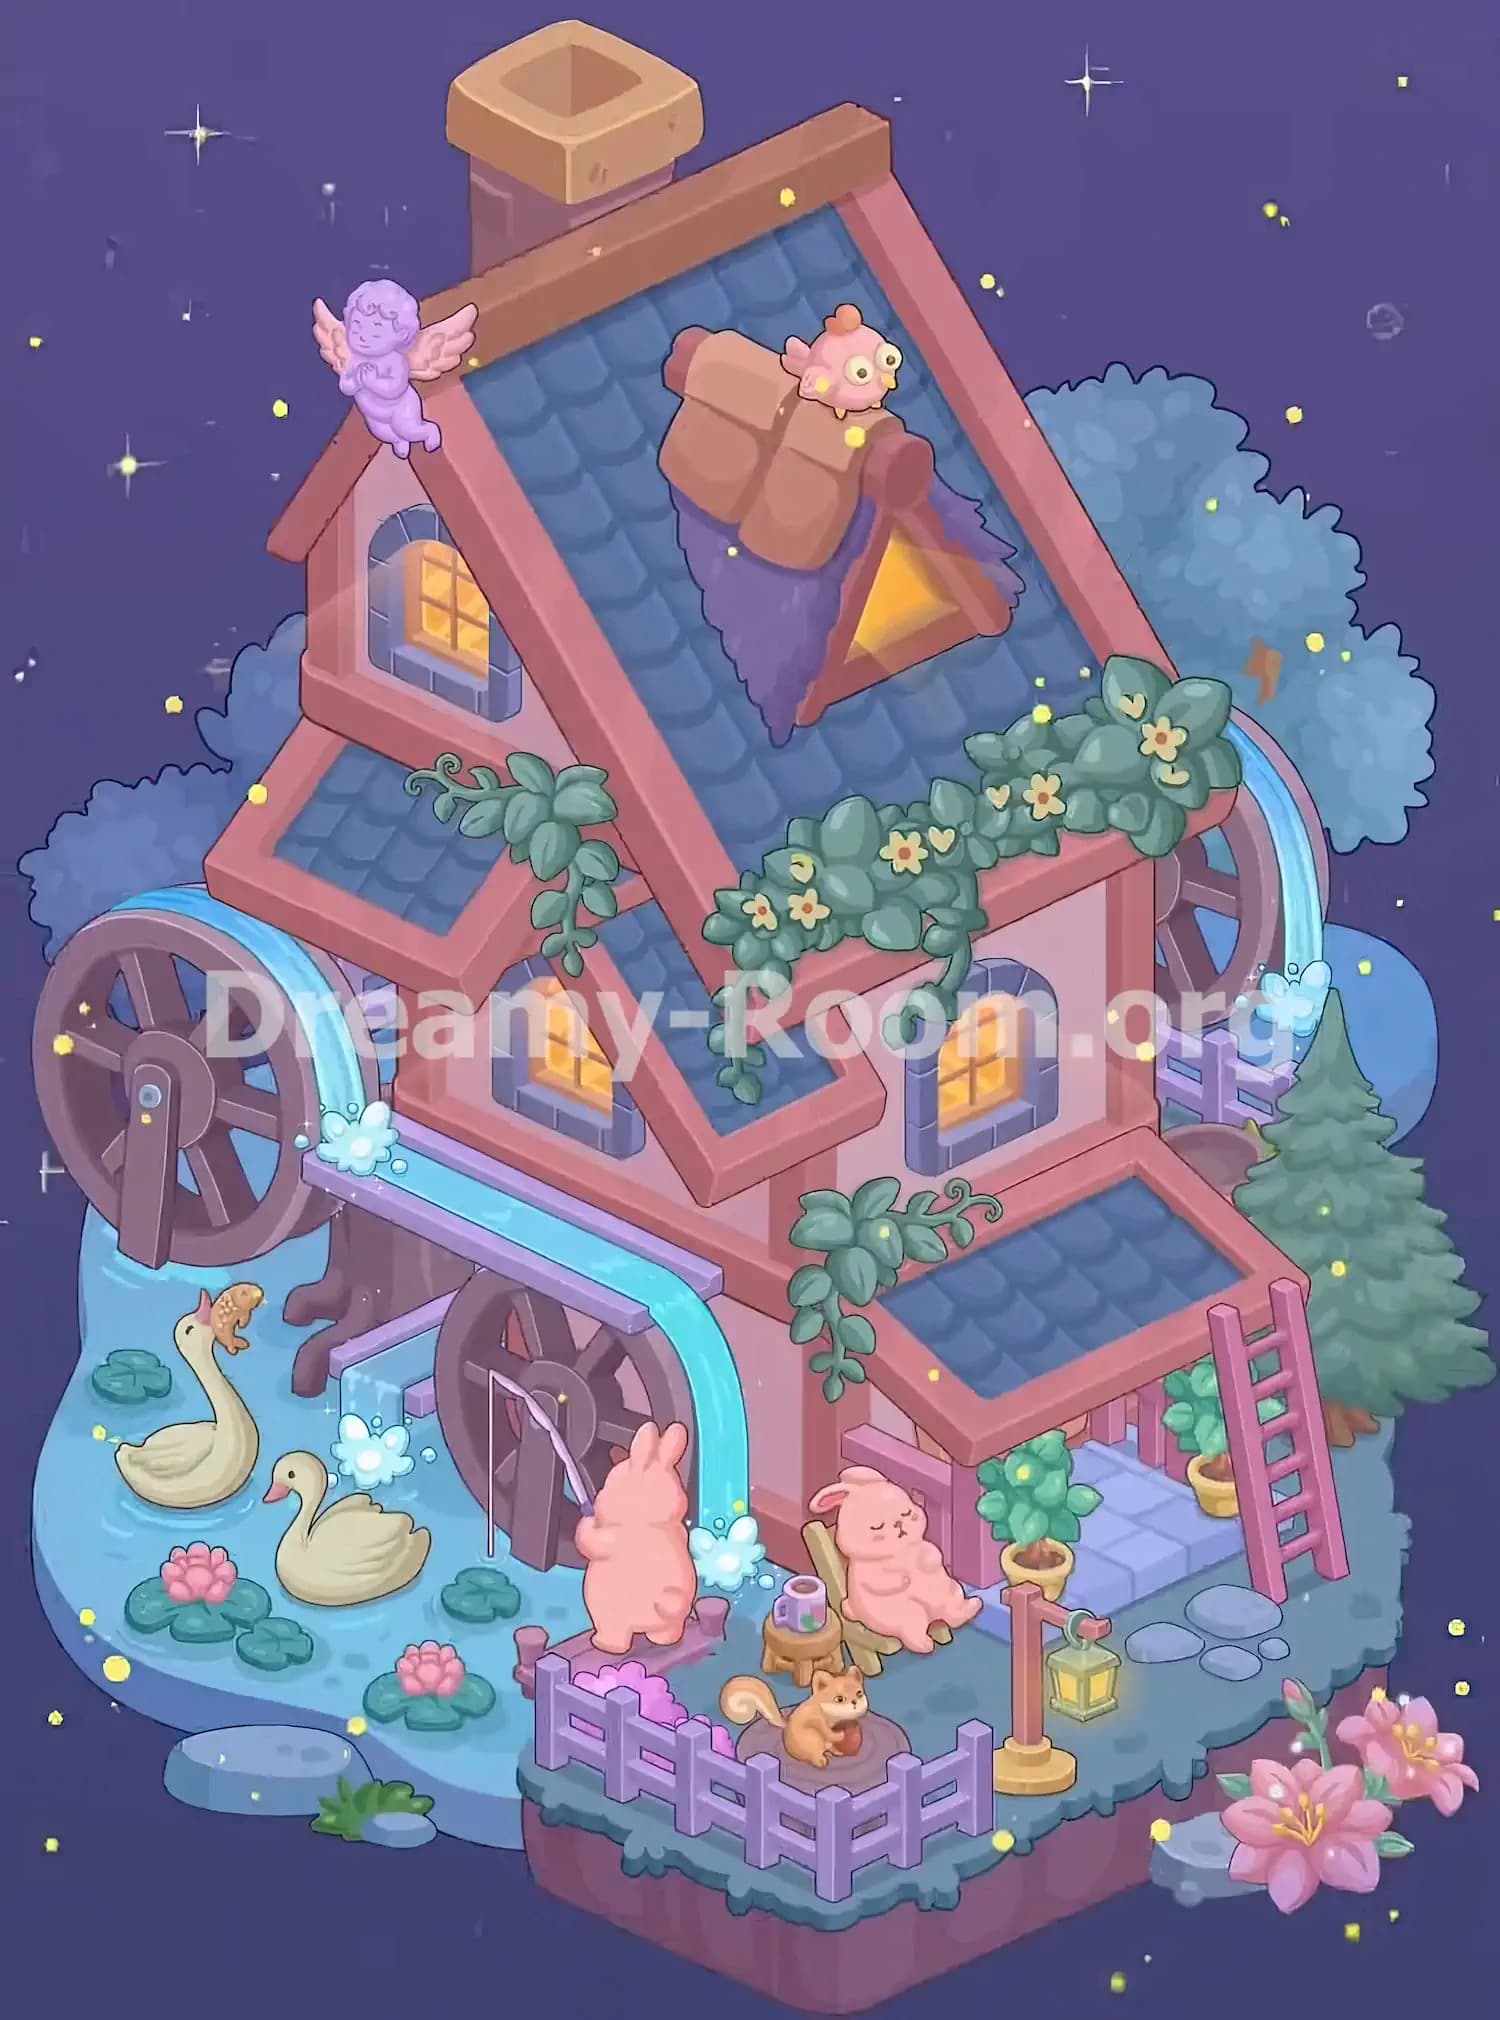
The completed structure occupies the center of this island, with its main building rising high above the surrounding water and garden. Position the pink cottage walls so the tallest section faces toward the upper-left portion of the scene, while the lower extension projects toward the front-right side.
The cottage features soft pink walls with darker rose-colored wooden beams around its corners and windows. Keep the left side open enough to accommodate the large waterwheels and the pond beneath them.
In Dreamy Room Level 918, the building's orientation is especially important because the roof sections, water channels, and exterior decorations all depend on this arrangement. Confirm the cottage's central position before adding the smaller architectural pieces.
Step 2. Install the Blue-Tiled Roof, Chimney, and Glowing Windows
The next task in Dreamy Room Level 918 is assembling the cottage's distinctive roof and windows. Place the large, steeply sloping blue-tiled roof over the main building. Its pink wooden borders should form a pointed gable at the upper-left side, creating the fairytale appearance visible in the completed image.
Attach the square chimney behind the upper-left section of the roof. The chimney has a muted pink shaft with a wide beige cap and a square opening at the top. It should rise above the roofline without covering the building's front-facing details.
Next, install the warm yellow illuminated windows. The upper gable contains an arched window with blue-gray stone framing. Another illuminated window sits on the lower-left projection, while a matching window appears on the right wall beneath the main roof.
Make sure the windows remain visible and align correctly with the surrounding roof panels. These glowing windows provide much of the cozy nighttime atmosphere that makes Dreamy Room Level 918 so visually appealing.
Step 3. Decorate the Upper Roof with the Angel, Dormer, and Pink Bird
Continue decorating Dreamy Room Level 918 by adding the whimsical ornaments on the upper roof. Start with the small lavender cherub statue, which sits along the upper-left roof ridge, directly above the main arched window. Its pinkish wings spread outward, while its body faces toward the viewer.
Next, place the small triangular dormer on the front slope of the main blue roof, slightly right of center. This dormer has a golden-yellow opening, brown wooden framing, and soft purple decorative material extending around its sides.
Position the overlapping tan roof pieces above the dormer, then place the tiny pink bird on top. The bird has large round eyes, a little orange tuft on its head, and small wings. It faces toward the right side of the cottage.
These roof ornaments are easy to confuse with ordinary decorations, but their precise positions are essential. In Dreamy Room Level 918, the cherub belongs on the left roof peak, while the pink bird belongs above the triangular dormer, not on the chimney or the outer roof edge.
Step 4. Arrange the Flowering Vines and Leafy Rooftop Decorations
Once the architectural details are installed, Dreamy Room Level 918 requires a collection of greenery to soften the cottage's sharp rooflines. Begin with the large floral vine that stretches across the lower edge of the main roof on the right side.
This vine has thick, rounded green leaves, small cream-colored flowers with yellow centers, and pale heart-shaped accents. Position its largest leafy cluster near the far-right roof corner and let the smaller stems trail downward toward the middle of the cottage.
Next, place another leafy vine over the lower-left roof junction, just beneath the upper gable window. Its curling stems extend toward the left, while its trailing leaves hang over the blue roof tiles.
Add the smaller greenery to the junction between the main building and the front-right extension. This cluster should rest just above the lower blue-tiled awning, with several leaves hanging down toward the entrance.
In Dreamy Room Level 918, these vines belong along the roof borders rather than across the windows. Keeping the illuminated windows uncovered preserves the finished cottage's distinctive appearance.
Step 5. Install the Three Wooden Waterwheels and Flowing Water Channels
The watermill mechanism is one of the most important features of Dreamy Room Level 918. Start by placing the large wooden waterwheel on the left side of the cottage. This dark brown wheel has several broad spokes and a central axle, and it stands partially above the blue pond.
Next, position the second waterwheel against the lower central section of the cottage, beneath the elevated water channel. It should be visible behind the standing pink rabbit and directly above the water's edge.
The third waterwheel belongs behind the building on the upper-right side, where part of its circular structure remains visible beyond the roof. Arrange the bright turquoise water streams so they follow the channels around the building and cascade near the wheels.
Add the white-blue splashing effects at the points where water falls into the pond. In Dreamy Room Level 918, correct alignment of the wheels and water channels is crucial. Avoid placing water splashes independently of their associated streams, since the completed design should appear like one connected watermill system.
Step 6. Create the Left Pond with Swans, Water Lilies, and Stepping Stones
The next major area in Dreamy Room Level 918 is the peaceful pond surrounding the left side of the watermill. The pond occupies the lower-left portion of the island, with blue water extending beneath the large left waterwheel and around the smaller central wheel.
Position the first cream-colored swan toward the back-left of the pond. Its neck stretches upward, and a tiny orange animal rests near the top of its head and neck. Place the second swan slightly lower and to the right, facing toward the first swan with its head lowered.
Arrange several round green lily pads across the pond, especially near the lower edge. Add two pink lotus flowers on separate lily-pad clusters: one near the front-left area and another closer to the center-front edge.
Complete the waterside scenery with flat gray-blue stones and small green grass tufts along the lower-left boundary. These details make the pond feel natural while keeping the swans clearly visible.
Dreamy Room Level 918 becomes much easier to organize when the larger swans are positioned before the smaller flowers and lily pads.
Step 7. Build the Right Porch with the Blue Awning, Ladder, and Potted Plants
Move to the right side of the cottage in Dreamy Room Level 918 to complete the sheltered entrance area. Attach the smaller sloping blue-tiled awning to the front-right side of the building. Its pink wooden framing should match the main roof, creating a cohesive cottage design.
Below this awning, arrange the porch with a light blue-gray tiled floor. The tiles extend outward toward the right edge and form a small paved entrance area.
Place the tall pink ladder against the far-right edge of the awning. Its feet rest on the ground, while its upper end reaches the roof border. The ladder should lean inward toward the building rather than stand independently.
Add two small yellow flowerpots with leafy green shrubs beneath the awning, positioning one near the front-left porch corner and another toward the right rear.
Behind the ladder, place the tall evergreen tree on the right side of the island. Its layered green branches rise alongside the cottage, and its brown trunk sits near the edge of the porch.
Finally, arrange several oval gray stepping stones along the front-right ground. These complete the entrance landscape in Dreamy Room Level 918.
Step 8. Position the Fishing Rabbit, Resting Rabbit, Chair, and Small Cup
The adorable rabbit characters give Dreamy Room Level 918 much of its personality. Begin with the standing pink rabbit near the lower central waterwheel, facing away from the viewer toward the pond. This rabbit stands on the narrow waterside platform at the front of the cottage.
Place its fishing rod so it extends upward and toward the waterwheel, with the thin fishing line hanging down toward the pond. The rabbit should appear to be peacefully fishing beside the running water.
Next, position the second pink rabbit to the right of the first, beside the porch. This rabbit has closed eyes and reclines comfortably against a small wooden lounge chair with light brown supports.
Between the two rabbits, add the short wooden stump table. Place the small purple cup with green decorative spots on top. The cup is a tiny detail, but it helps complete the relaxing outdoor scene.
When arranging the characters in Dreamy Room Level 918, remember that the fishing rabbit stands closer to the pond, while the resting rabbit belongs nearer to the cottage entrance. Their positions should create a cozy seating area without blocking the waterwheel or porch.
Step 9. Complete the Front Garden with the Purple Fence, Squirrel, and Hanging Lantern
Finish the foreground decorations in Dreamy Room Level 918 by creating the small enclosed garden at the front of the island. Place the lavender-purple wooden fence along the front edge, forming an angled enclosure around the lower-center grassy area.
Inside this fence, position the small orange-brown squirrel on its circular brown resting spot. The squirrel faces slightly toward the right, with its fluffy tail curled upward and an acorn held close to its body.
Add the small pink flowering bush behind the left portion of the fence, near the standing rabbit. Keep the squirrel visible above the fence rather than hidden behind its posts.
On the right side of the enclosed area, install the wooden lantern stand. The structure consists of a vertical brown post, a horizontal arm, and a golden base. Suspend the glowing yellow lantern from the end of the arm, facing the stepping-stone path.
Next, place the large pink flowers along the far-right foreground edge of the island. Their bright blossoms should extend slightly beyond the grassy boundary, surrounded by small green leaves and buds.
Check the surrounding blue ground, rock edges, and grassy patches for any missing decorations. With these final details in position, Dreamy Room Level 918 should resemble a magical watermill garden filled with tiny animals and warm lights.
Notes and Precautions
While completing Dreamy Room Level 918, pay attention to the following placement details to avoid unnecessary mistakes:
1. Build from large to small. Position the cottage, roof, and waterwheels before attempting to place small decorative objects. Large structures establish the correct locations for everything else.
2. Distinguish the three waterwheels. The completed scene contains one large wheel on the left, one lower wheel near the center, and another partially hidden wheel behind the right side of the building. Their positions are not interchangeable.
3. Keep the roof ornaments separated. The lavender cherub belongs on the left roof ridge, while the pink bird belongs above the golden triangular dormer.
4. Watch the overlapping decorations. Flowering vines, roof panels, water channels, and windows overlap visually. Use the visible borders of each object to judge where it belongs.
5. Place the rabbits correctly. The standing rabbit fishes near the lower wheel, while the resting rabbit sits to its right beside the porch.
6. Don't overlook small accessories. The purple cup, hanging lantern, squirrel, tiny orange pond companion, flowerpots, and lily pads are important parts of the completed scene.
7. Check objects that appear partially hidden. Some decorations intentionally sit behind the house, including the right waterwheel and parts of the evergreen tree.
The greatest challenge in Dreamy Room Level 918 is not speed but identifying the exact position of each decorative element. Take time to compare the arrangement against the completed image, particularly around the roof and watermill.
Tips and Tricks from top player
To complete Dreamy Room Level 918 more efficiently, organize the decoration process into manageable sections rather than placing items randomly.
- Follow a consistent order. Complete the main structure first, then the roof, water system, landscape, characters, and small accessories. This reduces the need to move objects repeatedly.
- Use distinctive objects as landmarks. The lavender cherub, large left waterwheel, pink ladder, and hanging lantern are especially useful reference points.
- Treat the water channels as one system. Before positioning the splashes, identify where each stream passes the building and where it falls into the pond.
- Use window placement to align roof pieces. The illuminated arched windows provide reliable visual markers for the slopes and overhangs.
- Finish the garden in layers. Start with the ground-level landscaping, follow with the fence and larger objects, then insert flowers and other small accessories.
- Check character orientation. The standing rabbit faces the waterwheel, the resting rabbit leans back with closed eyes, and the squirrel faces toward the right side.
- Inspect the edges carefully. Small items near the purple fence, porch, and pond can be difficult to notice because they blend into the surrounding scenery.
A particularly useful strategy in Dreamy Room Level 918 is to divide the scene into three visual zones: the upper roof, the central watermill, and the lower garden. Complete one zone at a time and check its details before moving to the next.
This approach makes complicated overlapping objects easier to identify and helps prevent placement mistakes.
Final Scene: A Magical Watermill Cottage Under the Stars
The completed Dreamy Room Level 918 reveals an enchanting pink watermill cottage standing on a floating island beneath a glittering purple night sky. Blue-tiled roofs, glowing yellow windows, flowering vines, and a charming lavender cherub give the building a warm fairytale appearance.
Three wooden waterwheels surround the cottage, with sparkling turquoise water cascading into a beautiful pond. Two elegant swans glide among green lily pads and pink lotus flowers, while a tiny orange companion perches on one swan's neck.
Near the water, a pink rabbit enjoys fishing, while another rests comfortably beside a wooden chair and a small cup. A cheerful squirrel sits inside a purple-fenced garden, surrounded by blossoming flowers.
To the right, an evergreen tree, potted greenery, a leaning ladder, stepping stones, and a glowing lantern complete the peaceful setting.
Dreamy Room Level 918 captures the charm of a cozy countryside retreat, blending playful animals, delicate decorations, and magical nighttime scenery into one delightful miniature world.