Dreamy Room Level 819
Dreamy Room Level 819 guide - Dreamy Room 819 Walkthrough & Solution.
Important Notice Regarding Level Numbering
Due to frequent changes in Dreamy Room's level numbering and differences between platforms (Android/iOS) – for example, level 819 on Android might not be the same as level 819 on iOS – the text guide below may not always match the images and video above. Please prioritize the image and video guides. If you find that the guide content doesn't match your current level, please visit the All Level Walkthroughs page to find the correct guide based on level images. Thank you for your understanding.
Dreamy Room Level 819 Walkthroughs & Guide
Step 1. Place the purple dessert shop on the left side of Dreamy Room Level 819
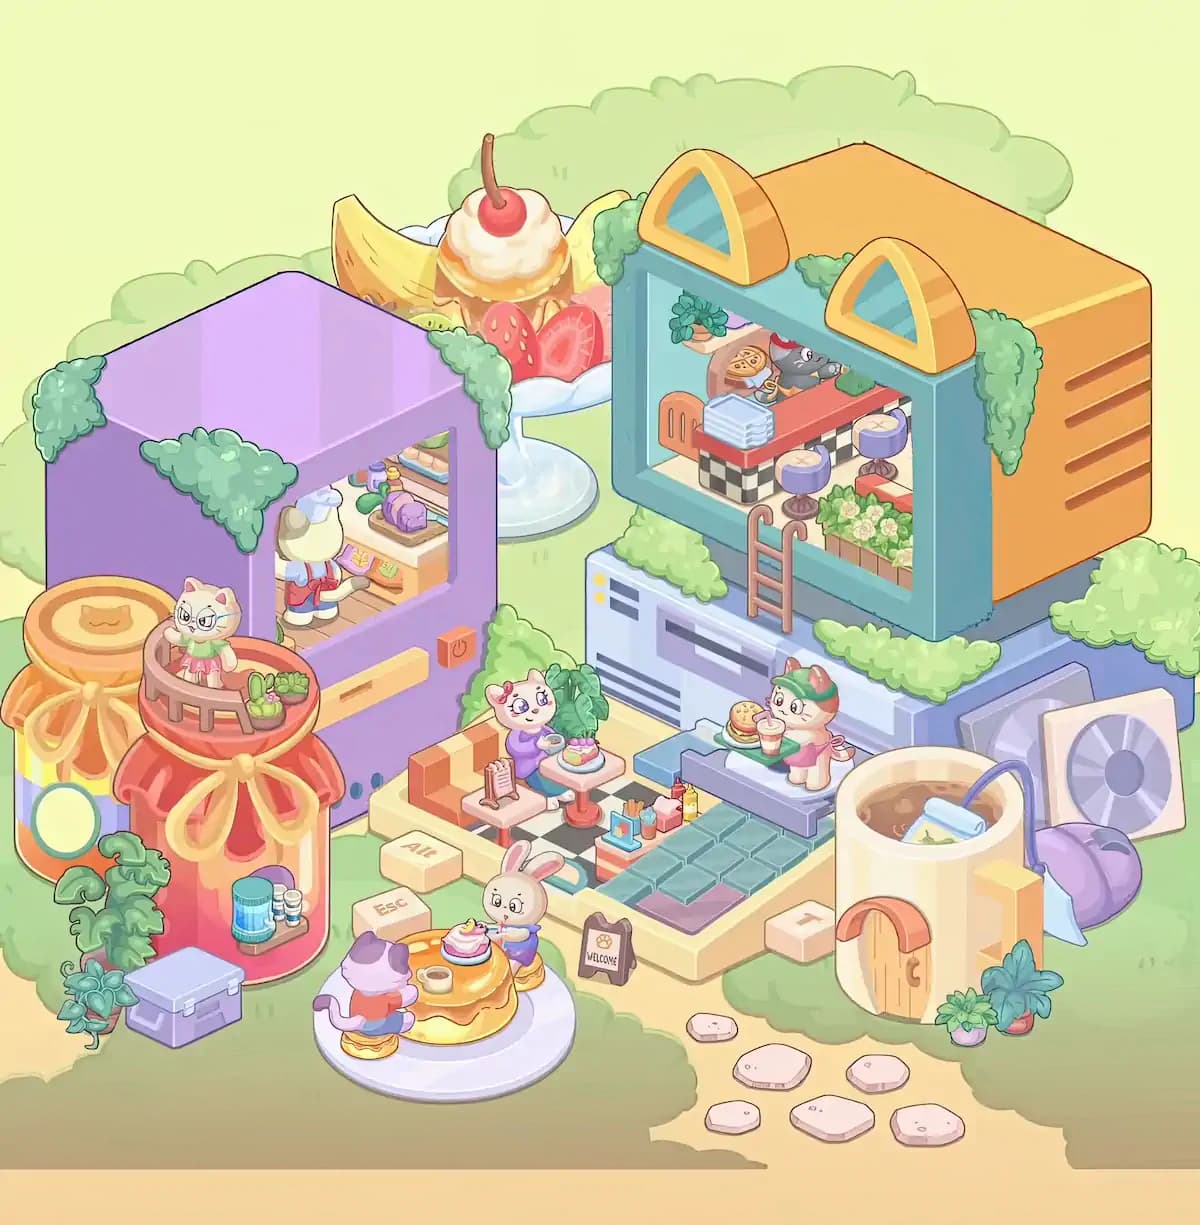
Begin Dreamy Room Level 819 by establishing the large purple shop on the left side of the clearing. Position the rectangular building slightly above the center-left area, leaving plenty of open ground below it for the oversized jars and pancake dining scene. The shop has lavender-purple walls and a large open front facing diagonally toward the lower-right corner. Its roof and upper edges remain simple and flat, while several clusters of soft green foliage hang over the corners. Place one greenery patch at the far upper-left corner, another along the left edge of the opening, and a larger trailing patch over the upper-right corner.
The open side of the shop is important because several interior objects remain visible in the finished Dreamy Room Level 819 arrangement. Keep the building far enough left that it does not overlap the central café. A long pale-yellow horizontal trim or handle belongs below the opening, while a small orange square fixture sits on the exterior wall toward the right. Completing this large structure first gives Dreamy Room Level 819 a reliable reference point for everything that follows.
Step 2. Fill the purple shop with its bakery shelves, pastries, and shop character
Next, complete the interior of the purple building in Dreamy Room Level 819. Inside the opening, place the bakery counter and shelving against the rear wall. The shelves contain several tiny food items, including bread or pastry shapes along the upper levels and a prominent purple rolled pastry on a tray near the middle. Smaller colorful containers and decorative food pieces fill the remaining shelf space. The lower cabinets feature tiny illustrated labels, helping make this section feel like a miniature dessert shop.
Position the light-colored shop character inside the room, facing the counter rather than outward. The character wears a colorful uniform with blue, red, and pale tones and stands toward the left side of the interior. Because Dreamy Room Level 819 contains many characters, it is easy to accidentally swap this figure with one of the café visitors outside. Keep this character permanently inside the purple shop. The arrangement should remain visible through the large opening, while the greenery around the frame partly overlaps the shop edges. When this area matches the completed Dreamy Room Level 819 image, move on to the oversized decorations surrounding it.
Step 3. Add the giant sundae behind the purple shop in Dreamy Room Level 819
The enormous dessert sculpture belongs directly behind the upper-right side of the purple shop. In Dreamy Room Level 819, only part of this decoration remains visible because the buildings overlap it, so do not try to move it into the open foreground. Set the large white pedestal dish in the rear center-left area, between the purple building and the teal café structure. The pedestal base should be visible underneath the dessert while the upper portion rises well above the purple roof.
Arrange the giant banana pieces around the dessert, then place the cream-topped centerpiece with its bright red cherry and long stem at the highest point. Strawberry slices and other colorful fruit pieces fill the lower portion around the cream. Dreamy Room Level 819 uses this object as a major background landmark, but its correct position is partially concealed by the foreground architecture. If too much of the white plate is visible, the sundae is probably too far forward. When positioned correctly, Dreamy Room Level 819 should show the banana and cherry clearly above the purple structure while the pedestal sits deeper in the garden.
Step 4. Build the two ribboned display jars in the lower-left corner
The lower-left section of Dreamy Room Level 819 contains two oversized decorative jars standing beside the purple shop. Place the taller orange-toned jar slightly farther back and to the left. It has a large round lid decorated with a simple cat-face symbol and an oversized golden ribbon tied around its upper section. Its translucent body contains vertical pastel details, and a pale green circular decoration appears toward the lower front.
Position the red jar slightly in front and to the right of the orange jar. Dreamy Room Level 819 gives this second jar another large golden bow, but its top functions as a miniature circular balcony. Place the small white cat character inside that upper railing, wearing its green outfit, and add the tiny pots of greenery beside it. In the lower opening of the red jar, arrange the cyan container and the small white-and-blue bottles. Finish this Dreamy Room Level 819 corner with leafy plants around the jar bases and the small lavender storage box on the grass in front. The box should stay low and separate from the jars rather than being placed inside them.
Step 5. Assemble the teal-and-orange café building in the upper-right area
Now establish the second major structure in Dreamy Room Level 819. Place the large teal café unit in the upper-right portion of the scene, slightly higher than the central dining platform. Its front frame is teal, while the roof and deep right side are warm orange. The right exterior wall has several narrow horizontal dark-orange slits. Make sure this orange wall points toward the right edge of the scene.
Two matching orange dormer-style windows sit along the roofline of Dreamy Room Level 819. Each has a rounded triangular shape with a blue glass center. Add trailing green foliage around the upper front corners and additional greenery along the lower edges. The broad rectangular service opening faces toward the viewer and must remain unobstructed. Beneath this opening, attach the short brown ladder vertically to the front wall.
The entire structure sits on a pale blue-gray base decorated with rectangular vent-like markings and small yellow details. More greenery runs along the top and lower ledges of this base. Correctly positioning this building is crucial because many smaller Dreamy Room Level 819 pieces align with its service window and the café platform directly below.
Step 6. Furnish the upper café window with counters, stools, food, and flowers
Once the teal building is fixed, fill its service window in Dreamy Room Level 819. Place the red counter across the middle of the opening with its black-and-white checkerboard base facing outward. An orange chair belongs toward the left interior, behind the counter. Stack the pale-blue trays or plates on the left end of the red countertop. Toward the back, position the small food items and the darker cat-like café worker, along with the pizza or pastry-shaped dish and the small green mat.
Two round purple stools with pale cream seats belong across the front portion of the interior. Keep them aligned with the counter rather than placing them on the outdoor platform below. On the lower-right edge of the window, add the wooden planter overflowing with green leaves and small white flowers. Dreamy Room Level 819 uses these tiny details to distinguish the upper café from the lower seating area, so the locations matter. Finally, make sure the brown ladder remains centered below the opening. With the plates, counter, stools, food, flowers, and worker in place, this section of Dreamy Room Level 819 should look like a miniature elevated diner.
Step 7. Construct the central keyboard-style dining terrace
The busiest area of Dreamy Room Level 819 is the square outdoor terrace directly below and slightly left of the elevated café. Begin with the cream-colored raised platform, then place the black-and-white checkerboard tiles toward the back-left portion. The front-right section contains a grid of teal rectangular tiles resembling large keyboard keys, with one purple key mixed into the lower row.
Several oversized cream keycaps sit around the outside edges of the platform. Place the key labeled “Alt” along the left side and the “Esc” key slightly lower and farther forward. Another large key with an arrow-like marking belongs at the lower-right side. These blocks are easy to mistake for seats in Dreamy Room Level 819, but they remain outside the main dining surface.
Add the orange-and-cream booth along the rear-left edge, the long lavender bench along the upper-right side, and the smaller blue seating piece nearby. In front of the terrace, position the dark-framed “WELCOME” sign. This central platform provides the anchor for most of the remaining Dreamy Room Level 819 characters and accessories.
Step 8. Arrange the café guests, tables, cake, burger, drinks, and condiments
Populate the central terrace carefully because character placement is one of the trickiest parts of Dreamy Room Level 819. At the left side of the platform, place the white cat with the pink bow and purple top beside the orange booth. A small white pedestal table belongs directly in front of this character, topped with a colorful layered cake. Position a second small table closer to the booth with the upright menu or paper display.
On the right side, place the cream-and-brown cat wearing the green-and-red cap near the lavender bench. This Dreamy Room Level 819 character has a burger and a pink drink positioned in front of it. Keep the food together rather than spreading the pieces across the terrace.
Along the front edge of the platform, arrange the condiment station containing small bottles, cups, napkins, utensils, and the blue holder. Yellow, red, pink, and blue containers should form a compact cluster. Dreamy Room Level 819 has very little spare space here, so use the checkerboard and teal tiles to judge alignment. Once finished, the café should look busy without any object blocking another important piece.
Step 9. Build the giant pancake dining scene in the lower center
Move to the foreground of Dreamy Room Level 819 and place the large pale-lavender circular plate below the central café, slightly toward the left. A giant stack of golden pancakes occupies the middle of the plate and acts as the dining table. The pancakes are covered with glossy syrup, and a small cup sits on the surface near the front-left side. A colorful cream-topped dessert or cupcake belongs toward the upper part of the pancake stack.
Seat the purple-and-white cat character at the lower-left side, facing inward toward the pancakes. The character wears a purple hood or hat with blue and orange clothing and sits on a small pancake-like cushion. Place the pale rabbit on the opposite side, toward the upper-right of the stack. The rabbit wears a blue outfit and also faces the dessert. Additional small pancake pieces serve as their seats.
This whimsical table is one of the most recognizable parts of Dreamy Room Level 819. Keep it separate from the “Esc” and “Alt” key blocks above so that the round plate remains clearly visible.
Step 10. Finish the right side with the giant mug house, fan, cable, plants, and stepping stones
Complete Dreamy Room Level 819 by arranging the large objects on the lower-right side. Place the enormous cream-colored mug just right of the central café platform. Its open top contains brown coffee or tea, with a pale blue rectangular object partly submerged inside. A dark blue cable or strap curves over the rim toward the purple rounded object resting behind the mug.
On the front of the mug, position the miniature wooden arched door with its peach-colored curved awning and small crescent-shaped handle. A cream rectangular protrusion belongs on the mug’s right side. Directly behind it, place the square off-white fan or ventilation unit with the circular gray-purple blades facing forward. The purple rounded object sits low between the mug and this fan.
At the base of the mug, Dreamy Room Level 819 includes several plants: a larger blue-green leafy cluster, a small mint-green plant in a pink pot, and a reddish accent tucked among the leaves. Finally, arrange the pale pink stepping stones across the foreground path in a loose curve. These finishing objects complete the right side of Dreamy Room Level 819.
Notes and Precautions
Dreamy Room Level 819 contains several objects with similar pastel colors, so shape and location are more useful than color alone. The biggest placement mistakes usually happen around the central café, where the stools in the upper service window, the outdoor benches, the keyboard-like blocks, and the pancake seats can appear interchangeable at first glance. Treat each area of Dreamy Room Level 819 as its own miniature scene before moving objects between zones.
Pay particular attention to overlapping pieces. The giant sundae intentionally sits behind the purple shop, the gray-blue base remains behind the central terrace, and the ventilation fan is partly hidden by the mug. Dreamy Room Level 819 will look incorrect if these objects are pulled too far forward merely to make them easier to see.
The small food items also have precise destinations. Keep the cake with the bow-wearing cat, the burger and drink with the capped cat, and the cupcake or cream dessert on the pancake table. The café counter accessories belong together along the front of the central terrace. In Dreamy Room Level 819, the challenge is determining the intended relationship between objects rather than simply filling empty space, so use the large structures as anchors before placing miniature props.
Tips and Tricks from top player
The fastest way to solve Dreamy Room Level 819 is to work from large objects to small objects. Start with the purple shop, elevated teal café, giant jars, central platform, pancake plate, and mug house. Once those pieces are correctly positioned, almost every remaining item gains an obvious reference point. Trying to place tiny bottles or food first makes Dreamy Room Level 819 unnecessarily confusing because their locations depend on furniture that may not yet be present.
Another useful technique is to complete one visual cluster at a time. Finish the purple shop before moving to the jars; complete the upper café before working on the terrace; and finish all right-side objects before placing the stepping stones. Dreamy Room Level 819 has many decorative plants, so save most foliage until the structural pieces are stable.
Use distinctive objects as landmarks when something seems uncertain. The cherry-topped sundae marks the upper-left background, the brown ladder identifies the elevated café front, the “WELCOME” sign marks the front of the central terrace, and the wooden door identifies the front of the mug. Following those landmarks greatly reduces trial and error in Dreamy Room Level 819 and makes the smaller placements much easier to recognize.
Final Scene of Dreamy Room Level 819
The completed Dreamy Room Level 819 becomes a cheerful miniature dessert village surrounded by soft green bushes. On the left, the lavender bakery opens toward the garden beside two enormous ribboned jars, while a cherry-topped banana sundae rises dramatically behind the roof. The teal-and-orange café dominates the upper right, with dormer windows, trailing greenery, a checkerboard counter, purple stools, flowers, and its small exterior ladder. Below it, cats gather around the colorful keyboard-style terrace with cake, burgers, drinks, menus, and condiments. In the foreground, a rabbit and purple-clad cat share the giant syrup-covered pancake table. To the right, the cream mug house sits beside its square fan, purple cable-connected object, potted plants, and curved line of pink stepping stones. Altogether, Dreamy Room Level 819 feels like a playful café hidden inside an oversized world of sweets, kitchen objects, and cozy garden decorations.